Articles

Over the years, I’ve been in various discussions regarding the benefits of clean architecture, best practices, techniques such as code reviews, unit tests, etc., and I think to some degree, most of us are aligned on the reasons behind it. Having a clean architecture or code-base not only makes your development team happier, but it has a far-reaching impact on the business itself.

In this post, we will learn about NDepend, which is described on their website as the following:

Source de l’article sur DZONE

Todoist is a to-do list app that 25 million people rely on every day to keep their lives organized. As part of the Doist design team’s goals for 2021, we aimed to redesign the Todoist Android app to take advantage of the latest Google Material Design guidelines.

In this post, we cover the design decisions and processes behind redesigning the Todoist Android app for Material Design. We explore the Design and Android team’s collaboration practices that brought the app update to life, which resulted in winning the Material Design Award 2021 in the large screen category. Let’s get started!

Opportunity

When we started the project, our design implementation on Android was ready for a major overhaul. The last milestone redesign on Android was initiated after the release of the first Material Design guidelines in 2016. Since then the team successfully worked on continuous improvements to the Android app, but we saw the opportunity to improve Todoist on Android on a more holistic level.

We set out to clean up instances of older UI components, colors, and text styles and update them with the latest Material Design components. We observed that some interactions and navigational patterns had become inconsistent with what users were expecting on newer Android devices and were eager to modernize this experience. With new hardware and software changes in mind, we set out to make the experience on larger phones and tablets even better, so Todoist could take full advantage of the latest generation of devices. Material 2 and 3 provided an incredible new framework to rethink the current app experience. With this in mind, we set out to challenge what a modern Android app should look like and innovate on top of the default user experience.

Solution

The team set itself the goal of redesigning our Todoist Android app and aspiring to make it the best-designed productivity app on Android. The project was ambitious and scheduled to take several months to complete. We set ourselves the following targets while working on the project:

  • Review the current implementation and older design specs.
  • Study the latest Material Design Guidelines and assess what is relevant for our project.
  • Research great Material Design apps and case studies and learn from their execution.
  • Define the new Todoist Android app design language and document the changes.
  • Design and development work together to assess the proposed solution and implementation.
  • Test an early version of the new app internally to gather feedback and make adjustments.
  • Invite beta testers to the new app to gather feedback and make adjustments.
  • Refine the app and address core issues before launching to the public.

Review

The project was kicked off by reviewing the current Todoist Android app implementation, noting down what areas needed to be fixed and what was up to date. While reviewing, we took screenshots of the app implementation for reference. This way we could easily see the current state of the app and compare it to the new design proposals that would be created. Once the review process was finalized, we had a comprehensive overview of the current state of the app and the layout, component, and styling changes we wanted to make.

Study

We continued the project by studying the latest Material Design Guidelines, assessing the components and practices that were most relevant to Todoist.

When the project kicked off in February 2021, Material 2 was the most recent version of their design system. Since Material 2 had already been released for quite some time, we anticipated that design changes to Material would be announced soon at the Google I/O event in May 2021. Rather than wait, because we expected the changes to be iterative, we pushed ahead with our work.

We identified 25 components and UI patterns that we wanted to change across the app. The changes included buttons, forms, menus, sheets, navigation drawer, app bar, system bars, text and color styles, and more. We started by creating a table view in a Dropbox Paper document with the component changes and references links to Google’s Material Design Guidelines.

This components list was a starting point for discussion to plan the scope and complexity of the changes. Close async discussions between the design and development team in Twist and Dropbox Paper comments helped us make decisions about scope and complexity early on and set a solid foundation for the project.

Research

In the initial Material Design study, we also researched inspiring Material Design apps, Material studies, Play Store apps, and Google Workspace apps to learn from their execution.

We started out by studying the Material Design Award Winners 2020 and tested out the products that were showcased. The showcased winners struck a good balance between implementing the Material Design Guidelines while maintaining their own product’s brand within the system. This balance between Google’s guidelines and the Todoist brand was also key for us to get right and so we strived to find this mix across the work we created and implemented in the project.

Along with the MDA winners, we researched the Material Studies that Google produced to showcase what apps could look like with branding and Material Design guidelines applied. It was a great reference to see how far components could be customized while maintaining the core platform principles. The Reply case study in particular offered valuable insight to us as its content type and layout came closest to Todoist. It showcased how components like the app bar, navigation drawer, and large screen layouts worked while being customized.

We continued our research by searching the Google Play store for inspiring app examples. Google Tasks, Press, Periodic Table, and Kayak stood out to us as the level of polish and quality of the apps were on par with the experience we were aspiring to create.

Sometime later in the project when Material You was released (more on that later), we stumbled upon the Google Workspace apps blog post which previewed Material 3 changes that Google was introducing to their own products. It offered a great glimpse at what was to come before the Material 3 Design Guidelines were officially released. This post sparked new internal discussions and further design explorations that we considered for future Todoist Android updates.

Design Spec

As we started to define the new Todoist Android app design language and document the changes, we opted to create a design framework, focusing on creating components rather than designing every screen in the app. This allowed us to consistently apply the design system in the app. We did so by using the previously defined component list that we created during the review and study process.

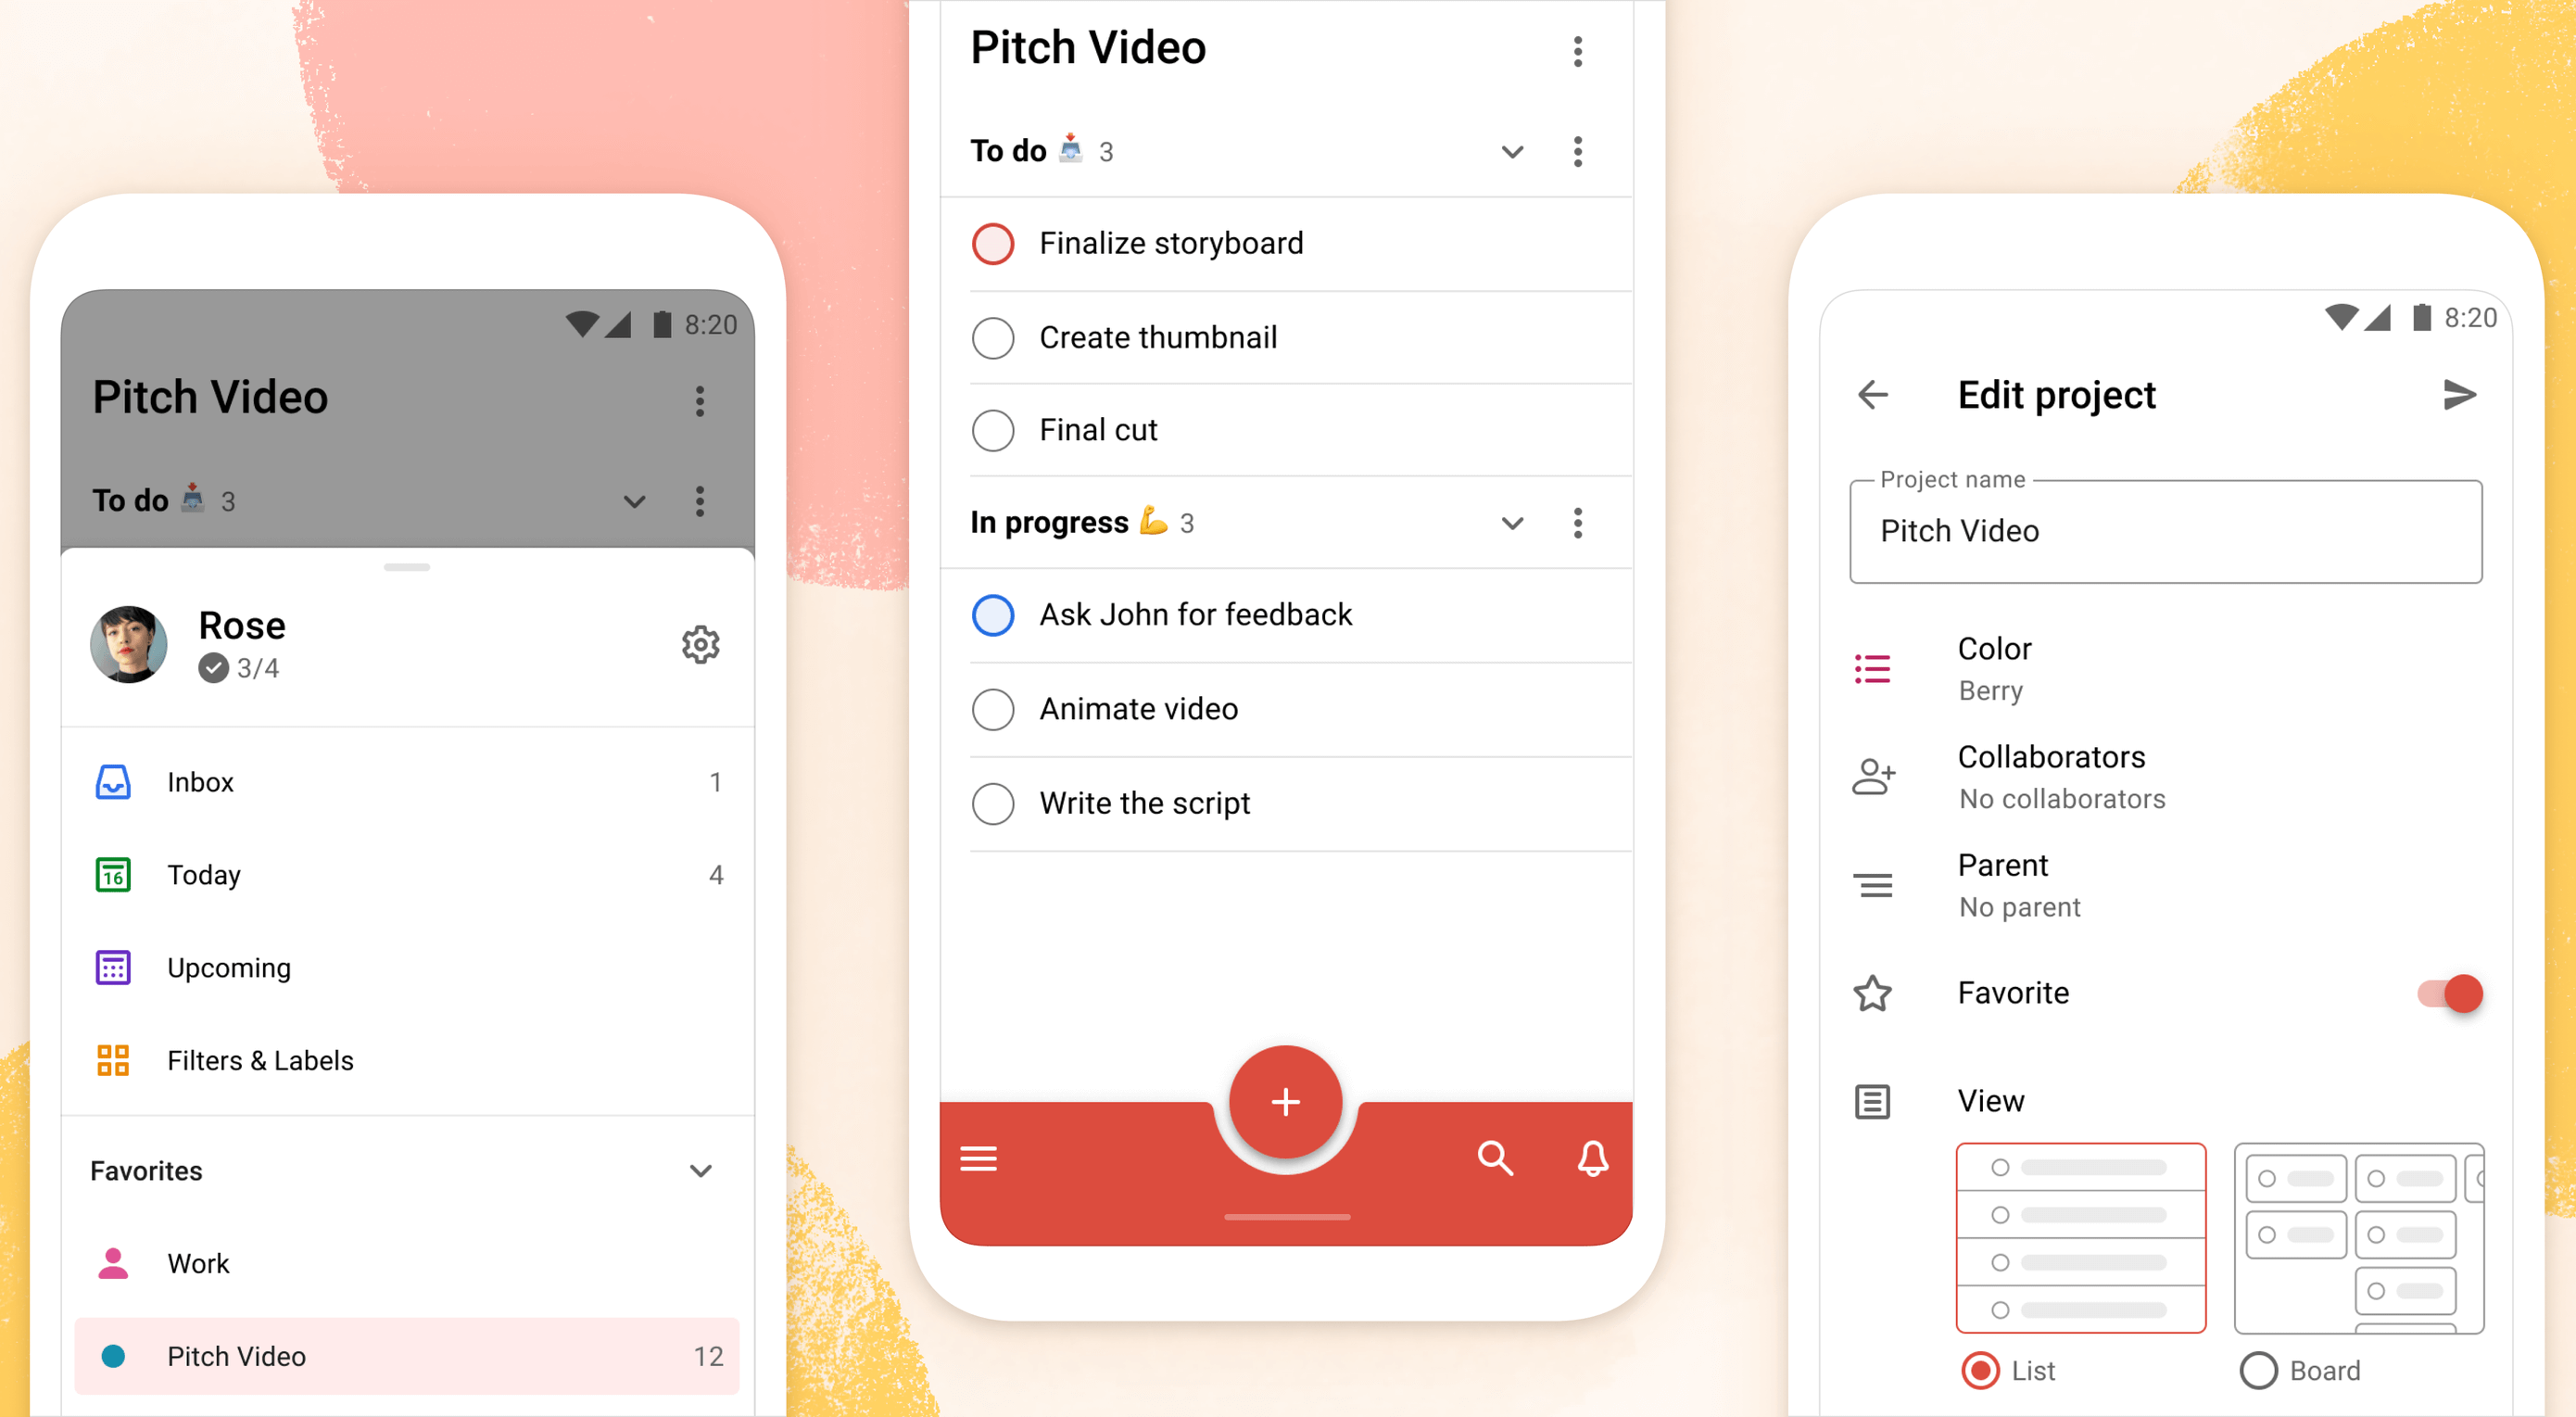
Core screens from different areas of the app were chosen to demonstrate how the components could be applied. We chose to mock up the Todoist project view, navigation drawer menu, project view edit screen, settings, and project detail view, among others. These screens gave us a good overview of how buttons, forms, drawers, lists, and other components would work together and in different states; selected, pressed, disabled, etc.

During the project, we were transitioning our Doist design system to Figma and started creating our first components in the new Doist Product Android Library. We started by using some components from the Material Design UI kit – Components library from the official Google Figma resource file and added them to our Doist design system. We then continued to build up the Product Android Library file with our Todoist-specific components such as task list & board views, detail views, sheets, colors, typography, etc.

We continued by documenting color and typography changes that were based on the Material Design guidelines. The design team opted to implement a new Design Token framework that would share the same values between our design system and the development implementation. The development team would output the values they had in the current implementation and the design team would analyze which values were needed and which could be merged, changed, or deleted. This informed the new Design Token color and typography system which we then documented and discussed with the team to implement. Later in the project, we were happy to see a similar token system introduced by Material 3 in the latest guidelines which validated our thinking and principles behind the new design system.

The design documentation expanded to hold other edge-case mockups that could sit alongside the design system. We documented different responsive screen experiences between phones and tablets against the previous implementation. Additional sections were created to document the motion that should be used for certain components and screens by referencing existing Material Design guidelines examples or prototyping custom motion in Principle and After Effects. The design spec also touched on haptic feedback that should appear on touch targets, how dark mode should work across the new components, documenting Todoist themes within the new design language, and more.

Design Implementation

At Doist, the benefit of the squad is that cross-team collaboration is built into the make-up of the team. Designers, developers, support, and product managers work together in a squad to deliver the project. This close collaboration from the start is key to bridging the gap between scope, estimations, design, development, and delivery. The squad discussed their findings on a daily basis and came up with the best plan of action together.

Designers started by creating components in Figma and shared them with developers in Dropbox Paper. We used screenshots to document the current implementation next to the new designs and linked to the default Google Material Design components. This allowed the team to compare all references in one place. Developers shared their feedback, adjustments would be brainstormed together as the designs were iterated.

Designers on the project would share their work in progress on a weekly basis with the rest of the design team in a design review Twist thread. Here details about the designs were discussed, alternatives mocked up and bigger picture plans made. Design reviews brought up topics like FAB (Floating Action Button) placement, theme options, accent color usage on components, consistency with other platforms, navigation options, and shadow elevation. After thorough discussions and alternative mockups were presented, the design team aimed to find the right balance between Material Design and Todoist brand guidelines. The development team, also part of the design reviews, gave their feedback on the solution and raised technical complexities early on.

Eventually, the design was stabilized and consistencies updated across components and mockups. The design spec was kept up to date so the development team could always review the latest designs in Figma.

Testing

As soon as the development process started, the Android team provided early screenshots and videos in Twist threads while they were implementing the design spec. This practice allowed us to review the app implementation early and often. Designers could review the development work and share feedback in Twist, which resulted in getting the implementation to a high quality. Alongside Twist discussions, the team set up a Todoist project to track ongoing issues and fix bugs. Designers logged new issues, developers would solve them and share the new implementation for designers to review.

When the team had the first stable version of the Android app, we shared it internally at Doist to get more insight and feedback. Other Doisters could access the redesign via a feature flag that could be turned on in the app settings and test the new version for however long they wanted. The feature flag system allowed people to give us early feedback on the design decisions we made and report bugs. Feedback was submitted by the wider team through a dedicated Twist thread and designers and developers could discuss how best to address the feedback during the active project implementation.

After we refined the app implementation further and addressed early feedback we opened up the app update to our beta users. Here users had access to the new Android redesign and were able to give us feedback. Our support team gathered feedback and shared it with us in a dedicated Twist thread. The squad aimed to analyze every comment and looked for patterns where we could make tweaks and improvements to the user experience.

As part of these tweaks, we made changes to how the bottom bar and navigation drawer worked. Some users reported frustrations with the way the new bottom navigation and menu drawer worked. In its first implementation, the drawer was half raised when opened and had to be swiped up to be raised again to see the full content list. This was an issue for some users as it was slower to get to the content below the list. So we decided to fully raise the drawer by default when opening. We also made it easier to open the navigation drawer by sliding up from the bottom app bar. This was a small shortcut but it enabled users to get to their content faster.

Material You

While we were in the testing phase and about to wrap up the project, Google unveiled Material You, and sometime later the Material 3 Guidelines were published. With the newly announced resources, we went back to study the latest guidelines and references we could find to see where the Todoist Android app redesign fits in and which adjustments we might need to make now or in the future.

Dynamic Color was a big new feature that was announced as part of the Material You update. As Todoist supports many different themes the Material You Dynamic Color feature seemed like a good fit for our product. We decided to prioritize this feature and implement Dynamic Color light and dark themes as part of our Todoist theme settings options.

To implement Dynamic Color, the development team started off by creating a demo prototype that utilized the Dynamic Color system and showcased how we could select from a range of color choices that the system defined based on the wallpaper choice. From there, we tried to incorporate system behavior in our design mockups. We designed a range of different color mockups and components to see which ones could fit with which components. We then came up with a color system that worked for the Todoist app and the new themes. These new Dynamic Color themes would sit alongside our current theme options in the Todoist app settings. From here users could choose between Dynamic Color Light and Dark themes.

Along with Dynamic Color, the team also created a customizable bottom app bar, allowing users to set up the app in a way that’s most convenient to their workflow. The location of the Dynamic Add Button can be changed to the center, left, or right corner of the screen. The order of the Menu, Search, and Notification buttons can be rearranged to best fit the ergonomics of the user’s dominant (left or right) hand and optimize their navigation patterns.

Launch

As critical beta feedback was addressed and stability tweaks were made, the squad felt ready to release the new Todoist Android app to the public. The team logged the issues that could not immediately be addressed for future reviews and updates.

The design and marketing team readied the launch by creating What’s New banner artwork and copy that are displayed within the app when launching the update. The Doist marketing team also created release notes and shared the app update announcements on our social channels. The brand and product design team worked together to create custom image assets and copy that summarised the project work in a simple and beautiful way.

What’s Next: Material 3

After a successful launch of the redesigned Todoist for Android app, Google contacted Doist to announce that Todoist was selected as the Material Design Award 2021 winner in the Large Screen category. The team was excited to be recognized for their hard work and it felt like we achieved the goal we had set out to accomplish.

Internally, designers and developers continued to study and discuss the Material 3 updates. The design team started exploring mockups and design changes inspired by Material 3 and Google’s Workspace app updates. Some of our current Todoist explorations include changing the FAB styling, updating the app bar, further removing elevation shadows, and more. Here is a preview of what a future Todoist update could look like.

We hope these insights into Doist’s design process and collaboration practices have sparked your interest. Thank you for reading and stay tuned for future design updates!

Takeaways

  • Study the Material guidelines, Material Design winners, Material studies, and Google Workspace apps to make informed design decisions when designing your next product or app update.
  • Evaluate which Material Design components and practices are right for you and implement them into your product.
  • Carefully balance the Material Design guidelines with your brand guidelines to create a unique and consistent experience between your product and the platform it lives on.
  • Collaborate with your Android developers early and often to ship app updates efficiently and increase the design implementation quality.
  • Use design components and build a design system along with practical mockups to create an efficient design spec.
  • Consider how the latest Android features fit into your product and which have the most impact on your users before deciding to implement them.
  • Test and review builds with your internal team and external beta users to get valuable feedback and make adjustments before releasing them to the public.
  • Create announcement artwork to showcase your latest app or feature update along with a clear description to share in-app and on social media.

Source

The post Case Study: Redesigning Todoist for Android first appeared on Webdesigner Depot.

Source de l’article sur Webdesignerdepot

It’s never been easier to set up an ecommerce store and start selling. There are a dizzying array of ecommerce solutions available in 2021, and most are feature-rich and competitively priced.

Ecommerce sites are notoriously difficult to migrate from platform to platform, so more often than not, you’ll be committed to your chosen solution for years. The key when choosing an ecommerce solution to maximize your return on investment, is to consider not just what your business needs today but what it will need tomorrow.

There are two basic approaches to ecommerce. The first is a dedicated platform that handles everything. The second is a plugin that adds ecommerce features to an existing CMS. Both approaches have benefits and drawbacks.

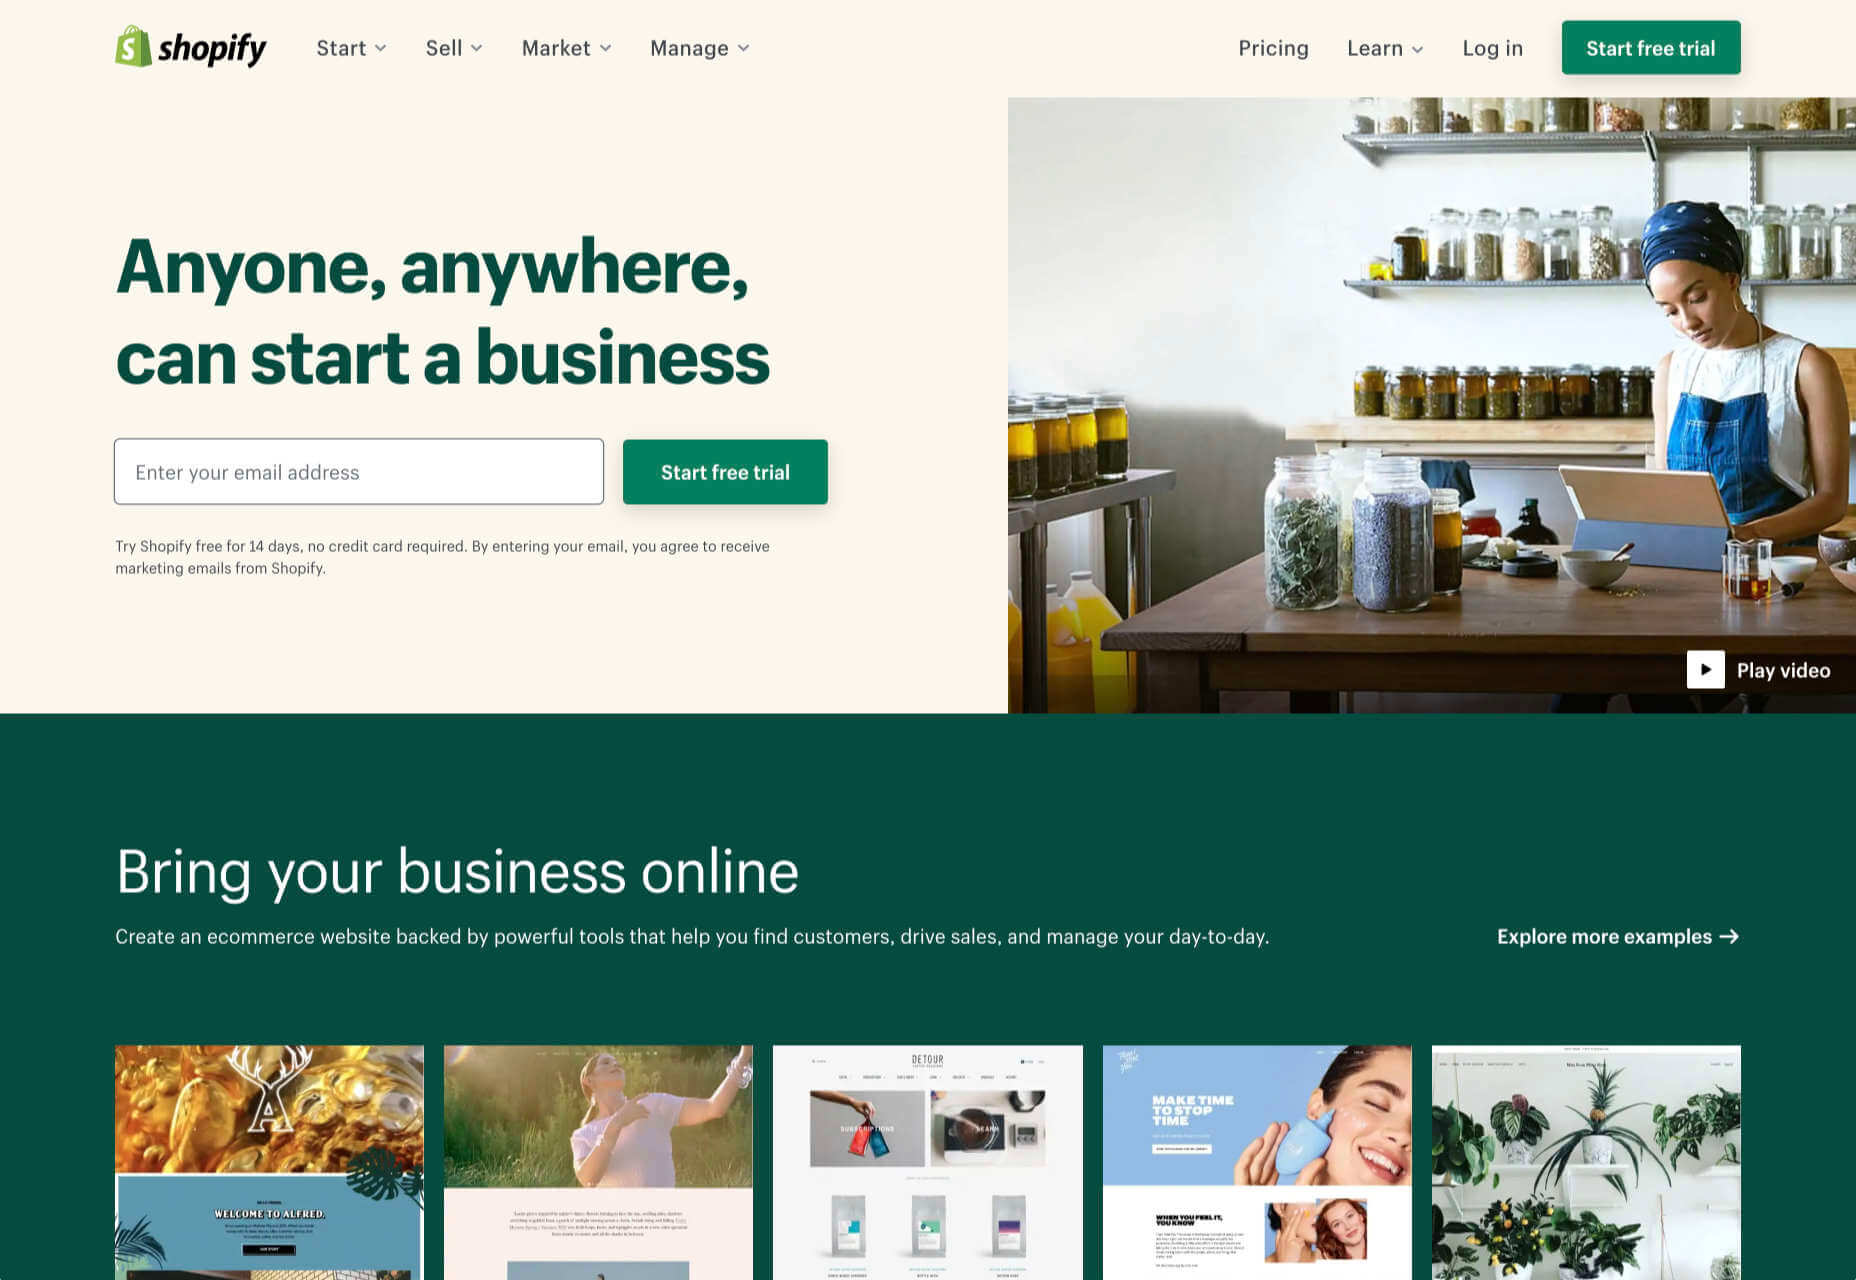
1. Shopify: Best for Almost Everyone

Shopify is a well-known, well-liked, and reliable dedicated ecommerce platform. As a system for getting a business off the ground and selling fast, it is peerless.

Shopify jealously guards developer access, with templates and plugins pre-vetted. Unlike some marketplaces, you can be confident that there are no hidden surprises in your shiny new store.

And because Shopify has passed the point of market saturation, it’s worthwhile for big players to provide their own plugins; credit services like Klarna and shipping companies like netParcel can be integrated with a few clicks.

The admin panel is a touch complex, as Shopify is designed to allow a single account to be linked to multiple stores. But once you’re set up and familiar with where to find everything, it’s a slick, streamlined business management system.

Whenever a client says, “we want to start selling online.” My first thought is, “Shopify.” And for 90% of clients, it’s the right choice.

And that’s where this roundup should end…except there’s still that 10% because Shopify isn’t perfect.

For a start, an all-in-one platform doesn’t suit everyone. If you already have a website you’re happy with, you’ll either need to migrate or lease a dedicated domain for your store.

Shopify’s platform is very secure, which inspires confidence in buyers, but the price of that security is a lack of flexibility in the design.

Then there’s the infamous variant limit. Shopify allows 100 variants on a product. Almost every client runs into that wall at some point. Let’s say you’re selling a T-shirt: male and female cuts are two variants; now add long or short sleeves, that’s four variants; now add seven sizes from XXS to XXL, that’s 28 variants; if you have more than three color options, you’ve passed the 100 variant limit. There are plugins that will allow you to side-step this issue, but they’re a messy hack that hampers UX for both customer and business.

Shopify should certainly be on every new store owner’s shortlist, but there are other options.

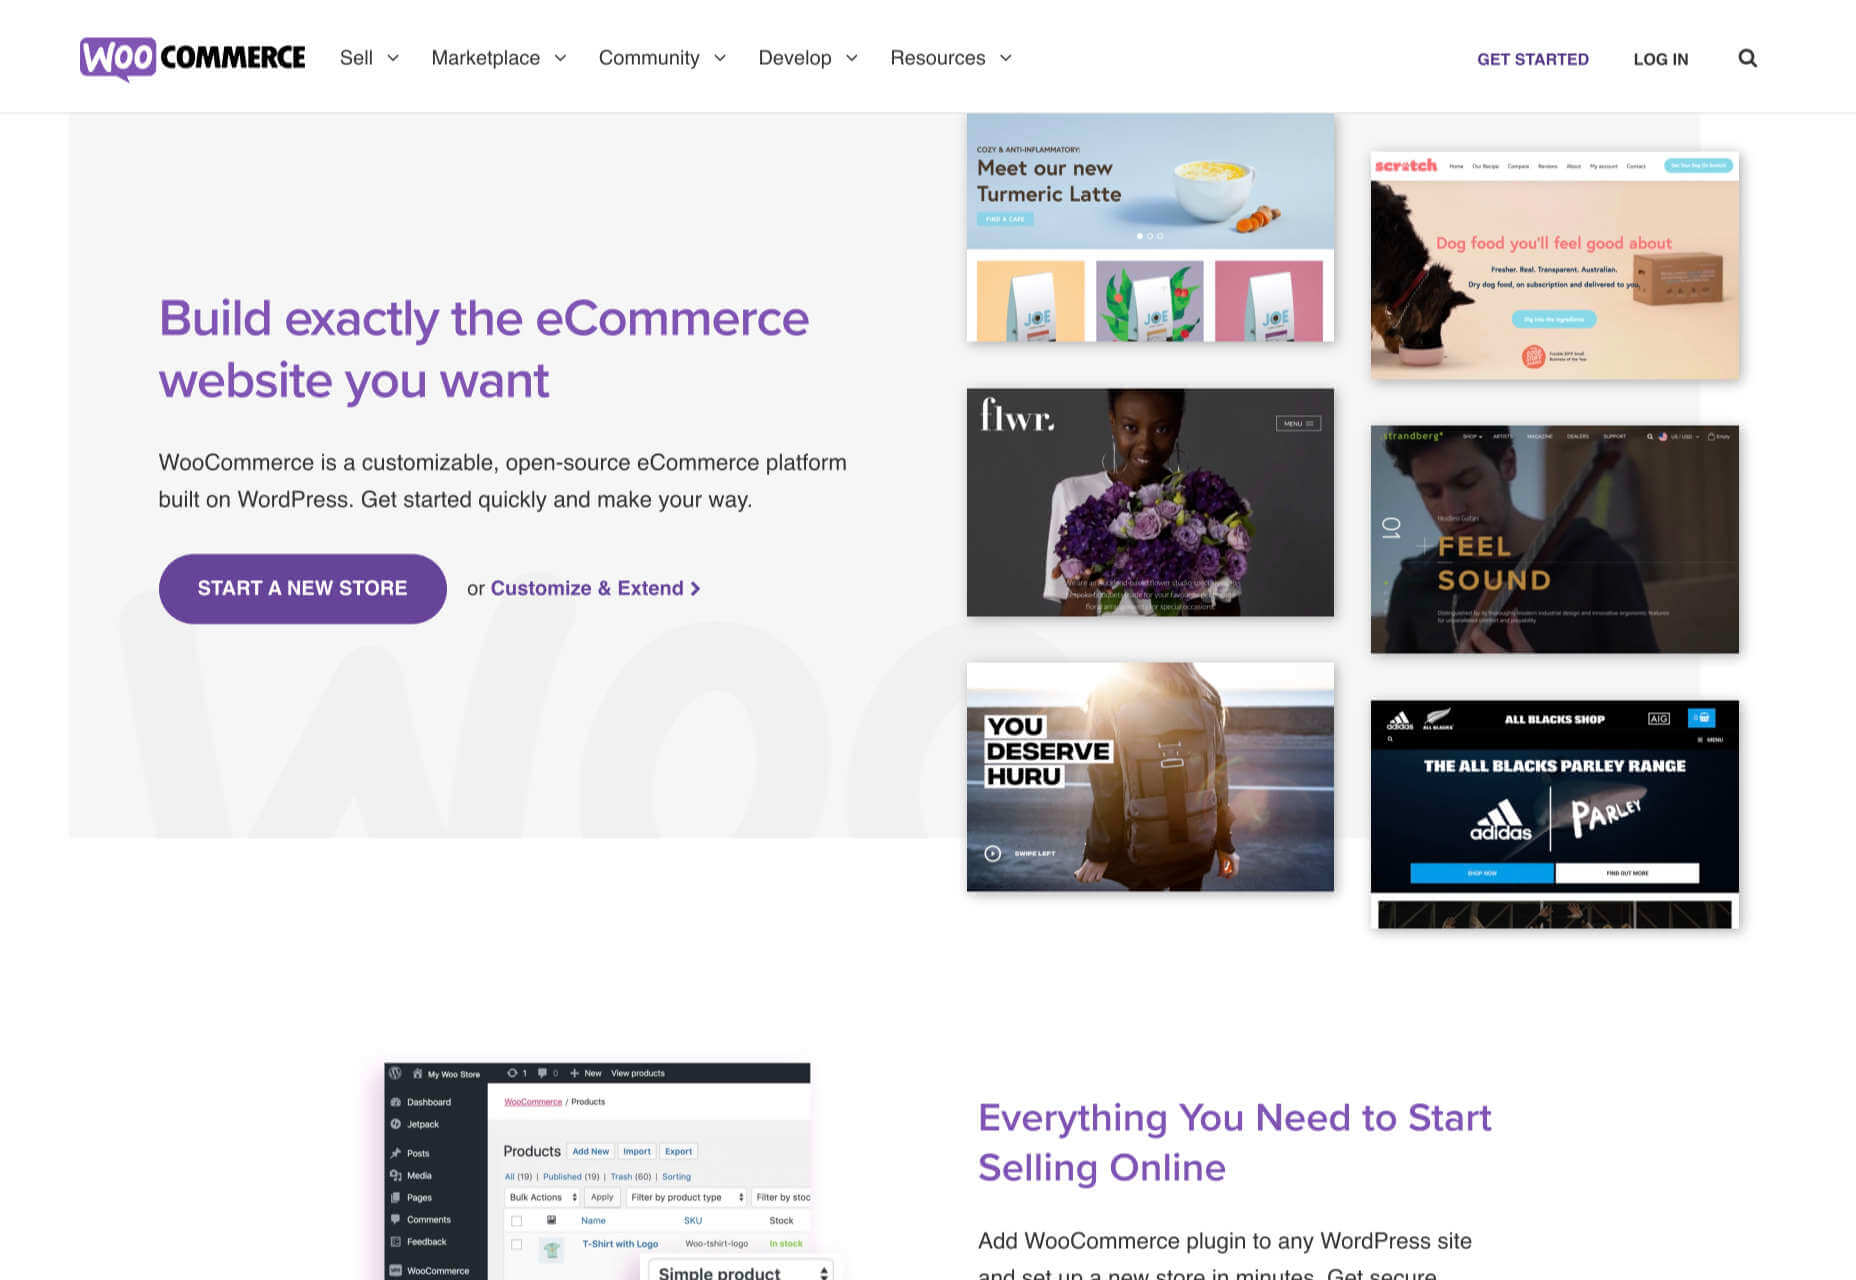
2. WooCommerce: Best for WordPress Users

If you’re one of the millions of businesses with a pre-existing site built on WordPress, then adapting it with a plugin is the fastest way to get up and running with ecommerce.

WooCommerce is regularly recommended as “Best for WordPress Users,” which is a back-handed compliment that belies the fact that WooCommerce reportedly powers 30% of all ecommerce stores. If running with the crowd appeals to you — and if you’re using WordPress, it presumably does — then you’re in the right place.

WordPress has a gargantuan plugin range. As such, there are other plugins that will allow you to sell through a WordPress site. The principle benefit of WooCommerce is that as the largest provider, most other plugins and themes are thoroughly tested with it for compatibility issues; most professional WordPress add-ons will tell you if they’re compatible with WooCommerce. If your business is benefitting from leveraging WordPress’ unrivaled ecosystem, it can continue to do so with WooCommerce.

The downside to WooCommerce is that you’re working in the same dashboard as the CMS that runs your content. That can quickly become unmanageable.

WooCommerce also struggles as inventories grow — every product added will slow things a little — it’s ideally suited to small stores selling a few items for supplementary income.

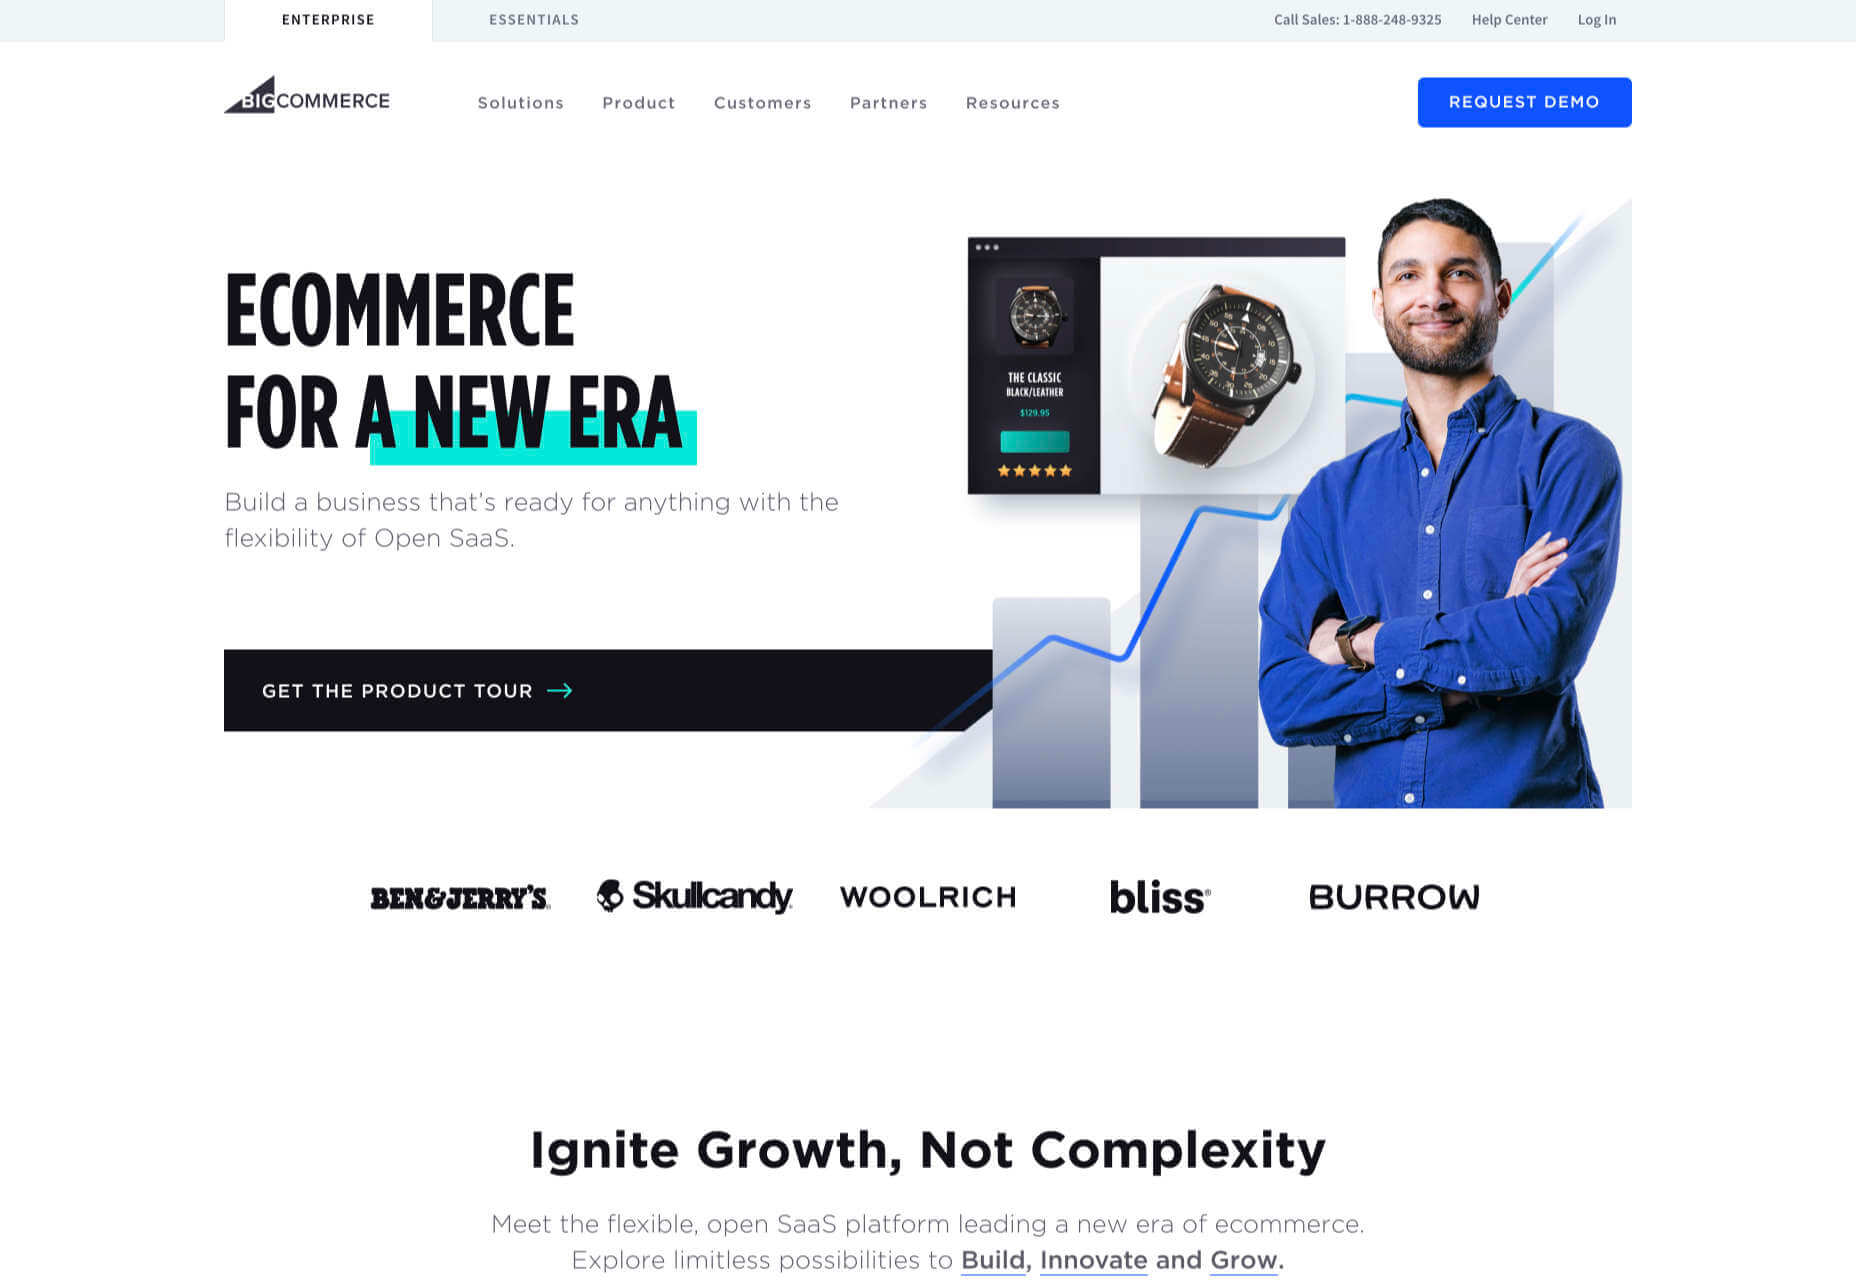
3. BigCommerce: Best for Growth

BigCommerce is an ecommerce platform similar to Shopify, but whereas Shopify is geared towards newer stores, BigCommerce caters to established businesses with larger turnovers.

The same pros and cons of a dedicated ecommerce solution that applied to Shopify also apply to BigCommerce. One of the considerable downsides is that you have less control over your front-end code. This means that you’re swapping short-term convenience for long-term performance. Templates, themes, and plugins — regardless of the platform they’re tied to — typically take 18 months to catch up with best practices, leaving you trailing behind competitors.

BigCommerce addresses this shortcoming with something Shopify does not: a headless option. A headless ecommerce platform is effectively a dedicated API for your own store.

Enabling a headless approach means that BigCommerce can be integrated anywhere, on any technology stack you prefer. And yes, that includes WordPress. What’s more, being headless means you can easily migrate your frontend without rebuilding your backend.

BigCommerce also provides BigCommerce Essentials, which is aimed at entry-level stores. It’s a good way to get your feet wet, but it’s not BigCommerce’s real strength.

If you have the anticipated turnover to justify BigCommerce, it’s a flexible and robust choice that you won’t have to reconsider for years.

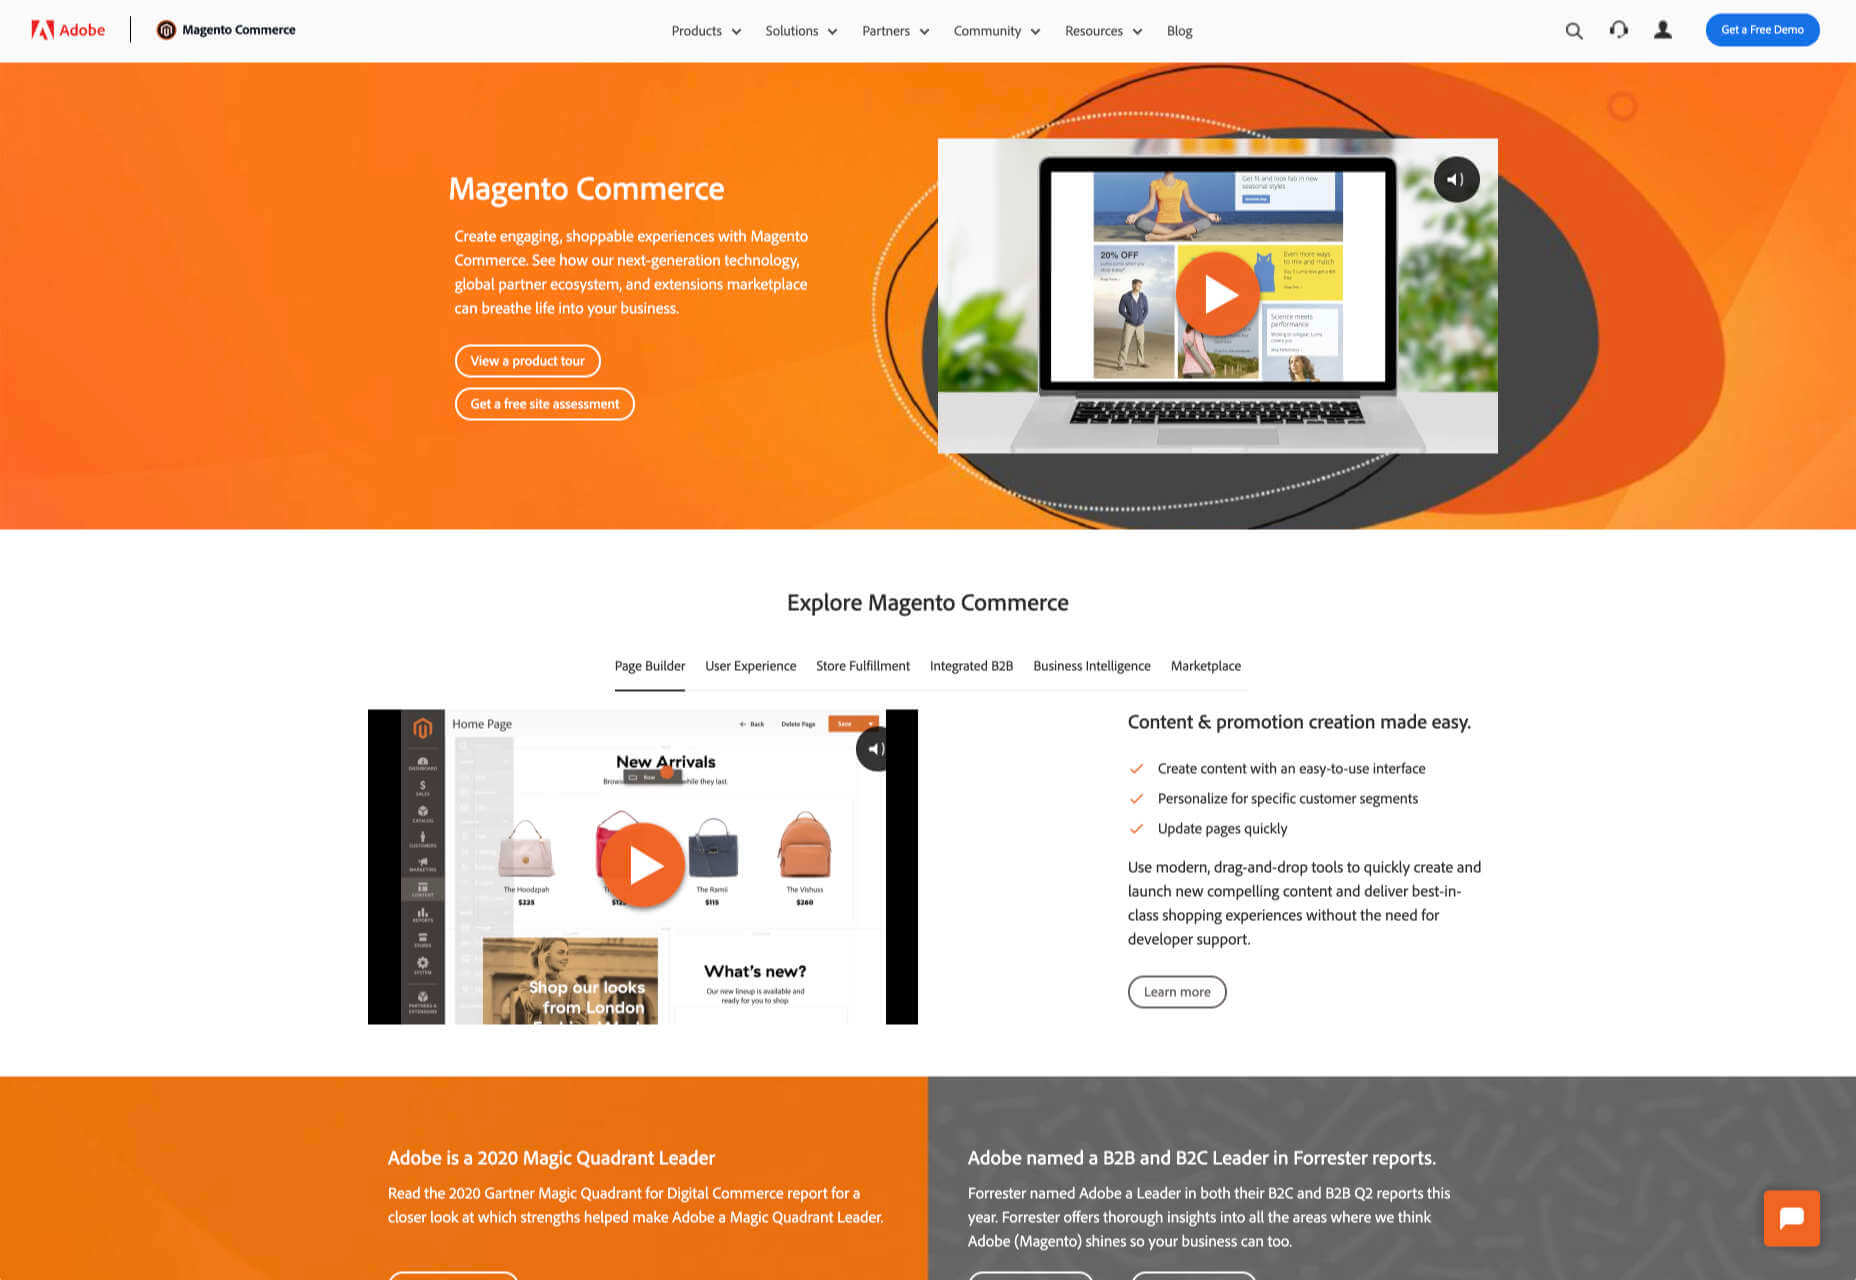
4. Magento: Best for Burning Budgets

If you have a development team at your disposal and a healthy budget to throw at your new store, then Magento could be the option for you.

You can do almost anything with a Magento store; it excels at custom solutions.

Magento’s main offering is its enterprise-level solution. You’ll have to approach a sales rep for a quote — yep, if you have to ask the price, you probably can’t afford it. Magento has the track-record and the client list to appeal to boards of directors for whom a 15-strong development team is a footnote in their budget.

That’s not to say that a Magento store has to be expensive; Magento even offers a free open source option. But if you’re not heavily investing in a custom solution, you’re not leveraging the platform’s key strengths.

5. Craft Commerce: Best for Custom Solutions

If you’re in the market for a custom solution, and you don’t have the budget for something like Magento, then Craft Commerce is ideally positioned.

Like WooCommerce for WordPress, Craft Commerce is a plugin for Craft CMS that transforms it into an ecommerce store.

Unlike WordPress, Craft CMS doesn’t have a theme feature. Every Craft Commerce store is custom built using a simple templating language called Twig. The main benefit of the approach is that bespoke solutions are fast and relatively cheap to produce, with none of the code bloat of platforms or WordPress.

Because your site is custom coded, you have complete control over your frontend, allowing you to iterate UX and SEO.

You will need a Craft developer to set up Craft Commerce because the learning curve is steeper than a CMS like WordPress. However, once you’re setup, Craft sites are among the simplest to own and manage.

6. Stripe: Best for Outliers

Ecommerce solutions market themselves on different strengths, but the nature of design patterns means they almost all follow a similar customer journey: search for an item, add the item to a cart, review the cart, checkout. Like any business, they want to maximize their market share, which means delivering a solution that caters to the most common business models.

Occasionally a project happens along that doesn’t fit that business model. Perhaps you’re selling a product that’s uniquely priced for each customer. Perhaps you’re selling by auction. Perhaps you don’t want to bill the customer until a certain point in the future.

Whatever your reason, the greatest customization level — breaking out of the standard ecommerce journey — can be managed with direct integration with Stripe.

Stripe is a powerful payment processor that handles the actual financial transaction for numerous ecommerce solutions. Developers love Stripe; its API is excellent, it’s documentation is a joy, it’s a powerful system rendered usable by relentless iteration.

However, this approach is not for the faint-hearted. This is a completely custom build. Nothing is provided except for the financial transaction itself. Every aspect of your site will need to be built from scratch, which means hefty development costs before seeing any return on investment.

The Best eCommerce Solution in 2021

The best ecommerce solution is defined by three factors: the size of your store, the anticipated growth, and the degree of custom design and features you want or need.

Shopify is the choice of most successful small stores because you can be selling inside a day. For businesses with an existing presence and a smaller turnover, those on WordPress will be happy with WooCommerce. For larger stores planning long-term growth, BigCommerce’s headless option is ideal. Craft Commerce is a solid performer that marries low costs with flexibility for businesses that need a custom approach.


Featured image via Unsplash.

Source

The post 6 Best Ecommerce Solutions for 2021 first appeared on Webdesigner Depot.


Source de l’article sur Webdesignerdepot

The start of the year is always a good time to reassess priorities and consider new approaches, but 2021 is more of a reset than we expected this time last year. 2020 is unlikely to go down in anyone’s autobiography as the best year of their life, but it has done something positive: it’s prepared the ground for rapid change in the next 12 months.

More than any other year in our lifetimes, 2021 is set to be revolutionary, with emerging trends that will last well into the new decade. Here’s what we think you can look forward to around the next corner.

1. The End of Minimalism

Minimalism has been the de facto approach to web design for the last decade because it works.

But design reflects the zeitgeist. Where minimalism once felt clean and fresh, it’s starting to feel dull and uninspired. There have been a few false-starts breaking out of the long-term trend, but thanks to the pandemic, 2021 will be the year minimalism finally folds — at least for a while.

Prior to coronavirus-mandated lockdowns worldwide, there were already signs of a more vibrant, more decorative, more joyful approach to design. Simple typefaces have been replaced with more decorative examples — faces that use ink-traps to fake 3D effects are surprisingly popular.

trends are cyclical, and the wheel always turns

One of the biggest aspects of this blossoming trend is the move away from Material Design-style flat color not just to gradients but to multi-color gradients and even animated gradients. Even Apple, the last bastion of the clean white-box approach, jumped on the gradient bandwagon with its Big Sur branding.

One of the few things COVID-19 hasn’t slowed is the adoption of new web technology, and CSS, in particular, has had some major developments in the last year. CSS Grid is now a practical technology, and our ability to code standards-compliant designs that aren’t dependent on hierarchical boxes is greatly enhanced.

After more than a year of pretty grim news for most people, much of the world will be vaccinated over the next twelve months, and life will rapidly return to normal. The last global crisis on this scale was the 1918 influenza pandemic, and it led directly to the decade known as the Roaring Twenties.

Minimalism was already dipping in popularity — trends are cyclical, and the wheel always turns — but lockdown, or perhaps more precisely the end of lockdown, is the catalyst for significant change.

2. The Decline of WordPress

In Autumn 2020, something entirely unexpected happened: The W3C announced the platform its new web presence would be built on, and WordPress — the previous choice of the web’s steering committee — didn’t even make the list of finalists.

Due to accessibility concerns, the W3C development team opted to migrate away from WordPress to Craft CMS. The decision was met with a mixture of glee and outrage. But whether you agree with the decision or not, it’s hard to see it as anything other than yet another symptom of WordPress’ decline.

WordPress faces a triple threat: there are web builders that do an adequate job for low-end web projects; there are newer rivals like Craft that outperform WordPress as a CMS; there’s a growing interest in alternate approaches, like Jamstack.

So will it all be over for WordPress in 2021? Not even close. There are myriad reasons WordPress will continue to be the choice of designers and developers for years to come. Tens of thousands of professionals worldwide have invested their whole careers in WordPress; there are millions of themes, plugins, templates, and build processes that are tightly woven into the WordPress ecosystem. What’s more, there are millions of sites with substantial content archives powered by WordPress [WebDesignerDepot is one such site].

WordPress reportedly powers approximately 37% of the web, and it will still be the dominant CMS in 2022. But it’s unlikely to grow beyond that 37%, and by 2030 its market share will be in rapid contraction.

2020 was the high-tide mark for WordPress

But for all its faults — and it’s undeniable that WordPress is full of faults — WordPress is the best of the web; it has given a voice to millions of people, launched countless careers, and empowered entrepreneurship worldwide.

2020 was the high-tide mark for WordPress, but it’s not an extinction-level event — even the much-maligned Flash, which was killed dead in a matter of months by the first generation iPhone, limped on until a few weeks ago.

WordPress will have to find a niche and accept a smaller market share; in doing so, it will address the single biggest complaint that anyone has about WordPress: that it’s trying to do too much.

WordPress is one of the great success stories of the web. In a decade, it may have to settle for powering just 10% of the web — a level of failure most of its rivals can only dream of.

3. The Digital Currency Explosion

2021 is undoubtedly the year that cryptocurrency goes mainstream. In 2020 Bitcoin grew by almost 400%; currently valued at around $35k, conservative predictions for a December 2021 valuation are $100k, with five-year predictions as high as $1m. And Bitcoin isn’t the only cryptocurrency; the value of developer-friendly Ether has jumped by more than 50% in the first few weeks of 2021.

In the US, the incoming Biden administration is preparing a multi-trillion dollar relief package, which many believe young Americans will invest in cryptocurrency. Perhaps more importantly, large investment banks are now pumping hundreds of millions in digital currencies. PayPal and Visa are both in the advanced stages of adopting blockchain technology.

The biggest threat to the new digital economy is the volatility of cryptocurrency. You cannot price services in XRP if XRP’s dollar price could crash at any time — as it did a few weeks ago.

And so there are two routes in which this trend will unfold for ecommerce. Either pricing will remain in dollars, and the equivalent price in various cryptocurrencies will be calculated in real-time. Or, transactions will make use of stablecoins like Tether that are tied to the value of the US dollar.

Cryptocurrency is the latest gold-rush, and whether you think it’s the chance of a lifetime or yet another Ponzi scheme, it will become increasingly high-profile in ecommerce throughout 2021.

4. No More Video Calls and also More Video Calls

2020 was the year of Zoom. Its growth from bit-player to overtaking Skype is a material lesson for entrepreneurs that every obstacle is an opportunity.

every obstacle is an opportunity

Over the last year, we’ve discovered two things: meetings are more creative in person, and office costs are significantly reduced when staff work remotely.

There’s going to be a shift in the business landscape this year. Remote working will continue to be normal for years to come as businesses enjoy rent savings. Video calls will still be common for quick update meetings. But expect to travel to physical meeting places periodically for in-depth strategic planning.

Expect to see major cities with deserted office buildings and a rapid expansion of co-working spaces, especially those with meeting spaces — if WeWork can hold on a little longer, there may be light at the end of the tunnel.

As a web professional, you’re in a unique position to thrive in the new business world, even more so if you’re a freelancer. Remember, if you’re working onsite, be mindful of your physical health, and if you’re working remotely, be mindful of your mental health.

What Do You Think?

No one saw 2020 coming. Sometimes world events are outwith our control, and we have to hang on and hope it gets better. It’s been a tough 12 months, and the truth is we’re not through it yet.

But the 2020 coronavirus pandemic is the first pandemic in human history that we’ve had the technology to shorten.

2021 offers the opportunity for enormous change. Will designers look for new, more decorative approaches? Will we replace our technology stack? Will you be billing clients in Ether this year? Will you suffer the misery of a packed evening commute ever again?


Featured image via Unsplash

Source

The post 4 Predictions for the Web in 2021 first appeared on Webdesigner Depot.


Source de l’article sur Webdesignerdepot

A hacked WordPress site is as damaging as having your home burgled. It can completely shatter your peace of mind and adversely impact your online business. 

Why do hackers target WordPress sites? The answer is relatively simple: WordPress is the single biggest platform for website creation these days, so there’s a larger base to attack; this attracts the attention of online criminals. 

So, how can a hack impact your website? 

Depending on the type of attack, your website could suffer any of the following:

  • It could be defaced completely;
  • It could load or operate very slowly on any device;
  • It could completely crash and malfunction;
  • It could display the dreadful “White Screen of Death”;
  • Its incoming visitors could be redirected to other suspicious websites;
  • It could lose all your valuable customer data.

This list is not exhaustive but you get the idea.

Now that we know how a successful hack can impact your website and online business, let us look at the top 10 reasons behind WP hacks and prevent them.

1. An Insecure Web Host 

Like any website, WordPress is hosted on a web host or server. Unfortunately, most site owners do not pay much attention to the web host they select and choose the cheapest they can find. For example, it is more affordable to host a website on a shared hosting plan — one that shares its server resources with many other websites like yours.

This can make your site vulnerable to hackers as a successful hack into any website on the shared server. A single hacked site can consume the overall server bandwidth and impact all the other sites’ performance.

The only way to fix this problem is to opt for a reliable host and a virtual or dedicated server.

Pro tip: If you’re already using a shared hosting plan, check with your hosts if they offer VPS hosting and make the switch.

2. Use of Weak Passwords

Weak passwords are the main reason behind successful brute force attacks that target your account. Even to this day, users continue to use weak and common passwords like “password” or “123456”; if you’re one of them, your website could land in trouble!

Guessing weak passwords allows hackers to enter the admin accounts where they can inflict the maximum damage.

How do you fix this problem? Simple, ensure all your account users (including admin users) configure strong passwords for their login credentials. With at least 8 characters, passwords must be a mix of upper- and lower-case alphabets, numbers, and symbols. 

For added safety, install a password management tool that can automatically generate and store strong passwords.

Pro tip: You can use a plugin to reset passwords for all your users.

3. An Outdated WP Version

Outdated software is among the most common reasons why websites get hacked. Despite being free to download, most site users defer updating their site to the latest version, for fears of updates causing their site to crash.

Hackers take advantage of any vulnerability or bug in an older version and cause issues like SQL Injections, WP-VCD Malware, SEO Spam & other major issues like website redirecting to another site.

How do you solve this problem? When you see a notification about an update on your dashboard, update your site as soon as possible.

Pro tip: If you are worried about updates crashing your live website, you can first test the updates on a staging site.

4. Outdated WP Plugins and Themes

Similar to the previous point, hackers also take advantage of outdated, unused, or abandoned plugins and themes installed on websites. With over 55,000 plugins and themes that are available, it is easy to install a plugin or theme, even from unsafe or untrusted websites. 

Plus, many users do not update their installed plugins/themes to the latest version or do not find the updated version. This makes it easier for hackers to do their job & infect sites.

How do you avoid this problem? As with the core WP version, update each of your installed plugins/themes on your site regularly. Take stock of all the unused ones and remove them or replace them with better alternatives.

You can update your plugins/themes from your hosting account.

Pro tip: We suggest setting aside time every week to run updates. Test them on a staging site and then update your site.

5. Common Admin Usernames 

In addition to weak passwords, users also create common usernames that are easy to guess. 

This includes common usernames for admin users like – “admin”, “admin1”, or “admin123”. Common admin usernames make it easier for hackers to get into admin accounts and control backend files in your WP installation.

How do you avoid this problem? If you are using any such usernames that are easy to guess, change them immediately to a unique username. The easiest way of doing it is through your hosting account’s user management tool, by deleting the previous admin user and creating a new admin user with a unique username.

As the first step, change the default username of your admin user and limit users who have administrator privileges.

Pro tip: WordPress has 6 different user roles with limited permissions. Only grant admin access to users who really need it.

6. Use of Nulled Plugins/Themes 

Coming back to the importance of plugins/themes, users have access to many websites that sell nulled or pirated copies of popular and paid plugins and themes. While these are free to use, they are often riddled with malware. They can compromise your website’s overall security and make it easier for hackers to exploit. 

Being a pirated copy, nulled plugins/themes do not have any available updates from its development team, hence will not have any security fixes.

How do you fix this problem? Simple, for a start, only download original plugins and themes from trusted websites and marketplaces.

Pro tip: If you don’t wish to pay for paid or premium plugins and themes, opt for a free version of the same tools that will have limited features but are still safer to use than the nulled version. 

7. Unprotected Access to wp-admin Folder

To take control of your site, hackers often try to break into and control your wp-admin folder in your installation. As the website owner, you must take measures to protect your wp-admin directory.

How can you protect your wp-admin folder? First, restrict the number of users having access to this critical folder. Additionally, apply for password protection as an added layer of security for access to the wp-admin folder. You can do this using the “Password Protection Directories” feature of the cPanel in your web host account.

Pro tip: Besides these fixes, you can also implement Two Factor Authentication (or 2FA) protection for all your admin accounts.

8. Non-SSL Website

You can easily migrate your HTTP website to HTTPS by installing an SSL certificate on your site. SSL (or Secure Socket Layer) is a secure mode of encrypting any data transmission between your web server and the client browser.

Without this encryption, hackers can intercept the data and steal it. Plus, a non-secure website can have many negative implications for your business – lower SEO ranking, loss of customer trust, or a drop in incoming traffic.

How do you fix this problem? You can quickly obtain an SSL certificate from your hosting company or SSL providers. It encrypts all data that is sent from and received by your website. 

Pro tip: You can get a free SSL certificate from places like Let’s Encrypt, but these provide limit protection that will only be sufficient for a starter site or small site.

9. No Firewall Protection

Lack of firewall protection is another common reason why hackers can bypass website security measures and infiltrate the backend resources. Firewalls are the last line of defence against hackers and work like the security alarm installed on your house. Firewalls monitor web requests coming from various IP addresses, including the suspicious (or bad) ones. 

They can identify and block requests that are known to be malicious in the past, thus preventing easy access for hackers to your website domain. Web application firewalls can thwart various attacks, including brute force attacks, XSS, and SQL injections.

Pro tip: A firewall provides much-needed security and is  your first line of defence. But it’s important to also have a malware scanner installed.

10. Lack of WordPress Hardening Measures

Typically, hackers target the most vulnerable areas or weaknesses within a WP installation, to illegally access or damage the website. The WordPress team has identified these vulnerable areas and has devised a list of 12 hardening measures recommended for every website.

A few of these include:

  • Disabling the File Editor;
  • Preventing PHP execution in untrusted folders;
  • Changing the security keys;
  • Disallowing plugin installations;
  • Automatic logout of inactive users;

How do you implement these hardening measures? While some steps are easy to understand, others require the technical expertise of how WordPress works. 

Pro tip: You can implement hardening measures on your own. However, some measures require technical expertise so in these cases, it’s much easier and safer to use a plugin.


Featured image via Pexels.

Source


Source de l’article sur Webdesignerdepot

The world of search engine optimization was born with all sorts of different hacks and shortcuts that many people use in an effort to grow their business.

Knowing effective SEO tricks would be incredibly profitable, but unfortunately it’s not that easy

This becomes evident as soon as you do a Google search about anything SEO-related, only to find pages and more pages replete with blog posts and videos disclosing all the tips and tricks you “need to know” in order to achieve the best SEO results, in the fastest way possible.

Knowing effective SEO tricks would be incredibly profitable, but unfortunately it’s not that easy.

In its essence, SEO isn’t about hacks, shortcuts, and hidden optimizations, but rather about resource allocation. Keep reading to learn why!

Be Careful About Over-Reliance on Hacks

Before we start talking about resources, it’s important to understand why the quick and easy SEO hacks we’ve all read about online aren’t as reliable as they might seem.

The reality is that yes, there are some traditional hacks and optimization tactics that many people swear by. However, SEO has become way too competitive for these hacks to still work.

Think about it: anyone can learn about these hacks and shortcuts in a matter of seconds, which means that anyone can use them, which means that they’re not going to help your website stand out. By way of example, when thinking about keyword usage, many websites simply decide to put them everywhere on their website, without actually planning and strategizing. Perhaps years ago, doing so would lead to excellent results, but that’s not the case anymore.

What I want to go over, and what I mean with this article, is that when developing your SEO plan, you should think less about hacks, and try to focus on strategy and resources instead.

As tempting as they might be, most SEO hacks won’t really go that far.

What does go far are those strategies and resource allocation decisions, which you can master as long as you know three things:

  • Who your competitors are;
  • What you have;
  • and What strengths you can double down on.

Base Your SEO Strategies on Your Business’s Resources

So, SEO is about resource allocation – we know that now…but what exactly does that mean?

Well, this logic is based on something you might have heard of before, and that is the three pillars of SEO.

As a refresher, everything in SEO revolves around three pillars:

  • Link building and referring domains;
  • Content development and content marketing;
  • Technical SEO.

Many businesses have a limited digital marketing budget and, as if that wasn’t enough, their SEO budget tends to be even more restricted.

This means that we can’t try every hack out there or do every campaign we can come up with, hoping it will lead to positive results. On the contrary, it means we need to be methodical and understand which strategies have the most potential and are actually worth exploring.

In summary, there’s one big challenge that every SEO team and company experiences, and that is the limitation of resources versus possible operations, and that leads us to a question: what mix of SEO pillars will give us a good shot at ranking high and surpassing our competitors?

Develop Your SEO Strategies Based on Your Inherent Strengths

The mistake that a lot of business owners make after reading SEO articles or hearing about amazing case studies is that they try and copy the strategies they learned about, from beginning to end.

However, contextually, each case study or article could refer to a strategy that was specifically optimized for a different type of business.

So, although copying what other successful businesses can work in certain situations when speaking about SEO, it’s best to borrow ideas and use the ones that fit your inherent strengths.

Based on the pillars of SEO that we discussed earlier, there are three strong points that a company can have:

If You Have a Strong Network…

Some businesses don’t have the resources to create an in-house content development team or outsource writing services.

However, they have another strong suit, which lies in their ability to go out into their community, speak, and be heard. They can do this because they have built a strong network over the years and, in cases like this, what we often do is use a backlinking approach.

When working with businesses that have a strong community presence, go out and double down on their network. Pitch their relevant contacts for guest speakership and guest posts, building thought leadership, while also driving links to their website.

If You’re Not That Popular But Are Good With Words…

Right now, some of you might be thinking: “Yeah, well, that’s easy when you’ve built the exposure, but not all of us are lucky enough to be well-known”.

Listen, I get it, we’ve all been in that position.

For clients and businesses that feel like they don’t have the brand equity or exposure to develop a strong backlinking strategy, opt for another route, and invest much more on content (and/or technical SEO, see below).

If the client has a team who’s ready to put its head down and get to work, then focus on producing a lot of content for their website.

Ultimately, the goal is to build a content library that is thorough and expansive, and that provides the client with more opportunities for keyword rankings, while also reinforcing the relevance of their website for those specific SEO keywords.

If Technical Knowledge is Your Forte…

You may not like (or have time) to write and you may not have a strong community presence, but if you have advanced technical skills and the ability to create a strong website quickly, then there’s another approach you can take.

This leads us into the third pillar of SEO: technical SEO.

This solution is indicated for technical teams that can create large websites, databases and user experiences in no time, and it is typically adopted by tech startups that are trying to create an app that provides user value.

First and foremost, winning at technical SEO requires strong technical skills that will allow you to build the web assets that you need, but that’s not all. It also requires you to understand how you can double down on these skills and manage large websites in the rather complex Google ecosystem.

So you need, for example, to know how you can get Google to notice and properly index the new pages you create on your website, even if you already have 100,000 pre-existing pages.

Or to ensure that each of your new pages is properly optimized for the best keywords.

Needless to say, using technical SEO does become a complex operation. However, when done right, it can lead your SEO to grow by sheer size, with the hopes that certain relevant keywords will start to rank for your business naturally.

Conclusion: Your Strategy Will Probably Be a Combination of the Three Pillars

When it comes to SEO, honing in on your strengths and accepting the fact that you can’t do everything is definitely the way to go.

When you’re running an SEO campaign, you should always focus on what you’re good at, know your resources, and augment what you already master – and that will put you in the right direction.

By focusing your resources on any of the pillars of SEO (or even a mix of them), you substantially increase your chances of achieving long-term success, which will not happen if you go for hacks and shortcuts instead.

A long-term, highly-organized, resource-allocated SEO strategy won’t only guarantee continuous success, but it can ultimately become self-sustaining, meaning that it will allow you to keep growing and growing, becoming an organic part of your marketing plan.

I’ve seen a lot of people try SEO hacks for two weeks, only to realize that they didn’t work and that their efforts had been in vain. 

It’s unfortunate because by doing so, you’re turning your back on a marketing channel that is very valuable to a lot of people, and these hacks trick people into thinking it’ll be overnight.

So remember, resource allocation over hacks and shortcuts!

Source


Source de l’article sur Webdesignerdepot

Web accessibility is important for two reasons:

  1. Being ADA & WCAG compliant is required by law (we’ll explain this further) so if your website isn’t compliant, you can get sued.
  2. It allows people with disabilities to browse your website, which increases your potential audience and it is the decent thing to do.

In this accessiBe review, we’ll cover:

How Does accessiBe Work

accessiBe is an automated solution that combines two applications to achieve full compliance.

Foreground application: the accessibility interface. This is the accessibility menu that allows users with disabilities to adjust the various UI and design elements on your website so it meets their unique needs.

Background application: proprietary AI technology that’s responsible for the ‘heavy lifting’, screen-reader, and keyboard navigation optimization.

The combination of these two applications is unique for accessiBe for a few reasons. While most available accessibility solutions offer just one of the two or rely on manual remediation, accessiBe checks both boxes and does it in a fully automated way.

Additionally, and most importantly, accessiBe continuously scans your website, every 24 hours, identifying and fixing new accessibility issues as they arise. Websites are dynamic – meaning, keep updating constantly with new content, pages, images and so on; being ADA and WCAG compliant is an ongoing concern, not a one-time fix.

How to Install and Setup accessiBe

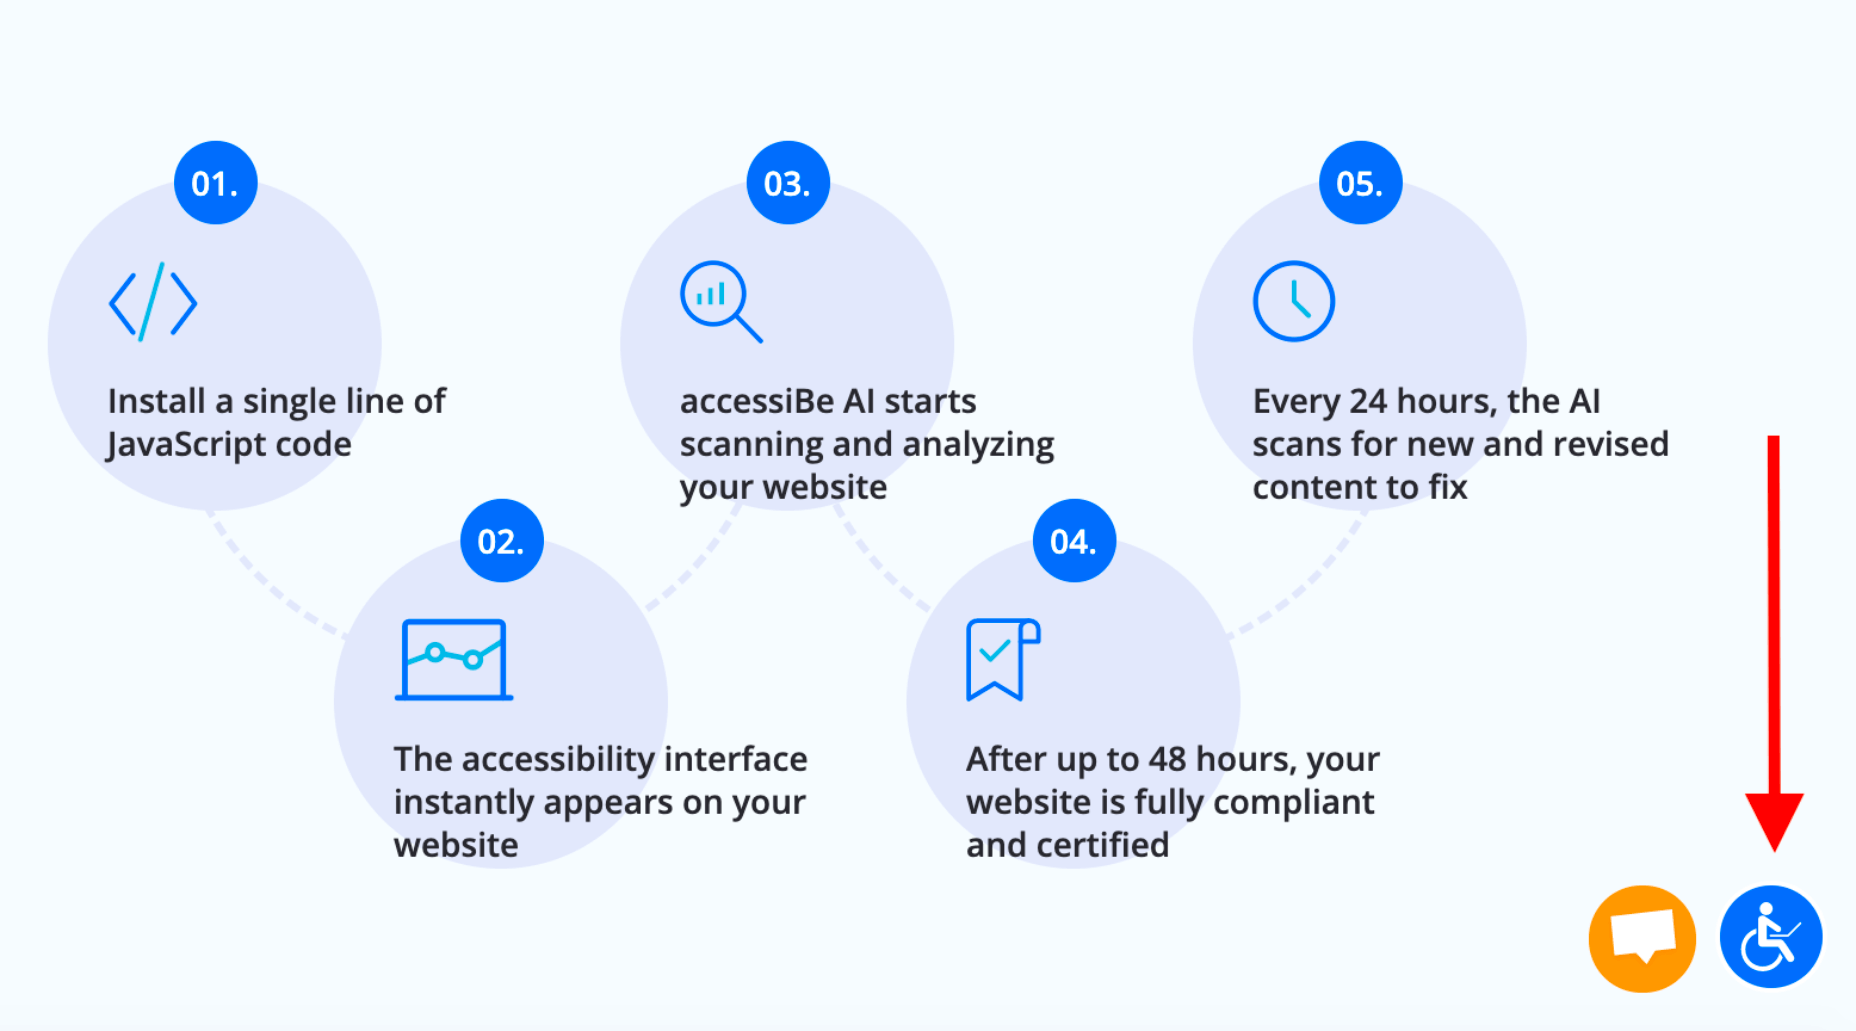
You install accessiBe by inserting a single line of code on your website.

From your end, that’s all it takes.

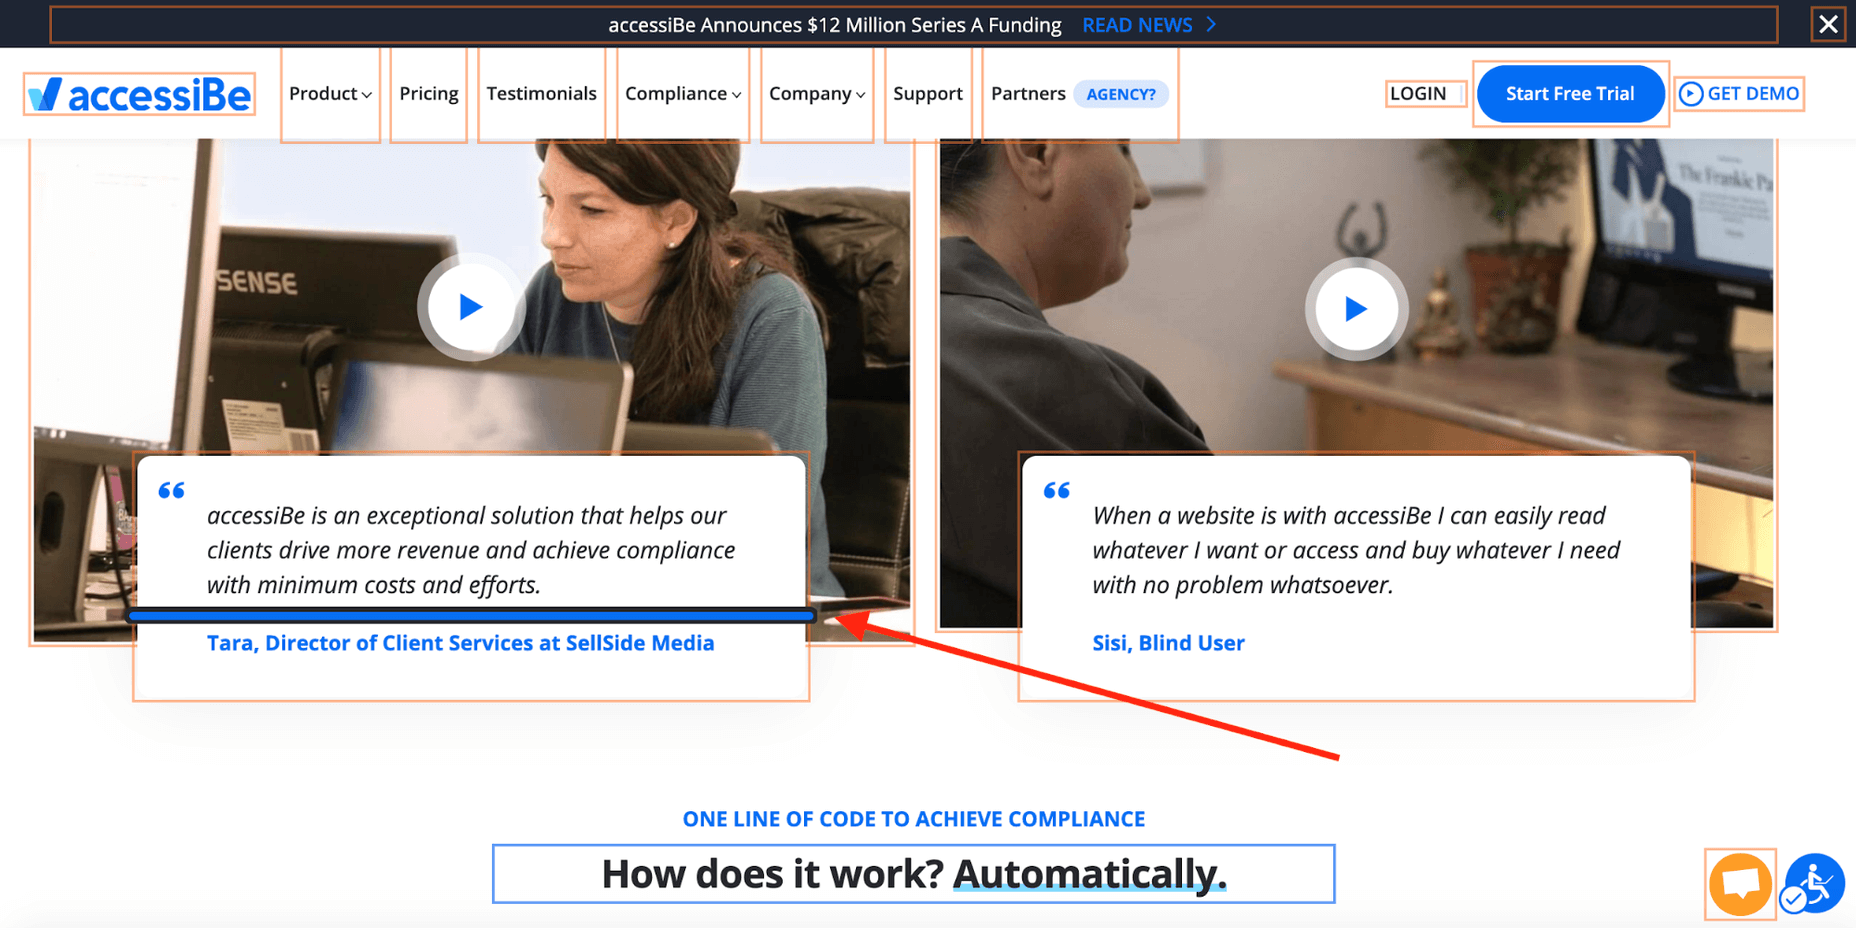
The first thing that happens is that the accessibility interface appears on your website. The menu is available via the accessibility icon (that also appears automatically.)
Source: accessiBe website

Next, the AI application scans and analyzes your website for accessibility issues and compatibility with screen-readers and keyboard navigation requirements and fixes them. This automated process takes 48 hours.

Once the initial 48 hours have elapsed, your website is compliant.

From here on, accessiBe automatically scans your website every 24 hours to identify and fix new accessibility issues as they arise due to website updates.

Why Ongoing Compliance is Important

We’ve mentioned this already, but it’s important to stress this point.

Whether you have an e-commerce website or a company website, you keep updating and changing your website; new items go up for sale, new videos and content pieces are added. Every addition or removal from your website has the potential of creating accessibility gaps (like missing alt text for images.)

By continuously scanning and fixing your website, accessiBe ensures that you stay compliant. An accessibility audit remediates your website for the specific point in time the audit took place. Meaning, you’ll need to audit your website periodically to remain compliant, which is a costly affair. With accessiBe you don’t need to worry about this.

accessiBe Front End Features – The Accessibility Interface

The accessiBe accessibility interface (the menu that is available for users) is installed automatically on your website once you insert the line of code. Let’s look at the various features that are available for people with disabilities.

Accessibility Profiles Explained

First, it allows you to choose from a pre-defined set of profiles optimized for various disability needs:
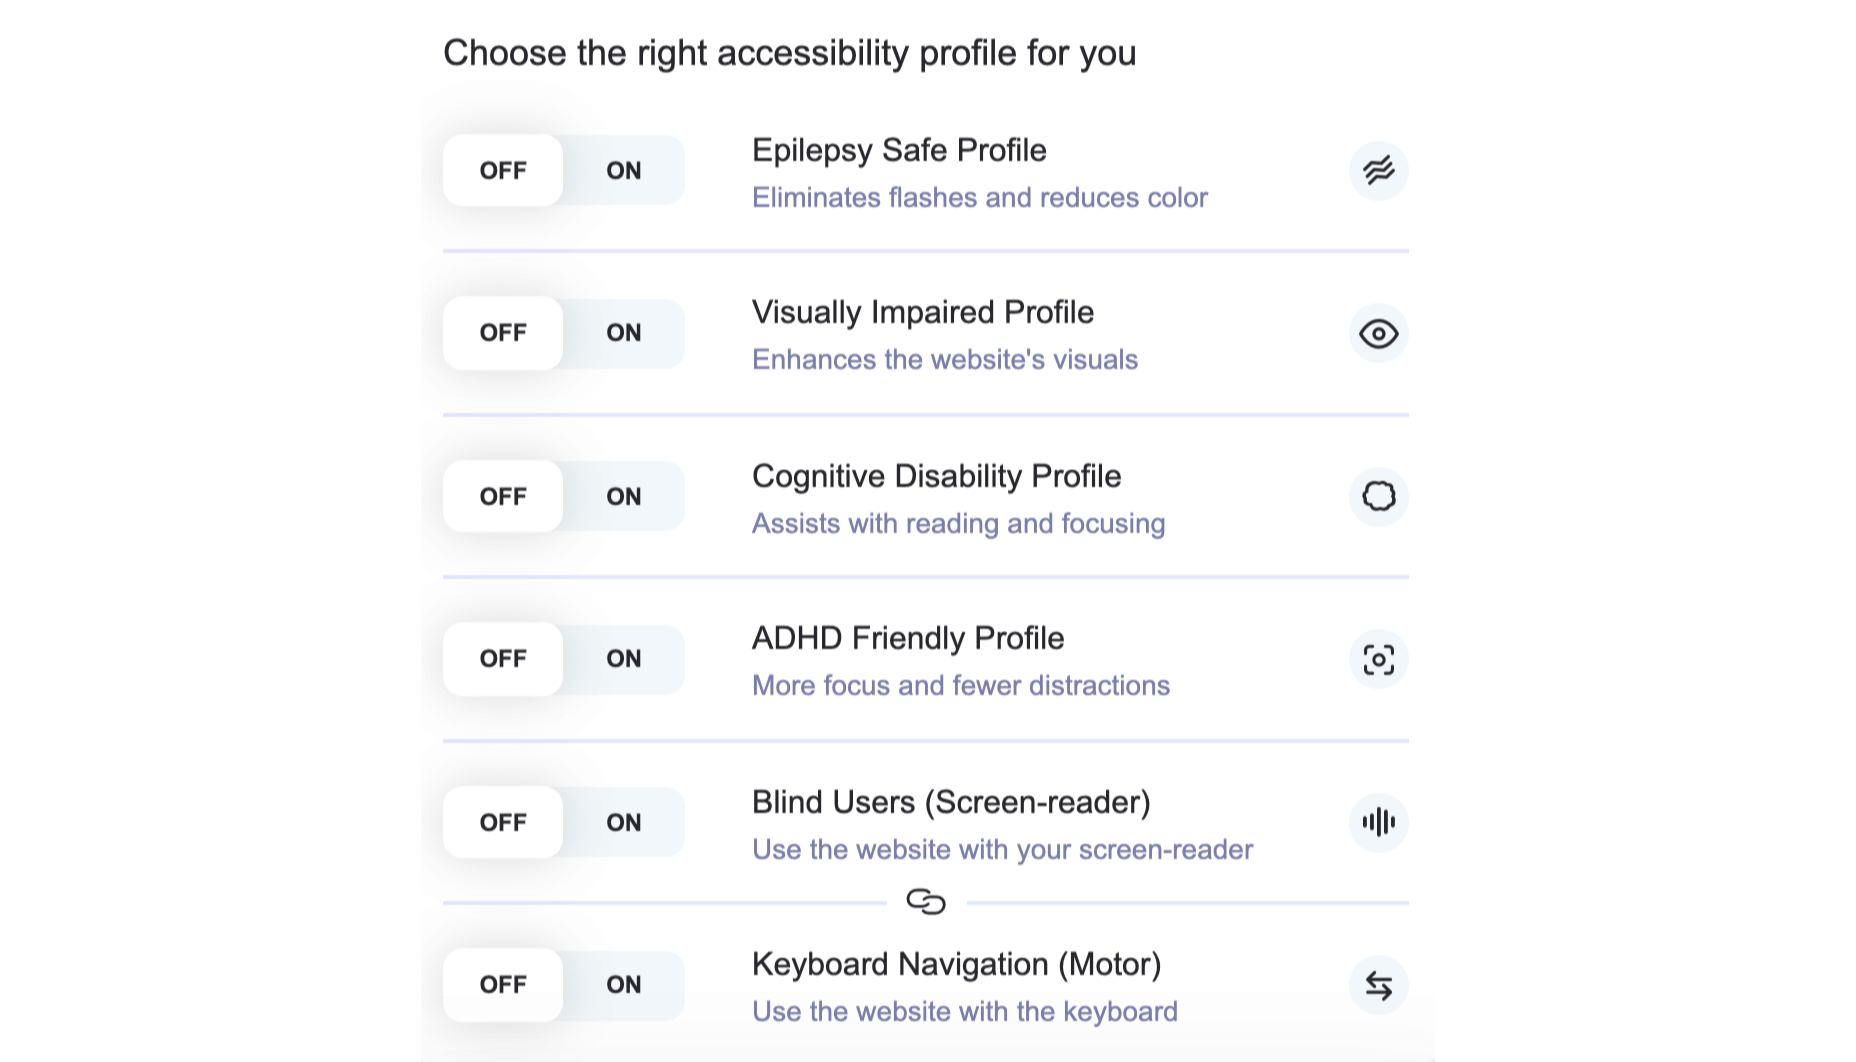
When one of the profiles is selected, the required adjustments are instantly applied to your entire website.

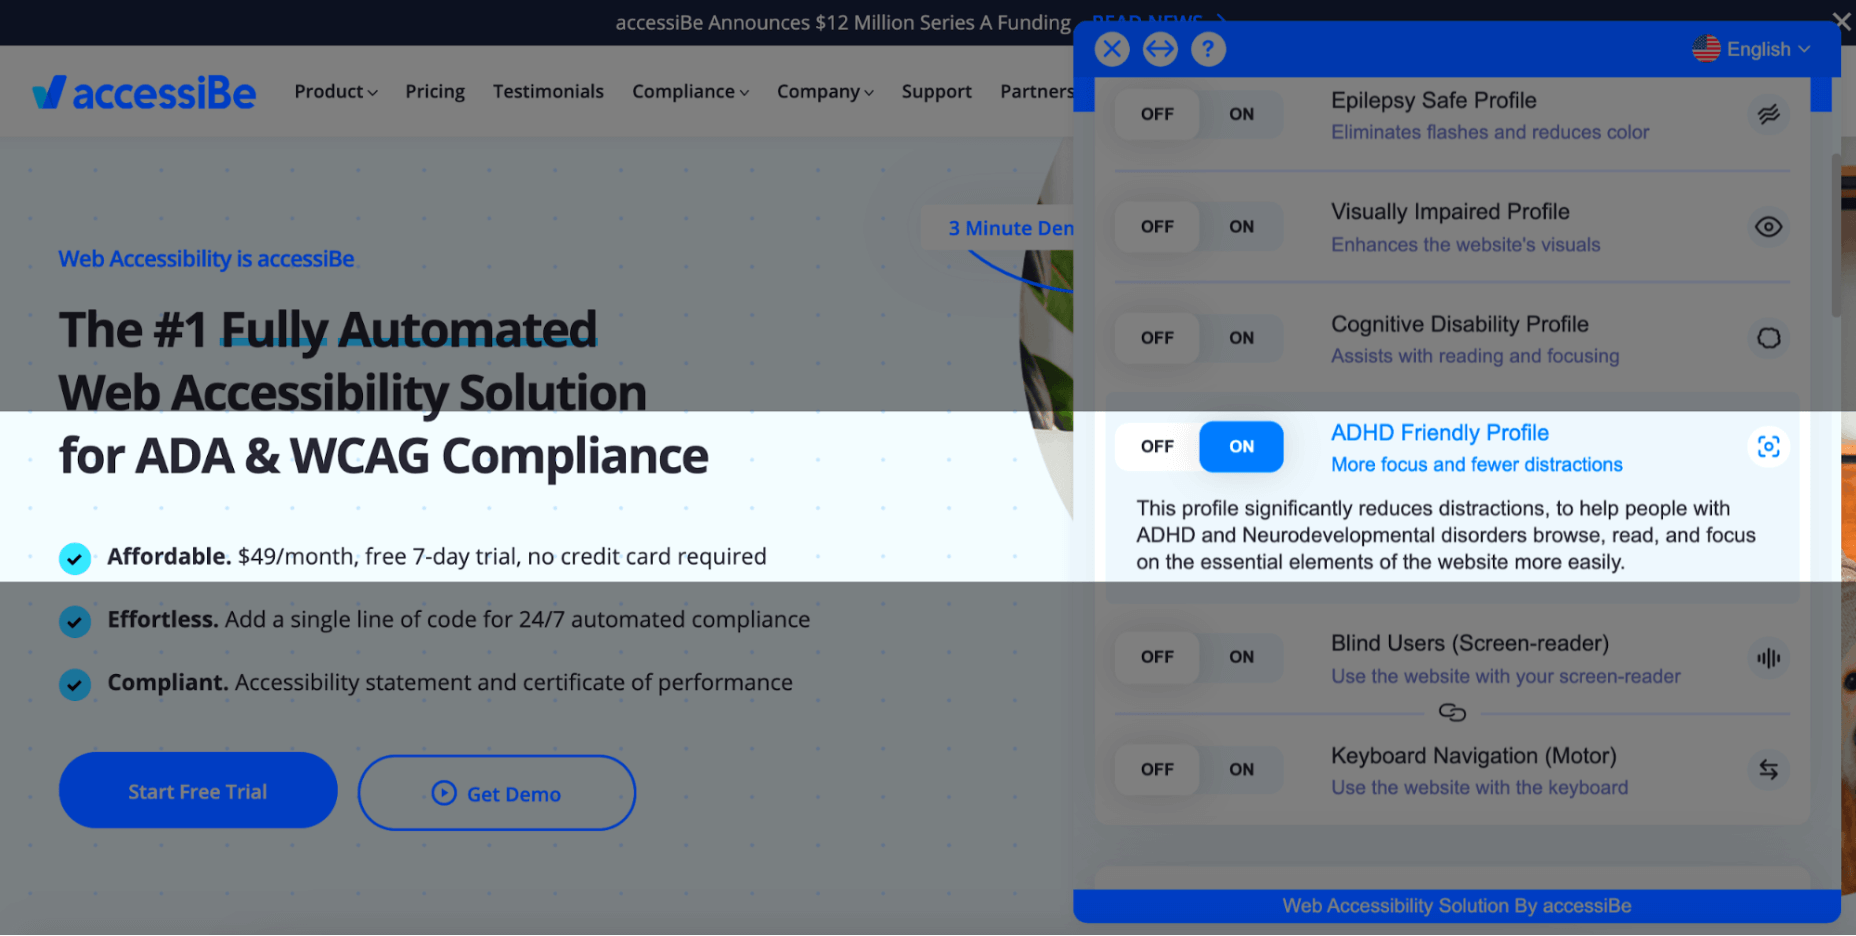
For example, The ADHD Friendly Profile creates a reading mark that follows your mouse movements that diminish distractions and allows better focus:
The Cognitive Disability Profile frames all the elements in bounding boxes and adds an ‘reading cursor’ that acts as your mouse to allow enhanced orientation:
Each of the predefined profiles includes a suite of features that target the unique accessibility needs of the disability; the Epilepsy Safe Profile prevents videos from playing automatically, dims all the colors on your website and eliminates flashing and blinking animations; the Visually Impaired Profile enhances all your website’s visuals, enlarges all fonts to allow most visual impairments conditions (degrading eyesight, tunnel vision, cataract, glaucoma and more) to be able to browse your website with ease.

The last two profiles, Blind Users and Keyboard Navigation, work in unison. They allow blind and motor-impaired individuals to browse and use your website as they are used to, through screen-readers and keyboard functionality, respectively.
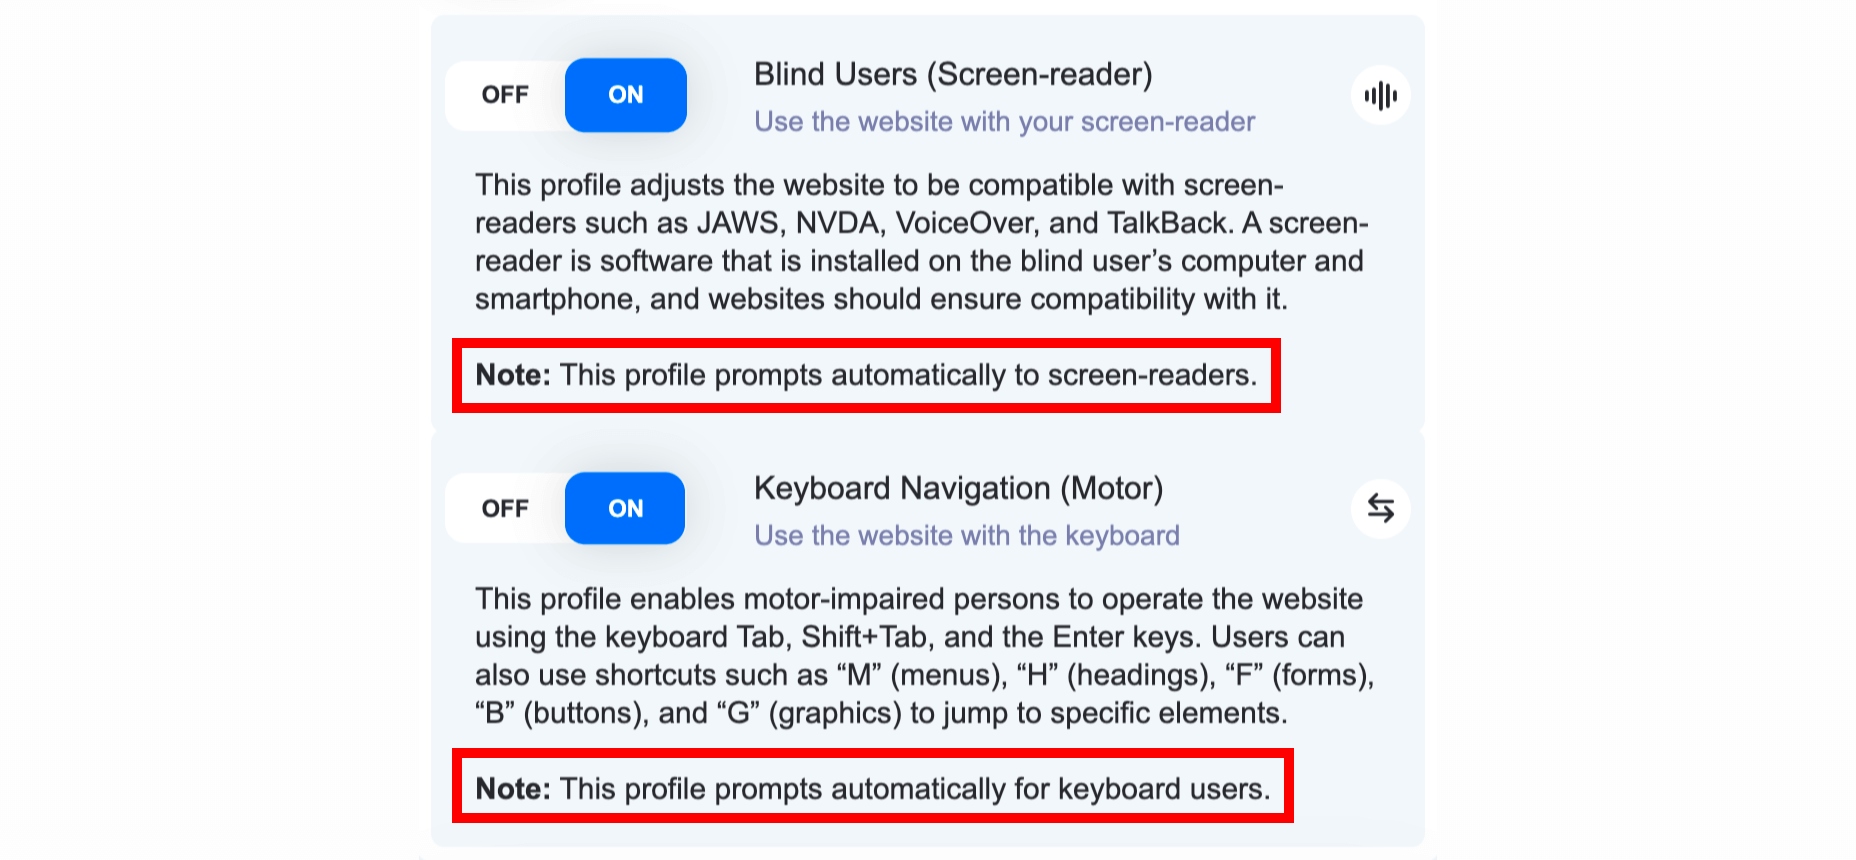
Two things need to be mentioned here:

  1. Blind individuals have screen-readers installed on their computers in the OS-level, meaning, on the hard drive of the computer. They use them to navigate the internet by having the software read for them every text that appears on the screen. As can be seen in the screenshot above, the Blind User profile is ‘launched’ automatically once accessiBe detects that the user is using a screen-reader. This is a crucial functionality since obviously blind users aren’t able to locate the accessibility icon.
  2. The same goes for individuals that are using the keyboard instead of a mouse to navigate the web, both the motor-impaired and the blind. accessiBe detects and automatically enables keyboard navigation on your website.

On top of the predefined accessibility profiles, accessiBe’s interface allows for further adjustments that can be controlled specifically to allow a personalized browsing experience according to the user’s needs. Let’s look at these adjustments.

Accessibility Content Adjustments Explained

The content adjustments allow you to control every aspect of the written content on your website. The menu looks like this:
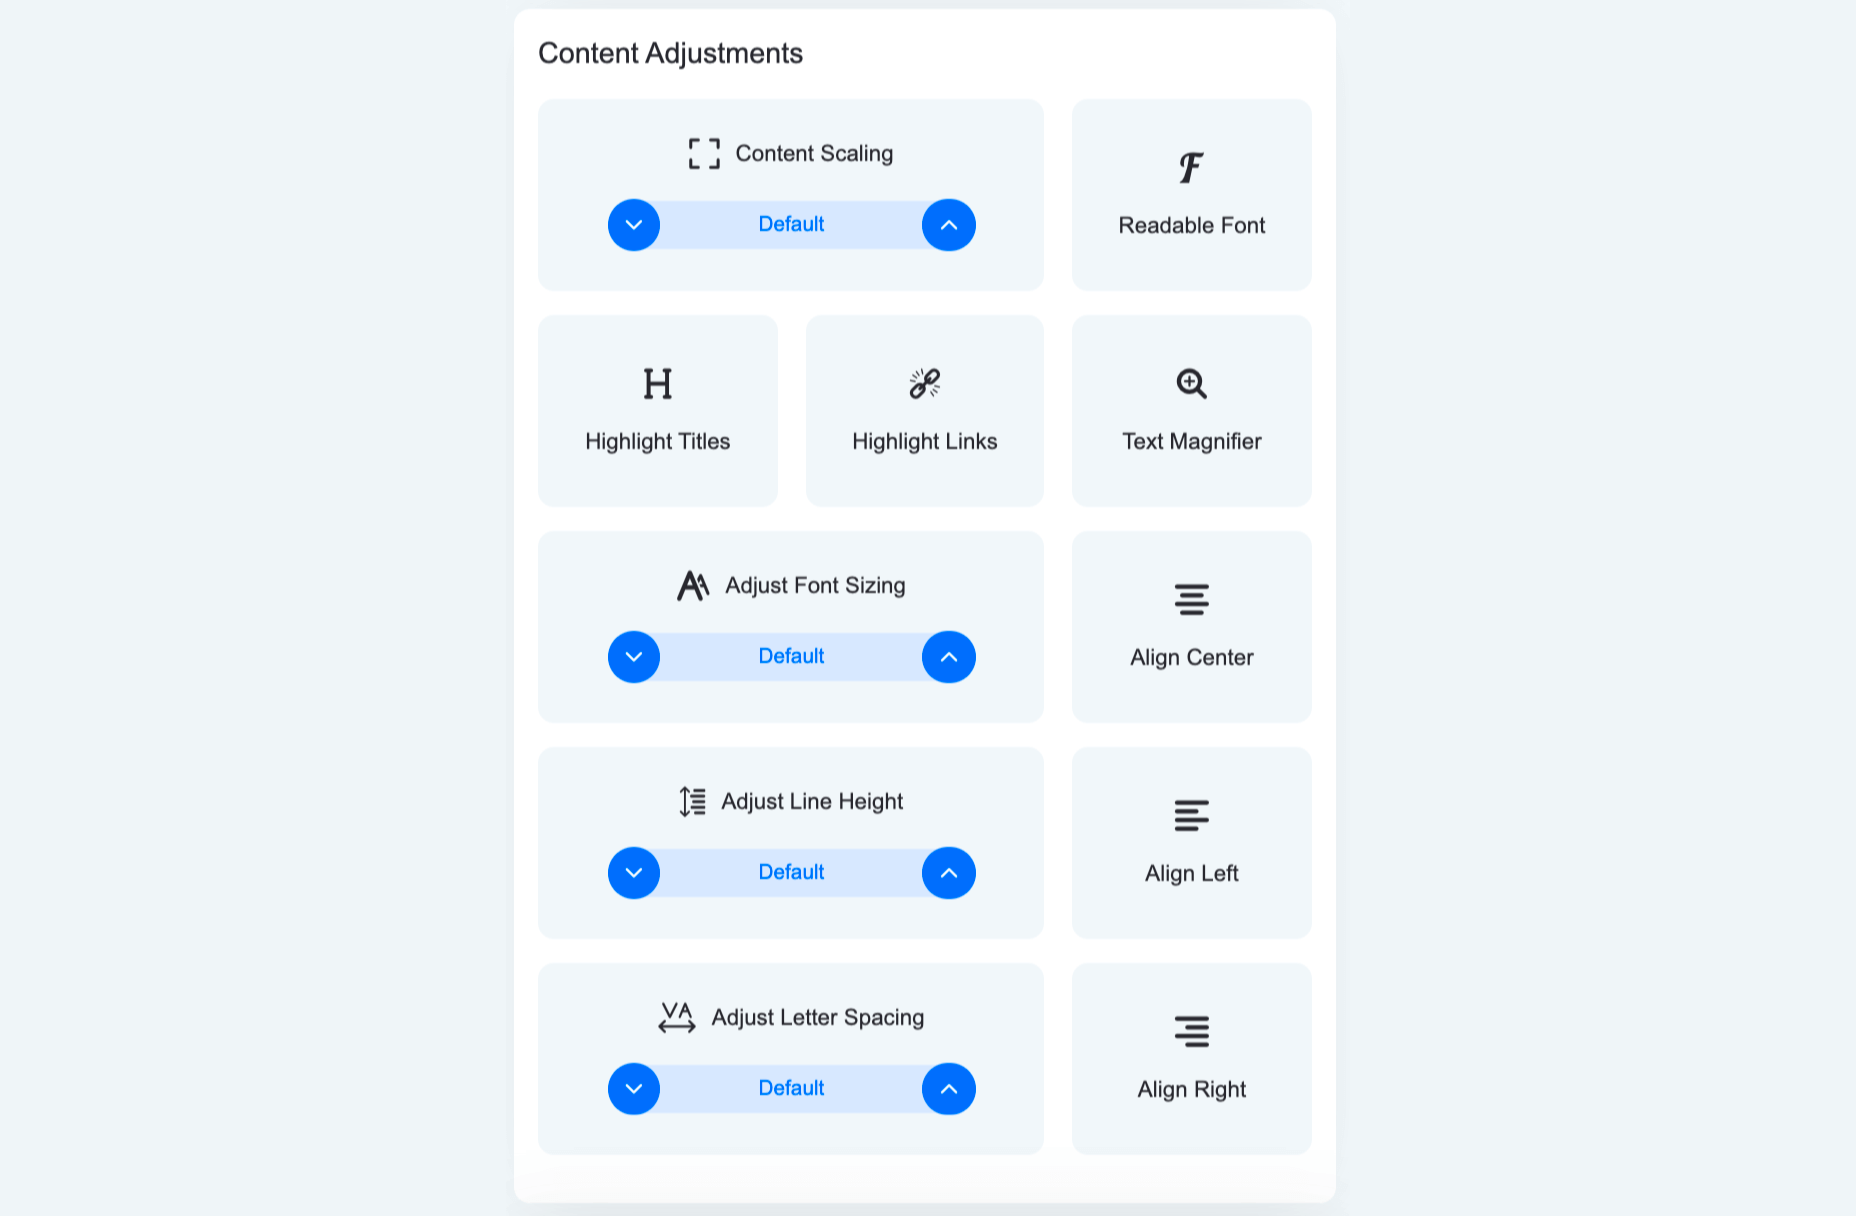
Each of these elements allows for granular control of the way content, or text, is presented. From altering the entire website’s text to a readable, sans-serif font that is easier to follow, to highlighting titles and links, to adjusting font size, the spacing between lines and letters and using a text magnifier that follows your cursor on the screen.

Here’s how it looks with Highlight Titles and Highlight Links turned on:

You can see all the links are highlighted with an orange bounding box while all titles are highlighted with a blue bounding box.

Accessibility Color Adjustments Explained

The color adjustments allows users to control every aspect of the color scheme on the website:
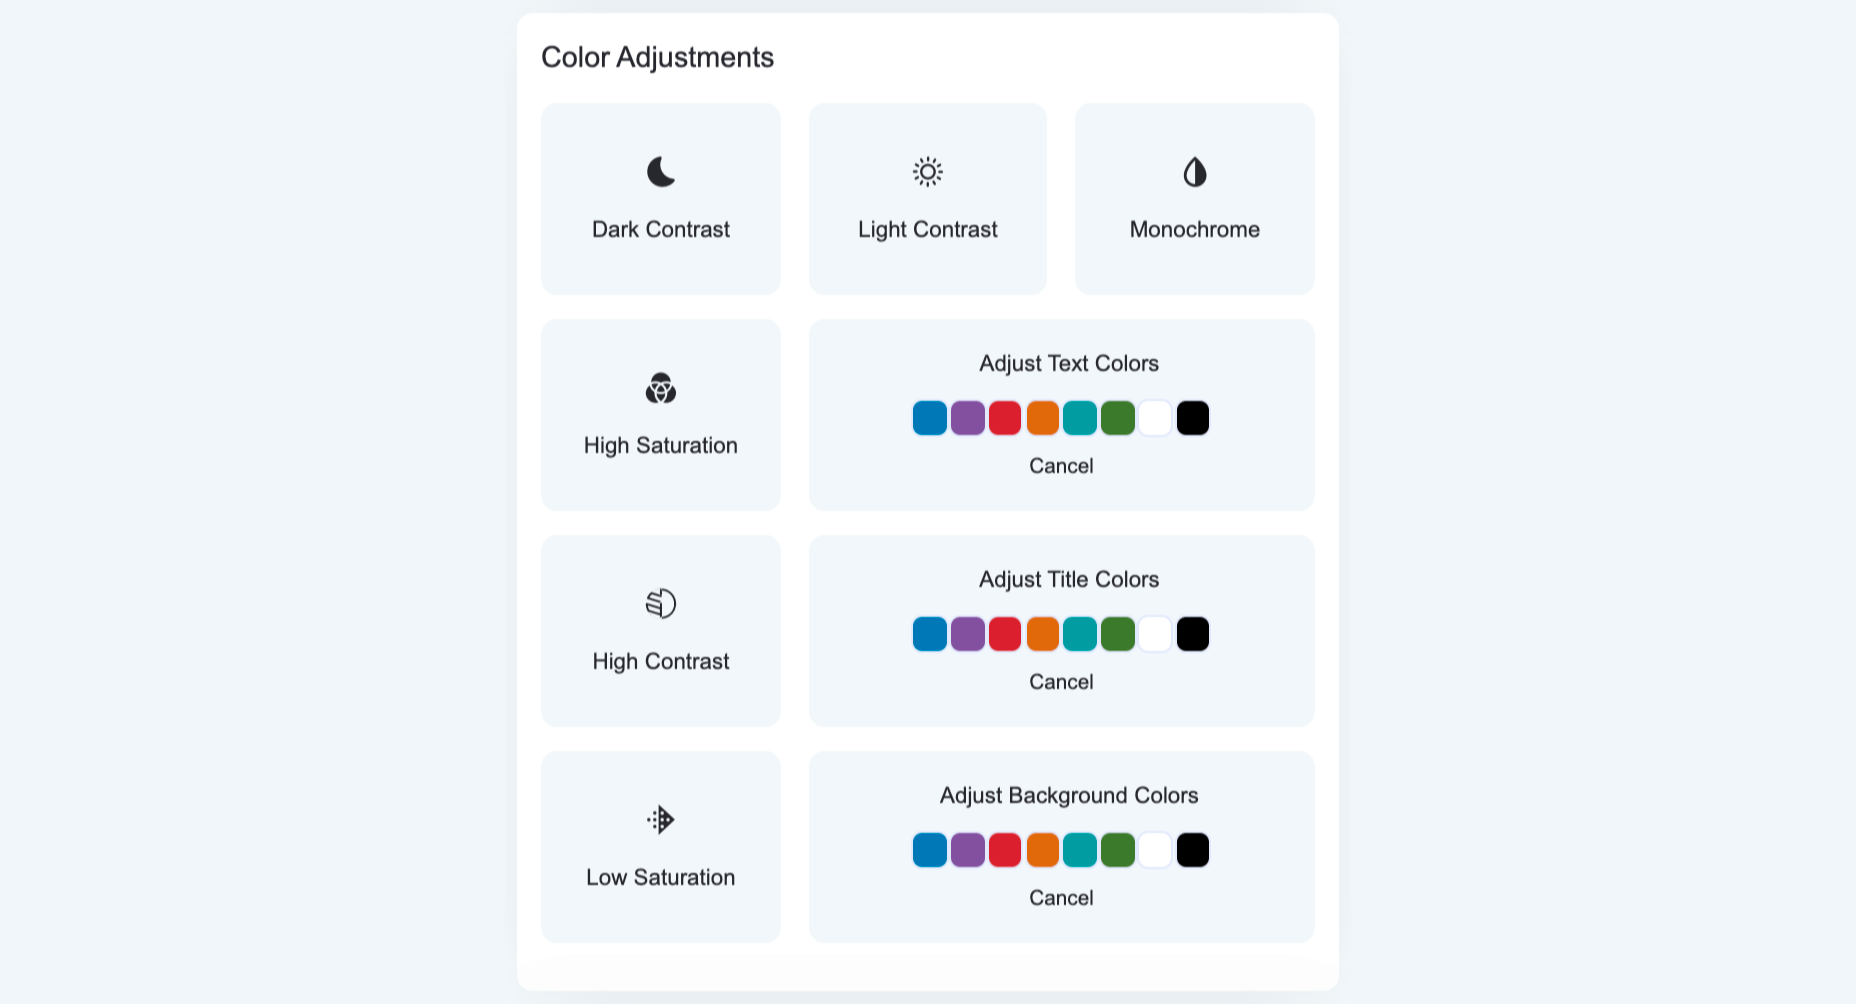
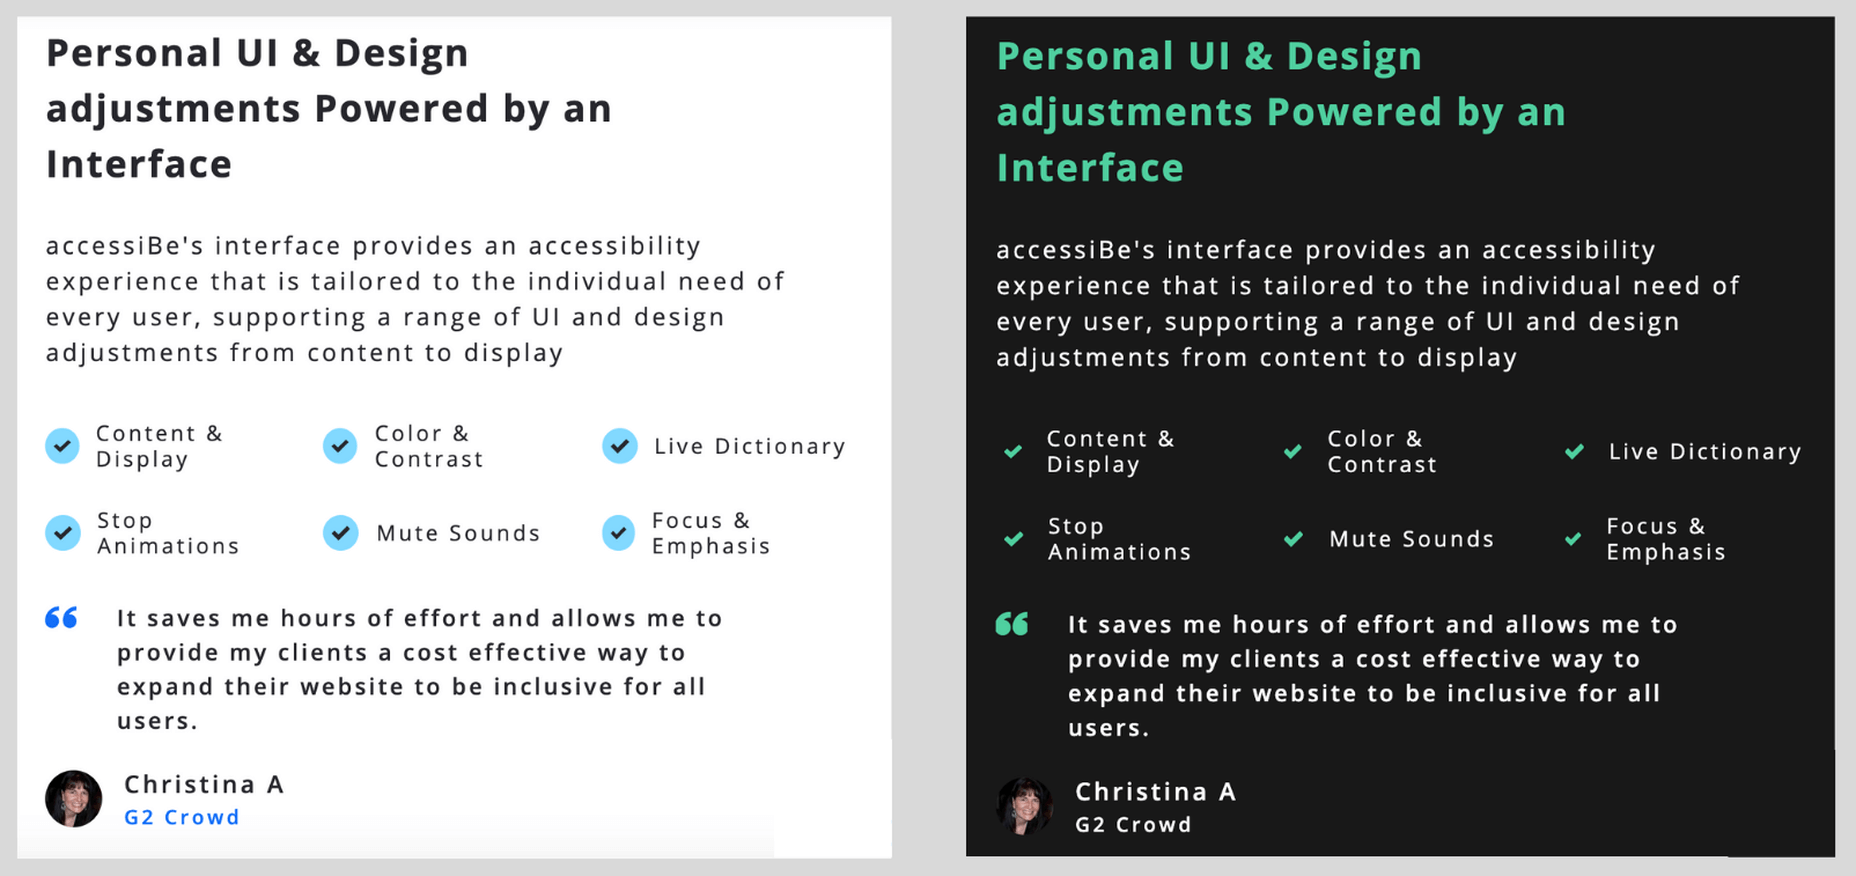
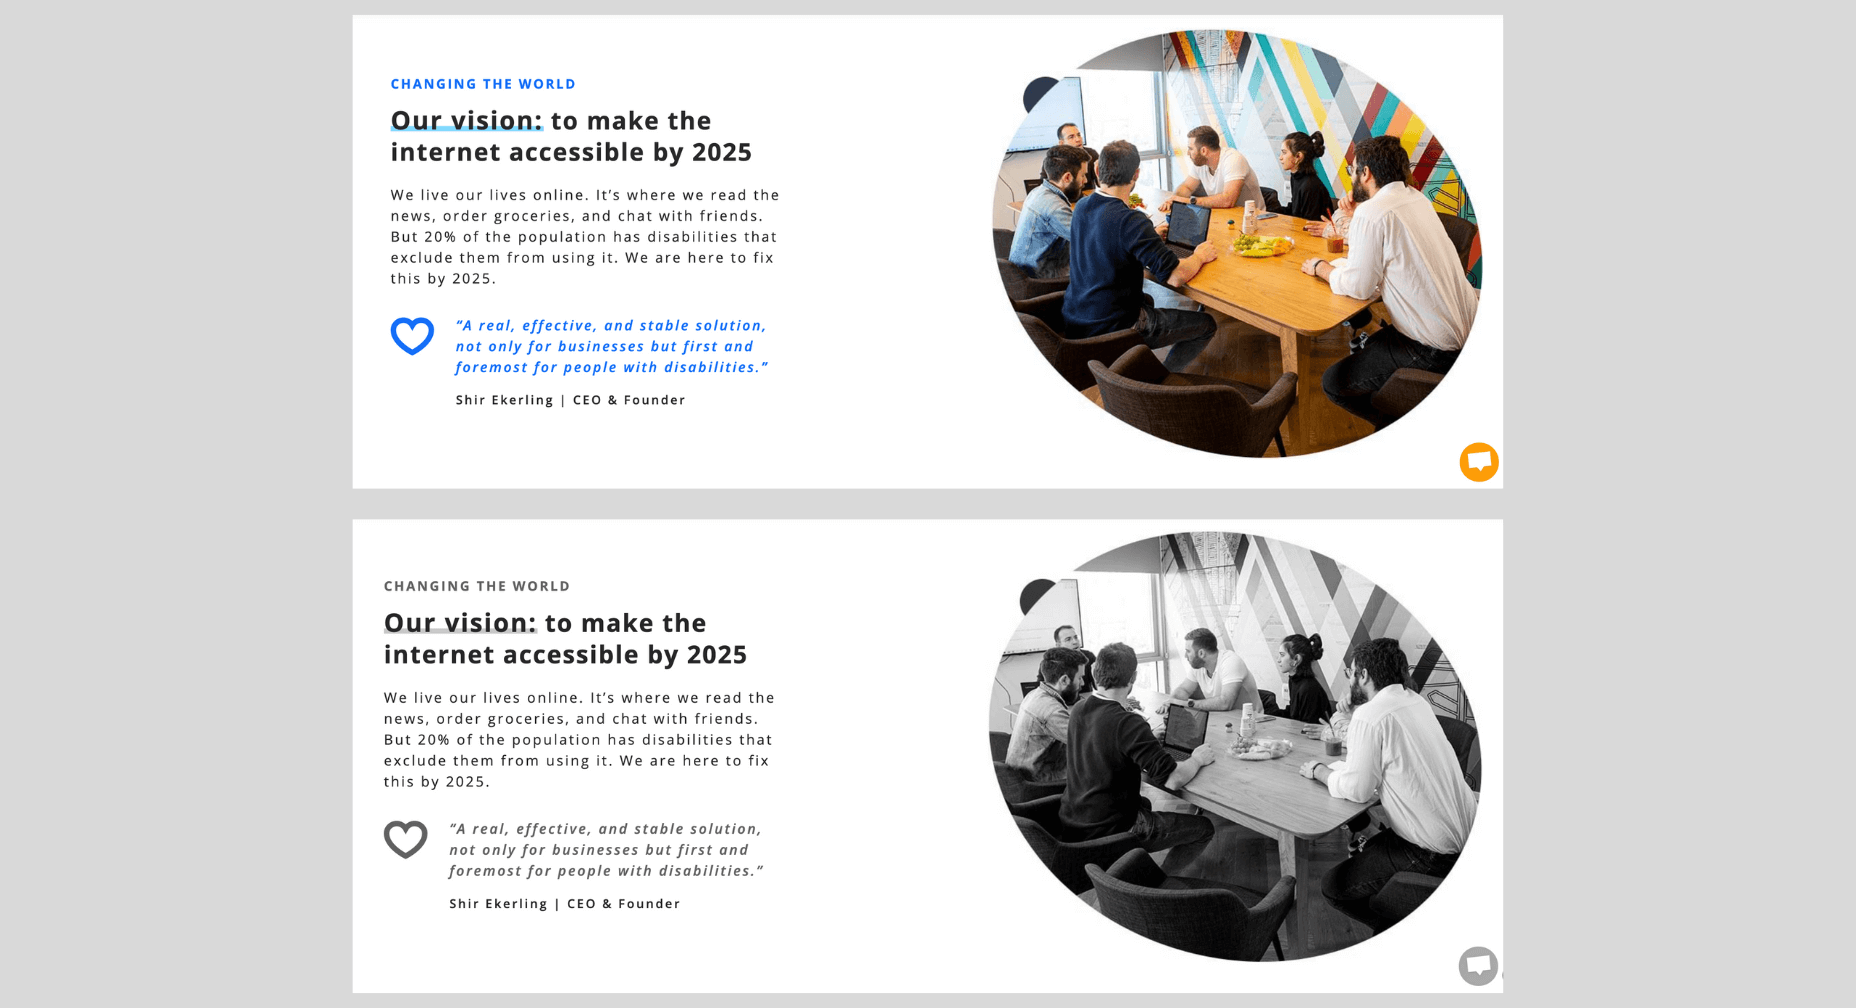
From adjusting contrast and saturation, to switching the entire website to a monochrome color scheme, to adjusting textual elements and background colors. Let’s look at a few examples.

Here’s a side-by-side of default appearance and the Dark Contrast adjustment turned on:
And here’s how it looks with the Monochrome adjustment turned on:
Accessibility Orientation Adjustments Explained

The orientation adjustments allow full control of ‘distractions’ that make it hard for individuals with epilepsy, ADHD, and cognitive disability to browse the web:
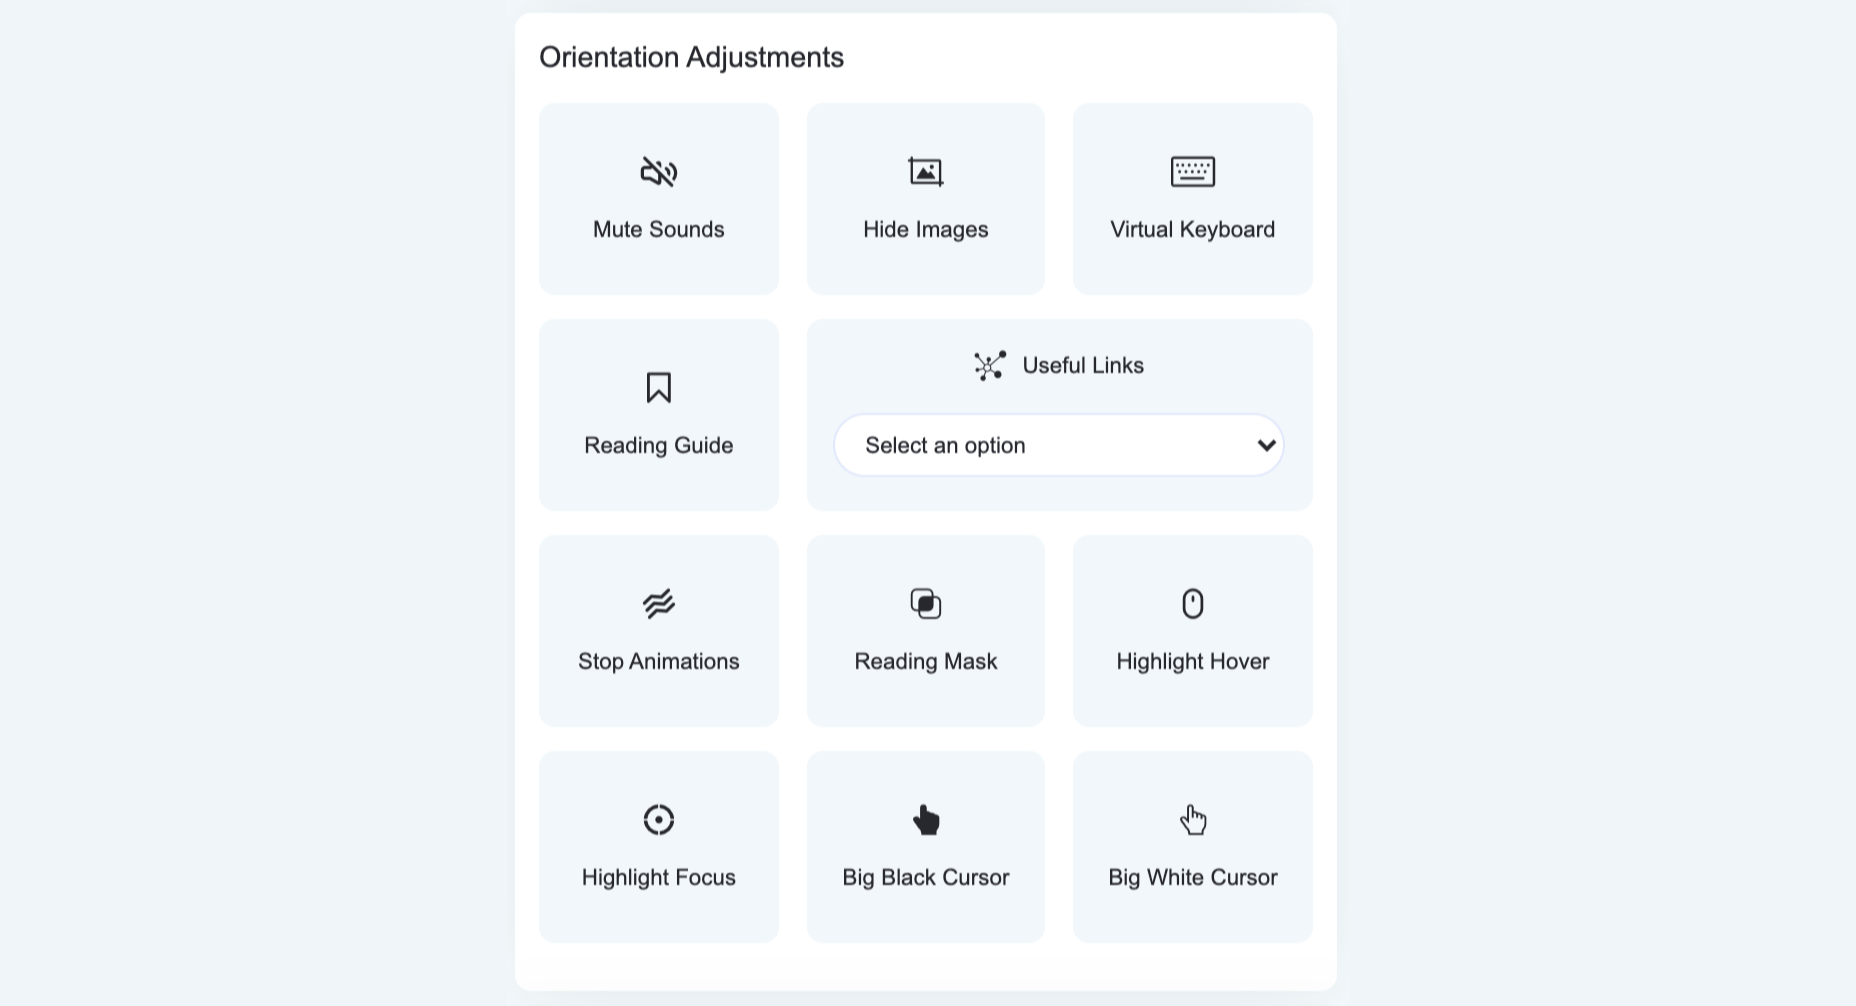
As such, the orientation adjustments allow users to mute sound, hide images, stop animations and additional ‘focus’ features such as an enlarged cursor and reading assistance that highlights the text being read.

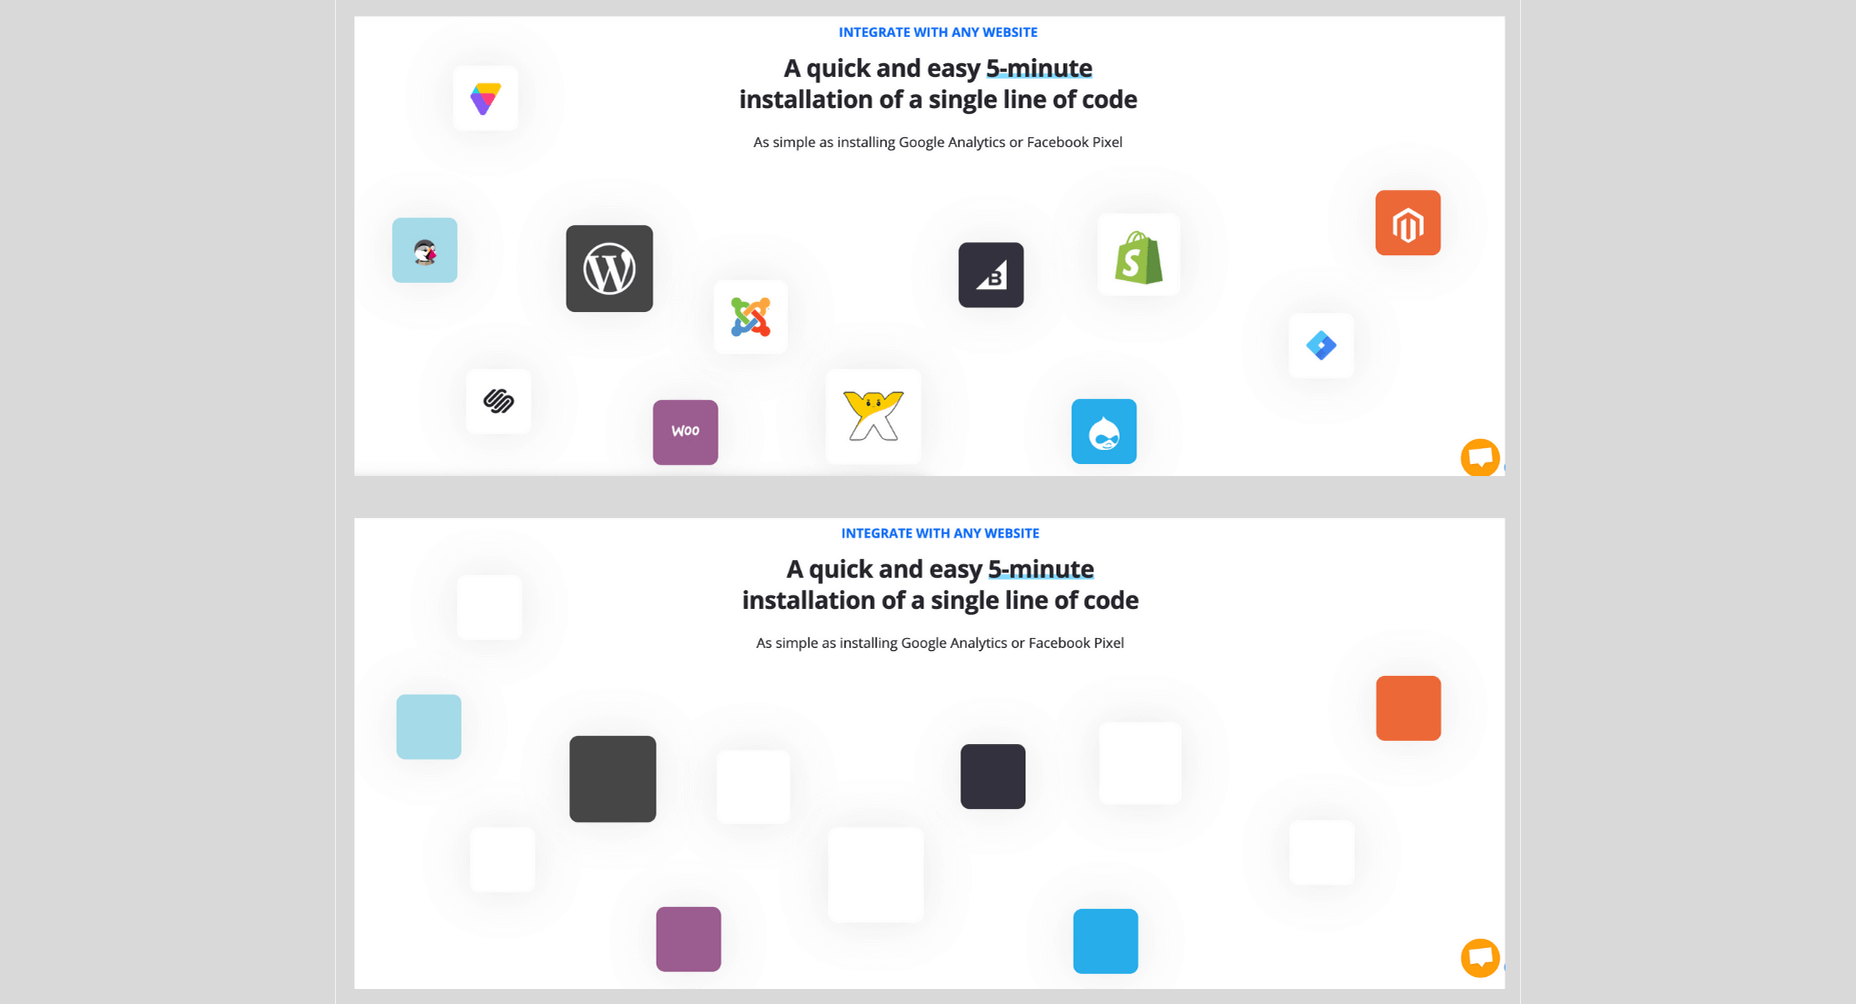
Here’s how the Remove Images adjustment works:
accessiBe Back End Features

Unlike ‘accessibility plugins’ (more on that later) accessiBe provides a comprehensive back end treatment to your website – automated, AI-powered analysis of compatibility with accessibility requirements and fixing of the elements that need adjustment.

It should be noted that 70% of the WCAG compliance requirements deal with screen-reader and keyboard navigation compatibility and all these requirements are not answered by installing an accessibility interface widget that merely makes UI and design adjustments.

For example, an accessibility widget will enable you to enlarge the font on your website, to adjust the saturation or to highlight links, but it won’t enable a blind individual to differentiate between a shopping cart icon and a checkout icon, nor will it enable a motor impaired individual to easily navigate a menu.

This is a crucial consideration to make when choosing a web accessibility solution. Being WCAG compliant is a YES / NO situation. Your website is either compliant or it’s not, there is no middle ground here.

accessiBe’s back end features come to solve and answer all these compatibility issues that enable full screen-reader and keyboard navigation functionalities.

Screen Reader Compatibility Explained

Screen Reader is a software for blind individuals to use computers and browse the web. As the name suggests, the software reads aloud what is seen on the screen for blind individuals.

The screen reader software is installed on the computer. But in order for it to work with websites, the website needs to be compatible with the software. To achieve compatibility with screen reader software, WCAG requires that a website should adhere to a set of attributes called Accessible Rich Internet Applications (ARIA) that are installed within the website’s code, allowing it to ‘communicate’ with the screen reader.

Let’s take social icons as an example. We are all familiar with those icons – Facebook, Twitter, Instagram – they are instantly recognizable for us visually. A screen reader software doesn’t actually ‘see’ elements on the screen, rather it scans the website’s code to understand what appears on the screen. As such, a Facebook icon code simply says ‘link’ and has the URL that directs the user when clicking the link.

So with a website that isn’t compatible with a screen reader, that doesn’t have ARIA tags implemented, the screen reader will read to the blind person “link” for the Facebook icon; not very helpful, is it?

When ARIA tags are implemented, additional information is added to the Facebook icon – and any other visual link on the website – that describes what is the link. So the screen reader will read to the blind person “Facebook link”.

It’s not difficult to imagine the scope and effort of the work needed in order to implement ARIA tags on your entire website.

Keyboard Navigation Compatibility Explained

Keyboard navigation means that motor-impaired individuals are using their computers only through their keyboard, rather than a mouse. Scrolling, clicking links and menu buttons, opening and closing tabs – everything is done using designated keys.

There are many issues relating to keyboard navigation as today’s websites are highly complex, layered with content elements, and react dynamically to user behavior. Any element of the website must be compatible to allow full keyboard navigation.

Let’s look at a popup as an example.

Popups can be triggered for a variety of reasons. For mouse users, it is a simple occurrence; you can bring the cursor to the area of the popup, click on one of the fields to input details or click the X to close the popup.

But how do you handle the popup using only the keyboard? How do you differentiate between ‘regular’ functionalities of the website and that of the popup? How do you ‘shift the focus’ of the keystrokes to a layered element? You need to allow unique keystrokes to operate the popup, keystrokes that are activated only when a popup appears.

It’s one example of the many challenges making your website compatible with keyboard navigation. The list of WCAG requirements for compatibility with keyboard navigation is a long one, and understandably so as it needs to enable motor-impaired individuals to navigate your website with the same ease as the rest of us using a mouse.

How accessiBe’s Background Processing Achieves Screen Reader and Keyboard Navigation Compatibility

Without getting too technical, what accessiBe does is scan the entire code of your website and adds keyboard functionalities and ARIA tags to various elements on your website directly. It won’t interfere with your site’s code, but rather add an additional ‘layer’.

accessiBe’s AI ‘learned’ all of ARIA’s tags and keyboard functionalities required by WCAG and when scanning your website’s code implements all the required adjustments to achieve full compliance.

How accessiBe Makes Menus Accessible

Menus are a good example for understanding what the accessiBe background processing does and the benefits it provides.

We recognize menus on websites instantly, because we saw thousands and thousands of them. We know how they look, we know what their functionality is, and we know where to hover and click in order to reach the various pages of the website.

But if you remember, we said that screen readers don’t ‘look’ at the screen, but rather scan the site’s code to understand structure, identify links and read them aloud with all the text that appears on the page.

So menus are coded as a list structure, because in a way they are. A screen reader will announce a menu as a list, which might be confusing for a blind user. Additionally, many menus have drop-down sub-menus, accessible via a hover or by clicking a little triangle. Without proper ARIA tagging, a screen reader will miss the sub-menu.

What accessiBe does is adding readable tags for every element in the menu so a screen reader will recognize and announce each element properly. The ‘list’ code structure will get a “menu” tag, and the sub-menu will get a tag for ‘sub-menu’, thus allowing the blind individual to utilize the full functionality of the website.

Additionally, accessiBe alternates the tags on-the-fly while the site is being browsed. Once a sub-menu has been opened, a tag that says “sub-menu open” will be added to indicate to the screen reader what has happened, and will be changed with the tag “sub-menu close” once the sub-menu has been closed.

Image Recognition

One of the key elements of accessibility compliance with screen readers is to provide accurate alternative descriptions for images, known as alt text.

accessiBe utilizes various image, object and character recognition technologies (OCR and Iris) to provide highly descriptive and accurate depictions of images displayed on the website. Without adding screen-reader compatible alt tags to images a blind individual would simply not be aware of the existence of images, and miss out on the information usually displayed on images.

Let’s look at the following banner images from an e-commerce website:

As you can see, valuable information is communicated via the images – sales and discounts – the kind of information any shopper would want to know.

This is the descriptive text that accessiBe’s AI assigned to these images, completely automated with no human intervention (from left to right):

  • Image contains: shopping,  shorts, woman, ashion; image text: extra 50% off shorts
  • Image contains: shopping, red top, woman, jeans, fashion; image text: 50% off bottoms
  • Image contains: shopping, blue jumpsuit, woman, fashion, bed, ; image text: 50% off jumpsuits & rompers
  • Image contains: shopping, shoes, ocean, woman, fashion; image text: 50% off shoes

Again, doing this kind of work for the hundreds to thousands of images that are displayed on every e-commerce website requires a lot of time and effort. accessiBe achieves this in a completely automated way, and every image added to your website instantly gets its alt text.

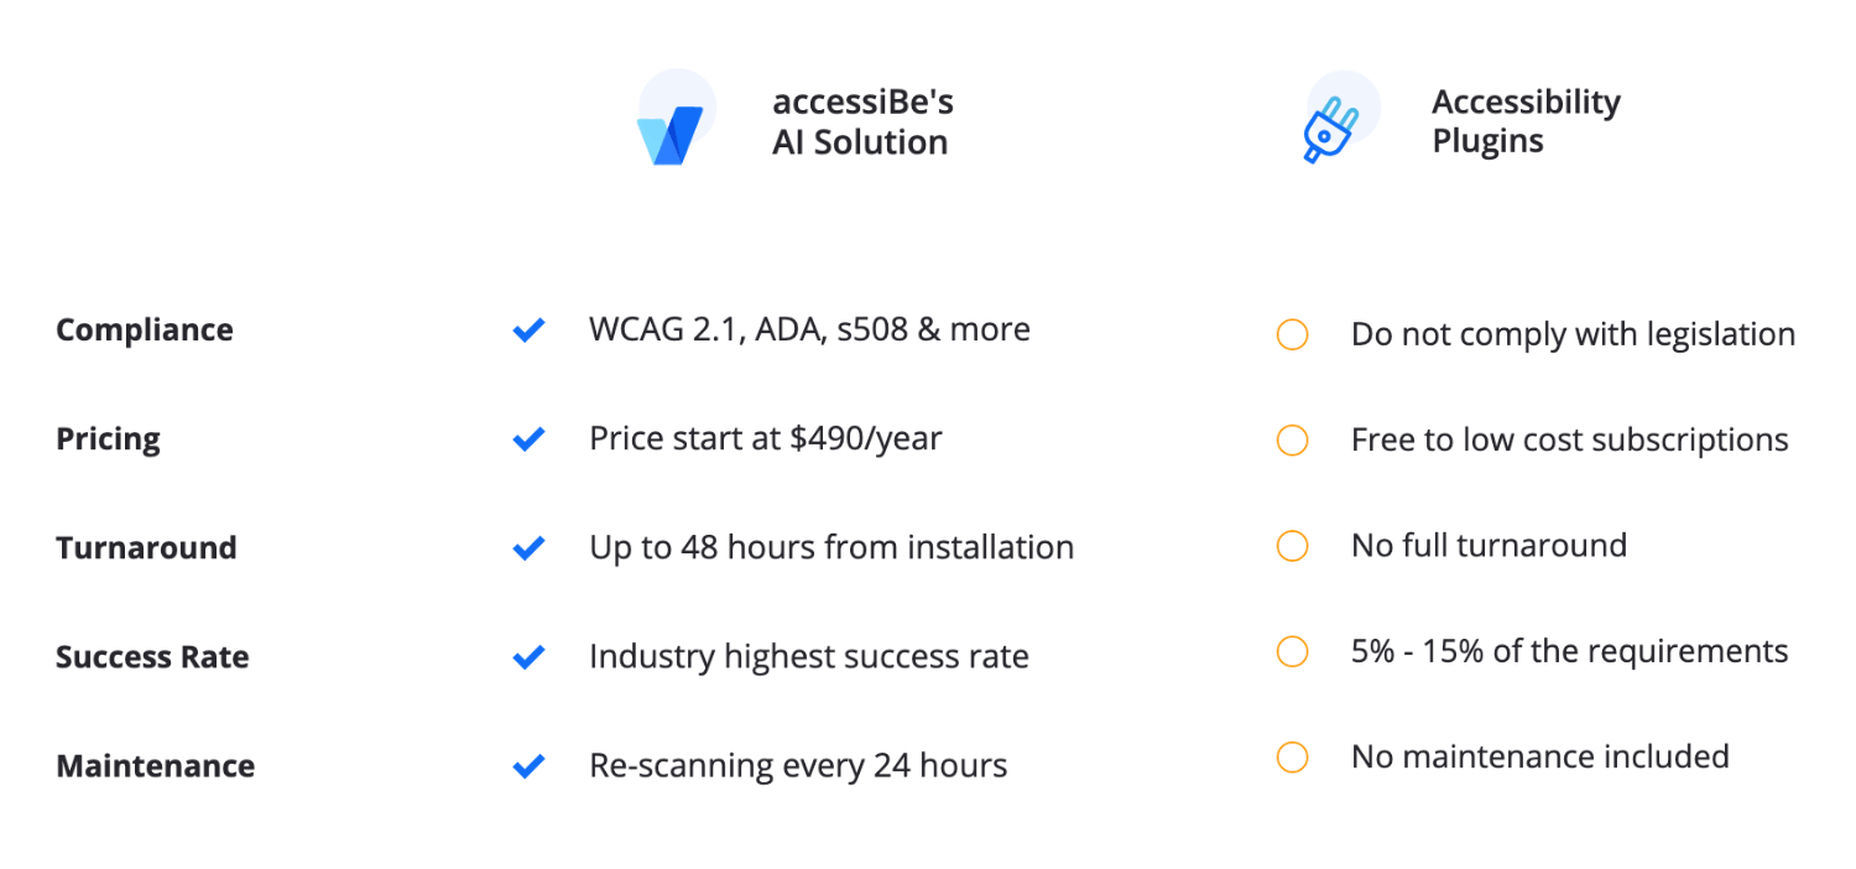
Comparison of accessiBe with Accessibility Plugins

There are many web accessibility plugins out there. They offer a ‘quick fix’ for ADA and WCAG compliance – add an accessibility menu and you’re done.

As tempting as it may sound, the distinction between an accessibility menu and being fully compliant must be made.

As we’ve mentioned earlier, there are two parallel tasks that need to handle in order to achieve ADA and WCAG compliance:

  • Front end – UI and design adjustments, achieved by the Accessibility Interface (the visible menu for content, font, color and orientation adjustments)
  • Back end – screen-reader and keyboard navigation compatibility, achieved by implementing ARIA tags and further code adjustments

Reminder: 70% of accessibility compliance requirements deal with back end adjustments, meaning, screen-readers, and keyboard navigation compatibility.

Accessibility plugins, whether free or paid, only answer the front-end requirements. Meaning, after installing an accessibility plugin, you are just 30% compliant. Since accessibility compliance is not a scale (you don’t ‘get points’ for making it halfway through) you’ll need to turn to an additional provider to do the back end work.

accessiBe, on the other hand, provides a full accessibility compliance solution, covering both UI and design requirements through the accessibility interface AND screen-reader and keyboard navigation compatibility requirements through it’s automated AI technology that analyzes and makes adjustments in the code-level of the website.

Benefits of Using accessiBe Over Accessibility Plugins

  • Achieving complete accessibility compliance
  • Dealing with a single provider, rather than two or more
  • Cost-efficiency (manual audit and remediation service are expensive)
  • Complete compatibility with screen-readers and keyboard navigation
  • Enabling true accessibility to individuals with disabilities
Comparison of accessiBe with Manual Accessibility Services

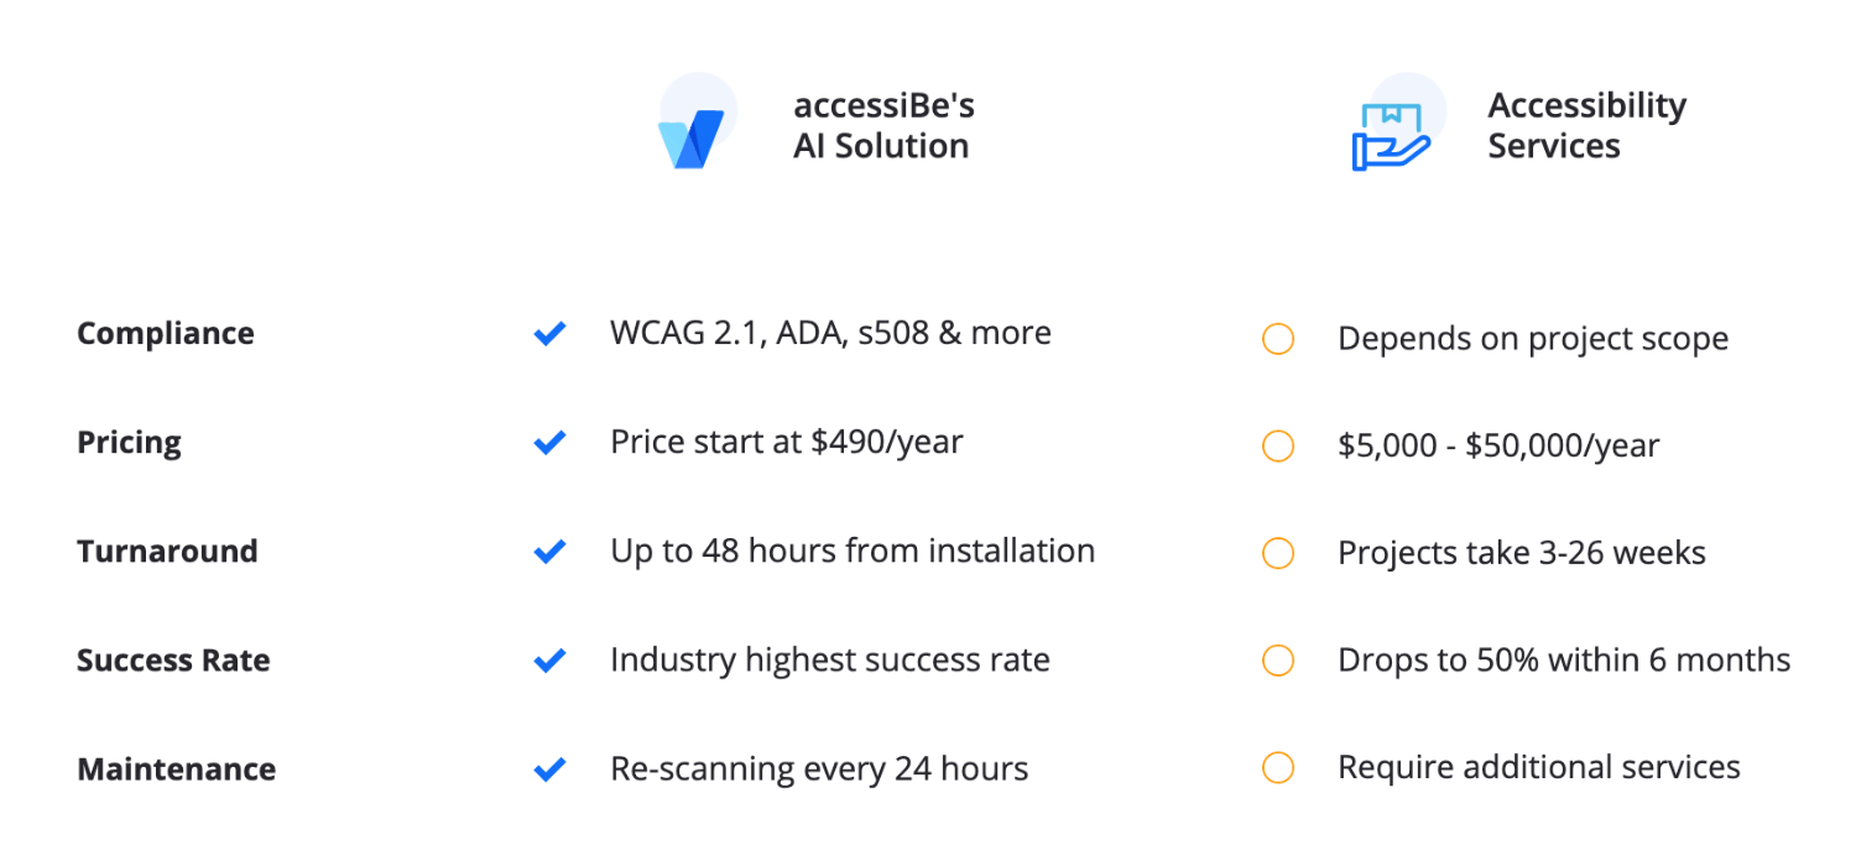
Manual accessibility services can help you achieve full accessibility compliance, but it comes with two major disclaimers:

  1. You’ll still need an additional solution for an accessibility interface, which the service companies don’t provide
  2. The compliance achieved is for the point in time the audit and remediation were performed. Let’s explain this point further.

Companies that offer a manual accessibility service assign a team of accessibility experts to do an audit of your website. The result of this audit is a lengthy document detailing all the accessibility faults that your website has. It is a valuable document as it gives you a precise depiction of what needs to be fixed in order to achieve compliance.

From here there are two possible paths:

You can either take the audit results to your development team and have them remediate your website accordingly.

Or, some of the service companies offer a remediation service, meaning, they’ll assign their own engineers to manually make the necessary changes in your website. Needless to say this extra service isn’t given for free.

In both cases, you are looking at a process that takes weeks if not months (depending on the number of pages your website has.)

Additionally, since it is a manual process done by experts, it comes with a hefty price tag.

But most importantly, the audit and remediation hold for the time they were done. Unless you have a 100% static website, meaning, you do not make any changes to your website – never add or remove products, never update content – the ‘effect’ of the audit and remediation fades away with time.

Since the process was manual, any changes you make to your website must be handled manually accessibility-wise. You added a new banner with a link to items on sale, you’ll need to go into the code and add ARIA tags. You added a new image, you’ll need to go into the code and add alt text compatible with screen-readers. And so on.

Some of the manual accessibility service companies offer maintenance services as well. They will periodically audit your website (manually) and provide a remediation document that will need to be implemented (manually) either by your development team or by theirs for an additional cost.

These costs add up. Having your website audited and remediated for compliance on an ongoing basis takes time, effort, and money. But you don’t have a choice. Being ADA and WCAG compliant is an ongoing task, since websites are dynamic and being updated regularly.

accessiBe, on the other hand, offers a 100% automated and ongoing compliance solution. The initial audit and remediation process is carried out – with no human intervention – in 48 hours (compared to weeks or months by a manual provider). Then, your website is scanned every 24 hours to identify and fix accessibility issues using accessiBe AI technology. Meaning, compliance maintenance is constantly carried out ‘in the background’ keeping you ADA & WCAG compliant at all times.

Which brings us to another crucial point regarding manual accessibility services. They make it extremely hard for you to scale up. Every business has a constant aim to grow, but with a manual accessibility service, scalability becomes a pain point. The more you grow the more time, effort and money you need to put in to remain compliant. You want to add another section to your website, you want to launch an additional website? Using a manual accessibility service will hold you back. You’ll need to account for additional time before going live to manually enable accessibility and additional funds. For fast-moving companies, time becomes a serious burden.

Since accessiBe offers an automated and ongoing accessibility solution, scalability is not an issue.

Benefits of Using accessiBe Over Manual Accessibility Services

  • Time-efficient
  • Cost-effective
  • 100% automated
  • Ongoing compliance
  • Infinite scale
  • Single provider for full compliance (front end and back end)
How to Check Your Web Accessibility Compliance Level

Before you get started on your path to being ADA & WCAG compliant it’s important to understand the current state of accessibility your website provides.

Obviously, if you’ve never taken any steps to make your website accessible to individuals with disabilities, there’s no need for this – your website isn’t accessible in any way.

This is actually highly important if you have taken steps to make your website accessible, like for example, installing one of the accessibility plugins. You might be under the impression that by doing so your website is both compliant and accessible to individuals with disabilities.

There’s a simple and quick way to face the accessibility reality.

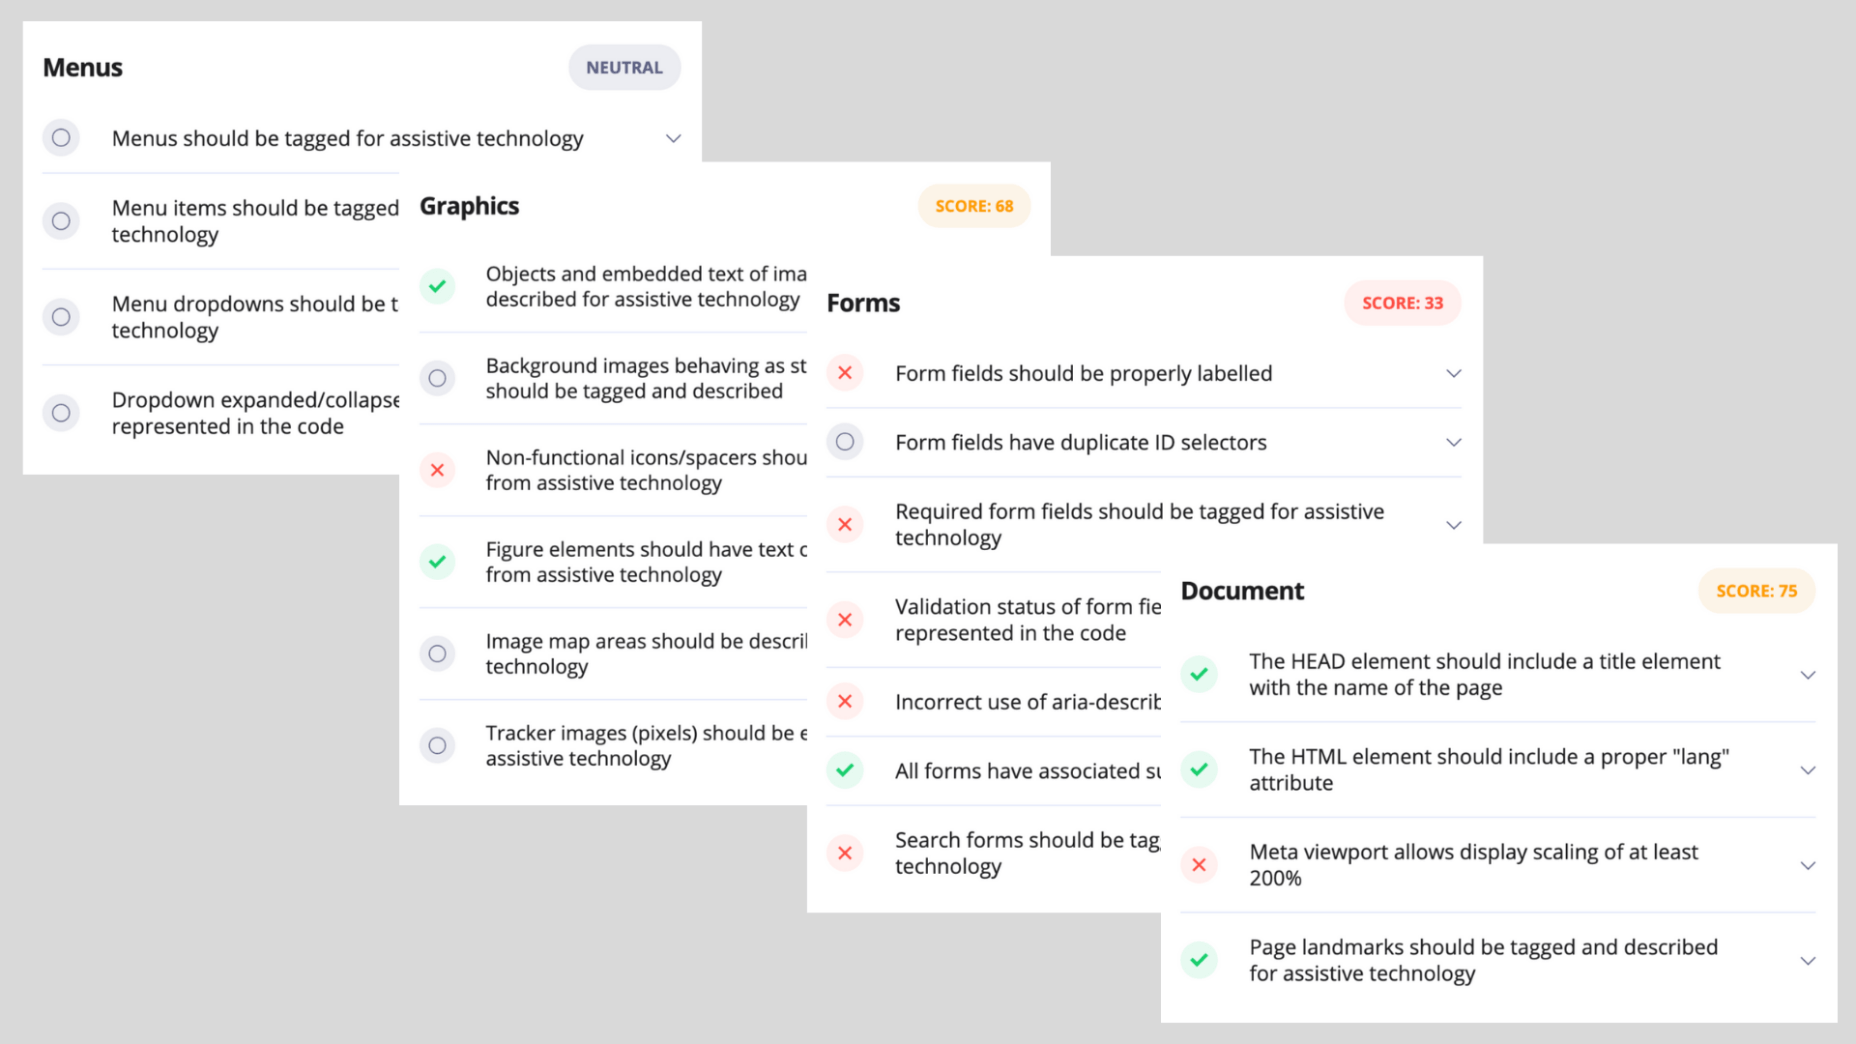
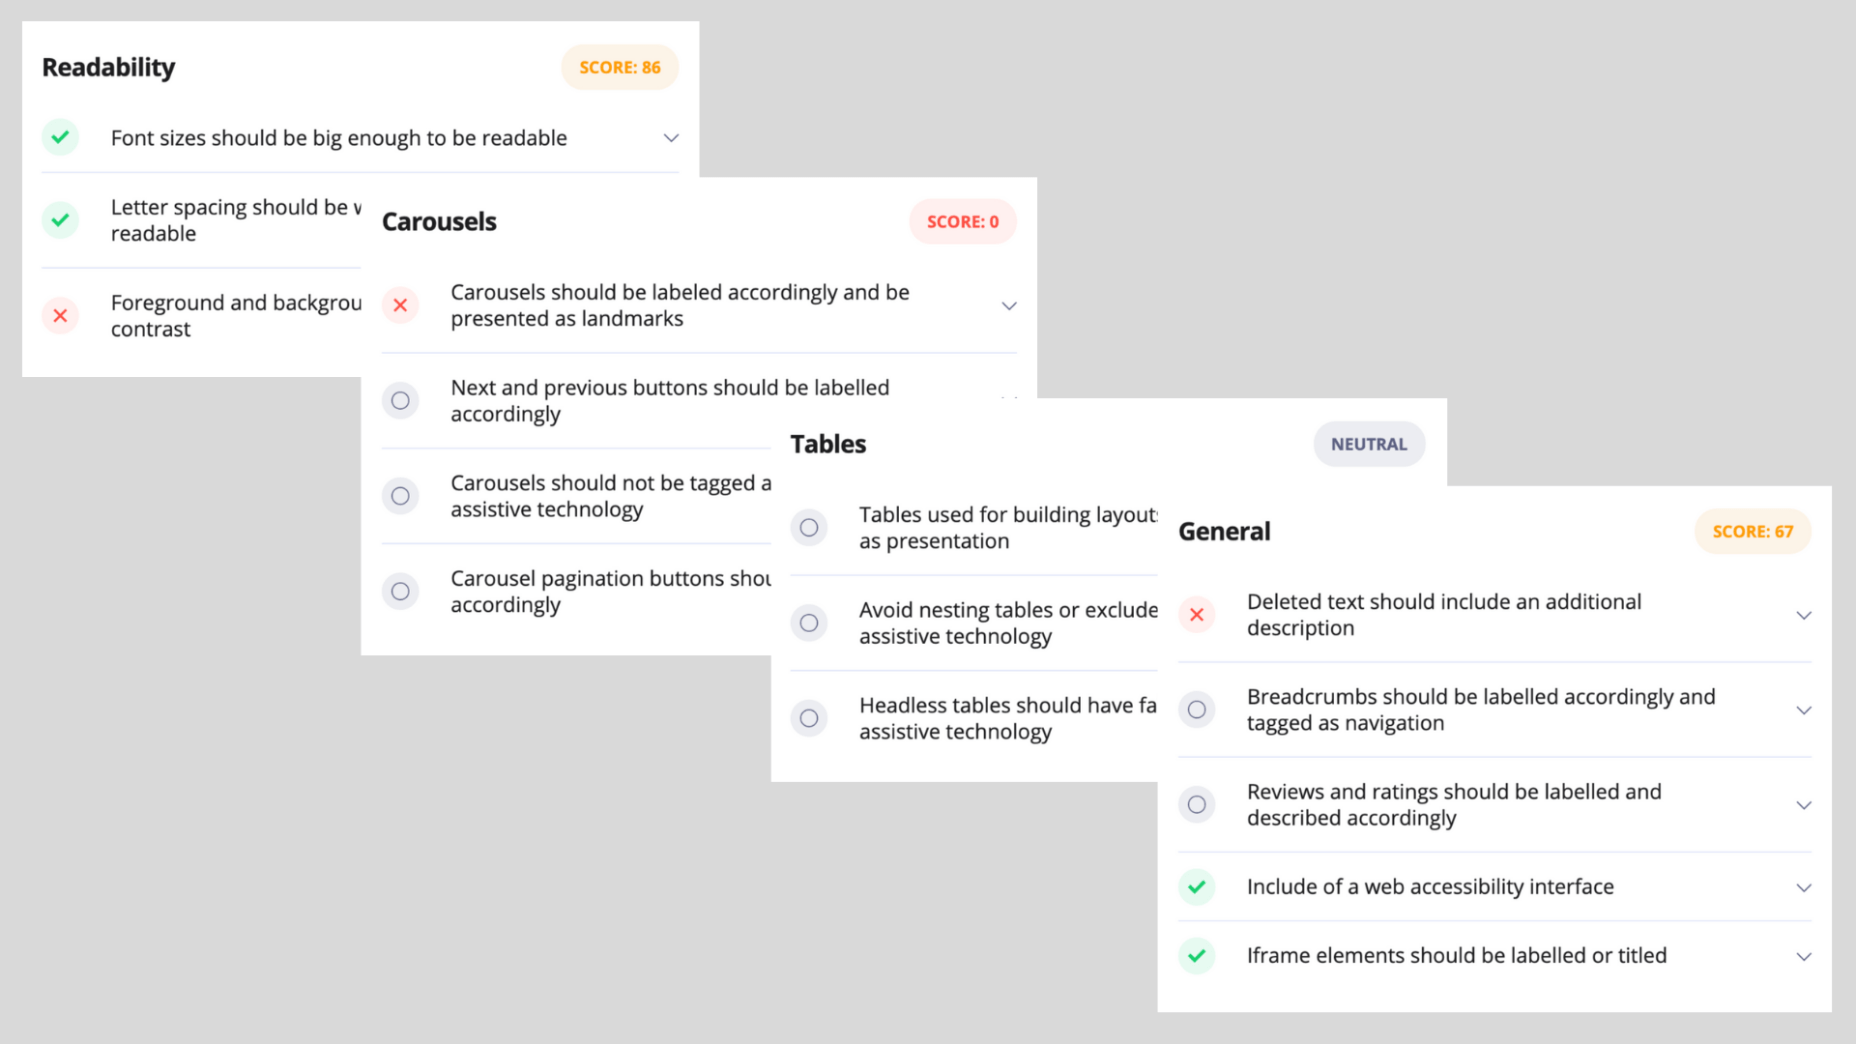
accessiBe offers a free, automated compliance audit tool available online named aCe. It uses accessiBe AI technology to scan your site, detect accessibility issues and provide quite a detailed report on the various elements that impact your website’s accessibility, and those include:

  • General score
  • Clickables
  • Titles
  • Orientation
  • Menus
  • Graphics
  • Forms
  • Documents
  • Readability
  • Carousels
  • Tables

Each of these elements is given a score and some explanations to the specific issues that need attention within the context of these elements.

In addition to gaining a compliance audit with the remediation steps needed to be taken in order to fix these issues, aCe gives you a very clear idea of where you stand and what needs your attention in order to achieve compliance.

We gave it a try. We ran a website that has installed one of the accessibility plugins (which was recognized, by name, by the aCe audit tool) and the results cement the point that these plugins aren’t comprehensive enough of a solution for true ADA & WCAG compliance.

Here are the results:
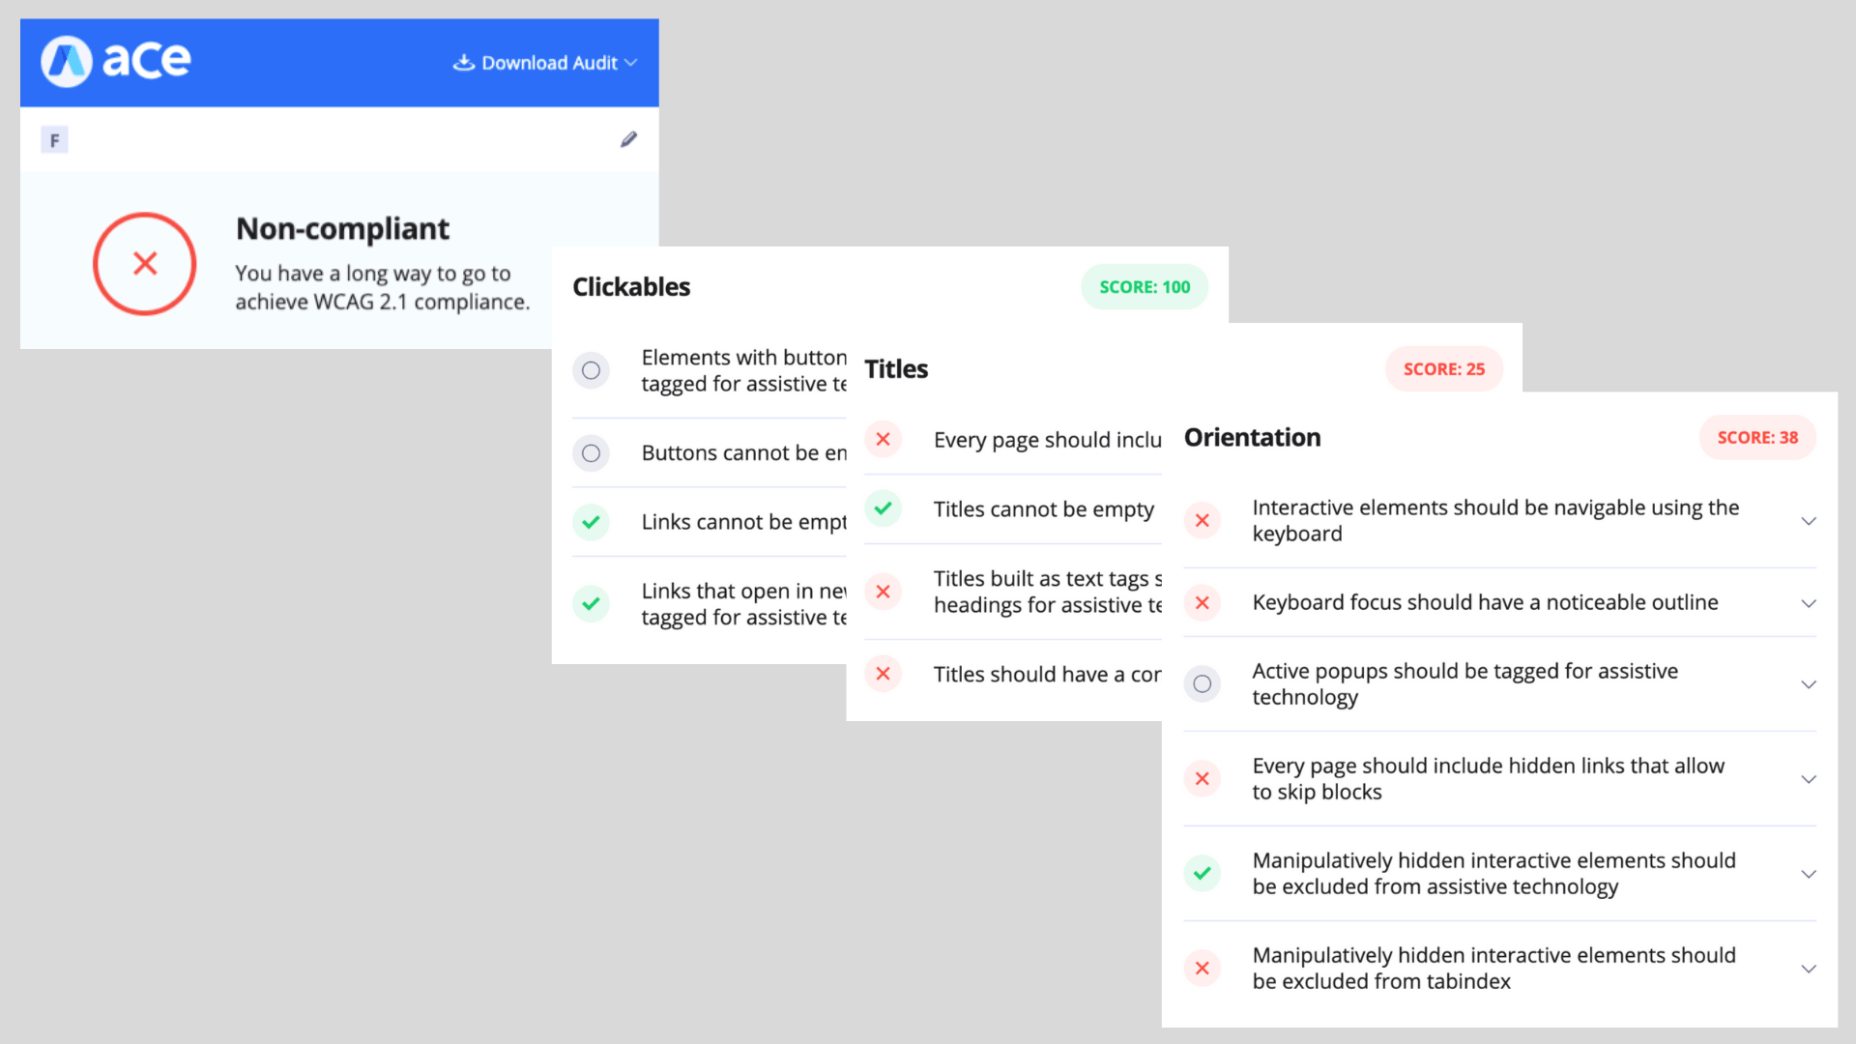
As can be expected, the UI and design side got relatively high scores, due to the accessibility plugin installed on the website, but anything that has to do with back end compatibility with screen readers and keyboard navigation got a failing score.

Conclusion

accessiBe is an automated and comprehensive web accessibility solution that achieves ongoing compliance with ADA and WCAG regulations for your website.

It offers a unique combination of front end and back end compatibility, meaning, it provides an end-to-end solution for both user-facing accessibility interface, and compatibility with screen readers and keyboard navigation.

The solution offered by accessiBe is a no-touch, no-code, continuous compliance utilizing proprietary AI technology that audits and remediates your website.

It is by far one of the most affordable web accessibility solutions, starting at $490 for websites with up to 1,000 unique pages.

When compared to accessibility plugins, accessiBe’s offering is robust and comprehensive, delivering full compliance that plugins aren’t able to.

When compared to accessibility manual services, accessiBe offers a speedy and automated audit and remediation process compared to the lengthy, manual and highly expensive offering of the service companies. Additionally, accessiBe, unlike accessibility manual services, delivers ongoing compliance and the ability to scale with ease and speed.

The combination of AI-based audit and remediation, the most comprehensive accessibility interface on the market, ongoing compliance, scalability, and a highly affordable plan makes accessiBe stand out from the competition by offering a unique end-to-end solution for achieving ADA and WCAG compliance in a fast and simple way.

Featured image via Unsplash.

Source de l’article sur Webdesignerdepot

The seventh Hands-on Agile webinar Scrum Sprint Anti-Patterns analyzed 12 ways a Scrum team can improve its effectiveness by avoiding typical sprint anti-patterns. Learn more about gold-plating, delivering Y instead of X, absenteeism, side-gigs, and organizing people instead of the flow of work.

The video of the webinar is available now:

Source de l’article sur DZone (Agile)