Apprenez à maîtriser Git et découvrez comment gérer vos projets de manière efficace et collaborative !
Git est un système de contrôle de révision distribué
The first area is the Working Directory. This is the area where you create and edit files. The Working Directory is the area where you do your day-to-day work.
The second area is the Staging Area. This is the area where you add files to the repository. You can add files to the repository by using the git add command. The Staging Area is also known as the Index.
The third area is the Git Repository. This is the area where Git stores all objects, such as commits, blobs, trees, and tags. The Git Repository is stored in the .git folder.
The fourth area is the Remote Repository. This is the area where you store your project’s files in a remote location, such as GitHub or Bitbucket. You can push your changes to the Remote Repository by using the git push command.
Les quatre domaines
Git stocke des objets dans quatre domaines illustrés ci-dessous. Ces quatre domaines représentent le flux des modifications dans un workflow Git typique.
Le premier domaine est le Working Directory. C’est l’espace où vous créez et modifiez des fichiers. Le Working Directory est l’espace où vous faites votre travail quotidien.
Le deuxième domaine est la Staging Area. C’est l’espace où vous ajoutez des fichiers au référentiel. Vous pouvez ajouter des fichiers au référentiel en utilisant la commande git add. La Staging Area est également connue sous le nom d’Index.
Le troisième domaine est le Git Repository. C’est l’espace où Git stocke tous les objets, tels que les commits, les blobs, les arbres et les étiquettes. Le Git Repository est stocké dans le dossier .git.
Le quatrième domaine est le Remote Repository. C’est l’espace où vous stockez les fichiers de votre projet à un emplacement distant, tel que GitHub ou Bitbucket. Vous pouvez envoyer vos modifications vers le Remote Repository en utilisant la commande git push.
Base de données Git
Git utilise une base de données pour stocker des objets tels que les commits, les blobs, les arbres et les étiquettes. La base de données Git est basée sur un système de fichiers qui stocke des informations sur chaque objet dans le référentiel. Chaque objet est stocké sous forme de fichier et contient des informations sur l’objet, telles que son type et sa taille. Les fichiers sont stockés dans des répertoires qui sont organisés en arborescence.
Git utilise également une base de données pour stocker des informations sur les branches et les tags. Les branches sont des références qui pointent vers un commit spécifique et qui peuvent être utilisées pour suivre le développement d’un projet. Les tags sont des références qui pointent vers un commit spécifique et qui peuvent être utilisés pour marquer des versions spécifiques d’un projet.
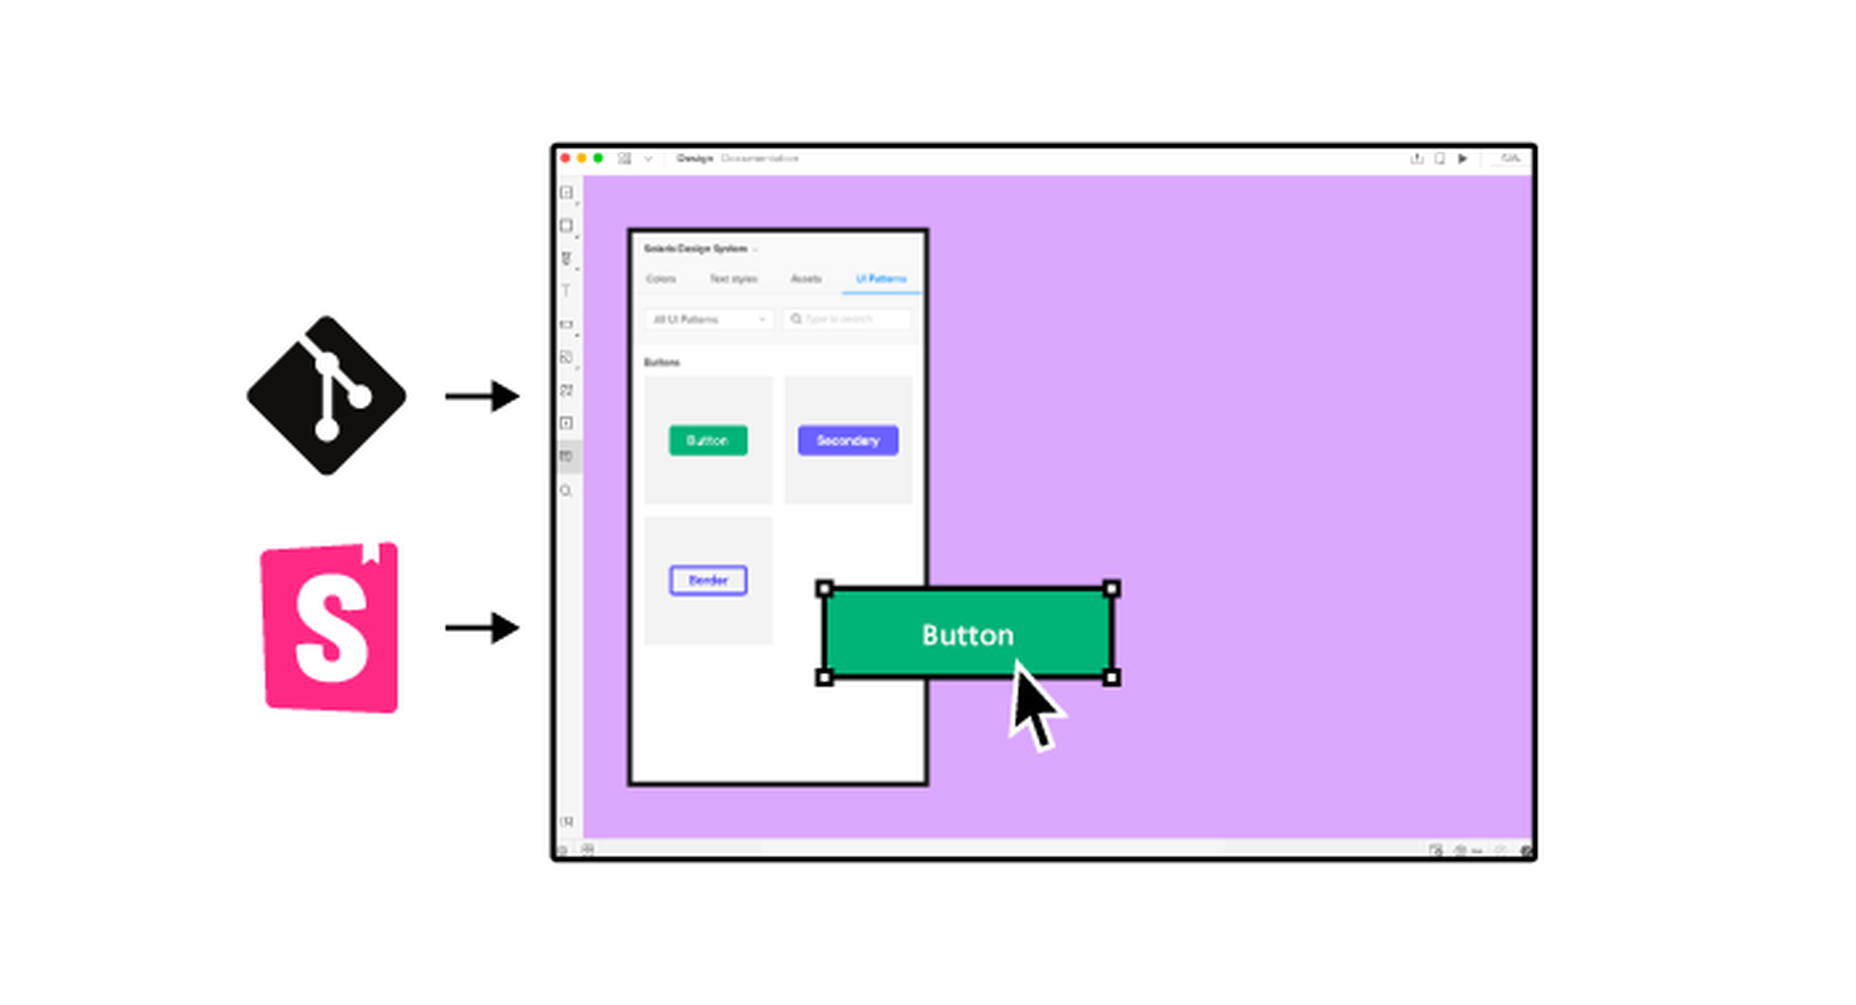
It’s something every design team dreams about – a better design process and handoff procedure. Your design team is not alone if you are looking for a better solution.
Imagine what your workflow would look like if you could forgo the struggles of image-based technology, design and handoff with accurate components that have interactive features. Projects in the design phase will look more like final products and, most importantly, interact like final products.
Let’s imagine a new design process together.
Challenges of an Image-Based Design Process
Here’s what we all know – image-based design tools provide pictures of components in the visual form but lack the interactivity and conditions that exist in the end-product. There’s not a high level of functional fidelity there, and it can cause confusion among design teams and rework.
These tools require you to redraw the fundamental components and design with boxes and rectangles, which takes too much time and can create a disconnect between the design and development teams.
Further, you don’t fully maximize the potential of a design system because of inconsistencies between code-powered systems that developers use and these image-based systems for designers. There’s an innate gap between maintaining the environments and creating consistency in components.
The final and maybe most difficult challenge with an image-based design process is in usability testing. You just can’t test an image the way you can working components. If the prototype is not interactive enough, you lose valuable feedback in the testing process. Functional fidelity is a must-have design and development tool in 2022.
Iress, market-leading financial software, had many of these same problems in its design system process. You can probably relate to its story, which includes a designer and engineer who aren’t entirely on the same page, hit the deadline and have to deliver, and then get customer feedback. The result was a lot of extra headaches and work.
But there is a better way: Import all user interface components into a code-powered design system in sync with a design tool so that your team can work in harmony to build, scale, and handoff projects with ease.
Scale Design With Accurate Components
Here’s what most design and development teams want en route to building products: Accurate components with built-in interactivity, states, and conditions. No redrawing boxes and rectangles; no trying to figure out what states and interaction should be.
And if you can do it with ten times the speed and agility? Now you’re really in business.
“It used to take us two to three months just to do the design. Now, with UXPin Merge, teams can design, test, and deliver products in the same timeframe,” said Erica Rider, Senior Manager for UX at PayPal. “Faster time to market is one of the most significant changes we’ve experienced using Merge.”
The time and workflow savings come from the ability to maintain only one environment as a product team. Rather than image-based tools, a code-powered design system that will push updates to components as the design evolves is the modern way to work. This workflow can also eliminate duplicate documentation so that your team has a single source of truth for whole product teams.
Now you can be more agile in the design process and scale. And as Rider hinted at, there is a solution already available in UXPin Merge.
Scalability with accurate design components has other benefits as well.
Teams can onboard people faster because the design system is in the design tool. There’s less searching for answers with drag and drop-ready building blocks. New team members will find more success and be more valuable to the team quicker due to fewer inconsistencies and errors.
Testing also gets a boost as you scale with a single source of truth. You can actually create better usability tests with a high-fidelity, functional version of the prototype, allowing users to leave more valuable and detailed feedback that can improve your product in the early stages.
Better Handoffs Start Here
As you imagine a better design process, take it one step further. Better handoffs are a goal for most teams.
An interactive component-based design tool can eliminate the need for multiple iterations of the same meeting to explain how a prototype works. Everyone can see and interact with it for themselves with accurate, true components that ensure the prototype works the same as the product.
Designers will feel more like their vision is making it into the final product, and developers have a better idea of how to work. Everyone has the exact same components written in code. Thanks to the single source of truth, devs can speed up as they build the product because they start with components that include production-ready code.
A typical design to developer handoff might have multiple steps: Create vector design elements, create a model for interactions, and then send the prototype with documentation. Not to mention the meetings that are required to make sure everyone is on the same page.
In a model with interactive component elements, the developer handoff is fast and easy; they create a prototype with true components and all the built-in properties. The developer copies the JSX code and pastes it into his tool to build the final product. All the component properties and their coded interactions already exist in the source code. This is possible because the source of truth is the code itself, the source code.
Productivity hack, anyone?
Enter the spec mode & copy the production-ready code with a click of a button. Definitely a time saver for devs!
This solution to this common challenge is not somewhere in the future; it’s already here.
UXPin, a code-based design tool, has Merge technology, which allows you to bring all interactive components into UXPin. Then you can use your own, or the open-source library with the ready-made building blocks to get products ready faster.
Here are just a few of the things you can do with Merge by UXPin:
Integrate your developer’s storybook to use it as a single source of truth (works for all frameworks)
Import design system components from a dev’s Git repository, such as GitHub, Bitbucket, GitLab, or others (works with React)
Work with the built-in MUI library
Add the npm component package to UXPin on your own (no developer required)
Design with the confidence that your work can be ideally reflected by developers
Create and share a library of interactive components
Summary
Say bye-bye to redrawing rectangles – build more accurate prototypes easier and end-products faster with Merge by UXPin.
Now is the time to solve one of your biggest design challenges while upgrading and scaling the design process and improving handoffs.
Merge by UXPin is user-friendly and made for scalable projects of almost any size. The line between design and development blurs with quicker product release and a fully-interactive solution. Request access today.
https://ankaa-pmo.com/wp-content/uploads/2022/03/how-to-scale-your-design-process-and-improve-handoff.png15292780Service comm.https://ankaa-pmo.com/wp-content/uploads/2017/04/Logo-Ankaa-engineering.pngService comm.2022-03-16 17:45:402022-03-16 17:45:40How to Scale Your Design Process and Improve Handoff
The 2021 State of DevOps report identifies two types of teams as the way high-maturity teams organize themselves: stream-aligned teams and platform teams. The idea of a « platform » or « internal developer platform » is fundamental to GitOps. While a GitOps pipeline begins with committing code to a Git repository, it is made possible by a platform that paves the way for that new code to move in an automated way from the repository to a production environment.
The platform is how the Ops team provisions resources such as cloud services, storage, service meshes, and security and monitoring tools in a ready-made template. These templates are created even before they are needed and made available to any developer within the organization. The big shift due to this is that developers need not raise a ticket for the resources they need: they can pick a ready-made template and deploy their code in a matter of minutes. From the Ops side, they have peace of mind knowing they have configured this template and that it follows security protocol by default. It does not require developers to separately configure security for deployments.
https://ankaa-pmo.com/wp-content/uploads/2022/03/gitops-takes-devops-teams-to-higher-levels-of-maturity.jpg375600Service comm.https://ankaa-pmo.com/wp-content/uploads/2017/04/Logo-Ankaa-engineering.pngService comm.2022-03-04 16:45:012022-03-04 16:45:01GitOps Takes DevOps Teams To Higher Levels of Maturity
https://ankaa-pmo.com/wp-content/uploads/2021/09/transferring-a-repository-from-tfvc-to-git-snippets.jpg375600Service comm.https://ankaa-pmo.com/wp-content/uploads/2017/04/Logo-Ankaa-engineering.pngService comm.2021-09-19 00:59:452021-09-19 00:59:45Transferring a Repository from TFVC to Git [Snippets]
Paramètres des cookies et politique de confidentialité
Comment nous utilisons les cookies
Nous utilisons les cookies pour nous faire savoir quand vous visitez nos sites Web, comment vous interagissez avec nous, pour enrichir votre expérience utilisateur et pour personnaliser votre relation avec notre site Web.
Cliquez sur les différents titres de catégories pour en savoir plus. Vous pouvez également modifier certaines de vos préférences. Notez que le blocage de certains types de cookies peut avoir un impact sur votre expérience sur nos sites Web et les services que nous sommes en mesure d'offrir.
Cookies essentiels sur ce site
These cookies are strictly necessary to provide you with services available through our website and to use some of its features.
Because these cookies are strictly necessary to deliver the website, you cannot refuse them without impacting how our site functions. You can block or delete them by changing your browser settings and force blocking all cookies on this website.
Cookies Google Analytics
Ces cookies recueillent des renseignements qui sont utilisés sous forme agrégée pour nous aider à comprendre comment notre site Web est utilisé ou l'efficacité de nos campagnes de marketing, ou pour nous aider à personnaliser notre site Web et notre application pour vous afin d'améliorer votre expérience.
Si vous ne voulez pas que nous suivions votre visite sur notre site, vous pouvez désactiver le suivi dans votre navigateur ici :
Autres services
Nous utilisons également différents services externes comme Google Webfonts, Google Maps et les fournisseurs externes de vidéo. Comme ces fournisseurs peuvent collecter des données personnelles comme votre adresse IP, nous vous permettons de les bloquer ici. Veuillez noter que cela pourrait réduire considérablement la fonctionnalité et l'apparence de notre site. Les changements prendront effet une fois que vous aurez rechargé la page.
.
Paramètres de Google Webfont Settings :
Google Map :
Vimeo et Youtube :
Politique de confidentialité
Vous pouvez lire nos cookies et nos paramètres de confidentialité en détail sur la page suivante

 It’s something every design team dreams about – a better design process and handoff procedure. Your design team is not alone if you are looking for a better solution.