Articles

Jakob Nielsen’s How Users Read on the Web is 25 years old this week, and one glance at an eye-tracking study will tell you its key observations are still relevant today.

Simply put, users don’t read a web page; they scan it for individual words and sentences.

A typical pattern shown in eye-tracking reports is that users will rapidly scan a page, scrolling down to do so. Then either hit the back button and pump your bounce rate, or scroll to the top and re-engage with the content.

Even when content, volume, and quality tick all the user’s boxes, and they choose to stay on your site, they still don’t read; they scan; a slightly deeper scan, but still a scan.

As a result, it’s vital to design websites to be easily scannable, both in a split-second scan to decide if your page is worth the reader’s time and on a second or third pass.

Clarify the Page’s Purpose Immediately

Every page should have a primary goal. The majority of the time, that goal is embodied in a CTA (Call to Action).

The good news is, if your SEO (Search Engine Optimisation) has gone to plan, your goal (i.e., to sell something) and your user’s goal (i.e., to buy something) will align. By clarifying the page’s purpose, you can show the user that your goals align.

You can be experimental if you’re an established company and the user knows what to expect. But if you’re new to the market or have a lower profile, you need to conform to established design patterns. This means that a SaaS should look like a SaaS, a store should look like a store, and a blog should look like a blog.

Including your CTA above the fold — which in the context of the web, means the user doesn’t have to interact to see it. Doing so makes it easier for the user to progress and clearly tells the user what you are offering.

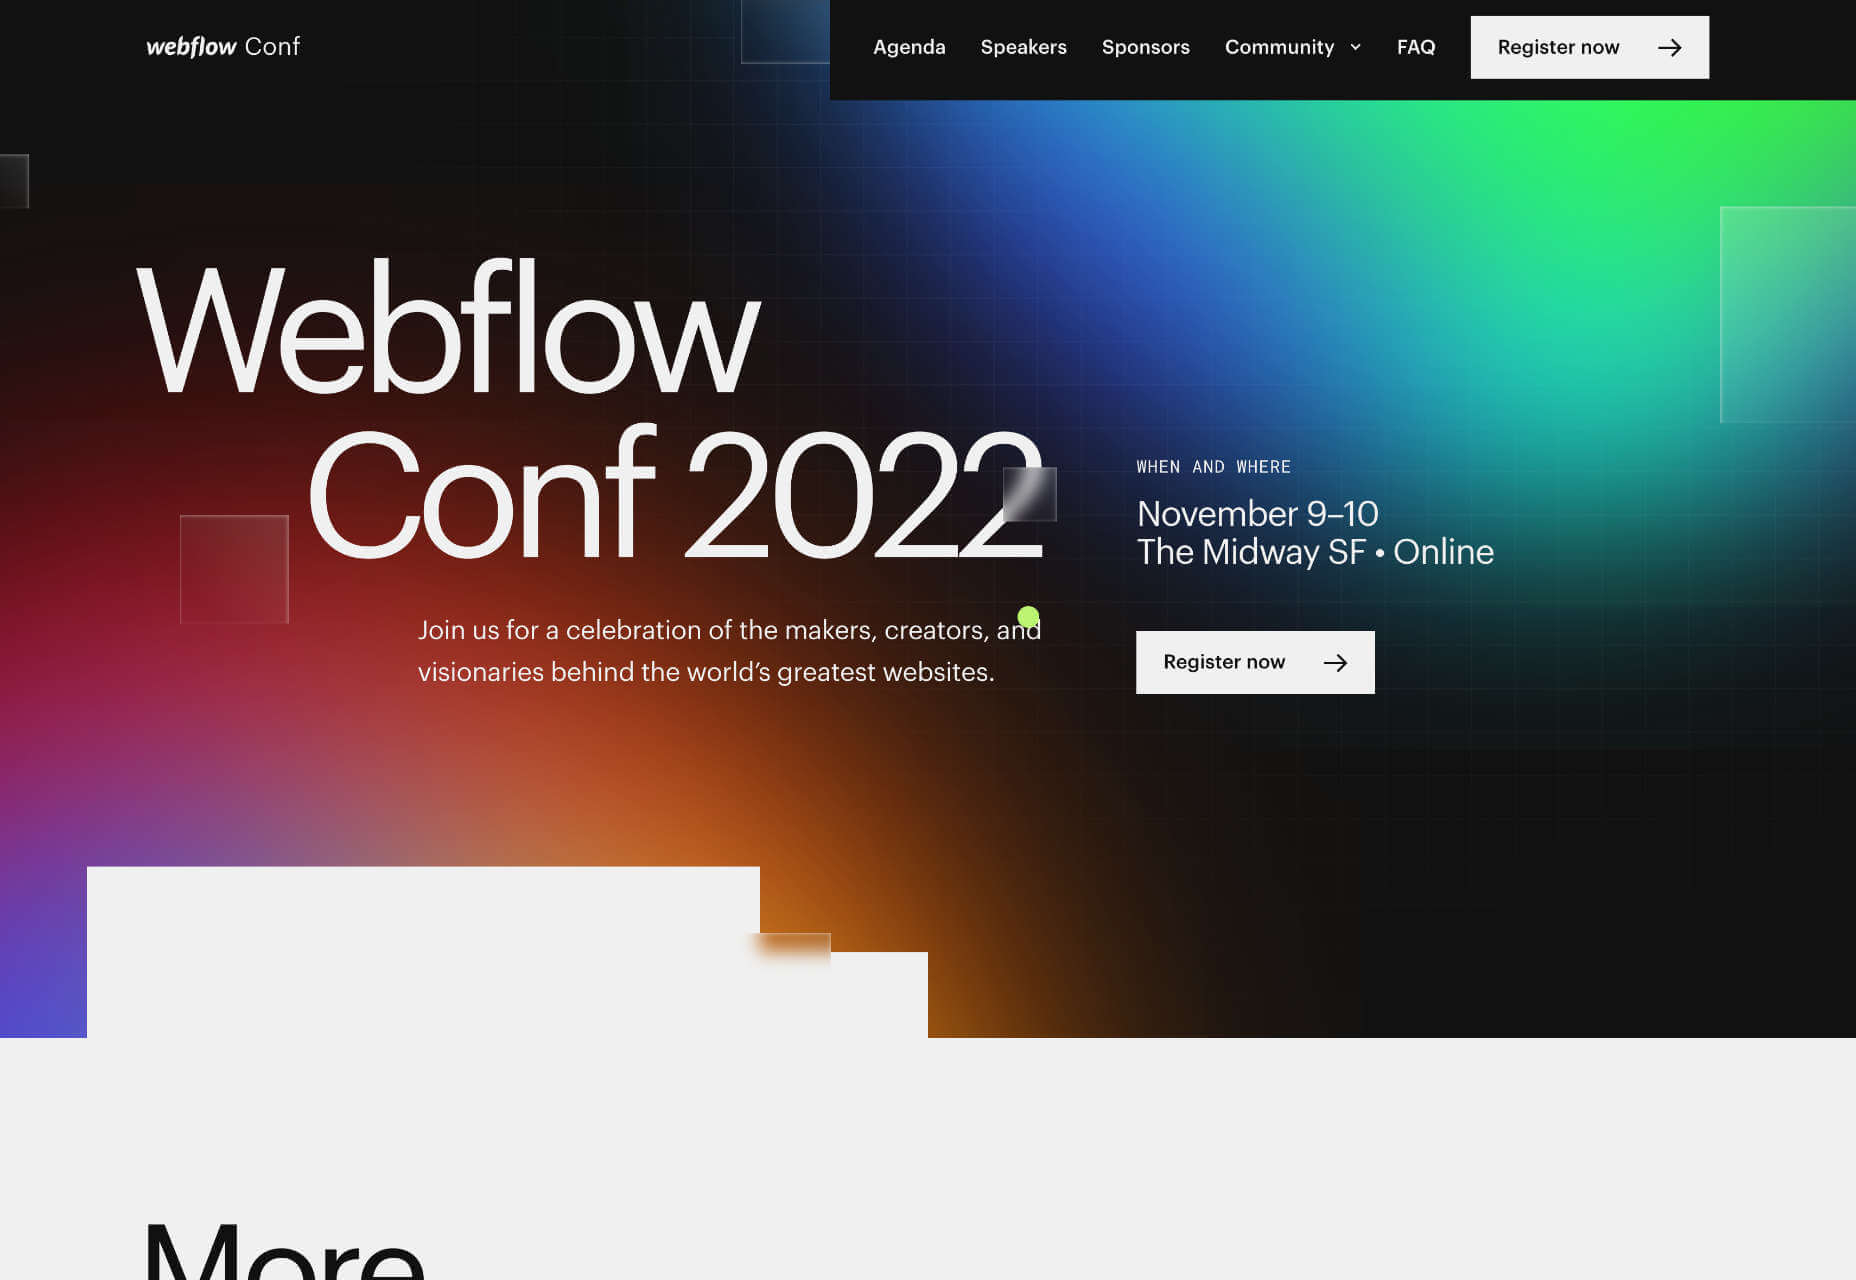
The landing page for next month’s Webflow Conf 2022 clarifies the page’s content, with a clear CTA above the fold.

Employ a Visual Hierarchy

The Von Restorff effect states that the more something stands out, the more likely we are to notice and remember it.

Visual hierarchies are excellent for guiding a user through content. HTML has the h1–h7 heading levels — although, in reality, only h1–h4 are much use — which gives you several levels of heading that can be scanned by different readers scanning at different rates.

For example, we know that subheadings have little impact if a user diligently reads the page from top to bottom, but they are excellent for catching the eye of skim readers.

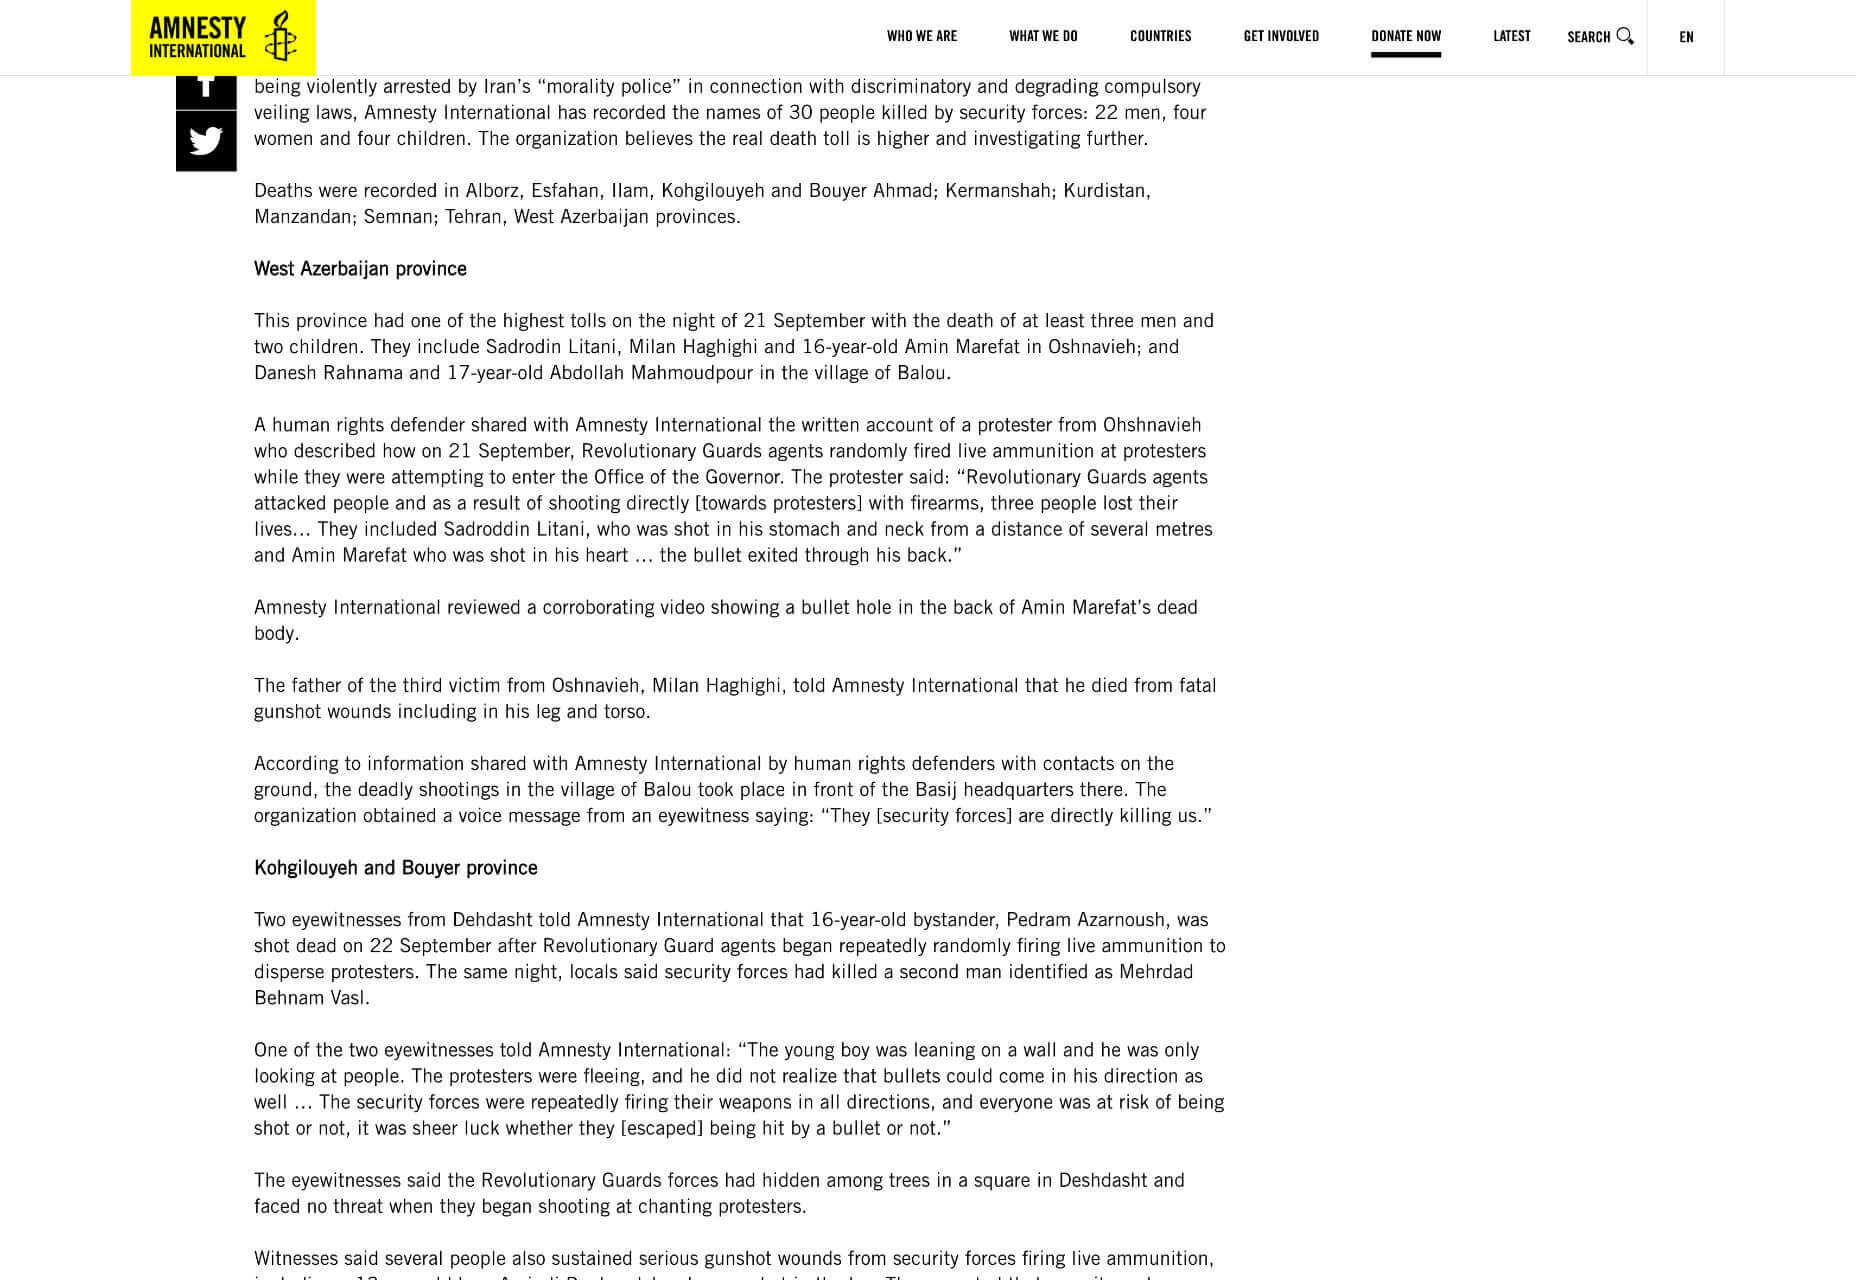
Amnesty uses very a very simple hierarchy, the only change for its subheading being increased weight. But it is enough to catch the user’s eye.

You can also create visual hierarchies with other forms of contrast; weight and color are often employed in addition to size. For accessibility and inclusive design, it’s wise to combine visual indicators when creating a hierarchy; for example, headings are usually larger, bolder, and colored.

Use Negative Space

Imagine a person standing in a crowd. Let’s say they’re wearing a red and white striped jumper and a red and white bobble hat — pretty distinctive. But if there are hundreds of other characters around them, they might be hard to spot.

Now imagine the same person dressed the same, standing on their own. How long will it take you to spot them? Even without the stripy outfit, it’s not much of a challenge.

Elements in isolation are not only easier to spot, but they pull the eye because the negative space (sometimes referred to as white space) around them creates contrast.

When using negative space, the key is to give elements enough room to breathe and attract the eye without giving them so much room that they are disassociated from the rest of your content.

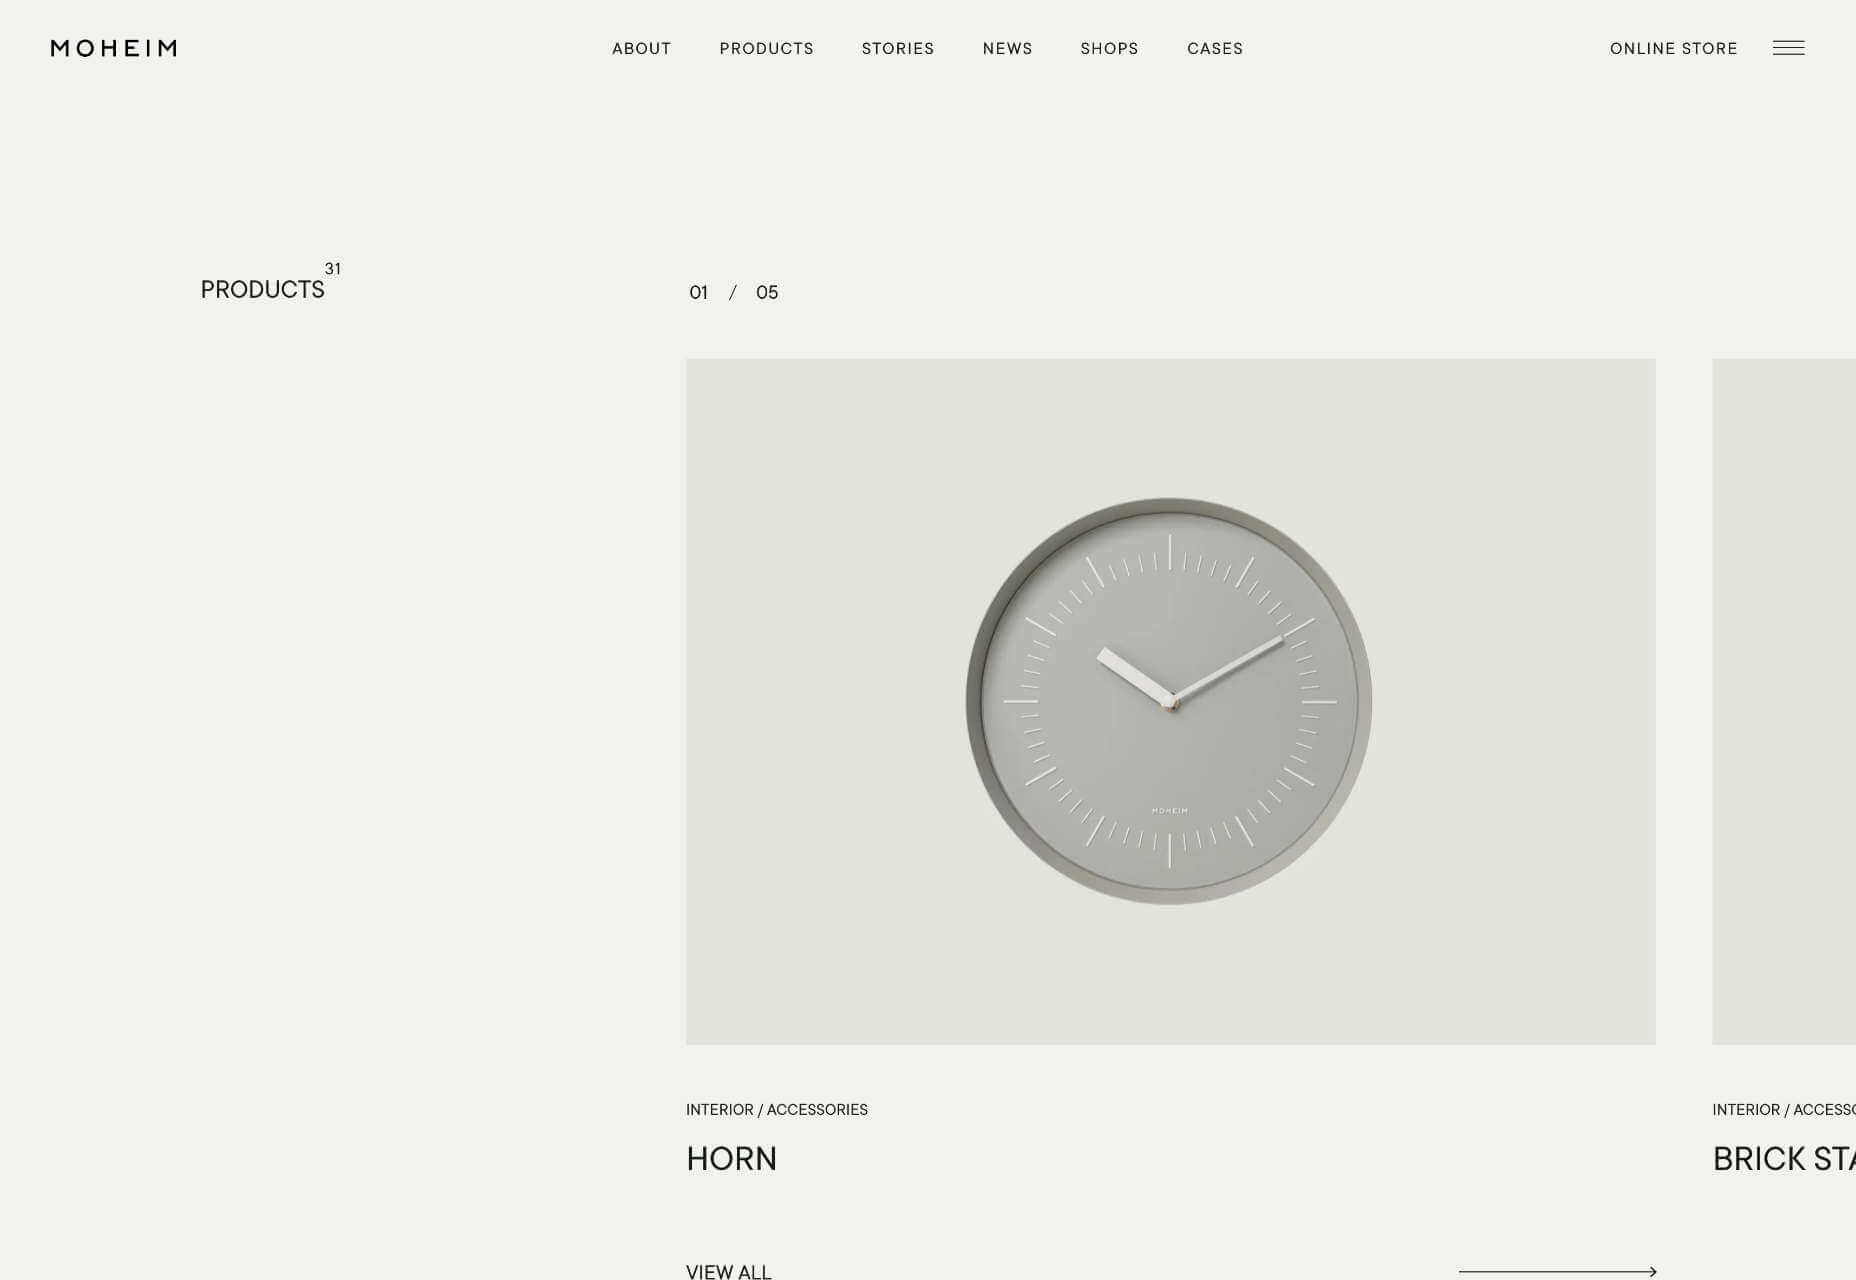
Across its site, Moheim uses negative space to highlight UI elements while grouping associated content.

Use F Patterns

Users scan a page using either an F-pattern or a Z-pattern.

Because users scan your page in predictable ways, we can employ layouts that cater to this tendency.

Designers have been aware of F and Z patterns for some time, and because they’ve been used for so long, they may be self-fulfilling, with users being trained to scan a page in this fashion. However, both patterns are similar to how eyes travel from line to line in horizontal writing systems.

Whatever the cause, by placing key content along these paths, you increase the chance of capturing a user’s attention.

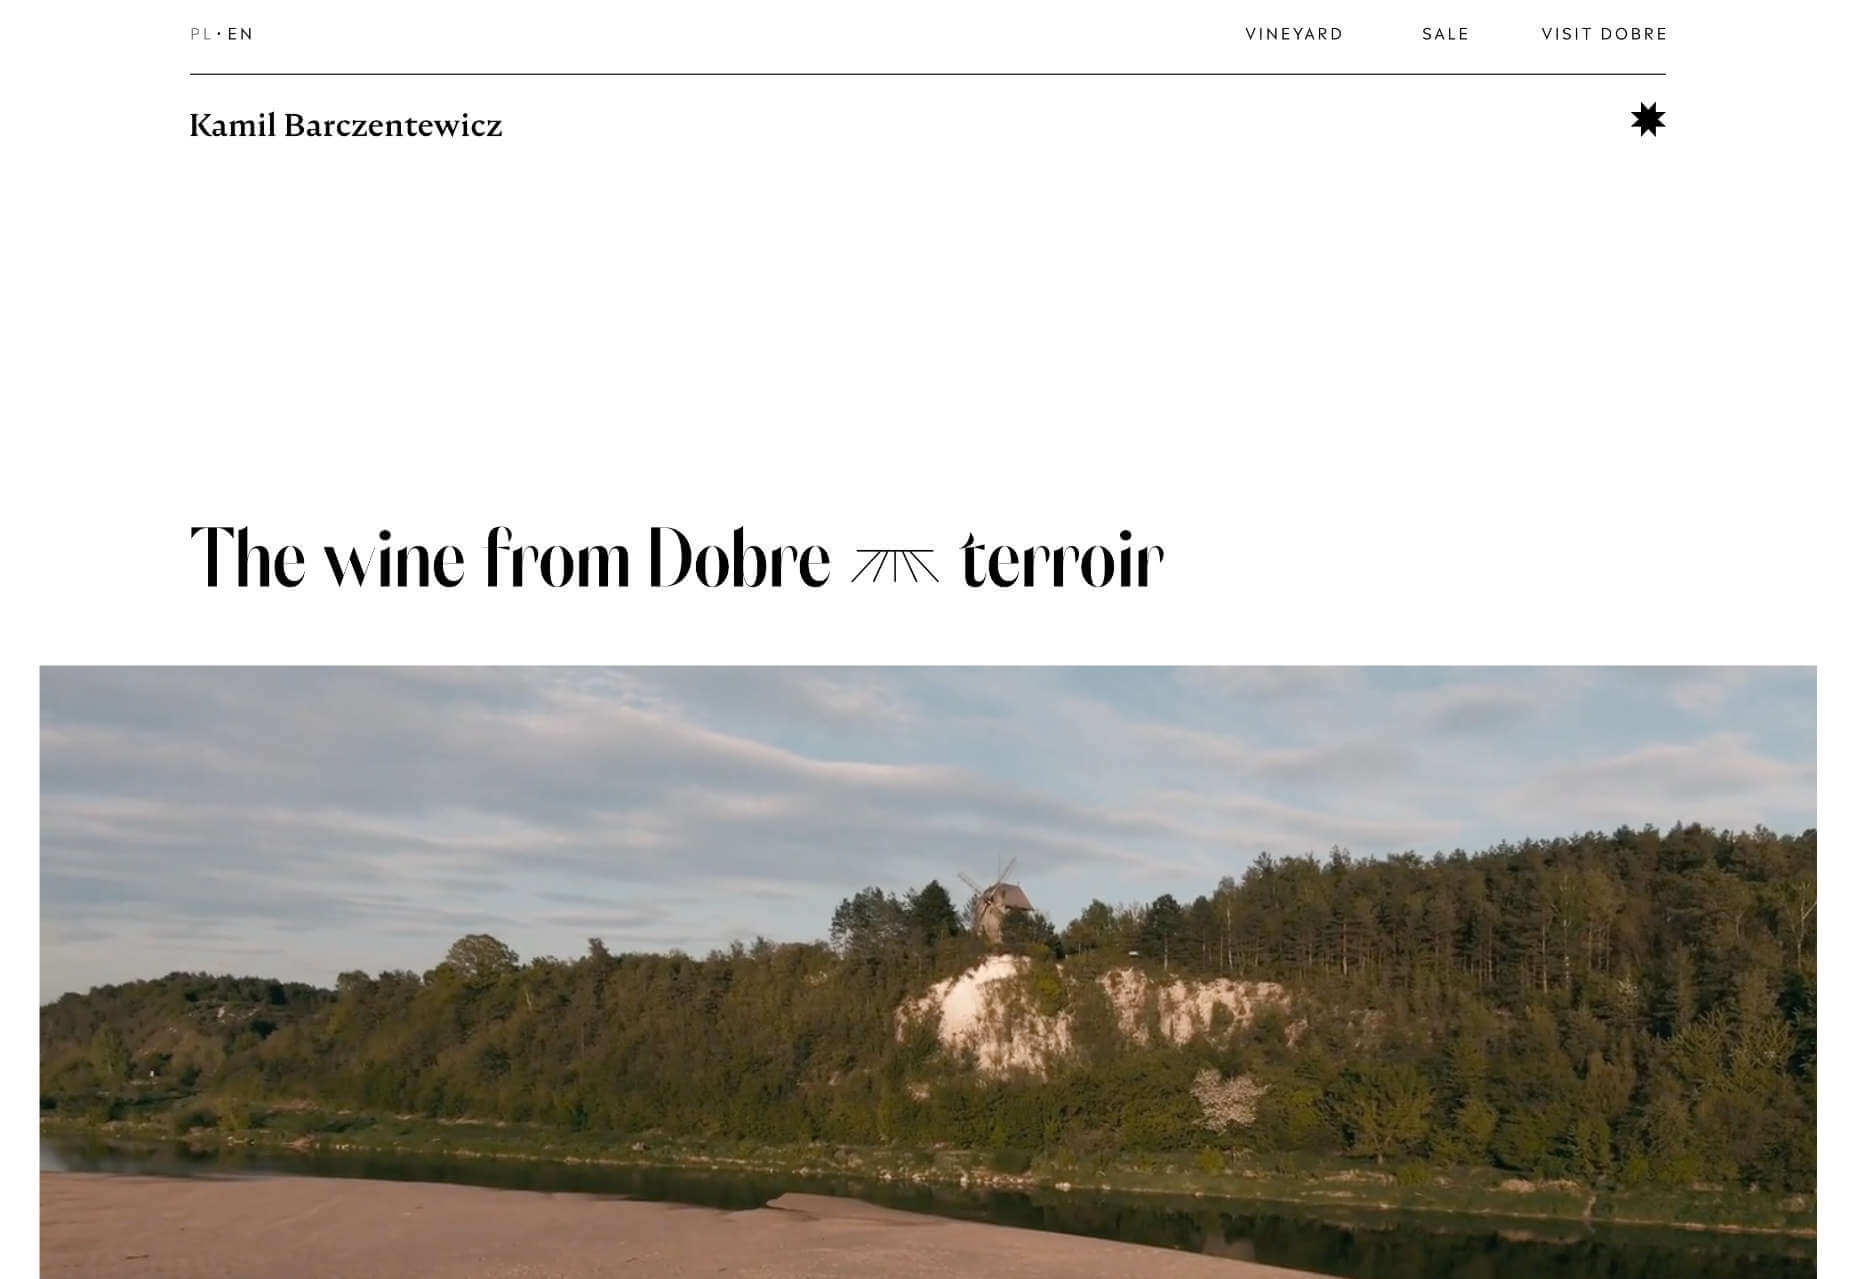
Kamil Barczentewicz uses a beautiful, natural layout that also conforms to a classic F pattern.

Include Images with Faces

Images are a great way of conveying brand values and making a site engaging. But when it comes to catching the eye of a user scanning your design, the best images include faces.

For example, a testimonial with an image of the customer will catch the eye more than a text-only testimonial.

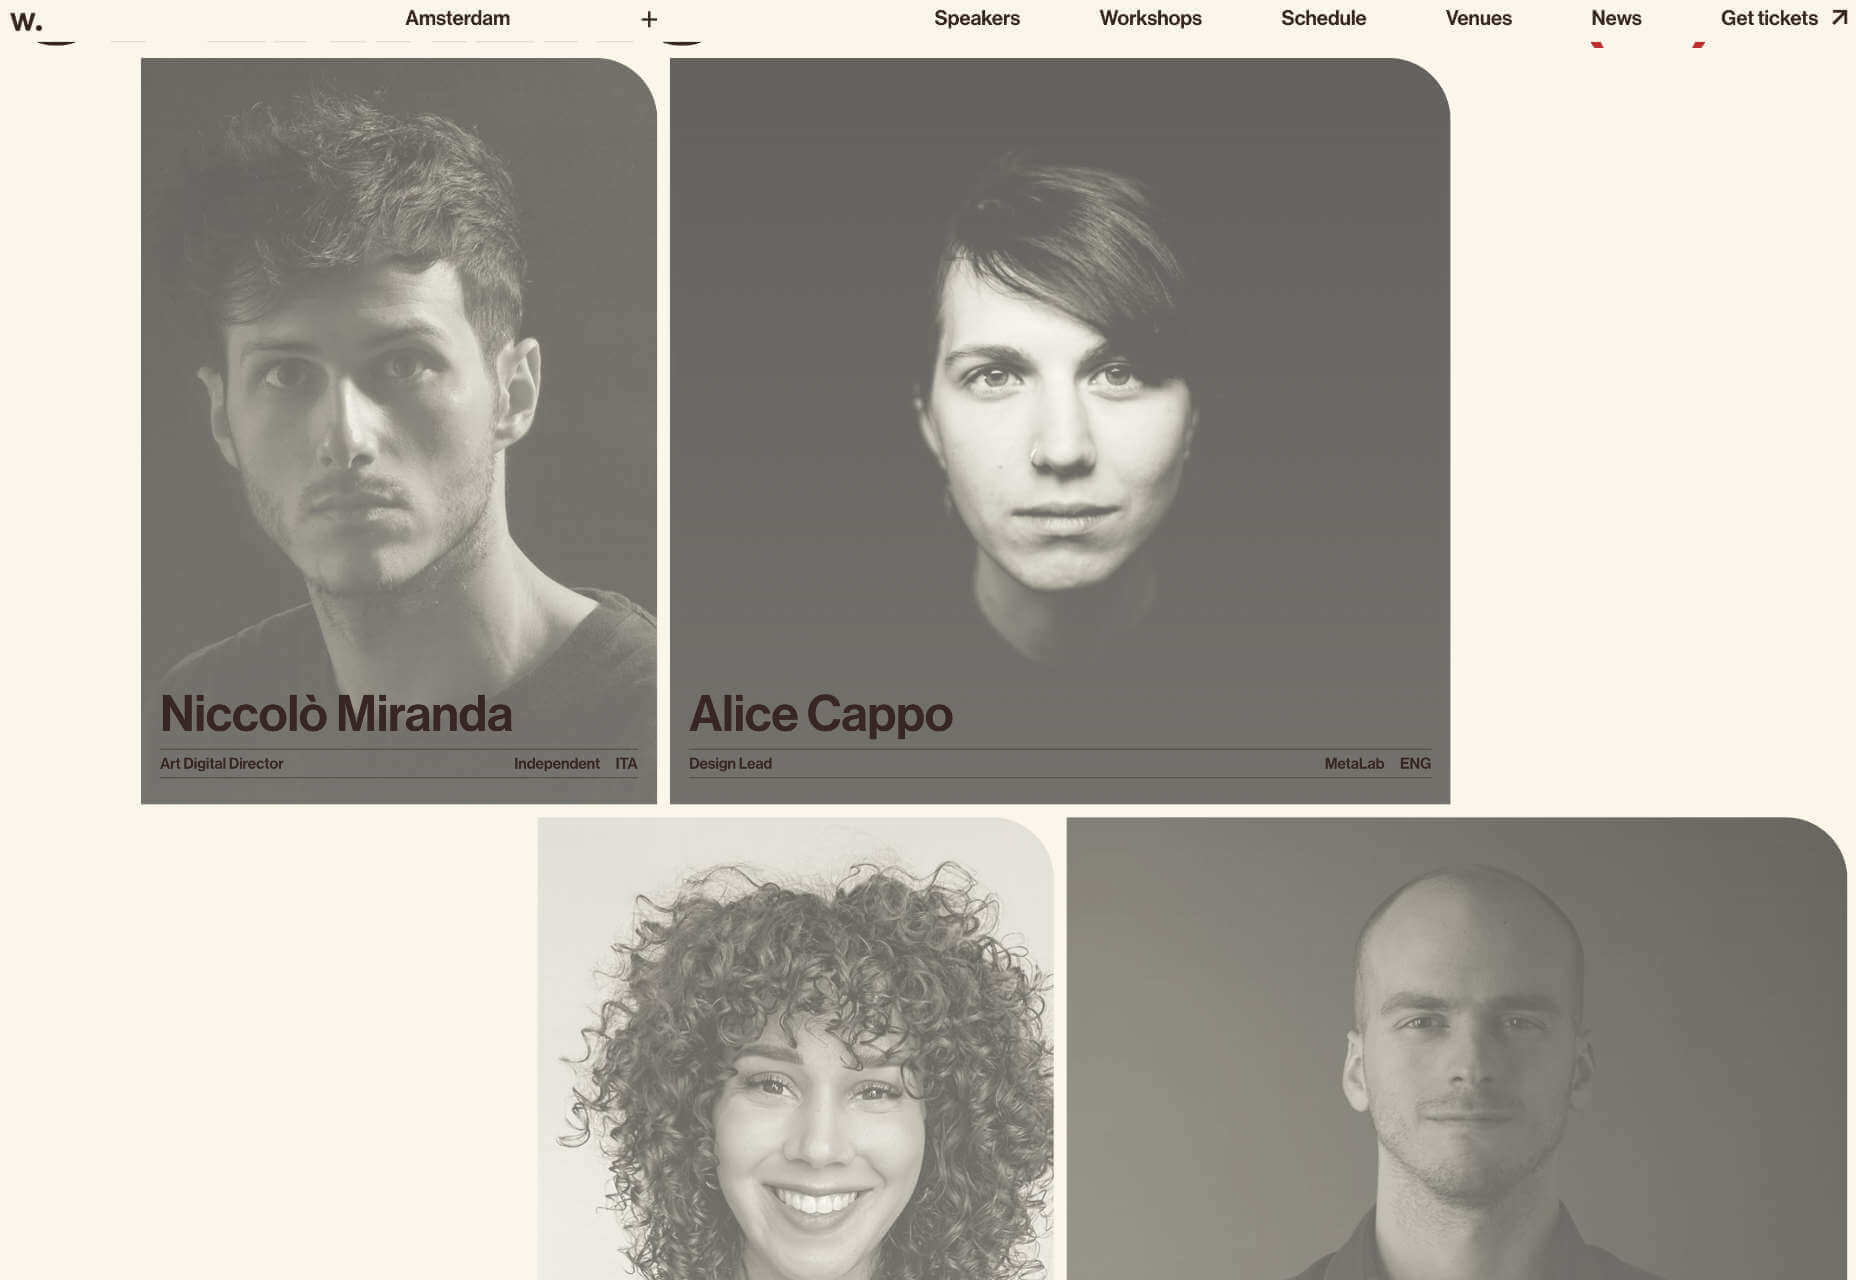
The Awwwards Conference uses an animated computer with a face to capture attention. And large images of speakers making eye contact.

This is almost certainly due to social conditioning; we see a face, and we engage with it to see if it is a threat or not. Most of us naturally look to expressions of emotion to understand situations, and the distinction between a real-life person and an image hasn’t made its way into our mental programming yet.

You don’t need to use photos. Illustrations are fine. The key is to ensure there is a face in the image. That’s why illustrations of characters perform so well.

Copy Print Design

Print design is centuries older than the web, and many print applications, from newspapers to advertising, developed design elements to catch the eye of readers scanning the design.

Subheadings, lists, blockquotes, and pull quotes all catch the eye. Introductory paragraphs in a larger size or even italics draw users into the text. Shorter paragraphs encourage users to keep reading.

Horizontal rules used to delineate sections of text act as a break on eyes traveling over content with momentum. They are a good way of catching a scan-reader who is losing interest.

You can use a horizontal rule or break up your layout with bands of color that divide content sections.

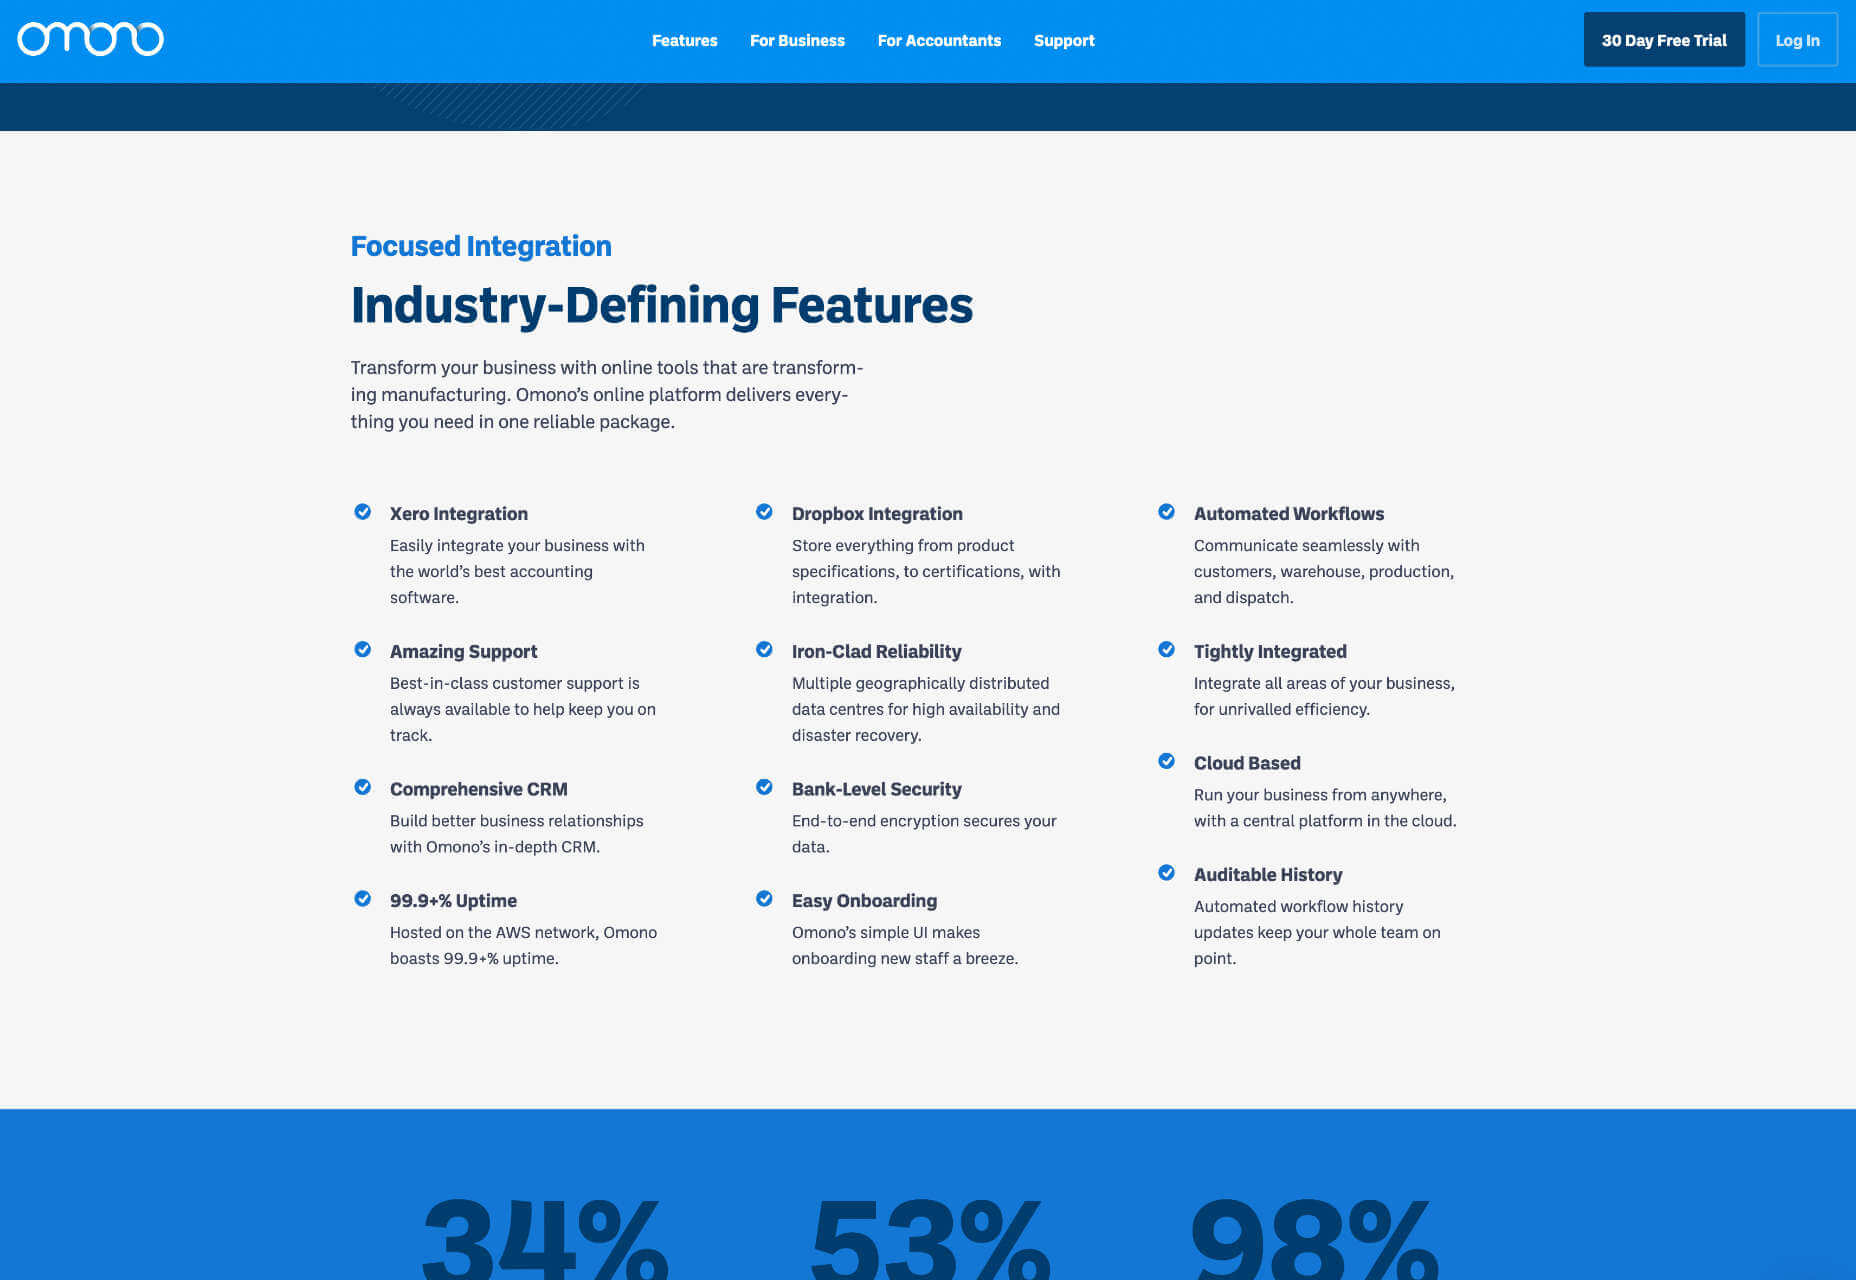
Omono uses horizontal bands to highlight different sections of content.

Mass, Not Weight

We often discuss design elements as having weight; font-weight is the thickness of strokes.

But it is more helpful to think of design elements as having mass; mass creates gravity, pulling a user’s eye towards them.

The trick is to design elements with enough mass to attract the user‘s eye when scanning at speed without forcing the user to change how they engage with your content.


Featured image via Pexels.

Source

The post How To Make Your Designs Scannable (And Why You Should) first appeared on Webdesigner Depot.

Source de l’article sur Webdesignerdepot

Apple has released an OS update. Packaged in with it is the latest version of Safari, 16.

Expected to be released ahead of next month’s macOS 13, Safari 16 is packed with updates, making it one of the most capable browsers available.

For web designers, the significance is the forward momentum in web technologies that enable freer design work and fewer hacks to achieve complex layouts. Little by little, CSS recommendations are being implemented to the point that using JavaScript for layout is rapidly becoming as unnecessary as it is disliked.

Some of this was announced in June in the Safari 16 beta. But a lot has been added in the last couple of months. So here’s what’s new in Safari 16 today.

CSS Container Queries

The most exciting addition to Safari 16 is CSS Container Queries.

It is hard to understate how in-demand this feature has been; if you imagine an edit button on Twitter that gifted you crypto every time you corrected a typo, you’d be getting close to how popular this feature is.

Until now, media queries have detected the whole viewport. And so, if you have an element like a card, for example, that needs to change at smaller viewports, you need to calculate the available space and adapt the element’s design accordingly. Unfortunately, this frequently gets out of sync with edge cases causing more than a few headaches for front-end developers.

Media queries are severely restrictive to modern layout methods like Grid that wrap elements automatically because there is no way to detect how the elements are laid out.

Container Queries solve this by allowing you to define styles based on the size of the actual containing element; if a div is 300px wide, the contents can have one design, and if it’s 400px wide, they can have a different design—all without caring what size the whole viewport is.

This is dangerously close to OOP (Object Orientated Programming) principles and almost elevates CSS to an actual programming language. (All we need is conditional logic, and we’re there.)

The latest versions of Chrome, Edge, and now Safari (including mobile) support CSS Grid. Even discounting the rapid decline of Twitter, this is way more exciting than any edit button.

CSS Subgrid

Speaking of Grid, if you’ve built a site with it (and if you haven’t, where have you been?), you’ll know that matching elements in complex HTML structures often results in nesting grids. Matching those grids requires careful management, CSS variables, or both. With CSS Subgrid, grids can inherit grid definitions from a grid defined higher up the hierarchy.

CSS Subgrid has been supported by Firefox for a while but is not yet part of Chrome or Edge. Until there’s wider support, it’s not a practical solution, and using a fallback negates any benefit of using Subgrid. However, its introduction in Safari will surely herald rapid adoption by Google and Microsoft and moves the web forward considerably.

CSS Subgrid is likely to be a practical solution within 18 months.

AVIF Support

AVIF is an exceptionally compact image format that beats even WebP in many instances. It even allows for sequences, creating what is essentially an animated GIF but smaller, and for bitmaps.

AVIF is already supported by Chrome, with partial support in Firefox. Safari now joins them.

AVIF support is one of the more valuable additions to Safari 16 because you’re probably already serving different images inside a picture element. If so, your Safari 16 users will begin receiving a smaller payload automatically, speeding up your site and boosting UX and SEO.

Enhanced Animation

Safari 16 introduces some significant improvements in animation, but the one that catches the eye is that you can now animate CSS Grid.

Yes, let that sink in. Combine Container Queries and animation. The possibilities for hover states on elements are tantalizing.

Safari 16 also supports CSS Offset Path — known initially as CSS Motion Path — which allows you to animate elements along any defined path. This enables the kind of animated effect that previously needed JavaScript (or Flash!) to accomplish.

Chrome, Edge, and Firefox all support CSS Offset Path; the addition of Safari means it’s now a practical solution that can be deployed in the wild.

Web Inspector Extensions

Announced as part of the beta release, Web Inspector Extensions allow web developers to create extensions for Safari, just as they would for Chrome.

Web Inspector Extensions — or Safari Extensions as they’re destined to be known — can be built in HTML, CSS, and JS, so the learning curve is shallow. It’s a good route into app development for web designers.

Because the underlying technology is the same as other browser extensions, anyone who has made a Chrome, Edge, or Firefox extension will be able to port it to Safari 16+ relatively easily. As a result, there should be a rapid expansion of the available extensions.

Improved Accessibility

Accessibility is key to an effective and inclusive web. Be like Bosch: everybody counts, or nobody counts.

When testing a design for accessibility, emulators don’t cut it. In my experience, Safari has some of the most reliable accessibility settings, especially when it comes to Media Queries like prefers-reduced-movement.

Further gains in this field mean that Safari continues to be an essential tool for QA tests.

Reduced Resets

Finally, I want to throw up my hands to celebrate the reduced number of non-standard CSS appearance settings.

For years we’ve been prefacing our style sheets with elaborate resets like Normalize, designed to undo all the assumptions browser developers make about design and the UI preferences of their engineers.

Safari 16 has reportedly “Removed most non-standard CSS appearance values.” How effective this is and how much we can rely on it given the other browsers on the market remains to be seen. However, like many of Safari 16’s changes, it’s a step towards a browser that’s on the developers’ side instead of an obstacle to overcome.

Source

The post Exciting New Features in Safari 16 first appeared on Webdesigner Depot.

Source de l’article sur Webdesignerdepot

The term “web design” refers to the process of planning, organizing, and editing content online. On the surface, it seems like a simple enough concept. However, the reality is what we consider “web design” can change over time, influenced by our perception of the “web.” 

In 2022, a professional web designer might create custom websites from scratch, but they may also be responsible for: 

  • UX Design: Creating elements focused on user experience
  • App design: Building digital components of a website or online experience.
  • Theme design: Creating visual tools for supplementing web design. 

Web design isn’t just about making a site look attractive anymore. The definition goes beyond the aesthetic to include a complete consideration of the functionality, performance, and abilities of countless assets we engage within the digital world.

What is Web Design? The Definition Today

Web design is the practice responsible for creating a website’s overall look and feel or web asset (such as web and mobile apps). It involves the process of planning and building elements of your project, from structure and layout choices to graphics and presentation. 

Web design has various components that work together to create the final “experience” of a website, including graphic design, interface design, user experience design, search engine optimization, content creation, etc. These elements determine how a web asset looks, feels and performs on various devices. 

Though the definition of web design in 2022 has evolved, it’s still different from web development, which refers to the actual coding which makes a website work. When you’re building a website, you’ll need web design and web development. 

Elements of Web Design in 2022 

When designing a website, modern designers need to consider two overlapping concepts: the overall appearance of the website and its functionality. The proper connection between these elements will maximize the site’s overall performance and usability, and make a design more memorable (for all of the right reasons). 

Let’s break down the elements of web design into its visual and functional components.

Visual Elements of Web Design

Visual elements of web design influence how a design looks. The various visual components of a design should still follow the basic principles of graphic design. In other words, designers should be thinking about contrast, balance, unity, and alignment simultaneously. The visual elements of web design include: 

  • Written copy and fonts: A website’s appearance and the text on the site often go hand in hand. Designers need to work together with content writers to ensure written copy makes sense structurally and uses the correct fonts for legibility. 
  • Colors: Colors for web design are usually chosen based on factors like color psychology, which demonstrates a color’s ability to affect how someone feels, and branding. Most brands have specific colors they use consistently throughout their visual assets; this helps create a sense of cohesion and unity in designs.
  • Layout and spacing: Layout and spacing influence how content is arranged in an app, website, or another visual asset. The right layout helps to create a visual hierarchy, guiding a viewer through a page and drawing their attention to the correct information in order. Spacing helps to separate components on a page and create legibility. 
  • Images, icons, and shapes: Images, icons, and shapes help convey significant amounts of information. The right ideas and icons can strengthen a brand message, direct a customer’s attention using a web app, and bring context to a design. 
  • Videos and animations: Videos and animations are becoming increasingly common in today’s web design strategies. Videos can include 360-degree videos, which help immerse someone in a space, video streams, and short content clips.

Functional Elements of Web Design

Functional elements in web design are the practical components designers need to consider to ensure websites and assets work as they’re supposed to. A website, app, or any other web asset needs to function correctly to be accessible to users.

Functional elements of web design may include:

  • Navigation: The navigation elements of a website or app are among the main components determining whether a site is functioning properly and ensuring a good user experience. Audiences need to be able to move around the app or website quickly. 
  • User interactions: Your site visitors may have multiple ways of communicating with your web app or website, depending on their device. You’ll need to make sure people can scroll and swipe on smartphones and tablets and click on desktops. If your website has VR or AR elements, you’ll also need to consider these immersive components in your design.
  • Speed and performance: While web development elements can also influence a web design’s speed or performance, it’s also essential for a designer to show elements of the composition don’t weigh down the functionality. Designs need to load quickly and correspond with the demands of browsers on various devices.
  • Structure: A website’s structure plays a critical role in user experience and SEO requirements. Users need to easily navigate through a website without encountering any issues like getting lost or ending up on broken pages.
  • Compatibility: A good design should look perfect on all devices, from a wide range of browsers to the various devices users might leverage today. 

What Does Good Web Design Look Like in 2022?

More than ever, achieving high-quality web design is crucial to success in any industry or landscape. More than half of the world’s population is active online. If you’re not appealing to this audience correctly, you’re missing out on endless opportunities.

Notably, while elements of good web design can be subjective, such as which themes or colors someone might prefer for their website, the underlying foundations of strong web design are the same for everyone in 2022.  

Good web design is any design that looks good, performs as it should, and delivers the best possible experience to your target audience. Effective web design should include components like:

  • Effective use of white space for organization and structure.
  • Clearly presented choices and navigation options for the user.
  • Clear calls to action to drive user activities from one page to another.
  • Limited distractions and a straightforward user journey. 
  • No clutter or unnecessary components irrelevant to the needs of the user. 
  • Responsive, flexible design accessible on any browser or device.
  • High-quality content and images are designed to hook a reader’s attention.
  • Appropriately sized fonts and legible typography.
  • A good balance between images and text on a page. 

Other elements like eye-catching imagery and professional photography can help your web design stand out. Using the right building blocks, like a strong color palette and the right shapes or icons in your design is helpful. 

Of course, there is some scope for variation in good web design. A web designer in 2022 needs to be able to adapt their use of the various essential elements of design to suit a specific target audience or the unique identity of a brand.

What Doesn’t Work for Web Design in 2022?

Just as web design elements seem to appear consistently in all excellent examples, there are also parts of web design we’ve left behind over the years. Simpler, more straightforward designs have replaced cluttered spaces, flashing images, and endless animations. 

The focus in 2022 is on creating an experience that’s simple, engaging, and intuitive, capable of speaking to the right audience without confusion or being visually overwhelming. In most cases, some of the top components to avoid include:

  • Clunky performance: Non-responsive website design, slow pages, and other examples of clunky functionality are a no-go in 2022. Websites need to be quick and responsive.
  • Distracting content: Flashing images, animations, and complex backgrounds are a thing of the past for a good reason. Websites today need to be clean, simple, and clear. Any elements which don’t add to the value of the design should be removed.
  • Generic content: Filler text, irrelevant stock photos, unclear buttons, and links can be removed from today’s website designs. A web design should be specific to the audience’s needs and the brand’s identity. Generic components don’t work.

Creating Web Designs in 2022

Today, the underlying definition of web design has a lot of similarities to the definition we’ve known for several years already. Creating a great website or web asset still requires focusing on user experience, aesthetic appeal, and functionality. However, today’s web designers generally have more components and different devices. 

Web design in 2022 is about creating high-quality experiences for customers that can support various environments and devices. The best web designs are aesthetically appealing, functionally reliable, and capable of adhering to the latest trends in web creation, like augmented reality, 360-degree video, and ultra-high resolution. 


Featured image via Pexels.

Source

The post What Even Is Web Design in 2022? first appeared on Webdesigner Depot.

Source de l’article sur Webdesignerdepot

Designing for user experiences is what all designers do. UX is often thought of as the preserve of app or web designers; however, even a print designer laying out a magazine anticipates reader reaction to the scale of type, the placement of adverts, and the art direction of successive stories.

Because all designers design user experiences, the role of UX Designer has come to mean someone focused on creating a product or service utilizing research and testing to guide decision-making.

To research and test anything, you need metrics: a baseline and a target against which to measure. No one set of metrics is suitable for all projects, but because UX tends to be for financial profit, the Pirate Metrics Framework — Acquisition, Activation, Retention, Referral, Revenue — is a good starting place.

You might seek out very different metrics in some cases. For instance, a museum might measure the success of its education program based on how many students go on to study paleontology. However, those types of metrics are notoriously difficult to quantify. Excepting a few niche cases, successful UX increases user productivity, decreases errors, reduces the cost of support, and increases sales.

So if it’s as easy as counting dollars, why does UX go bad?

UX vs. Design Principles

To understand what UX is, you need to understand what UX is not.

One of the most straightforward design principles to understand is hierarchy: bigger is more important, i.e., a heading is visually stronger than a sub-heading, a sub-heading is visually stronger than the body text.

Design principles stem from one thing: human-centered design. At the most basic level, bigger is more important because the bigger a saber-toothed tiger appears, the more likely it intends to eat me.

The evolution of human beings is so slow that had a smartphone existed at the time, a neanderthal would have been able to tap a button with the same level of precision as me. Prehistoric man shares the same minimum button size as modern man: 48 x 48px. Design principles don’t change, don’t require research, and don’t need verifying with tests.

On the other hand, a neanderthal would not have understood a smartphone, let alone an app. You only need to step back by a single generation to find perfectly intelligent people baffled by a commonly employed design pattern.

Unlike design principles, user experience is a house built on sand. When the sand shifts, the walls crack. The bricks are still solid, but the rain gets in.

Because effective UX is temporary, so is the ROI.

Technology Breaks UX

Technology unfolds at a rapid pace. As technology develops, the user experience defined by that technology changes.

The classic example is the mobile revolution, but technological change does not necessarily mean hardware. One of the most significant shifts in UXD (User Experience Design) in my career has been the popularisation of AJAX — the process of using JavaScript to load new data without refreshing the page. This seamlessness has been around since the early 2000s, but it’s only in the last ten years, as the code to achieve it has simplified, that it’s been widely used.

Jakob’s Law states that users spend most of their time on other sites and, as a result, prefer your site to function like other sites by following familiar design patterns.

Even if your UX is rigorously tested and optimized, when other sites and services carry out their own research, they are testing against the background of younger technology, and the “other sites” Jakob Nielsen refers to begin to change. As a result, the UX of your site is gradually eroded.

The consequence of continual technological change is that user research is constantly invalidated. The UX of an app, site, or service begins to degrade as soon as it is created.

User-Experience Lifecycle

Human beings have two deep-seated motivations: survival and procreation. The most important, survival, depends on discovery — new food sources, new routes through dangerous territory, new ways to skin a mammoth. We are biologically programmed to seek out the new.

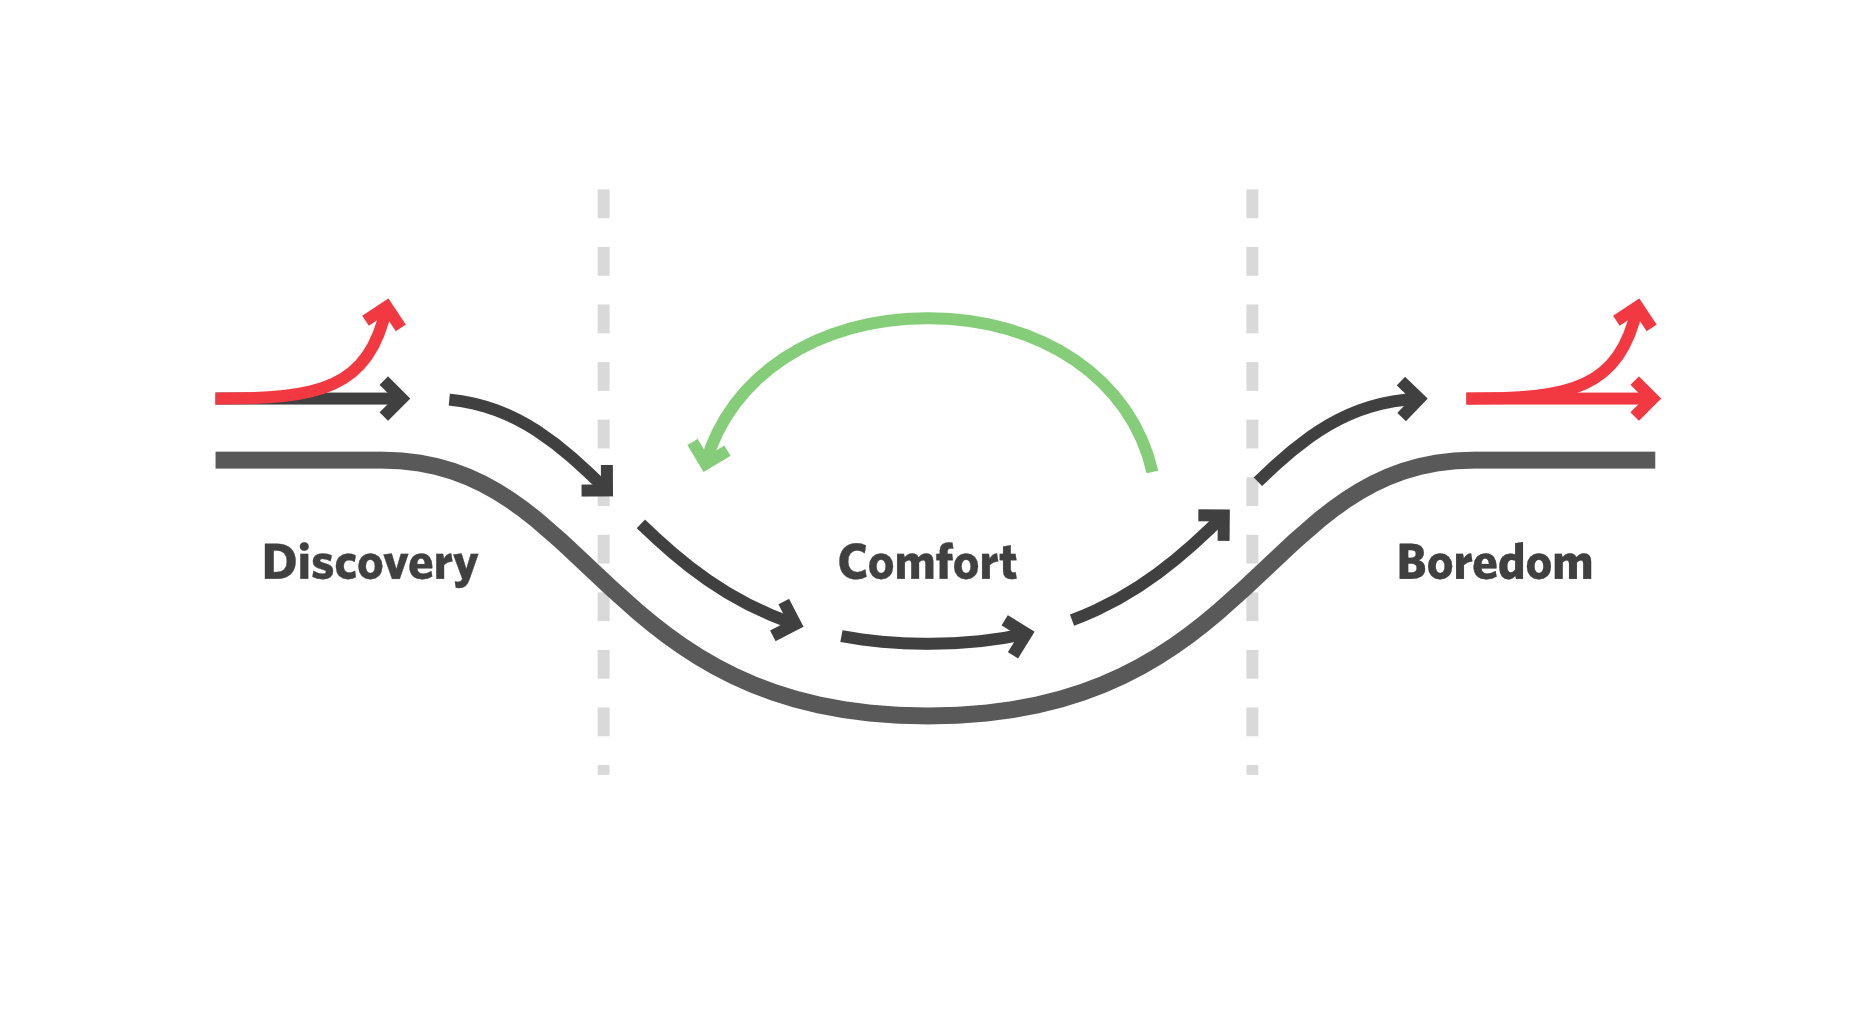
A typical user passes through three phases of a relationship with a site, app, or service: discovery > comfort > boredom. Churn, or drop-off, tends to occur in the discovery phase (if the comfort phase is too slow in developing) or the boredom phase. The sweet spot is the comfort phase. That’s the part of the business-customer relationship in which the customer requires minimal support and is least likely to drop off.

The most effective form of UX — meaning the one that satisfies most metrics — rapidly moves a user from discovery to comfort and then continually eases the user back to the start of the comfort phase without tipping back into discovery.

This can be achieved with numerous micro-discoveries, tiny chunks of new experience, from simple functionality tweaks to style revisions.

Summary

All UXD, regardless of the quality, level of investment, and skill of the practitioner, begins to degrade the moment it is created.

Design principles like simplicity are good indicators of successful UID (User Interface Design) and are timeless; comprehensive design systems, brand assets, and content offer good ROI.

The most effective UX is broadly familiar and continually refreshed in small ways, allowing users to enjoy the comfort of the familiar while also experiencing the excitement of discovery again and again.


Featured image uses photos by Wolfgang Hasselmann & Shainee Fernando.

Source

The post When UX Goes Bad (and How to Fix It) first appeared on Webdesigner Depot.

Source de l’article sur Webdesignerdepot

Whether you’re new to the job or are an experienced designer, the anxiety of a new project can sometimes – often unexpectedly – cause us to freeze in our tracks. This creative paralysis sees us staring at a blank page, unable to come up with ideas, and the knowledge that time is slowly ticking away.

We’ve all been there. So we thought it would be helpful to share our tips and tricks for overcoming the tyranny of the blank page and help you get back to doing great work.

The first thing to know is that you are not alone; blank page syndrome has a basis in science, with a clearly identifiable set of symptoms that consistently occur together. 

The first thing to know is that you are not alone; blank page syndrome has a basis in science

It starts when you become stressed. Stress causes your brain to produce hormones that slow down neural functions, which only serves to increase the feelings of inadequacy over a lack of creative spark – and fuel anxiety. Understandably, this causes a spiral as your mind seems to get emptier and the blank page more threatening.

But don’t fear! Because there are ways to move past blank page paralysis and get back to productivity. 

Just Relax

Once you’re in a negative spiral, it’s notoriously difficult to get out of. The best solution is to avoid the spiral entirely – by starting in the right frame of mind. This means setting up a calm work environment before you even sit down. 

Do your best to avoid major distractions – such as young children who need your attention or colleagues who like to play music that vexes your soul. We’re not saying that you need a sound-proofed home office – the kitchen table might be fine – but schedule your work time for when the kids are at school or with a minder, or work from home if the office is likely to be noisy. A pair of noise-canceling headphones can be handy, too.

Avoid Distractions

Seemingly small things can also get in the way of your work. Chat and email notifications are the digital equivalents of a person calling your name from across a room. Try to avoid or silence anything that stops you getting into the creative mindset, even if you just mute things for a few hours. It’ll help you mentally separate your creative workspace from everything else.

all of those notifications will still be there when you resurface

Ultimately, you need to create a mood that you subconsciously associate with being productive. But even when the space around you is perfect, it can still take a while to get into the zone. Brains don’t just flip into creativity at the flick of a switch, so be kind to yourself. And remember – all of those notifications will still be there when you resurface later in the day. 

Do a Warm-Up

Studies have shown that a blank page is particularly stressful because it makes the task in front of you feel bigger than it really is. Gazing at an empty page is like seeing the whole project stretching out before you. The stress comes from the feeling of having to fill the whole journey, all the way from A to Z.

So don’t start with A! Instead, begin with a warm-up. Just as dancers always start with a series of exercises to warm up their muscles, creative designers can benefit from something similar. You could start by talking things through with colleagues or sketch some ideas using pen and paper, before opening your design app. 

Alternatively, you could start by planning your content hierarchy. You don’t need all the final words – but it can be helpful to work out how many headings you’re going to have, where images will sit, and whether your copy will be in paragraphs or lists. 

By doing this, you’ll have elements to place and a rough idea of their relative importance. It’s easy to get overawed by the importance of actual content – so start by getting a grip on the type, density, and length of content. 

Take Inspiration

The world around us is filled with inspiration and according to an icon designer Yannick Lung:

It helps to observe things in the real world and play around with them.

It can also help to borrow an idea. Obviously, we never condone copying someone’s work, but using existing work as a reference or jumping-off-point can help. Think of it as putting your own twist on an existing idea.

“I sometimes find it useful to reverse engineer a good example of the sort of thing I’m trying to write (and this works for design too). I usually break down a successful example into its constituent parts and swap them out for things more relevant to the project at hand, then refine from there,” says Harvey, one of Sketch’s brand storytellers.

Let Templates Take the Strain

Instead of putting pressure on yourself to instantly start designing, begin by creating templates or wireframes. This isn’t an avoidance tactic. Spending time creating an outline template saves time in the long run – plus, doing practical work that doesn’t need lots of detail will act as a warm-up. It might even help you catch potential issues in your designs earlier. 

Be Collaborative and Welcome Early Feedback

In general, people don’t work well in isolation – so collaborating with colleagues is a great way to get design ideas flowing. At the start of a project, reach out to your colleagues to let them know what you’re going to be working on and set up a session to collaborate on ideas and ask for direct input.

Never wait until the end of a project to ask for feedback. Involving your colleagues in the process early helps counter blank page paralysis and involving stakeholders can help you manage expectations. Aim to get regular and consistent feedback rather than waiting for it – which could cause a delay in your project. 

And of course, you should always choose a design software that enables real-time collaboration so that everyone working on a project can avoid version conflicts.

Avoid Burnout

When work isn’t physical, it can be hard to judge how much it takes out of us

When work isn’t physical, it can be hard to judge how much it takes out of us. If you’re suffering from blank page paralysis, it’s probably a sign that you’re starting to get burnt out. Try setting an alarm on the other side of the room so you have to get up to turn it off regularly – or just scheduling some time into your day to take a break, stretch, or even take a walk. Stepping away from your screen is good for your brain and your body.

In the end, the most important thing to remember when it comes to blank page syndrome is that you have to be kind to yourself. Nobody can be productive 100% of the time – we’re only human, after all. What matters is that you do whatever you need to get your creativity flowing.


Featured image via Pexels.

Source

The post Overcoming Blank Page Paralysis first appeared on Webdesigner Depot.

Source de l’article sur Webdesignerdepot

Micro-interactions effectively communicate brand identity and ethos while strengthening ties with the customer. These habit-forming tools make for a fun and seamless user experience. Facebook’s ‘likes’ and Tinder’s ‘swipes’ are two classic examples. 

Micro-interactions originated with the need to guide customers who had hit a snag while using a service or a product. The goal was to ease customers into being more product-savvy via subtle reassurance and feedback. Micro-interactions are now employed by everything from washing machines, to coffee makers.

Along with feedback, prompts, and recommendations, they can also present customers with an appealing visual reward upon finishing a task. When used optimally, micro-interactions drastically enhance the navigation and simplify how users interact with sites and apps.

How Micro-Interactions Work

Here are the four structural elements to a simple micro-interaction: triggers, rules, feedback, and loops. Every micro-interaction has a significant component to organize the operational cycle. It lets you control feedback and runs, so the users understand the consequences of their performance and feel motivated to follow through.

Triggers

This feature begins micro-interactions of both the user-initiated (prompted by user) and system-initiated (driven by the system) kind. For example, a click, scroll, swipe, tap, and pull are common triggers that users carry out. So making a payment, booking a cab, and clicking or tapping on the hamburger menu all fall under this category. On the flip side, the user’s alert prompt upon entering a wrong password is a classic system-generated trigger. 

Rules

This element determines what happens after the user sets a prompt into motion via tapping, clicking, scrolling, or swiping. Rules refer to the fact that apps decide the triggers that users employ — Tinder’s ‘swipe’ feature illustrates this point. These rules gradually become a habit-forming action that users get accustomed to while regularly engaging with an app.

Feedback

During this process stage, the system informs the user via auditory, visual, or haptic cues. It engages the users and encourages them to proceed further in their process. For example, the progress bar of a download, the visual representation of steps cleared in a circle, or the visual, aural, and tactile indication upon the success or failure of payment are all a part of the feedback mechanism.

Loop/Modes

This final stage entails tiny meta-rules of the process and determines the frequency and duration. A classic example from an ecommerce app is the ‘Buy Now’ transformed to ‘Buy Another’ Before the user loses interest in the app, the app typically uses such a loop to get them to re-engage with the app. 

How to Use Micro-Interactions

We’ve established that micro-interactions are fabulous, but not every UX interaction on your app or site needs one throughout the wireframe. Overusing this tool could saturate the overall creative experience your design may want to offer. Worse, it might even end up confusing the information hierarchy. It undermines the design and unbalances the user experience of discomfort and irritability. So it’s crucial to know when exactly to use them.

Let’s find out how few quick tips on micro-interactions can elevate and humanize your mobile user experience:

  • Swipe right or left: A signature move made entirely on swiping micro-interaction featured in the famous Tinder app. Swiping is an easier action than clicking or tapping.
  • Call-to-action:  As part of the last step during payment or order, place a ‘Confirm Order’ or ‘Book Now’ prompt, which gives the task a sense of urgency. As a result, having acted on it feels like a minor achievement. 
  • System status: Your app user wants to know what’s happening. System status lets them know they are moving in the right direction and helps avoid confusion. Sometimes, users even run out of patience while uploading a picture, downloading a file, or filling up the registration form.
  • Classic notifications: Users need a quick reminder of products selected/wishlist in their abandoned cart with a reduced attention span. A simple notification can nudge them toward finalizing the purchase. 
  • Button animation: Animated buttons are not only cute, but they also help users navigate the mobile app swiftly. Try out attractive colors, fonts, sizes, shapes, and clipart elements corresponding to the animation and create that cool button to pop up when tapped or hovered on. 
  • Animated text inputs:  A simple process of a likable element like zooming in while entering data into a form or filling up card details for payment can enhance the user experience.
  • Reward an achievement:  Especially true for educational and health apps, micro-interactions celebrating big and small milestones with a badge or a compliment of encouragement can strengthen a user’s engagement with the app. 

Benefits of Micro-Interactions

  • Brand communication: A successful brand ensures that the transmission to the buyer is engaging, positive, and hassle-free. When micro-interactions show a process status clearly, it creates and reinforces a positive image for your brand.
  • Higher user engagement: Experts say micro-interactions engage users better. These tiny elements subconsciously create the urge to keep interacting with your app. For example, each push or nudge notification acts toward redirecting your customers back to your app.
  • Enhanced user experience: From shopping to banking to traveling to learning to staying healthy, there’s an app for everything. A wide range of activities elevates the overall user experience and stays ahead in the game. Micro-interactions can work that magic for your brand. 
  • Prompt feedback: It’s frustrating not to know what’s happening behind the blank screen, especially during a purchase. Instant feedback via visual, sound, or vibrating notifications makes for a pleasant user experience. 
  • Visual harmony: Micro-interactions initiated even with a tap, swipe, typing, or scrolling are all a part of the UX design’s overall appeal. The trick is to keep all the interface elements in perfect sync with the app’s visual features.

Micro-Interaction Best Practices

Here are a few basic principles you should follow when you introduce a micro-interaction to the user experience.

1. Keep it simple, stupid (KISS)

KISS is a famous design principle that becomes even more important in the case of micro-interactions. The goal is to make the user journey delightful and not be a distraction.

2. Keep it Short

It has ‘micro’ in the name itself. But, again, micro-interactions aren’t supposed to be show stars, and a lengthy micro-interaction only distracts the user. 

3. Pick the Right Place

You should always consider the options carefully before choosing the spot for any micro-interaction. The widely used user-interaction designs are popular for a reason. Many people have already approved them, so you can safely continue with them. The use of micro-interaction should also sit well with your brand image. 

See also if the placement of a micro-interaction is reaching your ideal customer or not. And even consider whether you need a micro-interaction to begin with. 

And That’s a Wrap!

As UX designers, we can profoundly impact the overall design of sites and apps, the user’s journey, their interactions with our product/service, their connection with the brand, and the ease of doing a transaction.

We want customers to connect to our brand, love our products, and experience our exceptional customer service. But most of all, we want to earn their trust and loyalty.


Featured image via Pexels.

Source

The post Using Micro-Interactions to Drive UX first appeared on Webdesigner Depot.

Source de l’article sur Webdesignerdepot

User Experience (UX) design and User Interface (UI) design are two terms people sometimes mistakenly use interchangeably. While aspects of each are interconnected, there are distinct differences between UI/UX design.

According to Internet Live Stats, there are over 1.9 billion websites, but not all are active at the same time. No matter how you slice it, there’s a lot of competition to grab and keep user attention. Good UX is just part of the equation. For a genuinely stellar site, you must also offer an excellent interface.

Learning the ins and outs of good UI and UX requires a bit of knowledge of how the two differ and what works. Although they weave in and out of the same design, they are different.

What Is the Biggest Difference Between Good UX and UI?

UI is the functionality of the design and what users see. How do they interact with various elements? UX is more the way things come together — both visual and interactive features — to create a feel for the user. You can certainly see why people confuse the two as they both apply to interacting with a website or app.

Top design firms often have team members specializing in each discipline. However, UX designers are also aware of UI, and UI designers are also mindful of UX. How can you ensure you’re offering excellent UI/UX design while covering the full spectrum of requirements for each?

Ensuring Effective UX Design

Good UX design increases conversion rates by 400% or more. The site visitor walks away feeling understood and not frustrated. What are some of the most important aspects of good UX design?

1. Create a Good Structure

What is the hierarchy of your site? What is the first thing the user sees when they pull it up? How do they navigate from one page to the next? A well-designed website classifies different aspects of the page, and new content naturally falls into the appropriate category as it grows.

When creating a structure for your site, think about how it might expand in the next five years. You want the hierarchy to work from day one, but you also want to think through significant shifts in the content you might see down the road.

Even your navigational hierarchy should accommodate new areas easily. Plan for the unexpected, so you know how to work it into the overall design when you must.

2. Choose Beautiful Aesthetics

You have a few seconds to make an excellent impression on your site visitors. Take the time to make sure your design functions and is visually appealing. Your color palette should work, images should be crisp and relevant, and typography should be readable and engaging.

Step back from your computer and look at your design from a distance. Does anything stand out that isn’t pleasing to the eye? Get feedback from visitors about what they like and dislike. Since the focus is on user experience, your best source of constructive criticism is from your target audience. Listen to their concerns and ideas.

3. Communicate With Site Visitors

Most experts agree that users want an element of interactivity on sites and apps. People want to know you hear them and get a response. Some ideas include adding a live chat option to your site or engaging in SMS customer support.

Put yourself in their shoes. A customer may visit your site for the first time, having never heard of your brand. They have no reason to trust you or that you’ll follow through on your promises. Potential leads may have a few questions before parting with their hard-earned dollars.

Adding various ways to communicate shows them you’ll be there should they have a problem. It’s much easier to trust a company when you know you can phone, engage in live chat or shoot off an email and get an almost immediate response.

4. Add Clear Direction

Excellent UX is intuitive. You should add calls to action (CTAs) and images pointing the user where they should go next. You can use graphics of arrows, people looking or pointing toward the next step, words, or CTA buttons.

Get feedback on how clear the directions are and tweak them as needed. The user should never have to stop and ponder what to do next. Everything on the page should guide them toward the ultimate goal.

5. Break Down Complex Data

Every industry has complicated data that is difficult for non-experts to understand. Part of good UX is breaking down complex information and sharing it in a simplified way.

One example might be the registration process. Instead of just showing text, a good UX designer would number the steps. Visualizations help add to understanding.

Embracing Effective UI Design

User Interface impacts UX and involves how the design works. The UI designer thinks through visitor expectations and then creates an interface that isn’t frustrating. UI works within the framework of a website to develop functional features. User experience isn’t the complete focus of UI, but it does tie into the planning phases. What are some elements of good UI design?

1. Set Standards

For a design to have good UI, it must perform as expected. Have you ever clicked on a button, and nothing happened? Determine how you want things to work and the minimum acceptable standards for your site.

For example, what happens when someone clicks on a link or button? How does the user know their action created the expected result? Consistency is crucial to how a site performs.

2. Choose the Right Colors

While UX designers look at the emotional impact of various colors, UI designers look at whether the shades match branding and how well the different ones contrast for readability and usability. UI/UX design often bridges a single designer’s work, so the employee ensures everything works as intended, both emotionally and functionally.

You may work with another designer to make the site aesthetically pleasing while also tapping into the emotions driving users. For example, some people love blue, so a blue button can have positive results.

UX and UI designers utilize split testing to see which users respond best to. Then, make adjustments as indicated by how site visitors respond.

3. Focus on Cognitive Matters

According to the Interaction Design Foundation, people can only retain around five things in their short-term memory. Designers should work with recognition instead, as users tend to rely on cues to find what they need.

UI designers may develop an intuitive navigation system and then use the same cues on every page, such as placement, color, and language. Users can then recognize the system without having to memorize it.

4. Prevent Errors

Your job is to ensure errors are kept to a minimum when designing a website or app. One of the most significant parts of a designer’s job is testing and retesting.

Think about all the potential problems a user might run into, such as broken links, images not showing, or incomplete actions. How can you keep those problems from occurring in the first place?

Error prevention is particularly vital when designing software as a service (SaaS) or apps. Users grow frustrated quickly and will find another solution rather than troubleshooting an issue. You’re much better off avoiding the error in the first place.

How Do UX and UI Work Together?

You’ve likely already figured out how closely UX and UI entwine to create a usable experience. The UX designer pays attention to function and interactivity, and the UI designer thinks through how the interface looks.

UX pays attention to the flow of the website and where users start, go next and end up. On the other end, UI figures out how the elements look to the viewer and where everything is placed.

The UX team may decide to add an extra button to the page. The UI team must determine where to place it, if any sizing needs must occur, and how it impacts usability on desktop and mobile devices.

Although each has a different function, user experience and user interface must work together to create a usable site the target audience responds to. You can’t have excellent UX without excellent UI, and vice versa. The best designers consider both and implement them to their fullest potential.


Featured image via Pexels.

Source

The post What’s the Difference Between Good UI and Good UX? first appeared on Webdesigner Depot.

Source de l’article sur Webdesignerdepot

Few things are more important to a web designer or developer’s chances of success than having the proper workflow. The term “workflow” applies to the set of standardized steps you or your company uses to create, test, and deploy designs or products.

Over the years, as development processes have evolved, so too have the workflows experts use to bring their ideas to life. The MVP workflow, or “Minimum Viable Product” strategy, is one of the most popular options in 2022.

Here’s what you need to know about the MVP workflow and how it differs from some of the other standard workflows developers may be used to.

What is the Designer/Developer Workflow?

As mentioned above, the designer/developer workflow is a series of steps used by experts in the web design world to achieve a creative goal. The process includes the steps taken to start a project, evolve it, and finish it. Since software is never developed without tools, the technology you’ll access throughout the development process is also considered in most workflows.

An example of a standard development workflow might look like this:

  • Scaffolding: This is the stage wherein you start your new web project, creating a git repo, downloading libraries, preparing file structures, and completing other tasks to make sure your product is ready to roll out into the world.
  • Develop: This is where you’ll spend most of your time writing code for your application or website. The development process may include various specific tools and support from other staff members.
  • Test: In this stage, you examine the functionality of your code to determine if everything works as it should. If there are errors or issues, you can go back and develop fixes to the potential problems. Your code may go through the development/test process several times before you can move to the next stage.
  • Integrate: This is when you merge the code for your part of the development process with the rest of the team. You can also integrate your code into websites and existing apps at this point. If you’re working solo, you can skip this process.
  • Optimize: You prepare all your assets for use on a production server during the optimization stage. Files are generally optimized to ensure your visitors can view your site easily or access your applications with ease.
  • Deploy: In the deployment stage, developers push code and assets up into the server and allow for changes to be viewed by the public.

What is MVP? (Minimum Viable Product)

Now you know what a developer workflow looks like, you can begin to assess the concept of the “MVP” workflow. The term “MVP” stands for Minimum Viable Product.

The idea of “Minimum Viable Product” applies to a range of industries, from education to healthcare and government entities. This term comes from lean start-up practices and focuses heavily on the value of learning and changing during the development process.

When you adapt your workflow to focus on an MVP, you’re essentially adjusting your focus to a point where you can create a stripped-back version of something new – like an app or a website. The MVP is built just with the core features (the minimum), so you can bring the idea to market and test it as quickly as possible.

For instance, if your goal were to create an attractive new website for a client, an MVP would focus on implementing the crucial initial tools, and nothing else. While you may create checkout pages, product pages, and other aspects of the site, you wouldn’t populate it with content or start experimenting with bonus widgets and apps.

So, how does this offer a better alternative to the standard workflow?

Simply put, an MVP workflow is quick, agile, and easy. The idea is you can validate key concepts with speed, fail quickly, and learn just as fast. Rather than having to build an entire app and almost start over from scratch every time you find an error, you can race through the iteration and development process.

MVP workflows are also highly appealing to start-ups and entrepreneurs hoping to validate ideas without a massive amount of upfront investment.

Examples of MVP Workflows

Still confused? The easiest way to understand how an MVP workflow works is to look at an example.

Let’s start with a conceptual example. Say you were building a voice transcription service for businesses. The desired features of this product might include the ability to download transcription, translate them into different languages, and integrate them into AI analytics tools.

However, using the MVP approach, you wouldn’t try to accomplish all of your goals with your software at once. Instead, you’d focus on something simple first – like the ability to download the transcripts. Once you confirm you can do that, you can start a new workflow for the next most important feature for the app.

One excellent example of a company with an MVP approach is Airbnb. The entrepreneurs behind this unicorn company, Joe Gebbia and Brian Chesky, didn’t have a lot of cash to build a business with at first. They had to use their own apartment to validate the idea of creating a website where people could share their available “space” in a home or apartment with the public.

To begin, Airbnb only created a very basic website, published photos of their property, and waited to see the results. After discovering people were genuinely interested in renting another person’s home, the company was able to begin experimenting with new ideas to make a site where people could list their properties for travelers.

The Pros and Cons of an MVP Workflow

There are a lot of benefits to the MVP workflow – particularly when it comes to gaining agility and developing new products quickly. However, there are downsides too.

Pros

  • With an MVP approach, you can maximize your learning opportunities and create a more innovative, successful product at speed. You get to test every step of the way.
  • You release iterations or versions of your product quickly, which means you discover problems faster, allowing you to quickly solve these issues.
  • You build on the benefits of customer fans, “evangelists” in the marketplace who are keen to help your product or service grow.
  • An MVP gives you more freedom to try out unique ideas and “risks” you might otherwise avoid with a traditional workflow.
  • Because you’re focusing on creating only the “minimum viable product,” you don’t have to spend a fortune on initially setting up your workflows.

Cons

  • Agile work with an MVP flow requires a lot of effort in collecting constant feedback from customers and releasing iterations.
  • You’ll need to dedicate yourself to releasing many small and frequent product releases on a tight schedule.
  • You might have to revise the functionality of your product or app a number of times.

Creating Your MVP Workflow

If you believe an MVP workflow might be effective for you, the first step is defining your “Minimum Viable Product.” The app, website, or product you design needs to align with your team’s strategic goals, so think about what your company is trying to achieve at this moment – before you get started. If you have limited resources, or specific purposes, like improving your reputation as a reliable company, now might not be the right time to develop a new MVP.

Ask what purpose your minimum viable product will serve and what kind of market you’re going to be targeting. You’ll need to know your target customer to help you test the quality and performance of each iteration of your MVP. Once you know what your ideal “product” is, ask yourself what the most important features will be.

You can base these decisions on things like:

  • User research
  • Competitive analysis
  • Feedback from your audience

For example, if you’re producing an AI chatbot that helps companies to sort through customer inquiries, the most important “initial feature” may be the ability to integrate that bot into existing websites and apps owned by the company.

MVP Approach Guidelines

Once you have your hierarchy of most valuable features for your minimum viable product, you can translate this into an action plan for development. Remember, although you’re focusing on the “minimum” in development, your product still needs to be “viable.” In other words, it still needs to allow your customer to achieve a specific goal.

  • Review your features: Reviewing your prioritized product requirements and the minimum level of functionality you can deliver with each of these “features.” You need to ensure you’re still providing value to your customer with anything you produce.
  • Build your solution: Build your minimum set of features for the product or service. Remember to build only what is required. You can use methodologies like the agile or waterfall method to help guide your team during this process.
  • Validate your solution: Release your offering into the market, and ensure you have tools in place to gather feedback from early adopters. Use beta programs, focus groups, and market interviews to understand how your solution works for your customers and where you can improve on your current offer.
  • Release new iterations: Based on what you learn from your target audience, release improvements to your product quickly. Use your validation strategies to collect information from your audience with each release.
  • Review again: Go back to your product requirements and desired features and start the process over again, this time focusing on the next most valuable functionality. Over time, the value of your minimum viable product will increase.

Using the MVP Workflow Approach

While the MVP workflow approach might not be the right solution for every development or design team, it can work very effectively in the right circumstances. The MVP approach doesn’t minimize the importance of understanding market problems and delivering value. Instead, the focus is on delivering quick value that gradually increases and evolves over time.

As many developers and designers know, the most useful form of product validation in most cases is real-world validation. When your customers have had an opportunity to use a product on a day-to-day basis, they can provide much more effective feedback.

Just keep in mind that committing to the MVP approach also means changing your workflow and committing to iterations – otherwise, other features may never be completed. You’ll need to be willing to work quickly and in small bursts without getting too heavily caught up in one feature or functionality.


Featured image via Pexels.

Source

The post How to Get Started with the MVP Workflow first appeared on Webdesigner Depot.

Source de l’article sur Webdesignerdepot

Maps are a fascinating method for delivering content. At their best, they can create an intuitive way of presenting information and interacting with it. This is the advantage that digital maps, through mobile apps and websites, have over print maps and images where no interactivity is possible.


But it’s important to understand that more data ≠ better experiences. We all now have so much data available to us through multiple services that, arguably, the greatest challenge isn’t sourcing information but filtering it out. We can only handle so much information input before we become overloaded. This issue risks being omnipresent with maps. There are so many potential points of interest on a map that it’s essential to be clear about what needs to be exposed to users.

Also, UX design, map design, and user interface are all critical. While maps can be a powerful way of drawing people in, if end-users feel that you didn’t even consider the visual design, they’ll ‘bounce off’ your site or app in moments.

Common Use Cases

When are maps useful, and what problems do they solve? Let’s dive right into the most common use cases for maps used in web design.

Navigation and Direction

Like Google Maps shows, navigation and direction are arguably the classic case study for interactive maps. You are in one place and need to get to another. You can enter your destination, your current location, and the map will present suggestions for getting there. You can select the method of travel and adjust desired departure or arrival times. But you need to understand first what functionality your users need. How these options are exposed to users is a critical piece of UX design.

Also, if users are searching for options such as somewhere to eat, it’s not so straightforward. Then, how your map handles panning in real-time as users swipe around a city is going to be a big issue.

Showing Relationships and Trends Geographically

This is something that you’ll see in every election in any western country. We’re all used to seeing maps that give us a state-of-play for which state or seat is held by which party. Then, we might see projections based on voter intentions and projected voting swings deriving from that. Then, exit poll data can be projected with the map updated on an ongoing basis until the final result is confirmed.

The capability to do this is essential because if a static map were used, it’d be out of date any time a new poll was released. Also, voting intentions can change over a campaign, so such maps need to be dynamic. Of course, such maps are only as accurate as the available data, as the US 2016 election map showed.

Show Points of Interest

As mentioned previously, there’s a lot of data that can be exposed to map users. However, that doesn’t automatically mean that it should be. Usability is key. For example, when you look at a map, you’ll typically first see key points of interest. Which points of interest are going to be presented to you can vary.

One variant is zoom level. If your map is currently showing an entire city, the level of detail the map presents is deliberately limited. You’ll see districts, large roads, or geographic features such as rivers. If more detailed information were presented, users on mobile devices, in particular, would be overwhelmed. Even at this level, you’ll notice typography differences. These can include the city name being in bold or the names of different areas in capital letters. So the level of detail is coupled with the scale of the map. Zooming in a few notches will expose significant points of interest, such as museums. Zooming in to specific districts will reveal restaurants, coffee shops, and universities. This visual hierarchy is a critical way of managing the exposed level of information.

But information is still being abstracted away. It’s not until you tap on the museum that you’ll see information on opening hours and busy times. This is also typically presented with user photos and reviews. Context is also taken into account, so you’ll start to see local hotels and restaurants. So it’s not just individual points of interest that are important, but the connections between them.

6 Tips For Improving Interactive Maps

What are the challenges of creating effective maps, and how do people address the data overload problem? We’ll answer this question and go over the must-know aspects of map creation.

1. Ensure Security and Brand Trust

GDPR or General Data Protection Regulation. This is a critically important European law that extends a wide range of legal protection to European citizens regarding personal data. It’s not possible here to cover the full extent of the law, but here are some quick key points:

  • Consent is required for the processing of personal data; it cannot be assumed
  • You need to have a retention policy for information that’s capable of identifying people

Be aware that the latter doesn’t just cover commercial purposes. Research students have to submit GDPR forms that address what kind of data they’re sourcing and how they’ll be retaining it.

But the most crucial context is commercial. If a business suffers a data breach, it can be fined up to 20 million euros or 4% of annual worldwide turnover in the preceding financial year, whichever is greater. Therefore, any business storing data that could identify their customers will need to assess risk and compliance. Remember: it’s 4% of worldwide turnover, not EU turnover.

Also, anything of your business that you expose to your customers or users is an extension of your brand. Therefore, you need to assess your maps for brand compliance too. If you have primary brand colors and your map doesn’t abide by them, that’s a very poor look. Source the color hex codes directly from your brand team and involve them in design.

2. Use the Appropriate Type of Map

It’s also important to consider what type of map is most appropriate for your use case. Think carefully about what your users need, what you’re trying to communicate, what information you need to present, and how best to present it.

For example, points of interest style maps in a tourist app will be way more helpful than heat maps: people want to know where something is, key data like opening hours, and how to get there. A heat map showing the number of visitors to each attraction or area of a city is unlikely to be useful to tourists. However, it could be useful to the attractions themselves to map their visitors by heat map over time. This could help larger museums chart which exhibits are most popular.

Transport for London is charting passenger movement on the London Underground by detecting when a device with Wi-Fi comes into range and then passes out of range. They’re using this to understand overall user journeys and movements within individual stations to better manage disruptions.

3. Avoid Pop-Ups

It should go without saying by now that auto pop-ups are despised. It doesn’t matter what they’re doing or what they’re offering; an unwanted pop-up can only get in the way. The level of impact is even greater on a phone where pop-ups take up even more screen space.

Given this, many users close them without even reading them. So if you’re using pop-ups, don’t kid yourself. You’re likely just irritating users and increasing the likelihood that they’ll ‘bounce off’ or uninstall.

4. Avoid Auto-Geolocation

Auto-geolocation sounds incredibly convenient but can result in some real problems. For example, if there are any bugs with auto-geolocation, you could get false results. If someone connects through public building Wi-Fi, you could get false results. If they’re connecting through a VPN then, unless you get the user’s IP address and check if it’s the exit portal of a VPN, you could get false results.

The problem is most significant with mobile maps. If a map user is looking at a points of interest map, they likely have a specific and immediate use. This means it’s in their best to get the most accurate results possible. So why not just ask them?

Precision and Accuracy

These terms have specific meanings in geolocation. ‘Precision’ is the exactness of the data. ‘Accuracy’ is how closely the information on a map matches the real world. So you want precision and accuracy to be spot on, or data risks losing value. This applies not just to the gathering of data but to the representation of it. For example, if you have street-level data but your maps don’t present individual streets, then any representation of data on that map is likely to have poor accuracy. That map might succeed in abstracting irrelevant information but presenting an imprecise and inaccurate view.

5. Avoid Map Legends as Much as Possible

In many cases, primarily points-of-interest maps, they’re just not needed anymore. An essential part of user experience design isn’t just visual hierarchy but information hierarchy. You can mouse over on a desktop or laptop to get the essentials of a location, e.g., the museum’s name and its opening hours. On a mobile device, you can tap on that location to get the essentials, and you can tap on another location to move on; you don’t even have to press back. Given that, a legend would get in the way. So this simple piece of information design solves information overload issues.

As with all rules, there are exceptions. A good one is a heat map where a density of what’s being measured needs to be communicated. It doesn’t matter what the data is; it just needs to be something where mapping provides greater insight, especially if it informs decision-making. Sales is an excellent example for a national or multinational company. Of course, weather forecasting can make use of literal heat maps.

6. Accessibility Compliance

Not everyone has perfect eyesight. Even if someone has excellent vision, they could still be colorblind (8% of men and 0.5% of women are). Given that, take the W3C’s accessibility standards into account and treat them as a baseline or minimum barrier to entry for compliance. You shouldn’t feel good about the possibility of excluding 8% of your potential audience or customers. Ensure you keep your UX designers involved and don’t shy away from creating senior-friendly web designs.

Put simply: imagine if you could appeal to a new demographic that’s not catered to. If your competitors ignore them, you could give them a real reason to choose you instead by taking some straightforward steps. If your competitors are catering to them, you also need to. If you don’t, you’re just giving potential customers a big reason to ignore you.

Conclusions

The key takeaway is that there’s far more to creating good maps than just good cartography. That can be critical, too, though this may vary depending on the use case.

This will be a team effort because your map will involve data sets, design decisions, and, yes, cartography. You’re going to need to involve brand and IT too. So think about design principles and development methodologies.

First and foremost, what are your users’ needs? If you haven’t done any user research or taken the time to understand the customer journey, are you adding anything or getting in the way? It’s easy to see the department that requested the map as stakeholders, but you should probably view your users as stakeholders too.

This sounds complex, but as you hopefully now appreciate, a map is probably more complicated than you thought.


Featured image via Pexels.

Source

The post The UX of Maps in Web Design first appeared on Webdesigner Depot.

Source de l’article sur Webdesignerdepot