Articles

Créer une API minimaliste RESTful avec .NET Core 7

Créer une API minimaliste RESTful avec .NET Core 7 est un excellent moyen de créer des applications modernes et flexibles. Découvrez comment le faire facilement !

NET Core et ASP.NET Core sont des frameworks populaires pour créer des puissantes API REST. Dans ce tutoriel, nous allons l’utiliser pour développer une simple API Minimal qui simule une cote de crédit. Les API Minimal offrent une approche simplifiée pour créer des API HTTP hautes performances à l’aide d’ASP.NET Core. Ils vous permettent de construire des points de terminaison REST complets avec un minimum de configuration et de code facilement. Au lieu de compter sur les échafaudages et les contrôleurs conventionnels, vous pouvez définir fluemment les routes et les actions API pour simplifier le processus de développement.

NET Core et ASP.NET Core sont des frameworks populaires pour créer des puissantes API REST. Dans ce tutoriel, nous allons l’utiliser pour développer une simple API Minimal qui simule un score de crédit. Les API Minimal offrent une approche simplifiée pour créer des API HTTP hautes performances avec ASP.NET Core. Elles vous permettent de construire des points de terminaison REST complets avec un minimum de configuration et de code facilement. Au lieu de s’appuyer sur des échafaudages et des contrôleurs conventionnels, vous pouvez définir fluemment des routes et des actions API pour simplifier le processus de développement.

Nous allons créer un point de terminaison permettant à un utilisateur de récupérer un score de crédit en envoyant une demande à l’API. Nous pouvons également enregistrer et récupérer des scores de crédit à l’aide des méthodes POST et GET. Cependant, il est essentiel de noter que nous ne relierons pas de systèmes backend existants pour extraire un score de crédit; au lieu de cela, nous utiliserons un générateur de nombres aléatoires pour générer le score et le renvoyer à l’utilisateur. Bien que cette API soit relativement simple, elle illustrera les bases du développement d’API REST avec .NET Core 7 et l’approche API Minimal. Ce tutoriel fournira une introduction pratique à la construction d’API REST avec .NET Core 7 et l’approche API Minimal.

Lorsque nous développons une API REST avec .NET Core 7, nous devons suivre certaines conventions d’architecture. Nous devons définir les chemins d’accès à nos API, les méthodes HTTP, les contrôleurs et les actions. Nous devons également définir les modèles de données que nous allons utiliser pour stocker et récupérer les données. Enfin, nous devons définir le format des données que nous allons envoyer et recevoir via l’API. Dans ce tutoriel, nous allons utiliser le format JSON pour envoyer et recevoir les données. Une fois que nous aurons défini ces conventions d’architecture, nous pourrons commencer à développer notre API.

Une fois que nous aurons développé notre API, nous devrons la tester. Nous pouvons tester manuellement l’API en envoyant des requêtes HTTP à l’aide d’un client HTTP tel que Postman ou cURL. Nous pouvons également tester automatiquement l’API en écrivant des tests unitaires et intégrés avec xUnit ou NUnit. Une fois que nous aurons testé l’API, nous pourrons la déployer sur un serveur web tel que IIS ou Kestrel. Une fois déployée, nous pourrons commencer à utiliser notre API pour récupérer des scores de crédit.

En conclusion, ce tutoriel a fourni une introduction pratique à la construction d’API REST avec .NET Core 7 et l’approche API Minimal. Nous avons appris à définir les conventions d’architecture, à développer une API, à tester manuellement et automatiquement l’API et à la déployer sur un serveur web. Bien que cette API soit relativement simple, elle illustre les bases du développement d’API REST avec .NET Core 7 et l’approche API Minimal.

Source de l’article sur DZONE

Mise en œuvre de la découverte de services avec Spring Cloud (2e partie)

Dans cette deuxième partie, nous allons voir comment mettre en œuvre la découverte de services avec Spring Cloud. Préparez-vous à apprendre comment configurer et déployer vos services !

Partie 2 de l’Article Spring Cloud: Comment Implémenter le Service Discovery (Partie 1)

Dans la première partie de cet article, Spring Cloud: Comment implémenter le service de découverte (Partie 1), nous avons vu les bases du Service Discovery dans le contexte de Spring Cloud. Nous avons vu que la composante Netflix OSS Eureka est toujours le choix principal. Dans ce post, nous allons discuter de certains sujets supplémentaires liés à Eureka, tels que :

API Java Client

API REST

Sécuriser le serveur de découverte et les services clients

Combiner le Service Discovery avec la Configuration Distribuée

Service Discovery : API Java Client

Dans les exemples de la première partie de cet article, l’enregistrement et le récupération des fonctionnalités étaient exécutés sous le capot et nous avons seulement vu les résultats des tests de l’architecture entière en appelant un point de terminaison REST client. Il existe également une manière d’interagir avec l’API Eureka de manière programmatique, en utilisant des appels de méthodes Java. Un choix possible serait d’utiliser la classe EurekaClient. Par exemple, si nous voulons obtenir toutes les instances d’un service identifié par un ID particulier, nous pourrions écrire le code suivant, supposant que nous avons un client implémenté comme une application Spring Boot exposant des services REST :

EurekaClient eurekaClient = new EurekaClient.Builder().build();

Applications applications = eurekaClient.getApplications(« SERVICE_ID »);

List instances = applications.getInstances();

Une fois que nous avons obtenu la liste des instances, nous pouvons parcourir cette liste et récupérer les informations dont nous avons besoin, telles que l’adresse IP et le port sur lesquels le service est en cours d’exécution. Nous pouvons également effectuer des opérations supplémentaires sur les instances, telles que la mise à jour des informations ou la suppression d’une instance.

Service Discovery : API REST

Eureka fournit également une API REST qui peut être utilisée pour interagir avec le serveur de découverte. Cette API est très similaire à l’API Java client, mais elle est plus adaptée aux scénarios où nous devons interagir avec le serveur de découverte depuis un environnement non-Java ou depuis un script. Par exemple, si nous voulons récupérer toutes les instances d’un service spécifique, nous pouvons appeler l’URL suivante :

http://:/eureka/apps/

Cette URL retournera une réponse JSON contenant toutes les informations relatives à ce service et à ses instances. Nous pouvons également effectuer des opérations supplémentaires sur les instances, telles que la mise à jour des informations ou la suppression d’une instance, en appelant des URL spécifiques.

Service Discovery : Sécurisation du serveur et des services clients

Enfin, il est important de noter que le serveur Eureka et les services clients doivent être sécurisés pour éviter toute attaque malveillante. Par exemple, nous pouvons configurer Eureka pour utiliser HTTPS pour sécuriser les communications entre le serveur et les clients. Nous pouvons également configurer Eureka pour authentifier les clients et leurs requêtes en utilisant un système d’authentification basé sur des jetons. De plus, il est possible de configurer Eureka pour

Source de l’article sur DZONE

Message and Event payload validation has been a rather thorny problem ever since extensible data structures (XML, JSON, YAML…) started to be used at scale. In fact, very little progress has been made since the good old days of DTDs. Schema definition languages such as XML-schema, json-schema, or even the OpenAPI schema are unfamiliar to most developers and often result in a rather anemic validation set of rules, leading to a perceived low value, and therefore a lack of interest. 

There are three key problems in a schema architecture: 

Source de l’article sur DZONE

Introduction

A URL shortener is a service that is used to create short links from very long URLs. Usually, short links have the size of one-third or even one-fourth of the original URL, which makes them easier to type, present, or tweet. Clicking on a short link user will be automatically redirected to the original URL. 

There are many URL shortening services available online, such as tiny.cc, bitly.com, and cutt.ly. Implementing a URL shortening service is not a complex task, and it is often part of system design interviews. In this post, I will try to explain the process of implementing the service. 

Source de l’article sur DZONE

One of the core things I’ve been working on for the past 10 years is APIs — everything from simple APIs that are used by one client to multi-device and multi-purpose APIs. During those years, I’ve also had the opportunity to work with many third-party APIs like Stripe, Twilio, and others who are less popular and glamorous. Almost all of those APIs were REST-based and unique in some way. 

There are many reasons why REST is so popular. It’s simple to understand, it’s flexible, it works on any scale, it has a great community and tools built around it. But besides those, I’d also say that a lot of popularity came from the fact that’s its oldest rival, SOAP, is just horrible.

Source de l’article sur DZONE

Currently the most popular version control system is git and I’ll be writing this based on git and it’s functionalities and capabilities.

Git is often seen as a way to enable distributed programming i.e. multiple programmers can work on the same code repository quite easily without disturbing each others work (much). In addition to that just like other VCS’s it’s also a log of work but to my experience that part is often unfortunately neglected. What I will be focusing this time is the log part because I think it deserves more attention.

Why to create a meaningful log?

The git log should consist from small meaningful changesets where each commit addresses a single problem. By dividing the log to small commits it enables resilient way of working. Being resilient enables simple and fast procedures to rollbacks, reviews, tags, branching etc.

Lets say that a developer is implementing a REST API. The API needs a web layer that receives the HTTP requests, it probably has some sort of logic layer to do data transformations and validations and maybe some calculations and finally it has a data storage where the data is persisted. There are options how to record this work to the log. One option would be to implement the API and record a single commit or squash the commits before pushing the changes to remote so it would become a single commit. Another option would be to record commits every now and then while developing and finally push those commits as is to the remote repository. Yet another way would be to carefully pick what is recorded per commit in order to have a set of meaningful commits that each address a single issue.

Example of the first approach would be something like this:

Source de l’article sur DZONE


Introduction

While many of us are habituated to executing Spark applications using the ‘spark-submit’ command, with the popularity of Databricks, this seemingly easy activity is getting relegated to the background. Databricks has made it very easy to provision Spark-enabled VMs on the two most popular cloud platforms, namely AWS and Azure. A couple of weeks ago, Databricks announced their availability on GCP as well. The beauty of the Databricks platform is that they have made it very easy to become a part of their platform. While Spark application development will continue to have its challenges – depending on the problem being addressed – the Databricks platform has taken out the pain of having to establish and manage your own Spark cluster.

Using Databricks

Once registered on the platform, the Databricks platform allows us to define a cluster of one or more VMs, with configurable RAM and executor specifications. We can also define a cluster that can launch a minimum number of VMs at startup and then scale to a maximum number of VMs as required. After defining the cluster, we have to define jobs and notebooks. Notebooks contain the actual code executed on the cluster. We need to assign notebooks to jobs as the Databricks cluster executes jobs (and not Notebooks). Databricks also allows us to setup the cluster such that it can download additional JARs and/or Python packages during cluster startup. We can also upload and install our own packages (I used a Python wheel).

Source de l’article sur DZONE

If you are building an application using Node.js, it can get a little overwhelming since there are a variety of databases to choose from and different ways to build APIs. One way to reduce development time and focus on the problem you are trying to solve is to use a Database as a service to store the data. The advantage of this approach is to use a cloud database system without purchasing hardware which can be cost and time-effective.

One such database service is HarperDB Cloud. To build REST APIs rapidly this service allows us to perform all database operations using a single endpoint. It supports a variety of programming languages such as JavaScript, Java, Python, and so on. Some of the features of HarperDB are the following:

Source de l’article sur DZONE

The microservice architecture pattern, which is used widely across tech companies large and small, enables businesses to distribute functionality between many small applications, instead of larger monolithic portions. Each piece has a specifically defined task, along with communications and other services, usually via a REST API channel. The benefits of utilizing a microservice architecture include, but are not limited to: 

  • Simple development and maintenance of applications: developers and teams are able to focus on one application rather than multiple, with the benefit of faster development, and fewer hitches (such as bug and easy to miss errors) in the larger project. 

    Source de l’article sur DZONE

What an extraordinary year 2020 has been for the news! From the ongoing coronavirus crisis, to a turbulent US election, to the unrelenting march of Bitcoin, this year like no other we’ve been glued to our phones micro-analyzing every tidbit of news.
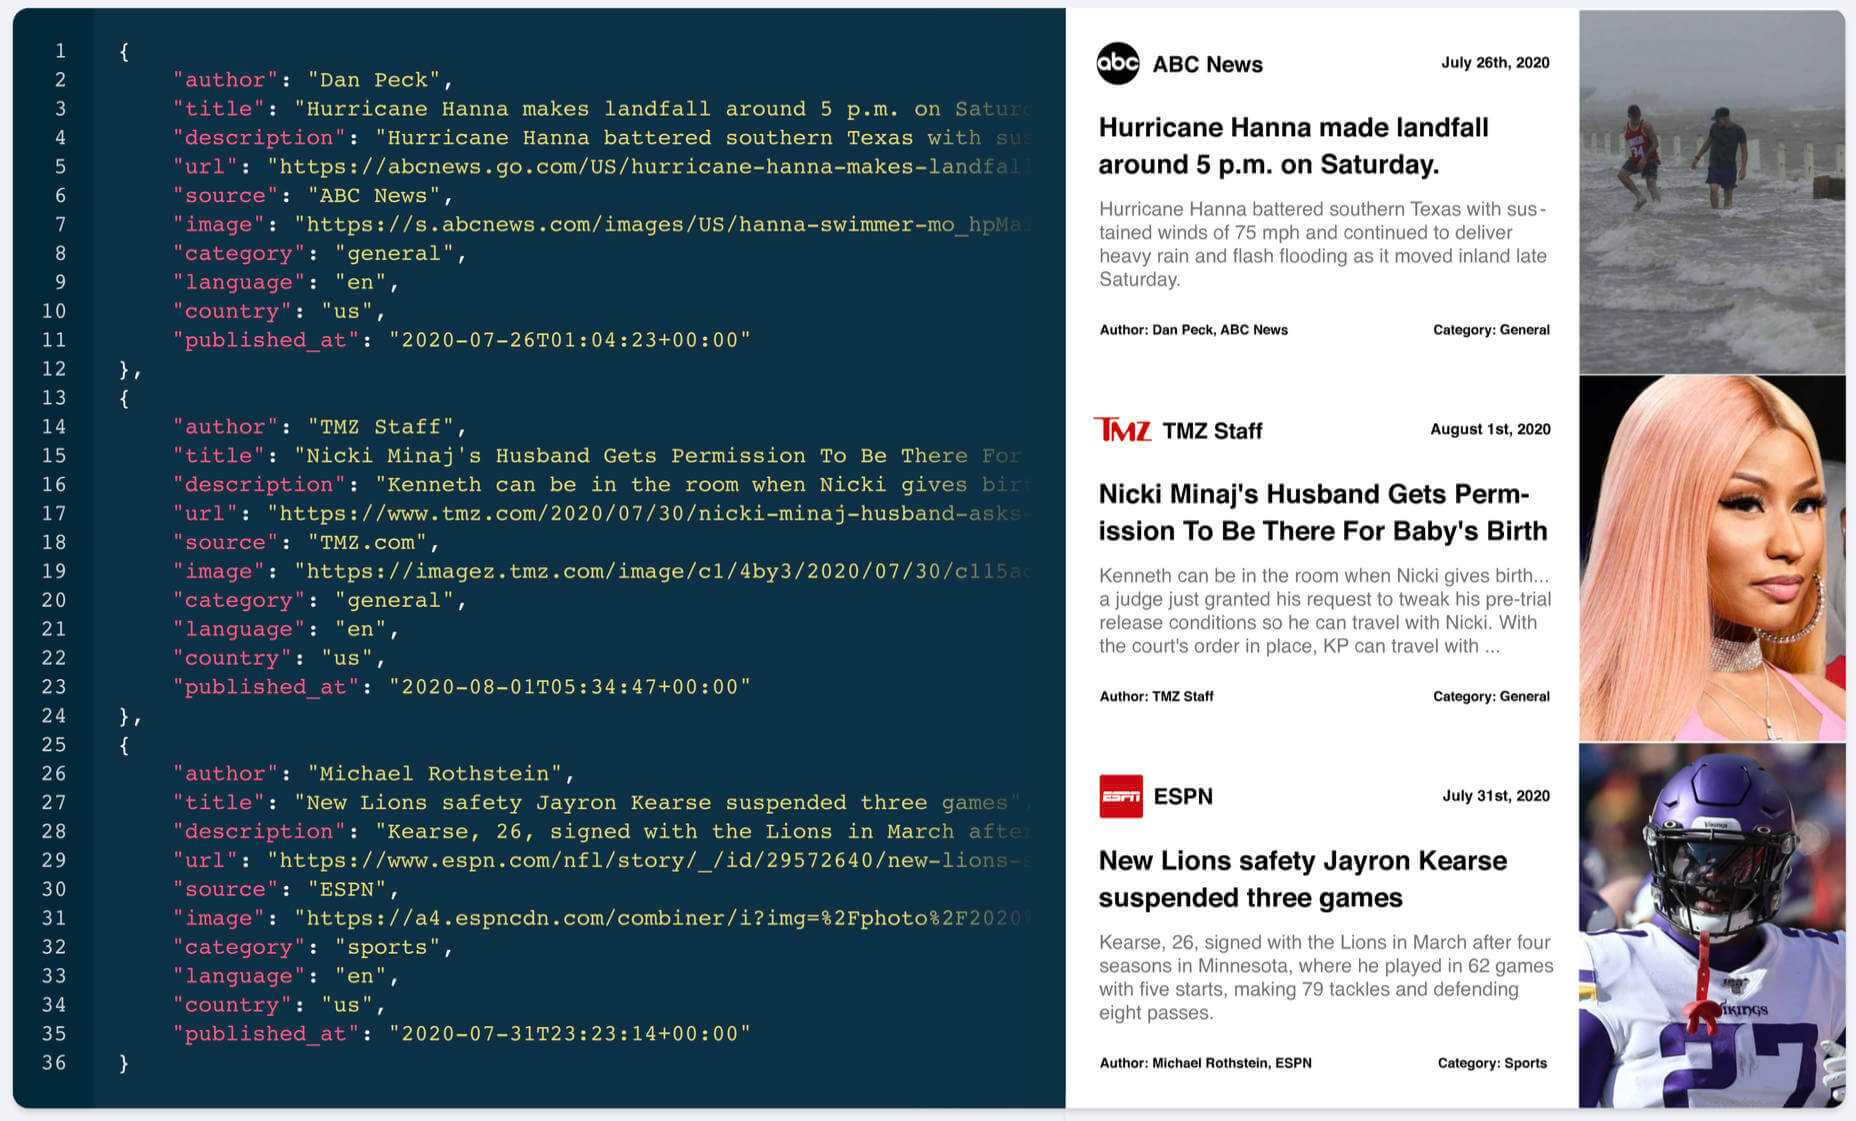
Which makes this the perfect time for mediastack, an awesome REST API that allows you to embed a customizable news feed, sourced from the world’s top news agencies, and updated by the minute, right on your site.

Integrating Global News with Your Site

News is the beating pulse of so many global industries. From political decisions that affect stock prices, to natural disasters that interrupt goods and services, to the whims of celebrities who overnight transform brands from unknown to must-have.

Whether you’re building a site for a non-profit in Louisiana that cares deeply about both Washington politics, and hurricanes in the Caribbean; or you’re building an app for a golf course in Halkidiki that’s focused on both local news, and golf around the world; delivering real-time news content to those users elevates UX.

Tightly integrating the news with your site makes it a hub for users hungry for that very news. The only limit is your creativity.

Display Up-to-Date News on Your Site

When news breaks around the world the top networks scramble to catch up; they simply can’t maintain correspondents in every town and city in the world, and so they rely on affiliates. mediastack pulls in news from over 7,500 different sources in over 50 countries worldwide, giving you access to exactly the same affiliates frequently used by big news organizations like CNN, MSNBC, BBC, or ABC.

When it’s one of the big players in news that breaks a story first, mediastack still has you covered because as will as covering smaller, lesser-known sources mediastack delivers real-time news from CBS, Sky News, The Guardian, Al Jazeera, USA Today, and a host of trusted names across the industry.

If your site targets users that are only interested in certain types of story — like sports, or Hollywood celebrities — then you can even pull in stories from ESPN, TMZ, or Fox News.

Get Started Quickly with mediastack

Getting started with mediastack couldn’t be simpler, and there’s a free plan that’s more than enough to prototype your project.

Full documentation is provided with code examples for PHP, Python, jQuery, Go, and Ruby. To start integrating all you need to do is register for a free access key.

Once you have your free access key, you connect to the API, then customize the results you receive with simple parameters. You can specify the types of news, the precise sources (including omitting sources), languages, countries, and most importantly your keywords.

For example here’s how you’d request science news from CNN, but not TMZ:

https://api.mediastack.com/v1/news
?access_key=[ INSERT YOUR ACCESS KEY HERE ]
&categories=science
&sources=cnn,-tmz

Let’s say you want to display Spanish language crypto news on your site, it couldn’t be easier:

https://api.mediastack.com/v1/news
?access_key=[ INSERT YOUR ACCESS KEY HERE ]
&categories=business,technology
&languages=es
&search=crypto,bitcoin,btc,xrp,ripple,etherium,altcoin

The API sends back simple JSON data that’s easy to run through. Each news item includes the author, title, description, url, source, image, category, language, country, and a published_at timestamp that records when the story was posted.

Once the feed is setup, sit back and relax. It’s all automated from now on.

The Best Source of News for Your Website

mediastack is delivered by apilayer, quite rightly one of the most trusted names in APIs, and is capable of handling millions of requests simultaneously.

Fast, updated by the minute, highly customizable, reliable, and sourced from the biggest names in the news industry, mediastack is an amazing API.

There’s a free-forever plan that allows you to use the API without charge, for up to 500 API calls per month, that’s perfect for trying it out.

For commercial use, plans start at just $19.99/month, and can handle up to 250,000 calls per month. Commercial plans also include HTTPS encryption, live news delivery, access to historical data, and — should you ever need it — technical support.

Head over to mediastack today, to prepare your site for whatever events 2021 throws at us.


[– This is a sponsored post on behalf of mediastack –]

Source


Source de l’article sur Webdesignerdepot