Articles

Whether you’ve worked with a few WordPress themes to design websites or worked with many of them, you’ll no doubt agree that plenty of WordPress themes that are visually gorgeous on the front end can be terribly unattractive and extremely awkward to use on the backend. 

Working with a WordPress theme can sometimes be difficult, but it can be different.

Want proof? Look no further than with BeTheme. 

BeTheme, with 260,000+ sales and counting and a 4.83-star user rating, is one of the top 5 best-selling WordPress themes of all time.

In this article, we’ll show you one of the many reasons why this is the case by focusing on how BeTheme’s backend is designed to make web design tasks more manageable.

Enhance your workflow experience with a WordPress theme backend that won’t stress you out 

Once you install BeTheme, you’ll almost immediately notice it’s different. Instead of a drab and often unintuitive WordPress backend, you’ll suddenly be confronted with a clean, well-organized dashboard and toolset.

You haven’t actually lost anything. WordPress, with its impressive assortment of content management tools, is still there. Be’s backend is a visually appealing space in which you will take pleasure to work.

If only the rest of WordPress could follow suit.

If you haven’t worked with BeTheme recently (or at all), why not let us walk you through several of its most helpful backend features.

Starting with:

1. Dashboard Design

BeTheme’s dashboard is conveniently located directly beneath the main WordPress Dashboard link. So you won’t waste time sifting through the sidebar trying to find your theme’s settings, and everything displayed in the dashboard is designed to help you get the most out of your WordPress theme. 

Clicking on the BeTheme or the Dashboard link gives you immediate access to the following: 

  • Theme registration information
  • BeTheme’s step-by-step website creator
  • A Navigation bar that directs you to BeTheme’s frequently used tools
  • Plugin status and updates and new features announcements
  • The latest additions to BeTheme’s ever-growing library of pre-built websites
  • Beloved BeTheme integrations

It takes a minute to fully appreciate how helpful this dashboard will be. 

BeTheme

2. Dark/Light Mode

Research on dark mode benefits is inconclusive. But since so many people seem to like it, it is offered as an option in many popular apps and devices.

Dark mode users will tell you that they experience less eye strain, they sleep better, and their device’s batteries last longer than is the case with light mode.

BeTheme’s backend offers a dark mode option, and you are encouraged to try it.

If you feel it beneficial, so much the better, and you needn’t concern yourself with what the research indicated, or didn’t indicate.

BeTheme

3. Step-by-Step Website Creator

When you first install a WordPress theme, it’s not uncommon to spend some time trying to figure out what to do next. The theme’s advertisements may highlight a selection of impressive demos, but where are they more exactly?

Of course, you’ll eventually find them, but is whatever difficulty you may have encountered necessary?

BeTheme removes that impediment. 

You will notice the Setup Wizard under BeTheme (and in the dashboard as well.) Click on the wizard, and with its step-by-step website, you can: 

  • Give your website a name.
  • Select the page builder you want to work with and choose your preferred editing mode.
  • Pick an ideal pre-built website based on your new website’s industry or niche.
  • Easily replace existing content with your own.

The entire process of loading your brand-new site and page builder into WordPress takes a minute (or more like 30 seconds once you are used to it).

BeTheme

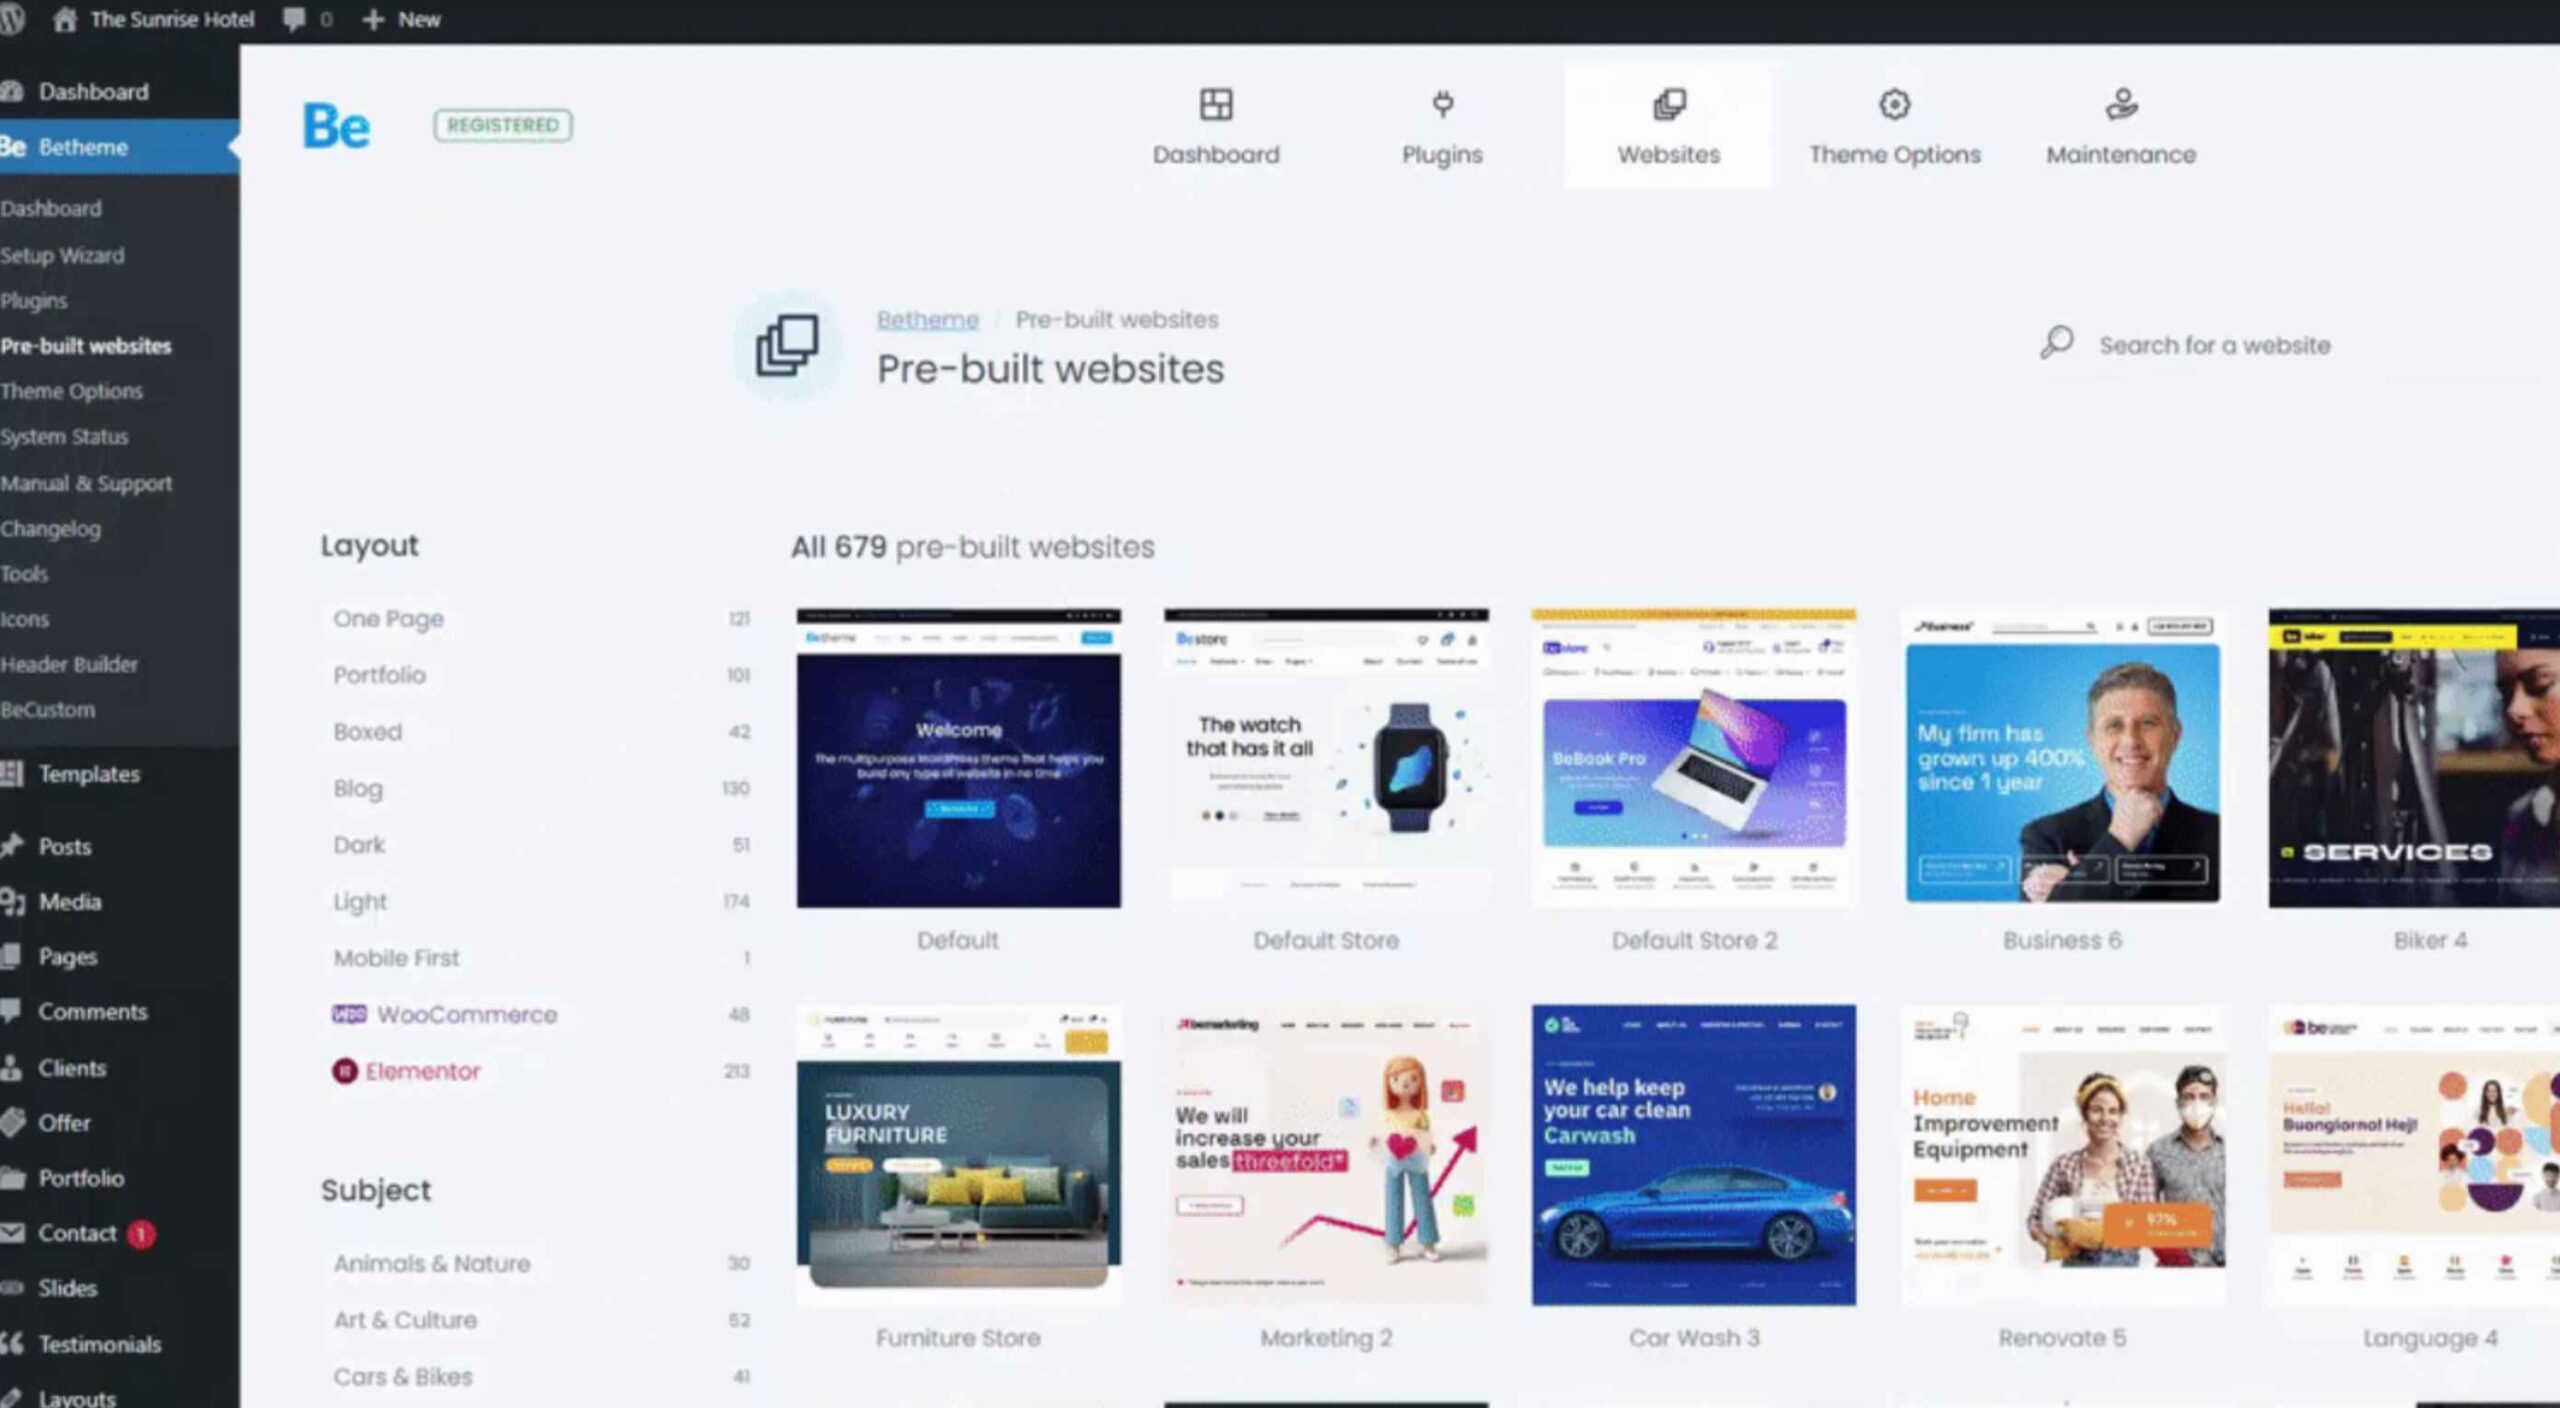
4. Pre-Built Site Previews

With BeTheme, you can choose from more than 650 pre-built websites. New ones are being added as we speak, and they’re delightfully easy to find. Just look under the dashboard’s Websites link or Pre-built Websites in BeTheme’s sidebar menu, and there they are!

You’ll be familiarized with the available design aids and options in no time, and you’ll find it easy to incorporate the latest design trends into your websites. BeTheme has even placed previews of its newest pre-built websites in your dashboard to help you along.

You may choose one of the latest pre-built websites to work with, or you might find one or more others you particularly like. Pre-built sites you do not plan to work with can still be sources of inspiration.

Whatever your choices, you’ll find it easy to incorporate the latest trends into website designs.

BeTheme

5. Plugin Manager

BeTheme’s Plugins area differs from what you see in the WordPress plugins area. You’ll find several of these differences to be particularly helpful in that BeTheme’s plugins manager enables you to: 

  • View the active plugins you’ve installed.
  • Update plugins when necessary.
  • Install and activate plugins only when it’s required.

The last item is essential in that plugins do not appear in the WordPress plugin manager until you have installed them. Not having to install plugins you will not need will help keep your website operating at a high level of performance.

BeTheme

6. BeTheme Support

WordPress is a powerful content management system and an extremely popular one. It may, in fact, be the most powerful and popular system of its type.

WordPress is also community-driven to a considerable extent, which can sometimes create user inconvenience. As a user, you might sometimes have to dig to find answers to your questions or get help when needed.

You don’t have to experience that inconvenience to get support from BeTheme.

To gain access to BeTheme’s support center, you need go no further than BeTheme’s sidebar or dashboard to access self-support options or open a ticket for direct assistance.

BeTheme

7. Theme Options

Plenty of well-known WordPress themes have theme settings customization capabilities. With BeTheme, it’s easy to set brand colors, choose custom fonts, and establish global layouts. The same holds for configuring responsiveness, performance, and accessibility, all of which are essential for optimizing UX and search engine functionalities.

The problem with most theme options is that they can only be modified from the main WordPress dashboard. So if, while designing on a page, you suddenly realize a portion of its design hasn’t been configured correctly, or you’re dissatisfied with any design segment, you’ll have to save your changes and go to your theme’s backend to make the necessary fixes.

From the BeTheme dashboard inside the BeBuilder BeTheme, you can modify your Theme Options without having to interrupt your workflow.

BeTheme

8. White-Label Mode

A final feature of the BeTheme WordPress theme’s backend you should become familiar with is BeCustom. This critical feature is located under BeTheme in the sidebar.

BeCustom enables you to access some white-label regions in BeTheme. 

  You can use BeCustom to:

  • Substitute Be’s branding with your business’s branding to reinforce your name with your clients.
  • Disable any features your clients have no use for and deny access to any features you do not want them to modify while at the same time making the WordPress theme’s backend easier to work with.
  • Create an extra user-friendly and secure WordPress login.
  • Customize the dashboard’s “Welcome” message.

BeTheme

Make Your WordPress Design Projects Simple to Handle With BeTheme

Is there anything BeTheme doesn’t do?

Most likely, but nothing that would adversely impact your design effort.

This multipurpose WordPress theme’s hundreds of pre-built websites will help you get virtually any website project off to a rapid start and headed in the right direction.

BeTheme features the fastest and most powerful page builder for WordPress.

You will have total control over every feature and facet of your website’s UI.

In short, BeTheme offers the finest way to manage any web design project within WordPress.


[- This is a sponsored post on behalf of BeTheme -]

Source

The post Why Do WordPress Theme Backends Have to Suck? (Hint: They Don’t!) first appeared on Webdesigner Depot.

Source de l’article sur Webdesignerdepot

User experience is one of the most important aspects of web design, but many experts overlook that UX doesn’t just apply to web pages. User experience as a concept encompasses all aspects of end-user interaction with a company.

That means you need to discover the right UX strategies for everything from your homepage to your email marketing and even your listings on Google.

Today, we’re going to explore some of how you can apply UX principles to your client’s image on search engines.

Why Your Search Engine Listing Matters

Let’s start with the basics: 89% of customers start their purchasing process with a search engine. That means that whether you’re creating a portfolio to sell your services or building a website for a client, the first connection a customer has with your design isn’t on the homepage.

Most of the time, you’re driving a specific experience for an end-user before you even realize it. Before you can wow an audience with a beautiful site design or an amazing CTA offer, you need to convince them to click on your Google link.

When you invest in user experience, you think carefully about the journey that an end-user goes through when interacting with a brand. This often means considering things like the user’s intent, their needs, and their pain points.

Those same principles apply to create an impressive search engine listing.

UX on a website is all about giving your audience what they need in an informed, and strategic manner; UX in the search engine results works the same way.

How to Make Your Search Listing Stand Out with UX

So, how do you begin to apply the principles of UX to your Google Search results?

It’s much easier than you’d think.

Step 1: Show Immediate Value

Delivering an excellent experience on a website often means providing end-users with the information they need as quickly as possible. Imagine designing a landing page; you wouldn’t want your audience to scroll forever to find what they need. Instead, you’d make sure that the value of the page was immediately obvious.

When creating an image for your search engine listing, you’ll need to take the same approach. This often means thinking carefully about two things: your headline and your meta description.

Around 8 out of 10 users say that they’ll click a title if it’s compelling. That means that before you do anything else to improve your SEO strategy, you need to make sure that your web page’s title is going to grab your audience’s attention.

The best titles deliver instant value. These titles tell the audience exactly what they’re going to get when they click onto the page. The promise drives action, while clarity highlights the informed nature of the brand.

The great thing about using an excellent title for a page is that it doesn’t matter where you’re ranked on the search results. Whether you’re number 2 or number 5, your customers will click if they find something they want.

It’s just like using a CTA on a landing page. Make sure your titles are:

  • Informative — show your audience value immediately;
  • Optimized for mobile — remember, your audience might not see your full title on some screens; this means that you need to make the initial words count;
  • Easy to read — keep it short, simple, and clear, speak the end-users’ language.

Step 2: Build Trust with Your URLs

Trust factors are another essential part of good UX.

When you’re designing a website for a new brand, you know that it’s your job to make visitors feel at ease. Even in today’s digital world, many customers won’t feel comfortable giving their money or details to a new company.

Within the website that you design, you can implement trust symbols, reviews, and testimonials to enhance brand credibility. On search engines, it all starts with your URL.

Search-friendly URLs that highlight the nature of the page will put your audience’s mind at ease. When they click on a page about “What is SEO” in the SERPs, they want to see an URL that matches, not a bunch of numbers and symbols

Use search-friendly permalink structures to make your listing seem more authoritative. This will increase the chances of your customer clicking through to a page and make them more likely to share the link with friends.

Once you decide on a link structure, make sure that it stays consistent throughout the entire site. If a link doesn’t appear to match the rest of the URLs that your audience sees for your website, they may think they’re on the wrong page. That increases your bounce rate.

Step 3: Be Informative with Your Meta Description

To deliver excellent UX on a website, you ensure that your visitor can find all of the answers to their most pressing questions as quickly as possible. This includes providing the right information on each page and using the correct navigational structure to support a visitor’s journey.

In the SERPs, you can deliver that same informative experience with a meta description. Although meta descriptions often get ignored, they can provide a lot of value and help you or your client make the right first impression.

To master your meta descriptions:

  • Use the full 160 characters — make the most of your meta description by providing as much useful information as you can within that small space;
  • Include a CTA — just as CTAs help to guide customers through the pages on a website, they can assist with pulling in clicks on the SERPS; a call to action like “read about the” or “click here” makes sense when you’re boosting your search image;
  • Focus on value — concentrate on providing your customers with an insight into what’s in it for them if they click on your listing.

Don’t forget that adding keywords to your meta description is often helpful too. Keywords will boost your chances of a higher ranking, but they’ll also show your audience that they’re looking at the right result.

Step 4: Draw the Eye with Rich Snippets

You’ve probably noticed that the search engine result pages have changed quite a bit in the last couple of years. As Google strives to make results more relevant and informative, we’ve seen the rise of things like rich snippets. Rich snippets are excellent for telling your audience where to look.

On a website, you would use design elements, like contrasting colors and animation, to pull your audience’s attention to a specific space. On search engines, rich snippets can drive the same outcomes. The difference is that instead of telling a visitor what to do next on a page, you’re telling them to click on your site, not a competitor’s.

When Google introduced rich snippets, it wanted to provide administrators with a way of showcasing their best content. Rich snippets are most commonly used today on product pages and contact pages because they can show off reviews.

Install a rich snippet plugin into your site if you’re a WordPress user or your client is. When you enter the content that you need into the website, use the drop-down menu in your Rich snippet tool to configure the snippet.

Ideally, you’ll want to aim for the full, rich snippet if you want to stand out at the top of the search results. Most featured snippets have both text and an image. It would help if you aimed to access both of these by writing great content and combining it with a relevant image.

Step 5: Provide Diversity (Take Up More of the Results)

As a website designer or developer, you’ll know that different people on a website will often be drawn to different things. Some of your visitors might immediately see a set of bullet-points and use them to search for the answer to their question. Other visitors will want pictures or videos to guide them. So, how do you deliver that kind of diversity in the SERPS?

The easiest option is to aim to take up more of the search result pages. Google now delivers a bunch of different ways for customers to get the answers they crave. When you search for “How to use Google my Business” on Google, you’ll see links to blogs, as well as a list of YouTube Videos and the “People Also Ask” section.

Making sure that you or a client has different content ranking pieces for the same keywords can significantly improve the experience any customer has on the search engines. Often, the process of spreading your image out across the SERPs is as simple as creating some different kinds of content.

To access the video’s benefits, ask your client to create YouTube videos for some of their most commonly asked questions or most covered topics. If you’re helping with SEO marketing for your client, then make sure they have an FAQ page or a way of answering questions quickly and concisely on articles, so they’re more likely to appear in “People Also Ask”:

Step 6: Add Authority with Google My Business

Speaking of Google My Business, that’s another excellent tool that’s perfect for improving UX in the search results. GMB is a free tool provided by Google. It allows business owners to manage how information appears in the search results.

With this service, you can manage a company’s position on Google maps, the Knowledge Graph, and online reviews. Establishing a company’s location is one of the most important things you can do to help audiences quickly find a business. Remember, half of the customers that do a local search on a smartphone end up visiting the store within the same day.

Start by setting up the Google Business listing for yourself or your client. All you need to do is hit the “Start Now” button and fill out every relevant field offered by Google. The more information you can add to Google My Business, the more your listing will stand out. Make sure you:

  • Choose a category for a business, like “Grocery store”;
  • Load up high-quality and high-resolution images;
  • Ensure your information matches on every platform;
  • Use a local number for contact;
  • Encourage reviews to give your listing a five-star rating.

Taking advantage of a Google My Business listing will ensure that your audience has all the information they need to make an informed decision about your company before they click through to the site. This means that you or your client get more warm leads and fewer people stumbling onto your website that might not want to buy from you.

Step 7: Use Structured Data Markup to Answer Questions

If you’re already using things like rich snippets in your Google listings, you should also have a structured schema markup plan. Schema markup on Google tells the search engines what your data means. This means that you can add extra information to your listings that will guide your customers more accurately to the support they need.

Providing additional schema markup information to your listings gives them an extra finishing touch to ensure that they stand out from the competition. You might add something like a “product price” to a product page or information about the product’s availability.

Alternatively, you could provide the people who see a search result with other options. This could be an excellent option if you’re concerned that some of the people who might come across your listing might need slightly different information. For instance, you can ask Google to list other pages along with your search results that customers can “jump to” if they need additional insights.

Baking structured data into your design process when you’re working on a website does several positive things. It makes the search engine’s job easier so that you can ensure that you or your client ranks higher. Additionally, it means that your web listings will be more thorough and useful.

Since UX is all about giving your audience the best possible experience with a brand, that starts with making sure they get the information they need in the search results.

Constantly Improve and Experiment

Remember, as you begin to embed UX elements into your search engine listings, it’s important to be aware of relevant evolutions. Ultimately, the needs of any audience can change very rapidly. Paying attention to your customers and what kind of links they click on the most will provide you with lots of valuable data. You can use things like Google analytics to A/B test things like titles, pictures, featured snippets, and other things that may affect UX.

At the same time, it’s worth noting that the Google search algorithms are always changing. Running split tests on different pages will give you an insight into what your customers want. However, you’ll need to keep an eye on the latest documentation about Google Search if you want to avoid falling behind the competition.

Like most exceptional UX aspects, mastering your SERP position isn’t a set it and forget it strategy. You’ll need to constantly expand your knowledge if you want to show clients that you can combine UX and SEO effectively.

It’s easy to forget that there’s more to UX than making your buttons clickable on mobile devices or ensuring that scrolling feels smooth. For a designer or developer to deliver wonderful UX for a brand, they need to consider every interaction that a company and customer have. Most of the time, this means starting with the way a website appears when it’s listed on the search engines. Getting your SEO listing right doesn’t just boost your chances of a good ranking. This strategy also improves your reputation with your audience and delivers more meaningful moments in the buyer journey.


Featured image via Unsplash.

Source


Source de l’article sur Webdesignerdepot