Articles

In this article, we will set up an HTTP connector and will work with the listener configurations to build a simple HTTP service to return a static message as the response. The Anypoint studio version used will be version 7.6 and the mule run time version will be 4.3 for this demonstration and better to use the same version of Anypoint studio and mule run time if in case you are planning to try out to build the project.

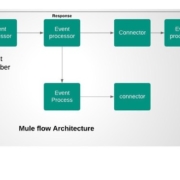
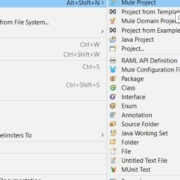
Setting up a simple HTTP service:

Source de l’article sur DZONE


Introduction

One of the interesting features of MuleSoft is that we can use a MuleSoft application to package and host website content. We package our website pages inside a MuleSoft application and deploy it to Anypoint Platform or Cloudhub and our website is published and accessible to the end-users. In this article, I will give you an example scenario of how it’s done so, you can use it for your own needs.

Imagine you are doing file transfers with MuleSoft and your target location is not always accessible. You have an option to move files in a temporary location and retry at a later point in time. While you can automate all of this, sometimes your customers would like a little bit more flexibility and control around retrying and clear visibility into what has not been yet transferred successfully.

Source de l’article sur DZONE

A friend shared this youtube video on the Art of Code where FizzBuzz was demonstrated on SonicPi and also at end of the video (I won’t spoil it for you). After watching it, I was highly inspired to also implement it on Mule, because why not? I even searched the web to see if anyone had already done a FizzBuzz loop on Mule. The fact that I then did it last night kinda tells you that the answer was no.

It turns out that I also learned a thing or two implementing FizzBuzz on Mule 4. FizzBuzz is one of the ways loops are introduced when learning a programming language. Even the recent Golang course I took also introduces loops using FizzBuzz. For the uninitiated, FizzBuzz is derived from a children’s game, the problem statement for a FizzBuzz program is pretty straightforward. This is the same one you can find at HackerRank.

Source de l’article sur DZONE


Steps to Use JCE Encrypt and JCE Decrypt Connectors

  1. Check if Crypto module is available in Mule Palette. If not, download it from exchange.
  2. Then, search for JCE in the Mule palette. The Crypto module should be visible now.

Mule pallette
3. To use Jce encrypt and decrypt connector, we need a keystore.

  • Generate a keystore using following command:  

keytool.exe -genseckey -alias jksvalue -keyalg Blowfish -keystore encKeystore.jceks -keysize 128 -storeType JCEKS

Source de l’article sur DZONE

This article describes the steps that need to be followed in order to invoke a stored procedure with complex Abstract Data Type as IN, OUT, and IN OUT parameter in Mule 4.

The lack of documentation to handle ADT payloads while invoking stored procedures and technical issues while retrieving the ADT response in mule run time 4.x.x discouraged developers using mulesoft for the purpose.

Source de l’article sur DZONE

Test beakers

Find out how to use MUnit with Mule for automated unit testing.

Why Unit Testing?

This is the first question most beginners ask when they struggle to relate unit test cases with real scenarios, like what value-added unit testing is doing. This was my first thought after reading JUnit documents fifteen years back. I am sure most new developers would have similar feelings after reading unit test documents alone, but I realized that unit testing is a powerful tool to release defect-free code to production. The unit testing helps to do regression testing and gives confidence for new developers to make changes to the old codebase.

MUnit For Mule Flows

MUnit is an extension of JUnit. Developers are allowed to write XML-based test cases or Java code-based test cases for Mule flows. This document covers MUnit basics, practical options for different scenarios, and automating the business validations.

Source de l’article sur DZONE

Implement a Counter in Dataweave

These days, I see quite a few posts that require using Counter in DataWeave. The problem faced is that users require a Sequence Number that is consistent throughout the different sections of data. Consider the below JSON:

JSON

xxxxxxxxxx
1

17


1

[{

2

"Item" : "ItemXYZ",

3

  "SequenceNo" : 1,

4

  "Parts": [

5

{ "Part" : "A1", "SequenceNo" : 2 }, { "Part" : "B1", "SequenceNo" : 3 },

6

{ "Part" : "A2", "SequenceNo" : 4 }, { "Part" : "B2", "SequenceNo" : 5 }

7

 ]

8

},

9

 {

10

"Item" : "ItemRTY",

11

  "SequenceNo" : 6,

12

  "Parts": [

13

{ "Part" : "A1", "SequenceNo" : 7 }, { "Part" : "B1", "SequenceNo" : 8 },

14

{ "Part" : "A2", "SequenceNo" : 9 }, { "Part" : "B2", "SequenceNo" : 10 }

15

 ]

16

}

17

]

Source de l’article sur DZONE

MuleSoft Custom Policies can be layered on top of the implementation of the APIs to provide the governance, security, and visibility required. While the out-of-the-box API management policies cover the majority of use cases, an organization may need to create a custom policy to meet specific business needs.

There is a lot of documentation that shows how to work with MuleSoft custom policies through API manager, however, developing the custom policy and debugging them locally has been always challenging. In this article, I will demonstrate how to develop and test Mule custom policy on your local standalone Mule runtime instances before uploading to the API manager or Exchange for live running APIs.

Source de l’article sur DZONE

MUnit is a Mule Application Testing Framework that allows you to easily build automated tests for your Integration and APIs. It provides a full suite of integration and unit test capabilities, and it is fully integrated with Maven.

MUnit is fully integrated with Anypoint Studio and allows you to create, design, and test your MUnit tests just like you would Mule Applications.

Source de l’article sur DZONE

Hello everyone, in this article, I’m going to share my experience of when I tried to do a conversion in Mule 4. I will briefly explain the purpose of this article while showing the code that I can implement in Mule 3 and how I have to write it in Mule 4 in order to get a similar response.

As we all know, Mule 4 is trending in the market, which makes Mule 3 people migrate their code from Mule 3 to Mule 4. 

Source de l’article sur DZONE