Articles

No one likes talking about money. Most of us got into web design because we loved it. But the fact is, we’ve all got bills to pay.

If you’re a half-decent designer or a relatively competent developer, then there’s no reason you can’t make a living as a web designer. Here are six simple steps towards earning a living using the skills you already have.

Step 1. Freelance Work

Many individual bloggers and small company owners require websites to reach a larger audience. You might exploit this opportunity to begin a side business as a freelancer.

One of the most efficient ways to start is to look through employment networks and online classifieds. Eventually though, you’re going to need a portfolio. Building your freelancing company website could be your first opportunity to demonstrate your web development talents. As you embark on new projects, this website can display client testimonials that demonstrate your expertise. Ensure that it’s up to date, relevant, and follows current design trends. Also, make sure your website is linked to your social media profiles. 

Even though you are responsible for finding clients, you have a great deal of flexibility: you can choose your working hours and exercise more freedom and creativity. However, you’d still be accountable for your work and have to execute assignments on time to keep your clients satisfied.

It’s also important to remember that you’ll have to keep track of your taxes and other financial paperwork. Furthermore, you would not have a standard employer who will provide you with health insurance and other perks.

Step 2. Specialize

Today’s market offers a wide choice of web design services most suited to our needs. From designing and building custom websites to creating social media websites to managing SEO and PPCs, web design services offer various services. And while it is beneficial to have a general understanding of what all these services entail, it is always good to identify and refine your expertise. Becoming proficient in one aspect of web design will give you more confidence and direction regarding the kind of work you would like to do.

Allowing yourself to land repeat clients specializing in one type of service will make it easier for you to create processes in your business to complete work accurately and quickly. These processes will also help you build a team should you need one.  

Step 3. Networking Effectively

You should leverage social networking sites such as LinkedIn, practical tools for engaging with colleagues and potential customers. Ensure your profile is updated with all the services offered and all talents you deliver. Make sure you include links to any past projects you’ve worked on. There’s also a career board on LinkedIn that can help you avail yourself of many freelance projects. Registering and engaging with relevant organizations can allow you to acquire more visibility.

Freelancers are generally matched with modest design/development assignments through these websites. Although some developers heavily vouch for them, getting work from these websites when you’re just starting may be exceedingly challenging, considering most of your time will be exhausted in securing billable employment. 

Step 4. Start Your Own Blog or Podcast

Blogs and podcasts are an excellent way to organically acquire fresh customers and other relevant parties. A well-written blog is a terrific source of amusement and knowledge for potential clients. Aside from showcasing your services, a blog may be used to earn money in various ways. Once the blog grows large enough, you can incorporate backlinks, ads, or author-sponsored content. Many popular blogs eventually grow into fully-fledged businesses.

When you start a blog from scratch, it can take a long time to see a return on investment. Consider producing freelance articles for a blog with a constant stream of traffic to help you get started. This will enable you to demonstrate your skills while also getting compensated for them. 

Step 5. Work at a Design Agency

Working at a design agency or in-house could be an ideal option if you desire a more traditional job title. It also helps you build your portfolio with larger and more recognizable clients than those you can secure as a freelancer.

Instead of stressing about the management side of things, you can focus on serving clients and constructing websites with this approach. You wouldn’t have to look for new clients, and you’ll get all of the paid benefits that regular employees get. However, you’d have to work under strict supervision and have less creative control over your projects. There will also be harsh deadlines looming over your shoulder. And this procedure will also set a wage ceiling for you. On the other hand, obtaining employee insurance and securing a source of income can be very reassuring.

Step 6. Start Your Own Agency

Once you feel you have enough relevant experience and are confident in your abilities to perform and manage things well, you can start your own agency. It’s like freelance work, but on a much larger scale. The flexibility to employ others to do your work is the fundamental advantage of having your own agency. You can recruit additional designers and eventually recruiters to help you secure clients.

Having your own agency allows you to do the work you want and how you desire. As a general rule, start as a freelancer and gradually create the foundations for your agency as you gain expertise. You can eventually automate the entire process with hard effort and an innovative business plan.

You must actively network with other people in your business and reach out to new clients in addition to working on your skills. If you can create a solid customer base and take measured chances with your chosen projects, you can procure meatier projects and become prominent in the corporate sector.


Featured image via Unsplash.

Source

The post 6 Simple Steps to a Career in Web Design first appeared on Webdesigner Depot.

Source de l’article sur Webdesignerdepot

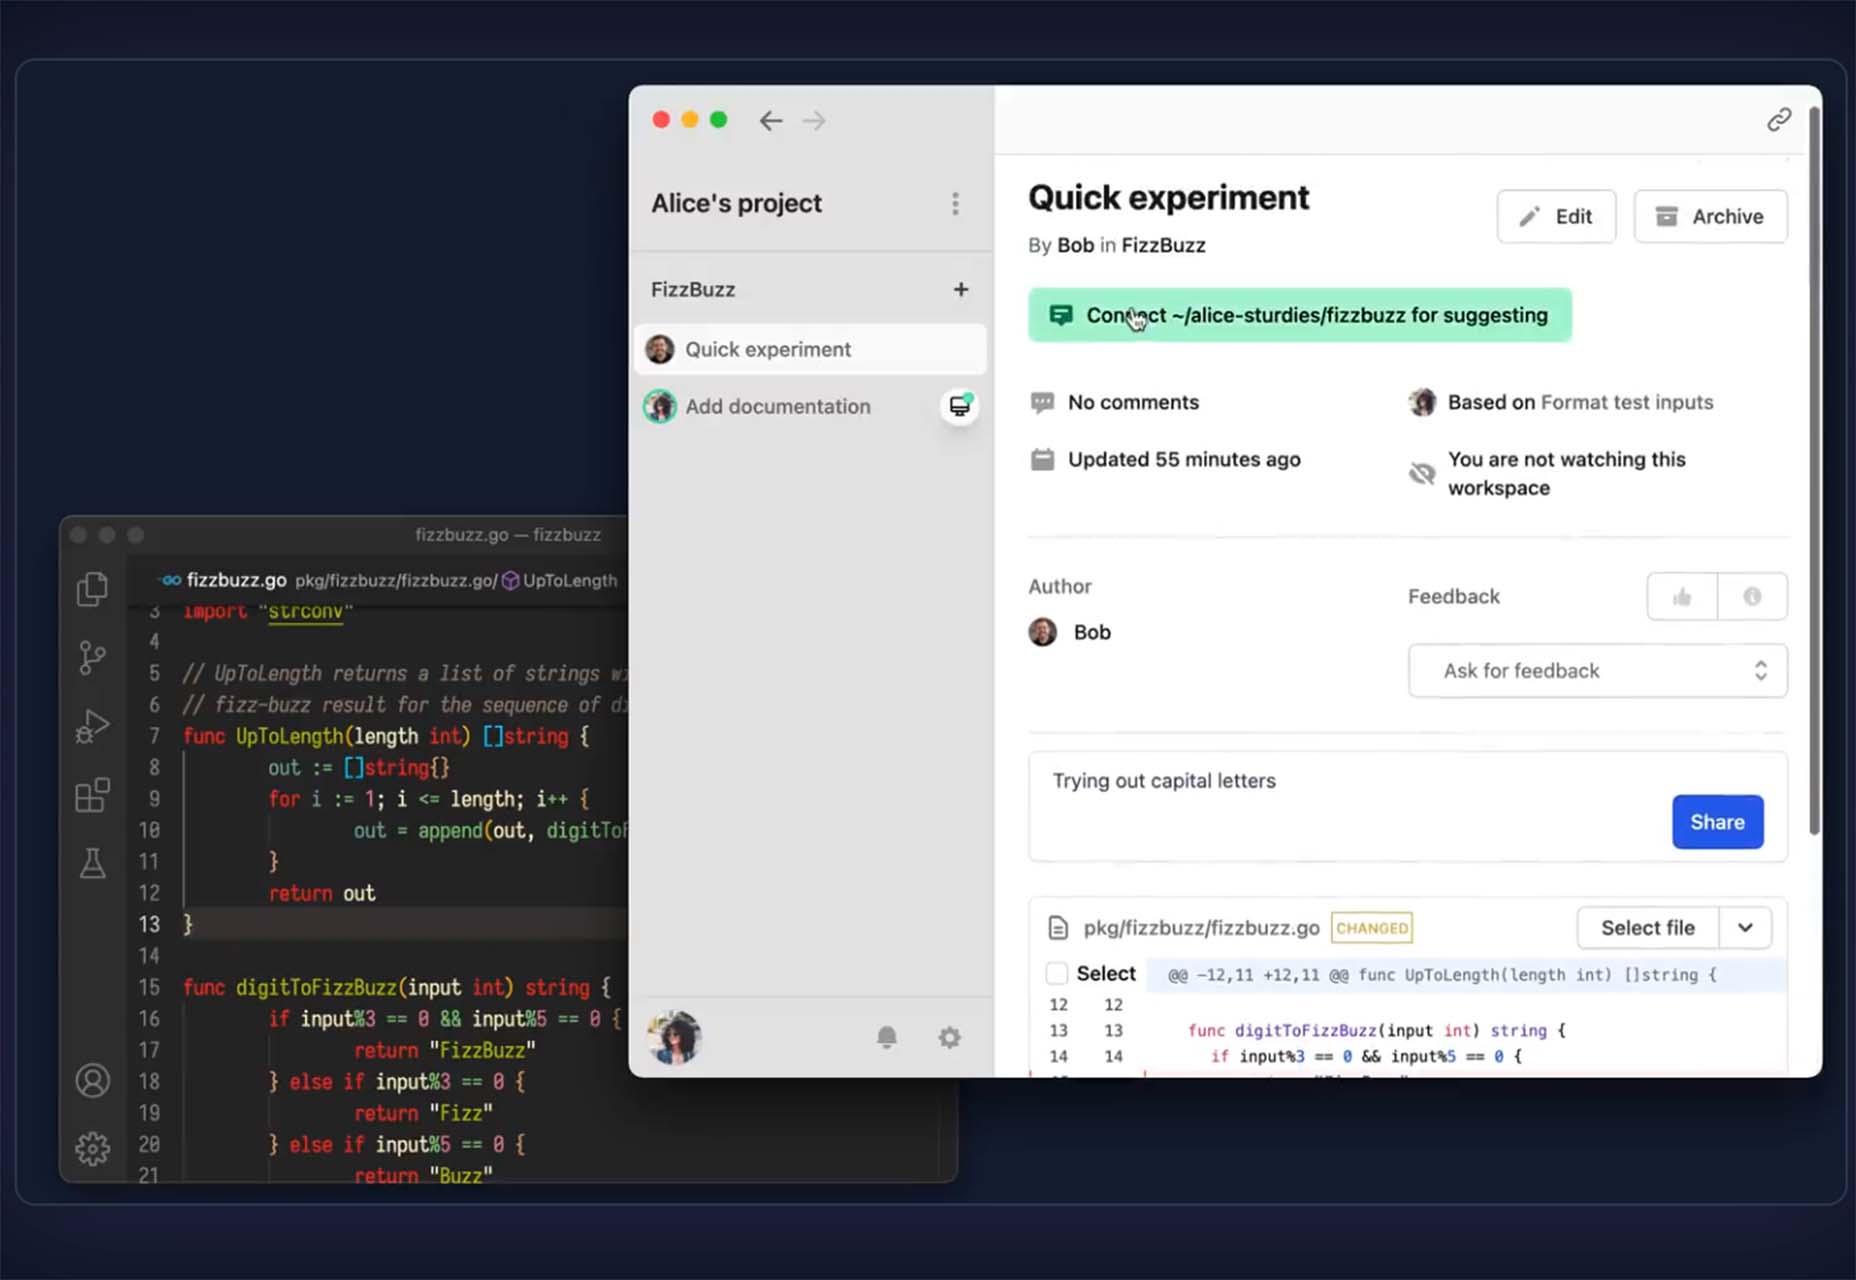
It’s something every design team dreams about – a better design process and handoff procedure. Your design team is not alone if you are looking for a better solution.

Imagine what your workflow would look like if you could forgo the struggles of image-based technology, design and handoff with accurate components that have interactive features. Projects in the design phase will look more like final products and, most importantly, interact like final products. 

Let’s imagine a new design process together.

Challenges of an Image-Based Design Process

Here’s what we all know – image-based design tools provide pictures of components in the visual form but lack the interactivity and conditions that exist in the end-product. There’s not a high level of functional fidelity there, and it can cause confusion among design teams and rework.

These tools require you to redraw the fundamental components and design with boxes and rectangles, which takes too much time and can create a disconnect between the design and development teams. 

Further, you don’t fully maximize the potential of a design system because of inconsistencies between code-powered systems that developers use and these image-based systems for designers. There’s an innate gap between maintaining the environments and creating consistency in components. 

The final and maybe most difficult challenge with an image-based design process is in usability testing. You just can’t test an image the way you can working components. If the prototype is not interactive enough, you lose valuable feedback in the testing process. Functional fidelity is a must-have design and development tool in 2022. 

Iress, market-leading financial software, had many of these same problems in its design system process. You can probably relate to its story, which includes a designer and engineer who aren’t entirely on the same page, hit the deadline and have to deliver, and then get customer feedback. The result was a lot of extra headaches and work. 

But there is a better way: Import all user interface components into a code-powered design system in sync with a design tool so that your team can work in harmony to build, scale, and handoff projects with ease. 

Scale Design With Accurate Components

Here’s what most design and development teams want en route to building products: Accurate components with built-in interactivity, states, and conditions. No redrawing boxes and rectangles; no trying to figure out what states and interaction should be.

And if you can do it with ten times the speed and agility? Now you’re really in business. 

“It used to take us two to three months just to do the design. Now, with UXPin Merge, teams can design, test, and deliver products in the same timeframe,” said Erica Rider, Senior Manager for UX at PayPal. “Faster time to market is one of the most significant changes we’ve experienced using Merge.”

The time and workflow savings come from the ability to maintain only one environment as a product team. Rather than image-based tools, a code-powered design system that will push updates to components as the design evolves is the modern way to work. This workflow can also eliminate duplicate documentation so that your team has a single source of truth for whole product teams. 

Now you can be more agile in the design process and scale. And as Rider hinted at, there is a solution already available in UXPin Merge. 

Scalability with accurate design components has other benefits as well. 

Teams can onboard people faster because the design system is in the design tool. There’s less searching for answers with drag and drop-ready building blocks. New team members will find more success and be more valuable to the team quicker due to fewer inconsistencies and errors. 

Testing also gets a boost as you scale with a single source of truth. You can actually create better usability tests with a high-fidelity, functional version of the prototype, allowing users to leave more valuable and detailed feedback that can improve your product in the early stages. 

Better Handoffs Start Here

As you imagine a better design process, take it one step further. Better handoffs are a goal for most teams. 

An interactive component-based design tool can eliminate the need for multiple iterations of the same meeting to explain how a prototype works. Everyone can see and interact with it for themselves with accurate, true components that ensure the prototype works the same as the product. 

Designers will feel more like their vision is making it into the final product, and developers have a better idea of how to work. Everyone has the exact same components written in code. Thanks to the single source of truth, devs can speed up as they build the product because they start with components that include production-ready code.

A typical design to developer handoff might have multiple steps: Create vector design elements, create a model for interactions, and then send the prototype with documentation. Not to mention the meetings that are required to make sure everyone is on the same page.

In a model with interactive component elements, the developer handoff is fast and easy; they create a prototype with true components and all the built-in properties. The developer copies the JSX code and pastes it into his tool to build the final product. All the component properties and their coded interactions already exist in the source code. This is possible because the source of truth is the code itself, the source code.

Quick Tool Solution and Technical Use

This solution to this common challenge is not somewhere in the future; it’s already here.

UXPin, a code-based design tool, has Merge technology, which allows you to bring all interactive components into UXPin. Then you can use your own, or the open-source library with the ready-made building blocks to get products ready faster.

Here are just a few of the things you can do with Merge by UXPin:

  • Integrate your developer’s storybook to use it as a single source of truth (works for all frameworks)
  • Import design system components from a dev’s Git repository, such as GitHub, Bitbucket, GitLab, or others (works with React)
  • Work with the built-in MUI library
  • Add the npm component package to UXPin on your own (no developer required)
  • Design with the confidence that your work can be ideally reflected by developers
  • Create and share a library of interactive components

Summary 

Say bye-bye to redrawing rectangles – build more accurate prototypes easier and end-products faster with Merge by UXPin.

Now is the time to solve one of your biggest design challenges while upgrading and scaling the design process and improving handoffs. 

Merge by UXPin is user-friendly and made for scalable projects of almost any size. The line between design and development blurs with quicker product release and a fully-interactive solution. Request access today.


[– This is a sponsored post on behalf of UXPin –]

Source

The post How to Scale Your Design Process and Improve Handoff first appeared on Webdesigner Depot.

Source de l’article sur Webdesignerdepot

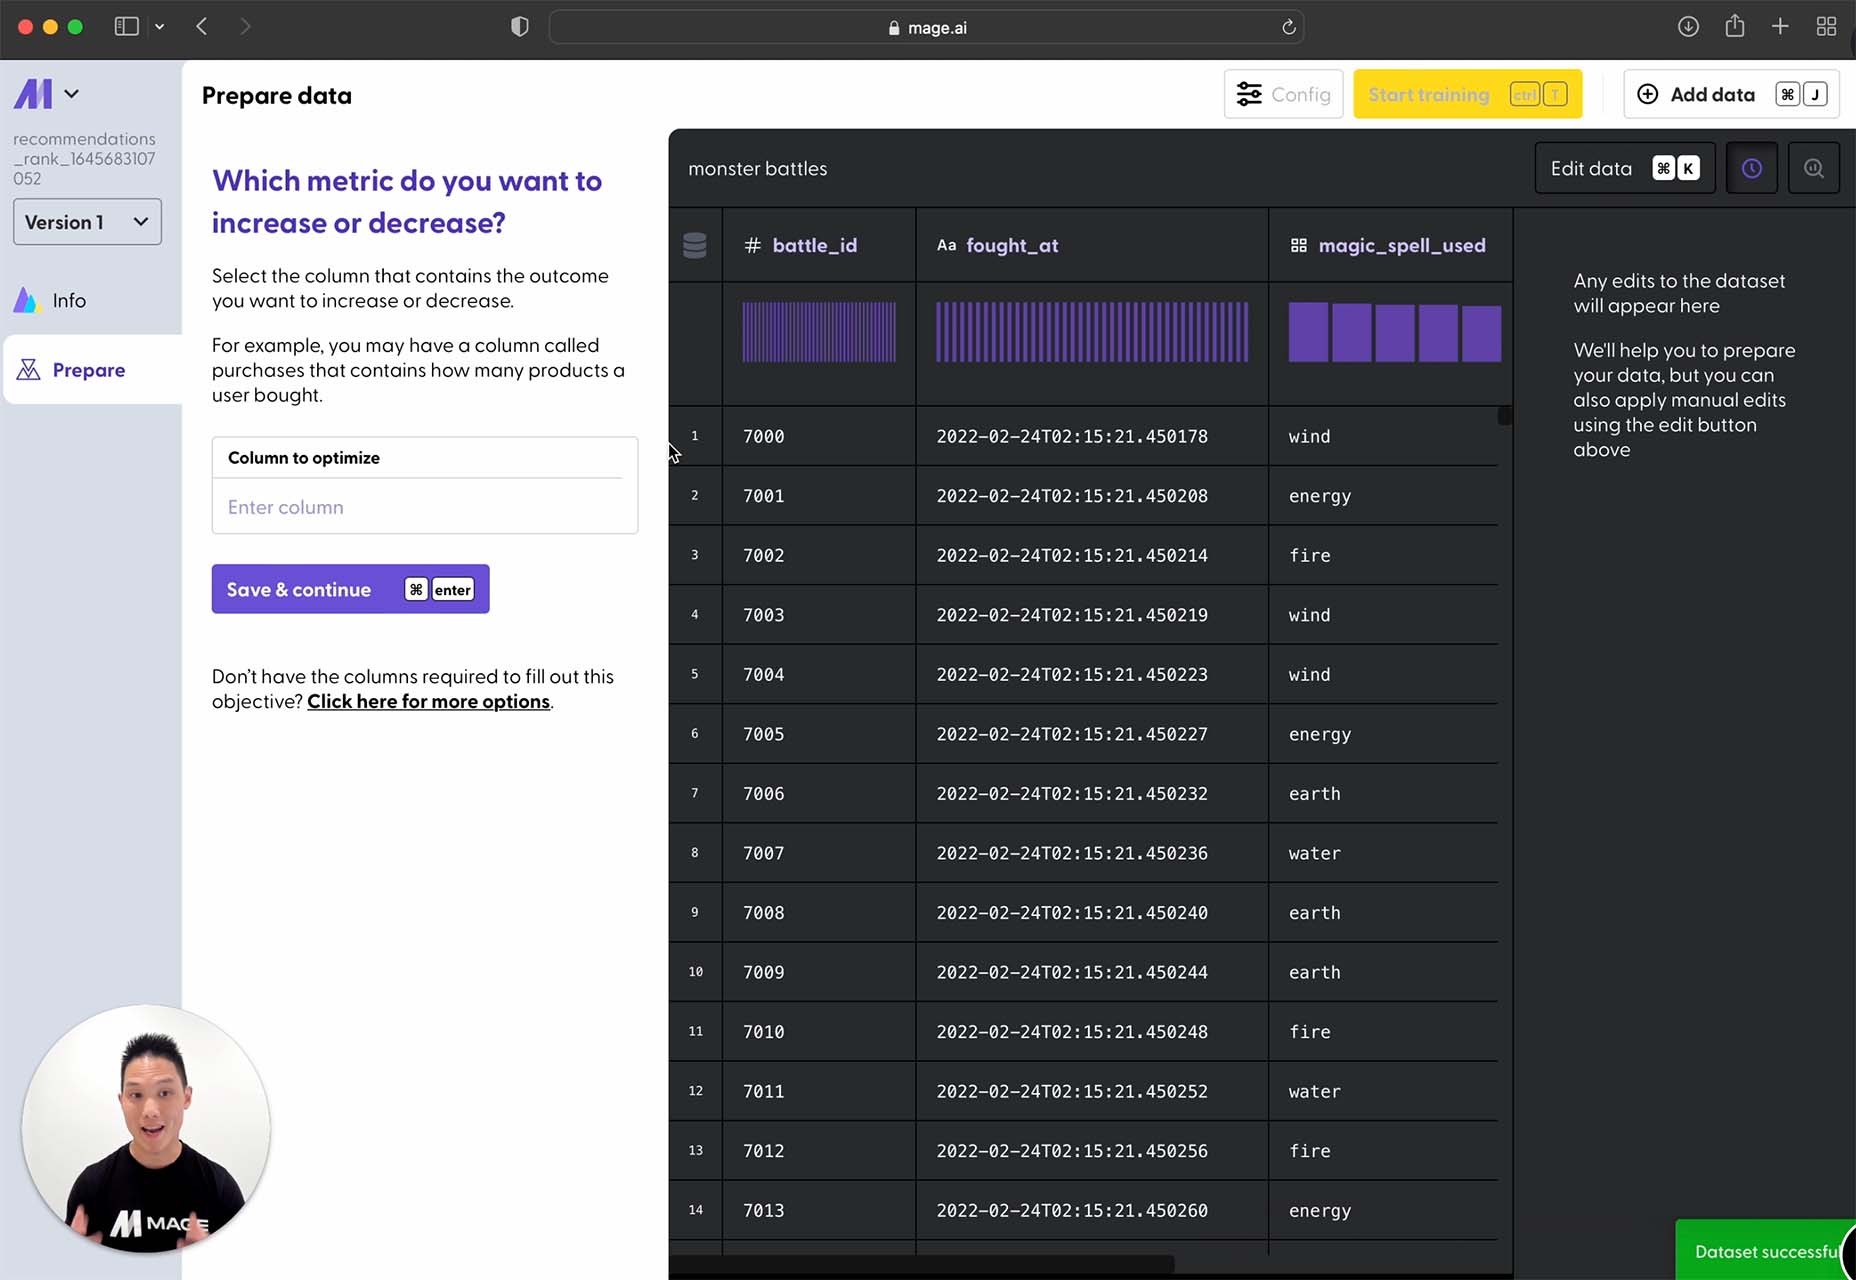
Experienced web designers are always on the lookout for tools or resources that will (1) introduce them to the latest design trends, (2) enable them to incorporate features and functionalities that will make their products more competitive, (3) allow them to improve their workflows or all the above.

Apply one or more of these new design tools and resources. Then you could realize anything from incremental to game-changing improvements. The better the tool or resource, the more you are apt to realize your investment.

The 15 tools and website design resources selected for this article are the best in their respective categories. The degree of improvement you can realize when using one or more of them may depend on your own business needs. Or on the actual needs and wants of your clients as opposed to what you are currently able to deliver.

Browse the list, and you should be able to put your finger on one or more of these products or services. They could lead to improvement in one or more areas of your work. Look closer, and you might come across a genuine game-changer.

Happy shopping!

1. Be – The Biggest WordPress and Portfolio WordPress Theme

If your website design activities are proving to be exercises in tediousness, or you’re tired of working around a design tool’s limitations, you need BeTheme.

BeTheme can be a game-changer in that it gives you the flexibility to design what you want. Be makes building a complex high-performance website quick, smooth, and easy.

  • BeTheme’s 650+ customizable pre-built websites are designed to get your website-building project off to a rapid start. They are responsive, UX-ready, importable with a single click, and incorporate the latest design trends.
  • You’ll love working with the recently launched BeBuilder, the fastest and most flexible page builder for WordPress with which you can import from Be’s pre-built website’s 1000+ pages.
  • There’s an absolute gem of a BeBuilder Woo you can work with to create your shop or single product layouts.
  • BeTheme features a wealth of design aids, options, and settings to work with.

BeTheme is Elementor ready and is regularly updated. Click on the banner to find out more about Be’s 40+ powerful core features.

2. Total WordPress Theme

Put Total to work, and 2022 could be a very good year for your website design undertakings.

Total has it all insofar as design aids and options, website-building tools, and design flexibility are concerned regardless of the type or style of website you plan to build:

  • Pick any of Total’s 45+ customizable quick import theme demos, and you are off to a quick start.
  • 90+ section templates, 75+ pre-styled post entry cards, and more than 500 live customer settings give you more design flexibility than you are ever likely to need. 
  • The page builder of choice is an extended version of WPBakery. With it at your fingertips, you can easily drag and drop your way to building precisely the website you have in mind.

Click on the banner to discover everything Total can do for you.

3. LayerSlider

What could LayerSlider do for you to help make 2022 a banner year? Look over any of your past website designs to see if any of them could profit from adding a little spice or pizzazz because that’s what LayerSlider does best. 

LayerSlider is an animation and website-building tool that can be used on any website to transform its look & feel with modern graphics, eye-catching animations, and interactive features. LayerSlider is one of the most established and popular products with millions of active monthly users.

  • LayerSlider has 150+ website, slider, and popup templates. Templates are a great way to learn as well as an ideal starting point for new projects.
  • LayerSlider comes with a very easy-to-use and modern editor interface similar to professional desktop applications. Anyone can use it without prior experience.
  • LayerSlider is not just for sliders. It can also create image galleries, popups, landing pages, animated page blocks, or even full websites.

Click on the banner to see what LayerSlider could do for you.

4. wpDataTables

Most table or chart building table plugins on the market either limit the amount of data that can easily be processed or the types of tables or charts that can be produced. wpDataTables has neither of these limitations.

With the wpDataTables premium WordPress plugin, you can –

  • create responsive, interactive, and frontend editable tables and charts
  • process huge amounts of data from various sources and in various formats
  • highlight or color code key data.

5. Uncode – Creative & WooCommerce WordPress Theme

Uncode is a top-selling pixel-perfect creative and WooCommerce theme. More than 80,000 sales have been made to date to freelancers, bloggers, agencies, and small businesses.

Uncode’s key features include –

  • a suped-up Frontend Page Builder.
  • an advanced WooCommerce builder with supporting capabilities that include a Single Product builder and a host of customer-centric design elements and options.
  • a Wireframes Plugin and 550+ section templates.
  • a gallery of inspirational user-created websites.

6. Trafft

With Trafft, you can schedule meetings, events, on-site and virtual appointments, manage staff schedules, send reminders, and accept payments — all from a single platform.

  • Special features include custom domains, coupons, and custom fields.
  • Trafft also manages group bookings and can serve multiple locations.

This game-changer integrates seamlessly with Google Calendar, Google Meet, Outlook Calendar, Apple Calendar, Zoom, and Mailchimp.

7. WHATFONTIS 

WHATFONTIS is a hidden gem in the world of font identifiers that allows you to find a font from your uploaded image in a matter of seconds.

  • Powerful AI algorithms and a database of 850K+ fonts provide the basis for this app’s impressive search capabilities.
  • Positive identification is achieved 90% of the time. Premium support is on hand should AI yield an awkward result.
  • Cursive fonts can be identified once the letters are separated.

8. Mobirise Website Builder Software

Mobirise is fast, easy to use, and the best offline website builder on the market.

  • Mobirise does not tie you to a specific platform; you can edit your site locally and host it wherever you want.
  • Full access to HTML allows you to code.
  • 4,000+ website blocks and 300+ elegant home page templates are guaranteed to make your website-building adventures short and sweet.

The Mobirise website builder is free for both personal and commercial use.

9. GetIllustrations’ Stock Illustrations Bundle

Downloads from this library of premium illustrations can change the way you go about designing your websites, apps, and presentations.

  • GetIllustrations, with its 10,000+ illustrations library, is the biggest of its kind.
  • Featured formats include Vector AI, PNG, Sketch, SVG, Figma, and Adobe XD.

Illustrations you download come with a commercial license and are yours to keep without limitations.

10. Slider Revolution

If you have trouble bridging the gap between what your clients want and what you can provide, Slider Revolution could be exactly what you need to fix the problem.

Slider Revolution is THE cutting-edge WordPress plugin for addressing today’s over-the-top web designs. It features –

  • 200+ awesome website and slider templates.
  • eye-catching WebGL slide animations.
  • 25+ powerful addons.
  • the ability to import dynamic content from social media outlets.

11. Amelia

Amelia offers an automated, highly customizable solution to any business that relies on a manual or semi-automated operation for booking client appointments.

  • Amelia is an excellent choice for beauty, healthcare and fitness, and educational and training enterprises.
  • Clients can make or change appointments online 24/7.
  • Amelia can manage individual and group bookings, events, and employee schedules at multiple locations.
  • Amelia integrates seamlessly with Google Calendar, WooCommerce, and Zoom.

12. 8bio – Link in Bio Tool 

Many social media platforms allow you to include a link that allows followers to visit your website or an important landing page. With 8bio, you can create a link that a visitor can’t resist clicking on.

Your link can – 

  • Present a brief biographical profile of your business or yourself.
  • Feature an image or catchy animated background.
  • Showcase your product or service at no cost.
  • Use your existing domain or a “yourname” .8b.io domain.

13. Essential Grid

The premium Essential Grid WordPress gallery plugin developers assembled a collection of aesthetic, easy-to-customize plug-and-play templates that make creating a breathtaking portfolio gallery a fun and easy task.

  • Your galleries will load lightning fast.
  • They will display perfectly on all devices.
  • You can choose from a variety of layouts and mix and match adjustable grids to get precisely what you want.

14. Pixpa – Portfolio Websites for Designers

Pixpa provides an all-in-one platform from which creatives can manage their online portfolios, blogs, galleries, and eCommerce sites.

  • Choose among Pixpa’s beautiful and mobile-friendly customizable templates and customize them to achieve exactly what you want. 
  • Put Pixpa’s drag and drop website builder into play to tie everything together, exactly as you want.
  • Add content, connect with your custom domain, and into your social profiles, and you are good to go.

15. XStore – Best WordPress WooCommerce Theme for eCommerce

XStore is a feature-packed Envato WooCommerce theme that is incredibly simple to work with has acquired more than 30,000 enthusiastic customers.

  • XStore’s 110+ customizable shops make creating your own shop as easy as can be.
  • XStore integrates seamlessly with the premium Elementor and WPBakery page builders.
  • $510 worth of carefully handpicked “must-have” premium plugins are included.

There are plenty of tools and resources for designers on the market. You could use them to create websites that are a little better than the ones you have already built or are using.

What you should really be looking for is a special design tool or resource. When using it for a small investment could markedly improve both your productivity and your design efforts to make 2022 by far your best year ever.

That’s the reasoning for publishing this selection of top 15 design tools and resources. Selecting one or more could make your day.


[- This is a sponsored post on behalf of Be -]

Source

The post 15 Instantly Helpful Tools and Resources for Designers and Agencies (Updated for 2022 ) first appeared on Webdesigner Depot.

Source de l’article sur Webdesignerdepot

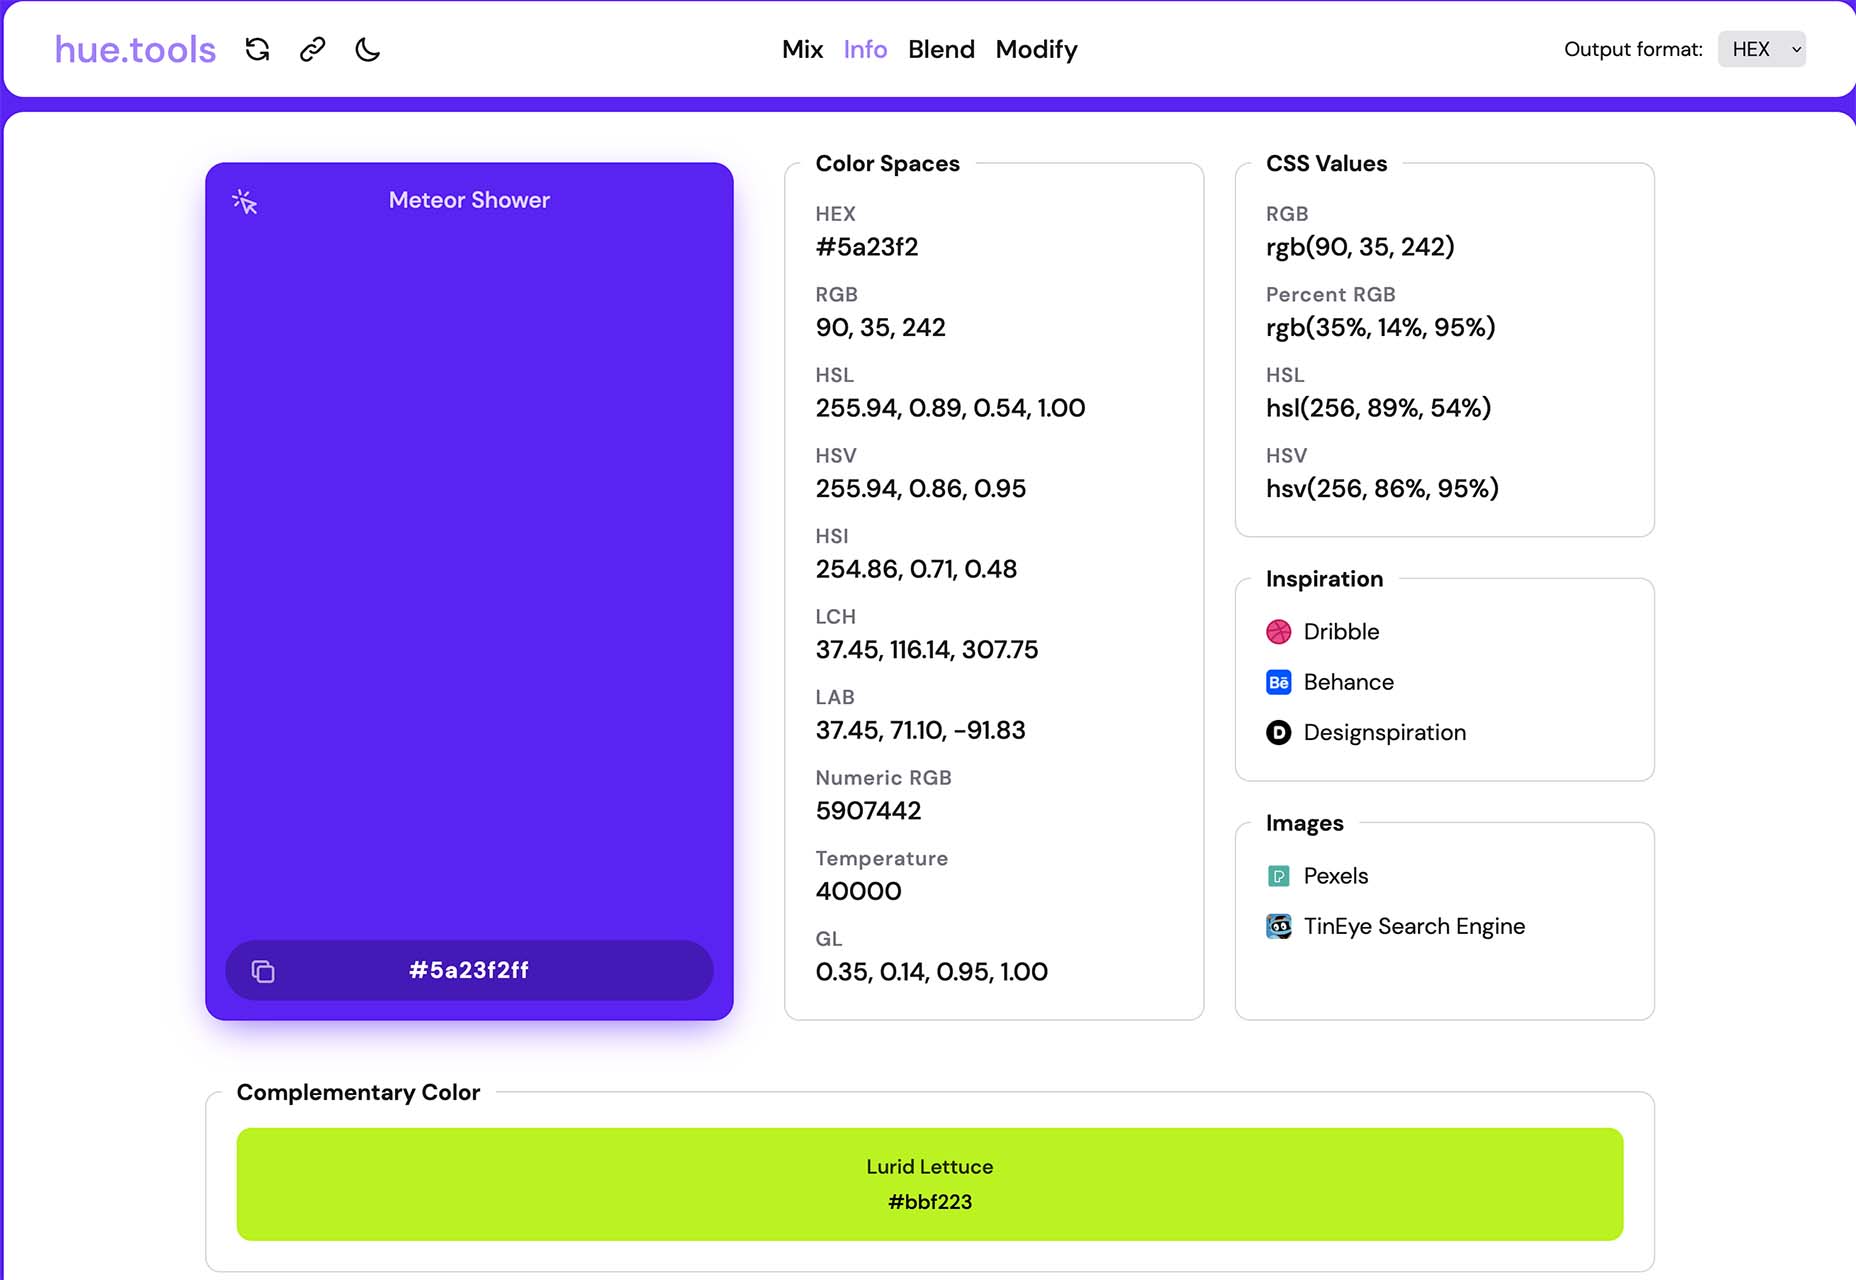
We’re going to have some fun this month. There are so many new tools and resources out there for designers that make life easier, and others are simply enjoyable.

Here’s what is new for designers this month …

Polka Dot Generator

Polka Dot Generator is exactly what you think. Adjust colors, dot size, shadow, and fuzziness, and then export the CSS for use in your projects. This could make for fun effects or backgrounds.

Design Memes

Design Memes is just a lot of fun. It’s a collection of memes based on design culture updated daily. It’s a little silly and a little reflective. Yes, it’s completely ok to laugh at yourself.

Pppointed

Pppointed is an SVG arrow-making tool that helps you create cool pointers without a lot of effort. Just pick a color, shape, and style, and you are ready to go. Save your custom arrows as SVG files or copy the code and use them on the web whenever you want to point at things visually.

Open Source Color System

Open Source Color System is a set of palettes that include carefully picked colors to help you overcome interface challenges. For example, it is one of the only color tools out there that includes palettes for light and dark modes. It’s also designed with accessibility in mind to help you create a complete and usable system.

Cowsay

Cowsay is a nifty little web interface of the same name made with Svelte and HTML Canvas. Play with it and then copy your art as ASCII or an image.

Minze

Minze is a simple JavaScript framework for native web components. It’s tiny and fast, modern, shareable, framework agnostic, and uses TypeScript to scale your component library. Plus, you can get started with it right away.

Tally

Tally is a simple – and free – online form builder. You can use it without coding, and it works like a document file, so there’s no learning curve. You can create unlimited forms, integrate with other tools, set logic, collect payments, and more. There’s a pro version as well if you need even more features.

Hue.Tools

Hue.Tools is another color tool to help you maximize effort when creating palettes. Generate a color you like, see specs and values in all the different color spaces, inspiration from design sites, and colors that work with it. It’s fun and functional.

Sturdy

Sturdy is a low overhead code collaboration platform for fast-moving teams. With Sturdy, you work in the open with your team. Discover and interact with draft code as it is written. Those team drafts are like live pull requests (Figma or Google Docs) but using your local editor.

Mage

Mage is a tool that transforms your data into predictions. Build, train, and deploy predictive models in minutes with no AI experience required. This is a premium tool, but you can try it for free.

Huemint

Huemint is a machine-learning-based color scheme generator for websites, graphics, and branding. There are many options to play with, and you can generate some pretty interesting combinations that ordinarily you might not think of.

CSSUI

CSSUI is another tool you’ll love because it includes pure CSS interactive components without any JavaScript. It’s easy to customize, uses standard HTML, is easy for all levels to use, is tiny and fast, and supports pretty much all modern browsers. It’s an open-source tool that you can download and use immediately.

UI Icons Line – Free

UI Icons Line – Free is a set of 1,000 free vectors for use in your projects. Who doesn’t need a robust set of icons?

Skill Icons

Skill Icons is a set of icons to help you showcase your design and development skills on your resume or GitHub. They all look great and match.

Ambient Design

Ambient Design is a mobile app design market where you can get mobile UI kits for Figma. Purchase kits separately, or buy quarterly or yearly plans to access all current and future UI kits.

TextFrame

TextFrame lets you create animated tutorials for your users to get the help they need. It integrates directly with WordPress or any other website with just a couple of lines of code and includes plenty of customizable options to make it easy for you to help others understand how to use the website. The tool is free for one site and just a few bucks per month for additional sites.

Booqsi

Booqsi is a fun new social media network for book lovers. The platform is still in beta and lets you save and share books, create shelves for reading, and doesn’t force a connection to Amazon. It’s just all about the books. And there’s a bonus: every link from the site goes back to bookshop.org to help you find and support local bookstores.

Stylo

Stylo is an open-source WYSIWYG interactive editor for JavaScript. It is made to bring great user experience and interactivity to the web, for everyone, with no dependencies. It has an interactive design, is customizable, and is future-proof.

Tutorial: How to Favicon in 2022

How to Favicon in 2022 is an excellent lesson on the five icon files every website needs (plus one JSON file). If you are creating more than that, this is a must-read.

Tutorial: Creating Generative SVG Grids

Creating Generative SVG Grids is an in-depth, step-by-step tutorial for anyone who wants to create a more artistic SVG. It uses a handful of tools, including SVG.js, Generative Utils, TinyColor, and GSAP.

Fromage

Fromage is a new and beautiful premium typeface family from Adam Ladd. It includes 14 styles with an interesting serif and alternative sans option. The high-contrast design is great for a variety of projects.

HD Colton

HD Colton is a premium super sans serif typeface with a whopping 91 styles and family package options. It would make a bold statement as a display option.

Source

The post Exciting New Tools For Designers, March 2022 first appeared on Webdesigner Depot.

Source de l’article sur Webdesignerdepot

Every day design fans submit incredible industry stories to our sister-site, Webdesigner News. Our colleagues sift through it, selecting the very best stories from the design, UX, tech, and development worlds and posting them live on the site.
The best way to keep up with the most important stories for web professionals is to subscribe to Webdesigner News or check out the site regularly. However, in case you missed a day this week, here’s a handy compilation of the top curated stories from the last seven days. Enjoy!”

Need a Laugh? Check Out these Car Logos Drawn from Memory

10 Useful CSS Tricks for Front-end Developers

13 Inspiring Examples of Contact Page Design

5 Tips for Creating Innovative UX Design

Mockover – Create Mockups from any Image on the Web

5 Must-Have Elements of a Successful Footer in 2022

MDB – Super Cool Badges for your Projects

Uimini – Uimini Modern and Lightweight CSS Framework

16 Google Search Tips for Developers

Chrome OS Flex: What It Is, and Why You Should Use It

Doodle Icons – 400+ Handcrafted Icons Free for your Next Project

CSS Box Shadow Tutorial: A Step-By-Step Guide (+ Examples)

Type Trends 2022

Source

The post Popular Design News of the Week: March 7, 2022 – March 13, 2022 first appeared on Webdesigner Depot.

Source de l’article sur Webdesignerdepot

Micro-interactions effectively communicate brand identity and ethos while strengthening ties with the customer. These habit-forming tools make for a fun and seamless user experience. Facebook’s ‘likes’ and Tinder’s ‘swipes’ are two classic examples. 

Micro-interactions originated with the need to guide customers who had hit a snag while using a service or a product. The goal was to ease customers into being more product-savvy via subtle reassurance and feedback. Micro-interactions are now employed by everything from washing machines, to coffee makers.

Along with feedback, prompts, and recommendations, they can also present customers with an appealing visual reward upon finishing a task. When used optimally, micro-interactions drastically enhance the navigation and simplify how users interact with sites and apps.

How Micro-Interactions Work

Here are the four structural elements to a simple micro-interaction: triggers, rules, feedback, and loops. Every micro-interaction has a significant component to organize the operational cycle. It lets you control feedback and runs, so the users understand the consequences of their performance and feel motivated to follow through.

Triggers

This feature begins micro-interactions of both the user-initiated (prompted by user) and system-initiated (driven by the system) kind. For example, a click, scroll, swipe, tap, and pull are common triggers that users carry out. So making a payment, booking a cab, and clicking or tapping on the hamburger menu all fall under this category. On the flip side, the user’s alert prompt upon entering a wrong password is a classic system-generated trigger. 

Rules

This element determines what happens after the user sets a prompt into motion via tapping, clicking, scrolling, or swiping. Rules refer to the fact that apps decide the triggers that users employ — Tinder’s ‘swipe’ feature illustrates this point. These rules gradually become a habit-forming action that users get accustomed to while regularly engaging with an app.

Feedback

During this process stage, the system informs the user via auditory, visual, or haptic cues. It engages the users and encourages them to proceed further in their process. For example, the progress bar of a download, the visual representation of steps cleared in a circle, or the visual, aural, and tactile indication upon the success or failure of payment are all a part of the feedback mechanism.

Loop/Modes

This final stage entails tiny meta-rules of the process and determines the frequency and duration. A classic example from an ecommerce app is the ‘Buy Now’ transformed to ‘Buy Another’ Before the user loses interest in the app, the app typically uses such a loop to get them to re-engage with the app. 

How to Use Micro-Interactions

We’ve established that micro-interactions are fabulous, but not every UX interaction on your app or site needs one throughout the wireframe. Overusing this tool could saturate the overall creative experience your design may want to offer. Worse, it might even end up confusing the information hierarchy. It undermines the design and unbalances the user experience of discomfort and irritability. So it’s crucial to know when exactly to use them.

Let’s find out how few quick tips on micro-interactions can elevate and humanize your mobile user experience:

  • Swipe right or left: A signature move made entirely on swiping micro-interaction featured in the famous Tinder app. Swiping is an easier action than clicking or tapping.
  • Call-to-action:  As part of the last step during payment or order, place a ‘Confirm Order’ or ‘Book Now’ prompt, which gives the task a sense of urgency. As a result, having acted on it feels like a minor achievement. 
  • System status: Your app user wants to know what’s happening. System status lets them know they are moving in the right direction and helps avoid confusion. Sometimes, users even run out of patience while uploading a picture, downloading a file, or filling up the registration form.
  • Classic notifications: Users need a quick reminder of products selected/wishlist in their abandoned cart with a reduced attention span. A simple notification can nudge them toward finalizing the purchase. 
  • Button animation: Animated buttons are not only cute, but they also help users navigate the mobile app swiftly. Try out attractive colors, fonts, sizes, shapes, and clipart elements corresponding to the animation and create that cool button to pop up when tapped or hovered on. 
  • Animated text inputs:  A simple process of a likable element like zooming in while entering data into a form or filling up card details for payment can enhance the user experience.
  • Reward an achievement:  Especially true for educational and health apps, micro-interactions celebrating big and small milestones with a badge or a compliment of encouragement can strengthen a user’s engagement with the app. 

Benefits of Micro-Interactions

  • Brand communication: A successful brand ensures that the transmission to the buyer is engaging, positive, and hassle-free. When micro-interactions show a process status clearly, it creates and reinforces a positive image for your brand.
  • Higher user engagement: Experts say micro-interactions engage users better. These tiny elements subconsciously create the urge to keep interacting with your app. For example, each push or nudge notification acts toward redirecting your customers back to your app.
  • Enhanced user experience: From shopping to banking to traveling to learning to staying healthy, there’s an app for everything. A wide range of activities elevates the overall user experience and stays ahead in the game. Micro-interactions can work that magic for your brand. 
  • Prompt feedback: It’s frustrating not to know what’s happening behind the blank screen, especially during a purchase. Instant feedback via visual, sound, or vibrating notifications makes for a pleasant user experience. 
  • Visual harmony: Micro-interactions initiated even with a tap, swipe, typing, or scrolling are all a part of the UX design’s overall appeal. The trick is to keep all the interface elements in perfect sync with the app’s visual features.

Micro-Interaction Best Practices

Here are a few basic principles you should follow when you introduce a micro-interaction to the user experience.

1. Keep it simple, stupid (KISS)

KISS is a famous design principle that becomes even more important in the case of micro-interactions. The goal is to make the user journey delightful and not be a distraction.

2. Keep it Short

It has ‘micro’ in the name itself. But, again, micro-interactions aren’t supposed to be show stars, and a lengthy micro-interaction only distracts the user. 

3. Pick the Right Place

You should always consider the options carefully before choosing the spot for any micro-interaction. The widely used user-interaction designs are popular for a reason. Many people have already approved them, so you can safely continue with them. The use of micro-interaction should also sit well with your brand image. 

See also if the placement of a micro-interaction is reaching your ideal customer or not. And even consider whether you need a micro-interaction to begin with. 

And That’s a Wrap!

As UX designers, we can profoundly impact the overall design of sites and apps, the user’s journey, their interactions with our product/service, their connection with the brand, and the ease of doing a transaction.

We want customers to connect to our brand, love our products, and experience our exceptional customer service. But most of all, we want to earn their trust and loyalty.


Featured image via Pexels.

Source

The post Using Micro-Interactions to Drive UX first appeared on Webdesigner Depot.

Source de l’article sur Webdesignerdepot

The fourth edition of MUXL (Mobile UX London) conference kicks off on the 21st of March, and you could win one of four free passes to the five-day digital event.

Running from the 21st of March to 25th, MUXL is a digital festival of UX and design, entirely online, meaning you can attend remotely from anywhere in the world.

The digital festival is themed around design systems, human-centered design, service designing the future, and UX psychology. MUXL features talks and live panels Q&A Monday – Wednesday, interactive workshops taking place on Thursday and Friday, with global networking opportunities throughout.

Speakers include senior UX researchers, managers, design strategists, and designers at companies including Google, IBM, Microsoft, Disney, and more…

MUXL is an excellent opportunity for UX designers of all levels to improve their skillset, make connections, and find inspiration.

Tickets are available now, but we have four Festival Passes to give away, and all you have to do to be in with a chance of winning is make sure you’re signed up for our weekly newsletter before the 14th of March. And don’t worry if you’re already a subscriber, you’ll be automatically entered into the draw.

We’ll select four winners at random on the 14th of March. Good luck!


Featured image via Pexels.

Source

The post Competition: Win One of Four Free Online Passes to MUXL first appeared on Webdesigner Depot.

Source de l’article sur Webdesignerdepot

BellSoft issued a new version of Liberica Native Image Kit (NIK), 22.0.0.2, so in this short article, I will provide a tutorial on how to use it with the Quarkus framework.

Liberica NIK is based on the open-source project GraalVM (Community Edition) and is compatible with many platforms, including lightweight musl-based Alpine Linux. Liberica NIK in essence is a utility that converts JVM-based applications into native executables (AOT compilation).

Source de l’article sur DZONE

Creating and sending business proposals can be a lot of work. However, if you have the right tools and knowledge, you can quickly create and send high-converting proposals that your clients will love. 

This article will explain how to create a fantastic business proposal that looks great and gets signed quickly. Although we’re focussed on design, our tips apply to every industry and type of business.

1. Know When to Talk About Yourself

One of the most common mistakes people make is starting the proposal by talking about themselves. 

You might be surprised to know that clients spend the most time on the introduction chapter, so it’s essential to use it right. You need to set the right tone by explaining to your clients how your solution will help them achieve their goals. 

They want to hear the benefits and feel assured that you’re the best choice for them. If you start the proposal by talking about your company and the values you believe in, you’ll lose the attention of your clients. 

In most cases, the clients have already researched you and know the points you make in your PR releases.

Once you explain your process and the time scales, you can introduce your team and talk about the company. Just make sure it’s short and sweet. 

2. Divide Your Proposal into 6 Sections

Sending a one-page proposal will only confuse your clients and won’t incentivize them to reach out. The best way to format your proposal is to create six sections. 

This should include:

  • Introduction
  • Process
  • Timescales
  • Pricing
  • Next steps
  • Terms and Conditions

You need to showcase what their future could look like if they work with you, listing all the benefits as well as explaining the next steps. You need to write down what happens if they don’t agree with some parts of the proposal, what will happen when you reach an agreement, how much they have to pay, and more. 

Be clear on your follow-up process to speed things up. 

3. Use a Dedicated Proposal App

If you’re someone who fires up MS Word and hopes for the best, your proposals probably don’t get a lot of traction. That’s because you’re spending too much time reinventing the wheel. The best jumping-off point for your proposal strategy is choosing the right app. It will help you automate and speed up the whole process. 

Different solutions suit different people, but some of the features you might want include: 

Digital Signatures

The digital signature option helps you get your proposals signed faster and turns your proposals into legally binding documents. This significantly reduces the agreement time since your clients no longer have to print out your documents, scan them and send them back.

Integrated Payment Methods

Speed up your payment process by choosing the proposal software that has a payment option that allows clients to pay as soon as they agree to your terms and conditions. It can significantly decrease the time it takes to get paid. 

Sales Tool Integration

For an even more straightforward sales process, select a proposal tool that has native integrations with your sales CRM and other sales tools. 

Proposal Analytics

Proposal analytics can help you in the follow-up process. They show when your proposal was opened, on which device, and how much time the client spent on each of the sections. 

Content Library

The content library lets you save any part of the content (text, pictures, videos, terms and conditions, pricing table) for easier access in the future—no more copy and pasting huge chunks of text. 

An Easy-To-Use Editor

In order to be able to create any documents with your proposals software, their editor needs to be very easy to use. If the editor requires design experience, look for a better one.

4. Let’s Talk About Price

When it comes to the price section, there are two significant things you need to look out for: the name of the section and the format of your price.

Naming your pricing section pricing, expenses, or something along those lines cheapens your proposals and makes it seem like a regular invoice. Try naming the section ROI or Investment. It will evoke positive feelings with your clients because if they think of working with you as an investment, they will know that a return on investment is a part of the deal. 

The way you format your prices won’t make or break your deal but can help you speed up the proposal process. Firstly, you need to figure out if you’re going to charge by the hour, based on the value of the project, based on the commission, or something else. 

Once you reach a decision, you have to format the prices in an easy-to-understand and short way. Many companies try to upsell their clients at the very start of their business relationship and create proposals with three different packages. 

We believe that the way you present your prices should be the same as the way doctors prescribe medicine. You need to be the authority on your prices and tell the client what type of package fits their needs. If you leave it up to your client to pick the right package, it will just lead to confusion, and you’ll have to do the extra work to explain the difference to them.

Bonus Tips

Web-based business proposals speed up the signing process. If you make your proposals printable, it will lengthen the time your clients take to agree to your terms and sign them. Make sure your proposals are web-based and have a digital signature option. 

Another tip is to send your proposal as quickly as possible. As soon as you meet with your client and hear them out, start working on your proposal. 

Our last tip is to send your proposal at the beginning of the week. If you send it on a Friday, it will negatively impact the time it takes to get your proposal signed.


Featured image via Pexels.

Source

The post 4 Tips For Getting Design Proposals Signed Faster first appeared on Webdesigner Depot.

Source de l’article sur Webdesignerdepot

Have you been feeling a little unproductive lately? Well, you are not the only one. Of course, we all want to be as productive as possible at work, but that’s not always the case.

According to recent research, we are fully productive for less than 3 hours a day. Stress and poor planning are just two of the reasons why. And this is true in all work environments. No one is exempt from this problem, from employees in central offices to freelancers or managers working from home.

That’s why we have researched and selected the eight best ways to increase your productivity at work. In our search for solutions to boost creativity, we have come across numerous promising approaches and tips that you can use. Here are the best tips you can follow to get the most out of a workday:

1. Plan your Tasks

I can safely say that there is nothing more important than efficient task planning. Planning your tasks can free you from stress and procrastination. Planning everything before the day even starts is probably the best approach.

This is also where time management comes into play. Think about it. How often have you been more productive after setting a specific time frame for a task? You need to plan for the project at hand and then map each workday.

The more you plan your projects and workdays, the more productive you will be. However, it would help if you tried not to spend hours and hours planning.

2. Minimize Distractions

So you have successfully planned your tasks. That should be enough to be productive, right? Well, unfortunately, no. Whether you work in the office or from home, numerous things can distract you daily.

Distractions are ubiquitous, from a colleague wanting to chat about last night’s game to TV at home. When you minimize such distractions, you become better at what you do.

Of course, it’s not always easy to resist temptation. But if you do, you’ll spend more hours focused and engaged in your task. The same goes for leadership positions. You can ask your employees to turn off their cell phones and minimize chats.

We all feel the need to check our phones or chat with our colleagues. This is precisely why the next tip is crucial to your productivity.

3. Take Regular Breaks

According to psychologists, taking regular breaks at work will help you minimize stress and thus improve your performance. Whether you work from home or at headquarters, relaxing and social breaks are necessary. But that’s not all.

As we mentioned earlier, regular breaks are a smart way to avoid distractions. If you know your next break is coming up, you will not need to chat or look at your phone.

This will help you maintain a high level of concentration. On the other hand, if you do not take regular breaks, your performance will continue to decline throughout the day.

4. Stop Multitasking

Once you have scheduled your tasks and breaks, it’s time to think about the actual work process. Contrary to what many believe, multitasking does not make you more productive.

Conversely, multitasking can decrease your performance, drain your energy faster, or even damage your brain. This is another reason why planning is so important. You should always try to engage your brain with one task at a time.

5. Optimize Workplace Conditions

This is one of the most efficient but often underestimated ways to increase productivity. Ensuring that the working temperature is between 20-24 degrees C (68 and 76 degrees F) will help you stay concentrated for more extended periods.

This will also save you a lot of time, whether at home or in the office. On the other hand, if you feel cold or hot, you will be distracted. Therefore, you should think about the working temperature before you start working.

6. Enough Sleep is Key

It’s not news that sleep deprivation can affect our performance. And that’s not just it. Lack of sleep leads to a massive decrease in:

  • Ability to concentrate
  • Working memory
  • Mathematical capacity
  • Logical reasoning

So sleep is crucial to our overall well-being. According to the National Sleep Foundation, you should try to get between 7 and 8 hours of sleep a night (for adults between 18 and 65).

It becomes evident that getting enough sleep is one of the best ways to increase your productivity at work.

7. Communication is Crucial

Communication is essential, especially for those of you who work from home. You should always have a conversation with the people you live with during your breaks. This can also help you avoid distractions during your work hours.

Try to make everyone around you (including yourself) understand what closed, and open doors mean. This will help you increase your productivity while communicating sufficiently with your loved ones.

The same goes for people who work in offices. You should always try to engage with your colleagues during breaks. Remember that feeling part of a group and sharing your experiences is the key to increasing your productivity.

8. Avoid Social Media

Our last tip is one of the hardest to follow, especially working from home. You may think that this is not a problem for you. Recent studies show that we spend an average of 145 minutes on social media every day. Of course, it’s not a bad idea to cut down on that time.

But, even if you do not, you should try to keep any engagement with social media outside of your work hours. This will help you focus on your tasks and get you one step closer to your goals.

Wrap Up

Keep in mind that we all get stuck at times when working on a project. The more you worry about it, the more stressed you will be. It’s essential to take care of yourself and your mental health. In any case, we hope you will find it easier to increase your productivity now that you have read our tips. All you have to do is follow them.

Featured image via Pexels.

Source

The post 8 Proven Ways to Turbo-Charge Your Productivity first appeared on Webdesigner Depot.

Source de l’article sur Webdesignerdepot