Articles

As a website designer, your professional life revolves around crucial questions that might help you to deliver better results for your clients.

Which widgets are essential to driving conversions? What kind of checkout page elements do you need to include? Should there be a video or slideshow on that product page?

One of the biggest queries that we face when building landing pages to encourage sales is whether a CTA (call to action) button needs to be above or below the fold. 

Answering the question: “Where should the CTA go?” correctly could make or break your client’s chances of a sale. Unfortunately, this particular concern has been the source of a raging debate for many years now. Everyone has their own opinion about CTAs and where they belong.

Today, we’re going to cover the benefits and issues with placing a CTA above the fold.

Should You Place a CTA Above the Fold? 

Starting with a quick refresher, the term “above the fold” refers to any area of a website seen on a screen when a user arrives on a webpage. The content that appears above and below the fold may differ depending on the device you’re visiting a website with. 

Experts in the design and digital marketing world have frequently claimed that if you want to get the best results with a CTA, you need to place it above the fold. 

This strategy makes a lot of sense. If your CTA is above the fold, then your chances of it being seen are significantly higher. Some customers might not want to scroll to the bottom of a page to find out what they need to do next in their buyer journey. 

Additionally, according to the NN group, the 100 pixels that appeared above the fold were seen 102% more often than the pixels underneath the fold. Eye-tracking technology learned that more often than not, you’ll get more engagement above the fold. 

Just look at this landing page from Lyft, for instance, you immediately see what you need to do next:

It’s not just a single study that has touted the benefits of an above-the-fold CTA, either. 

Another report into the “importance of being seen” found that above-the-fold ads and CTAs had a 73% rate of visibility compared to only 44% for those below the fold

So, with stats like that to think about, why would you ever consider using a below-the-fold CTA? 

When to Place a CTA Below the Fold

As with most things in web design, there is an exception to the rule. 

Yes, above the fold, CTAs will be better for you most of the time. However, there are times when you might need to think outside of the box. 

Most people think that placing a CTA below the fold practically guarantees that it won’t be seen. However, if you’re creating a website page or landing page that includes a lot of vital information, your audience will need to scroll. 

For instance, if you’re creating a page where someone can download an app to engage with a business they already know about, it makes sense to speed the journey along with an above-the-fold CTA. However, if you’re trying to convince someone to sign up for your webinar, you might need to tell them what that webinar is all about first. That’s where a below-the-fold CTA comes in handy. 

Customers might not have a lot of time in their busy schedules for scrolling these days. However, they still need the right information before they can make a decision about what to do next with your brand. According to Marketing Experiments, below the fold, CTA buttons can result in a 20% increase in conversions. However, this conversion boost only happens when you’re providing valuable, engaging, and persuasive content.

Check out this example from the Boston Globe, for instance:

The Fold Isn’t Everything in Web Design

The fold is often an essential consideration in web design. 

However, it’s not all you need to think about when you’re deciding where to place sign-up forms and valuable CTA buttons. 

According to the Nielsen Norman group, the content that appears at the top of the page will always influence user experience. However, that doesn’t mean that you need to place your CTA there. What you do need to do is ensure that whatever you have above the fold is promising enough to engage your visitor and make them scroll. 

Put simply, what’s above and below the fold does matter, but your focus should be on taking advantage of customer motivation, rather than worrying exclusively about an imaginary line. 

When deciding where a CTA belongs, you need to think about motivation. 

How motivated is your prospect to click on a button? How desirable is your offering at that time, and how much does your visitor already know about the thing they’re being offered?

If you’re going to need to provide more information before your customer wants to convert, then a below-the-fold CTA makes more sense. 

If you’ve already provided all the information that your customer needs and a prospect is visiting from an advertisement or another page on the website, then above the fold should be exceptional. 

The Truth About Designing for The Fold

The reality for web designers today is that achieving higher conversion rates doesn’t really have that much to do with whether a CTA is above or below the fold.

What’s important is whether your buttons come under the right amount of copy that answers the correct questions for an audience. 

Remember, when visitors come to a website, they’re looking for different things. There are visitors that:

  • Already know your brand and value your offering: These people are often clicking into your landing pages from other marketing campaigns where they’ve learned about the brand or offer. You can give these prospects a CTA immediately so they can continue down the buyer’s funnel as fast as possible. 
  • Are uncertain about your offering and need to know a bit more: These people need some extra information. They might have a concern that needs to be addressed before they’re willing to spend their money. You might not need much copy here, which means that a CTA may still appear above the fold. 
  • Are brand new to your website: These prospects need a reasonable amount of copy. They don’t know what you’re offering or why it’s valuable to them. Because of this, you may need to wait to push them into action until you’ve delivered the right copy. 

In some cases, you may even place multiple CTAs on the same page. Some people will have a general understanding of the technology and what it does. This means that they’ll be happy to click on the button at the top of the fold. 

On the other hand, there could also be visitors arriving on the same page that don’t understand what the benefits of real-time personalization are. This means that you need to elaborate a little on what you have to offer. A simple one-line explanation isn’t enough here.  

Figuring Out Where to Place a CTA

Deciding where to place different elements of a website is a common challenge for web designers. Despite tons of blogs out there, that claim “above the fold” is always the best option for any conversion rate optimization, the truth is a little more complicated. 

The critical thing to remember as a web designer is that a CTA button asks a customer for commitment. Even if the CTA allows someone to download a free demo or sign-up for a newsletter without spending any money, it requires a customer to start a relationship with a brand. 

In a world where customers are less trusting of companies than ever, it doesn’t make sense to push them into a relationship too quickly. Asking for a commitment from a target audience before they’ve had the chance to see what’s “in it for them” is not a good idea. 

Jump in too quickly, and you’re likely to rub people the wrong way. 

Go Out and Master the Fold

The issue for today’s designers isn’t figuring out whether a button needs to be visible from the moment someone arrives on a page. Instead, you need to think about whether visitors are finding the CTA at a time when they’re ready to take action. 

You can only answer the question “where should the CTA go?” after you’ve carefully analyzed the project that you’re working on. 

Remember, above the fold isn’t always the answer. 


Featured image via Pexels.

Source

The post Perfect CTA Placement: Above-The-Fold Vs. Below-The-Fold first appeared on Webdesigner Depot.

Source de l’article sur Webdesignerdepot

There are a lot of factors that contribute to a better user experience on a website. Pages need to load quickly to give users peace of mind and efficiency. Navigation must be clear and straightforward, with direct pathways for visitors to follow when finding your contact pages, blog posts, and products. Your colors need to work seamlessly together while providing just enough contrast in the areas that need it most.

Excellent user experience needs to be considered for every part of your website that acts as a touchpoint with a potential customer or user.

One of the most significant touchpoints of all is your forms.

All websites need some form of interactive content to thrive. Users need to be able to do something with the site, whether it’s looking for information with a search bar, contacting a team for a quote, making a booking, or completing a purchase. Forms power the majority of the interactive activities available on websites.

If you know how to master great UX on a form, you can contribute to more meaningful interactions between your brands and their customers. But not all web forms are the same. Here are some of the top types of forms you need to master and how you can optimize them.

The “Opt-In” Form

The Opt-in Form is probably the best-known form in the digital landscape. It’s essentially a form that asks visitors to “opt-in” to a specific offer. Sometimes, this means signing up for a webinar; other times, it’ll be agreeing to an email newsletter or a regular series of blog updates.

Opt-in forms grab attention quickly and ask for something specific from the audience. For instance, this example from HuffPost encourages visitors to “Subscribe to the Morning Email.”

Opt-in forms are all about generating action.

Sometimes, they’re placed at the bottom of a landing page after a company has had a chance to explain precisely what they’re offering. Other times, you’ll find the opt-in form situated on a sidebar of a website, constantly enticing people to “sign up” if they like what they see on a blog post or article.

It’s also common for opt-in forms to appear as pop-ups and exit pop-ups on modern websites. For example, a brightly colored opt-in form that promises an immediate benefit to a customer could encourage them to hand over their details before they abandon your website.

How to Design a Great Opt-In Form

So what kind of best practices go into an excellent opt-in form?

  • Start with simplicity: If you’re asking your visitors to do something, don’t overwhelm them with too big of a request straight away. Keep the form short and simple, so it doesn’t seem like too much extra work for the visitor. Something like “Subscribe to our newsletter” should ask for nothing more than an email. 
  • Highlight the benefits: Most customers won’t want to give you a place in their inbox or the opportunity to interact with them further unless you can offer something in return. Even if you’re asking for something small, like an email address, let the customer know what’s in it for them. In the HuffPost example above, the company highlights that you can wake up to the day’s “most important news.” 
  • Give the visitor the power: Let your visitor know they’re in control here. They want to see that they’re getting exactly what they need from you in exchange for their contact details. This means reassuring them that their email address won’t be used for spam, like H&B Sensors does here: 

The Contact Form 

The Contact Form is another crucial part of building an effective UX for your website – but it’s also an element that web designers and business owners often overlook. When customers decide they want to learn more about a business, they need a quick and easy way to get in touch.

Contact forms need to be easy to find and use on any website. Usually, your user will expect to see a link to the contact form situated somewhere at the bottom of your webpage. It might be called “Contact Us” or “Customer Support.” Avoid anything that would go over the user’s head.

Aside from being easy to track down, your contact form also needs to reassure an audience that they’re making the right decision by getting in touch. Therefore, the content needs to be short, sweet, and authoritative—highlight why the user might contact your company and how they can do so.

Avoid any unnecessary information in the contact form. For example, you don’t need to know your client’s age and their job to answer a question about where their nearest physical branch is. Keep form fields to the point, or you’ll chase customers away.

How to Design a Great Contact Form

Design something personalized but straightforward to make the most of your contact form. Use features like smart content and conditional logic, if possible, to adapt the page to the user’s needs. Dynamic content is becoming increasingly valuable these days. Other best practices include:

  • Set the right expectations: Let your customers know how active you are and how quickly they can expect to hear back from you. Imagery and the right fonts can also set expectations about the kind of communication your audience can expect. For example, this contact page from the Marvel app is fun and playful, like the company itself:

  • Provide multiple options: If your customer doesn’t want to use your contact form, give them another way to get in touch. Ensure the contact page includes information like where to find you on social media and your professional phone number. 
  • Simplify things on your end: To ensure that you can contact your audience as quickly as possible, allow your customers to choose a specific subject that their query is connected to. Allowing them to choose “Sales” or “Order issues” means you can automatically direct the message to the right team member on the back-end. 

The Online Payment Form 

Sometimes, when your customers have seen what you have to offer and they’ve checked out the competition, they decide to go ahead with their purchase. To facilitate this, you’re going to need an online payment form. Online forms ensure that your customers can safely enter their credit or debit card details to purchase whatever you have to offer.

Most payment processing companies like PayPal, Square, and Stripe come with payment forms included, so you can easily embed them into a website in minutes. However, there’s always the option to customize those payment forms.

For instance, ideally, you’ll need a payment form that keeps your customer on the same page, so they don’t have to log into another browser to make their purchase. The fewer transitions your client has to make, the safer they’ll feel.

How to Design a Great Payment Form

When designing any payment form, simplicity and security are the two most important factors. Your customer should be able to enter their information quickly and easily and get through the transaction process without worrying about their details.

Remember to:

  • Keep it simple: The fewer fields the visitor has to fill out, the better. Customers still feel uncomfortable sharing personal information and payment details online. Make the experience as painless as possible. If your client already has an account with your business, you might create a system that automatically fills some of the fields, such as their email address, name, and billing address. 
  • Offer the right integrations: The proper payment forms will integrate with the payment services your customers prefer to use. Options include PayPal, Stripe, Square, Verified by Visa, and Mastercard. Get a developer to integrate the right APIs with your form to give your customers the broadest range of options. 
  • Ensure security: Give customers peace of mind by providing as much security evidence as possible. An SSL certificate that places the padlock on the top of the browser next to the URL is a great way to make customers feel more secure. Integrating verification options so your customers can avoid fraud issues is another significant step. Sometimes just putting logos from the card types you accept on the page will make a customer feel more secure. 

Support Forms

Some companies bundle the contact form and the support form together. Others have a separate support form to get their queries routed directly to the people most capable of helping them. If you want to take the second route, it might be a good idea to design a “help” section on your website where you can locate the support form.

The “Help” section on a site often appears alongside other links on the footer. For instance, it could appear alongside “About” links and “Contact” options. Here’s an example of Hubspot’s Customer Support options:

The best customer support pages come with various ways for clients to help themselves and find answers to their most pressing questions. For example, you might have a search bar where your audience can search for the answers to their queries or a knowledge base full of helpful blogs.

Hubspot allows users to choose between a blog, knowledge base, academy training center, community forum, developer discussion board, and assistance from a certified partner.

How to Design a Great Customer Support Form

Designing a good customer support form is about getting your audience the information they need as quickly as possible. Once again, you’ll need to stick to as few form fields as possible here to avoid angering an already frustrated customer. Also, remember to:

  • Ask for the right information: Find out what the query is about by giving the customer a drop-box menu full of possible topics to choose from. If you need a product reference number or something similar, ask for that at the top of the form, then allow the customer to provide extra information about their query underneath. 
  • Set expectations: Let your customers know when they can expect to get a response to their concerns and provide them with advice on what to do next. For instance, you could invite them to check out your knowledge base while they wait for a response. 
  • Keep it simple: Avoid using technical jargon on your support request forms. Be direct in your requests for summaries of the issue at hand, contact information, and other supplemental data. 

Customer Feedback Forms

According to Microsoft, around 96% of customers say that customer service is crucial in determining their loyalty to a specific brand. Another 52% of global customers believe that companies need to respond to the feedback provided by customers.

To ensure your customer service strategies are on-par with what your customers expect, you need to get feedback from your audience. That’s where a feedback form comes in. Customer feedback forms often appear after a client has finished purchasing on the “thank you” screen. They may also occur after a customer has completed a service interaction online.

Here’s an example of an Apple feedback form:

How to Design a Great Customer Feedback Form

By leaving you feedback, your customer is doing you a massive favor. They’re giving you a chance to learn from your mistakes and improve the service you can give next time around. Feedback is one of the best tools for any business that wants to grow and thrive.

If you want your customers to use your feedback forms, you’ll need to make them as simple as possible. Your customers don’t have time to waste on a complex form.

  • Don’t make any fields mandatory: Don’t stop your customers from submitting a form unless they’ve completed every field. Allow them to enter the information they consider to be the most important, and that’s it. You can even fill some of the form out for your customer, if possible, by entering their name and email address if they’re already a member of your site.
  • Make it mobile responsive: Remember there are around 3.5 billion smartphone users worldwide. You can’t afford to lose feedback because your form isn’t responsive. Every form should look and feel incredible on any device. 
  • Include a rating option: If your customers don’t have much to say about your service, or they’re not wordsmiths, they might prefer a rating option instead. A one-to-five rating system that allows your customer to judge your product or service on a scale of poor to wonderful is a great way to gain quick information. Check out the Uber Engineering example here:

Though you can pre-enter some information on a feedback form to make your customer’s life easier, don’t overstep your bounds. Adding your customer’s email address to the form is fine if they’re already a customer with you. Pre-selecting the “very satisfied” rating above would look presumptuous.

Top Tips to Improve Every Form Design

The online form is an essential part of any web design project, but it’s also frequently overlooked. Unfortunately, without a good set of forms, your customers will struggle to interact with your company in a meaningful way.

When creating any form, remember:

  • Reduce friction: Reduce the friction for your customers by asking as few questions as possible. The less your customer has to answer, the better. If you can pre-populate forms with information like your customer’s name and email address, this could help. 
  • Keep it simple: Make sure that the form is clean and easy to use. Your customers shouldn’t be confused about where to click or how to submit their information. A single-column design is often better than a multi-column option.
  • Be clear in error messages: Don’t just tell your visitors that something has gone wrong. Let them know what they need to do to submit the form successfully. If possible, use inline validation with real-time feedback to let your audience know that you recognize the information they’ve submitted.
  • Keep data secure: Make sure your audience feels safe by letting them know how you will use this information and why you’re asking for it. If you’re asking for an email address, make the benefits of entering that information clear. 
  • Make fields optional: Allow your audience to add more information to a form if they want to – but don’t demand it. Give some freedom to the visitor. 

The better your forms are, the more effective your interactions with customers will be. Remember, it’s not just the face-to-face interactions that your customers judge when making decisions about your business and whether to trust you. Today’s digital world has prompted a new demand for more meaningful virtual experiences.

Your form could be the first interaction you have with a client, whether it’s a contact form, a booking form, or something else entirely. Get that right, and you can improve your chances of your customers coming back to interact with you again later.


Featured image via Pexels.

Source

The post The Top 5 Form Types to Use in Your Web Design  first appeared on Webdesigner Depot.

Source de l’article sur Webdesignerdepot


Regard croisé : pourquoi SAP S/4HANA est un ERP intelligent ?

Qu’est-ce qu’une Entreprise Intelligente et qu’est-ce qu’un ERP Intelligent ?

Pierre-Édouard Hamon, SOA People, et Christian Charvin, SAP, partagent leur vision de l’évolution du SI des entreprises.

Aujourd’hui, la plupart des entreprises ont à leur disposition un certain volume de données qu’elles n’exploitent pas. Cela représente pourtant une richesse qui permettrait aux organisations de mieux comprendre leur activité et leur marché. Être une Entreprise Intelligente, c’est savoir exploiter ces données afin d’optimiser son organisation, automatiser ses processus et se mettre en ordre de marche afin de relever de nouveaux défis.

Pierre-Édouard Hamon 


C’est la raison d’être de l’ERP Intelligent SAP S/4HANA. Cette nouvelle génération d’ERP simplifie l’accès à la donnée et en assure l’exploitation en temps réel. SAP S/4HANA propose des avancées clés pour aider les équipes au quotidien : le reporting opérationnel intégré et la gestion par exceptions permettent aux utilisateurs de se concentrer sur les points nécessitant une attention particulière ; la gestion avancée des workflows, associée à des fonctions collaboratives, fluidifie les échanges entre utilisateurs.

Christian Charvin


Une porte ouverte vers les nouvelles technologies


Le fait que l’ERP propose des tableaux de bord où l’information utile est directement remontée aux utilisateurs rend l’ERP SAP S/4HANA particulièrement facile à utiliser. Ceci permet de se concentrer sur les tâches les plus urgentes et aide à la prise de décision. Son interface de nouvelle génération est très proche de celles utilisées dans les applications desktops et mobiles du quotidien. Un atout pour accélérer la prise en main de l’ERP.

De nouvelles technologies permettent d’aller encore plus loin. Le RPA permet ainsi d’améliorer l’automatisation des processus, en mettant en place des robots capables de prendre en charge les tâches répétitives, libérant ainsi du temps aux équipes métiers. Le Machine Learning et l’Intelligence Artificielle s’appuient sur l’historique de données de l’entreprise pour prédire son futur. Ces technologies de forecasting automatique sont directement intégrées dans l’ERP.

Lorsque les entreprises vont mettre en œuvre ces technologies intelligentes, elles pourront s’appuyer sur des préconfigurés adaptés à leur secteur d’activité. Cela leur évitera de partir d’une feuille blanche et de se lancer dans l’inconnu. Y compris en cas de déploiement de l’ERP en mode cloud.

Pierre-Édouard Hamon


Cap vers le cloud !


Le cloud devient le mode de déploiement majoritaire des utilisateurs d’ERP SAP. Depuis le début de l’année 2021, 80% des clients SAP optent pour un déploiement de leur ERP SAP S/4HANA en mode cloud. Le cloud permet d’avoir une meilleure prédictibilité sur les coûts, de déléguer la gestion des infrastructures à des spécialistes et de disposer d’une flexibilité sans égale permettant d’adopter de nouvelles technologies et fonctionnalités au fil des besoins. Sans compter que le cloud est accessible de partout et permet donc une utilisation facilitée de l’ERP sur des sites distants, en mobilité ou en télétravail.

Christian Charvin


L’offre RISE with SAP permet de profiter de tous les avantages du cloud sans avoir à gérer la complexité de la relation avec les hyperscalers. Le contrat est directement pris en charge par SAP, qui se charge de garantir la disponibilité, la sécurité et la flexibilité de la solution, avec une prédictibilité totale sur les coûts. RISE with SAP permet de bénéficier de tous les avantages du cloud, avec une mise en œuvre rapide au travers des préconfigurés, et ce sans faire une croix sur les spécifiques. Et des mises à jour régulières de l’ERP donnent accès à de nouvelles fonctionnalités.

La SAP Business Technology Platform permet de déployer le code spécifique, mais aussi d’accéder à des technologies avancées, comme des systèmes de reconnaissance d’images, des outils d’analyse de l’expérience client ou même des agents conversationnels, qui vont à la fois assister les utilisateurs et faciliter la collaboration au sein de l’entreprise. La SAP BTP permet d’ouvrir l’ERP à un nombre illimité de technologies innovantes, proposées par SAP, ses partenaires ou tout autre fournisseur de services.

Pierre-Édouard Hamon


L’occasion de se réinventer


Ce mouvement massif vers le cloud s’accompagne d’un changement de paradigme chez nombre de nos clients. Ils adoptent une approche Fit to Standard consistant à utiliser un ERP aussi proche que possible de la version originale, afin de faciliter les montées de version. Les spécifiques, auparavant déployés dans le cœur de l’ERP, sont déportés sur la SAP BTP, qui sert également d’interface pour adopter des technologies innovantes : Chatbots, Blockchain, Internet des Objets, etc.

Christian Charvin


Pierre-Édouard Hamon  Christian Charvin


Pour en savoir plus :

The post Pourquoi SAP S/4HANA est un ERP Intelligent ? appeared first on SAP France News.

Source de l’article sur sap.com

Tilda website builder combines everything we liked so much about constructors when we were kids – you can experiment, test out and build myriads of new creative ideas out of ready-to-use blocks. Tilda is that type of constructor that allows you to own your creative process and create pretty much any website: landing page, business website, online store, online course with members area, blog, portfolio, or event promo page.

Founded seven years ago, Tilda is a website builder that completely revamped the way we create websites. Tilda has been the first website builder to introduce block mechanics that allows users to create websites out of pre-designed pieces. This breakthrough technology allowed all users – not only designers – to create professional-looking websites. Just like in kid constructors, you can drag-and-drop and mix-and-match blocks on Tilda to let your creativity flow and build a dazzling website, at extraordinary speed. 

When you ask designers why they love Tilda, they usually say it’s because the platform provides the ultimate balance between choosing from templates and being able to fully customize and create from scratch to bring any creative idea to life. Here’s what else they say:

Tilda has been a game-changer for us. It allows our team to quickly spin up new web pages, make edits, and ship new programs. We left WordPress for Tilda and after being with Tilda for 2 years, I don’t ever want to go back.

~ Andy Page, Executive Director, Forge.

I built my first website in 2001. Since then I’ve used countless platforms and website builders for customer websites and my own business. Tilda is the perfect combination of ease of use with powerful features at an unbeatable value.

~ Robby Fowler, Branding and Marketing Strategist, robbyf.com & The Brand ED Podcast.

Let’s dive deeper into core functionalities you can leverage on Tilda. 

#1 Cut Corners With 550+ Pre-Designed Blocks And 210+ Ready-Made Templates

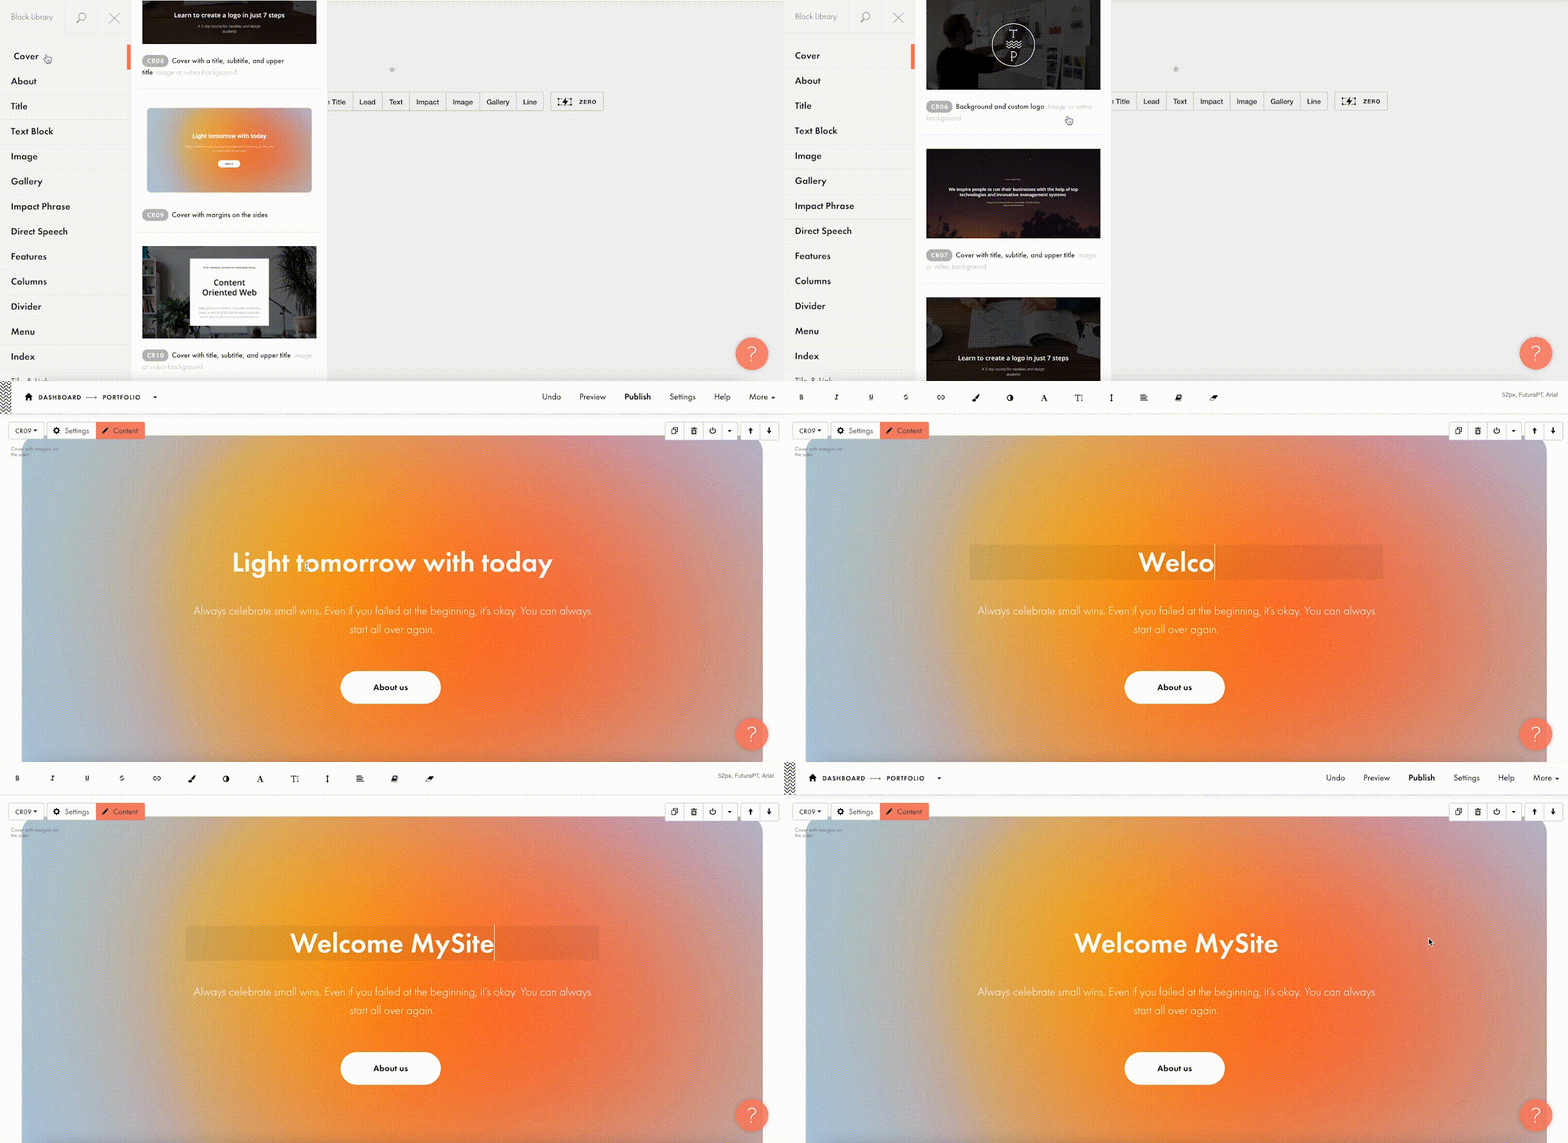
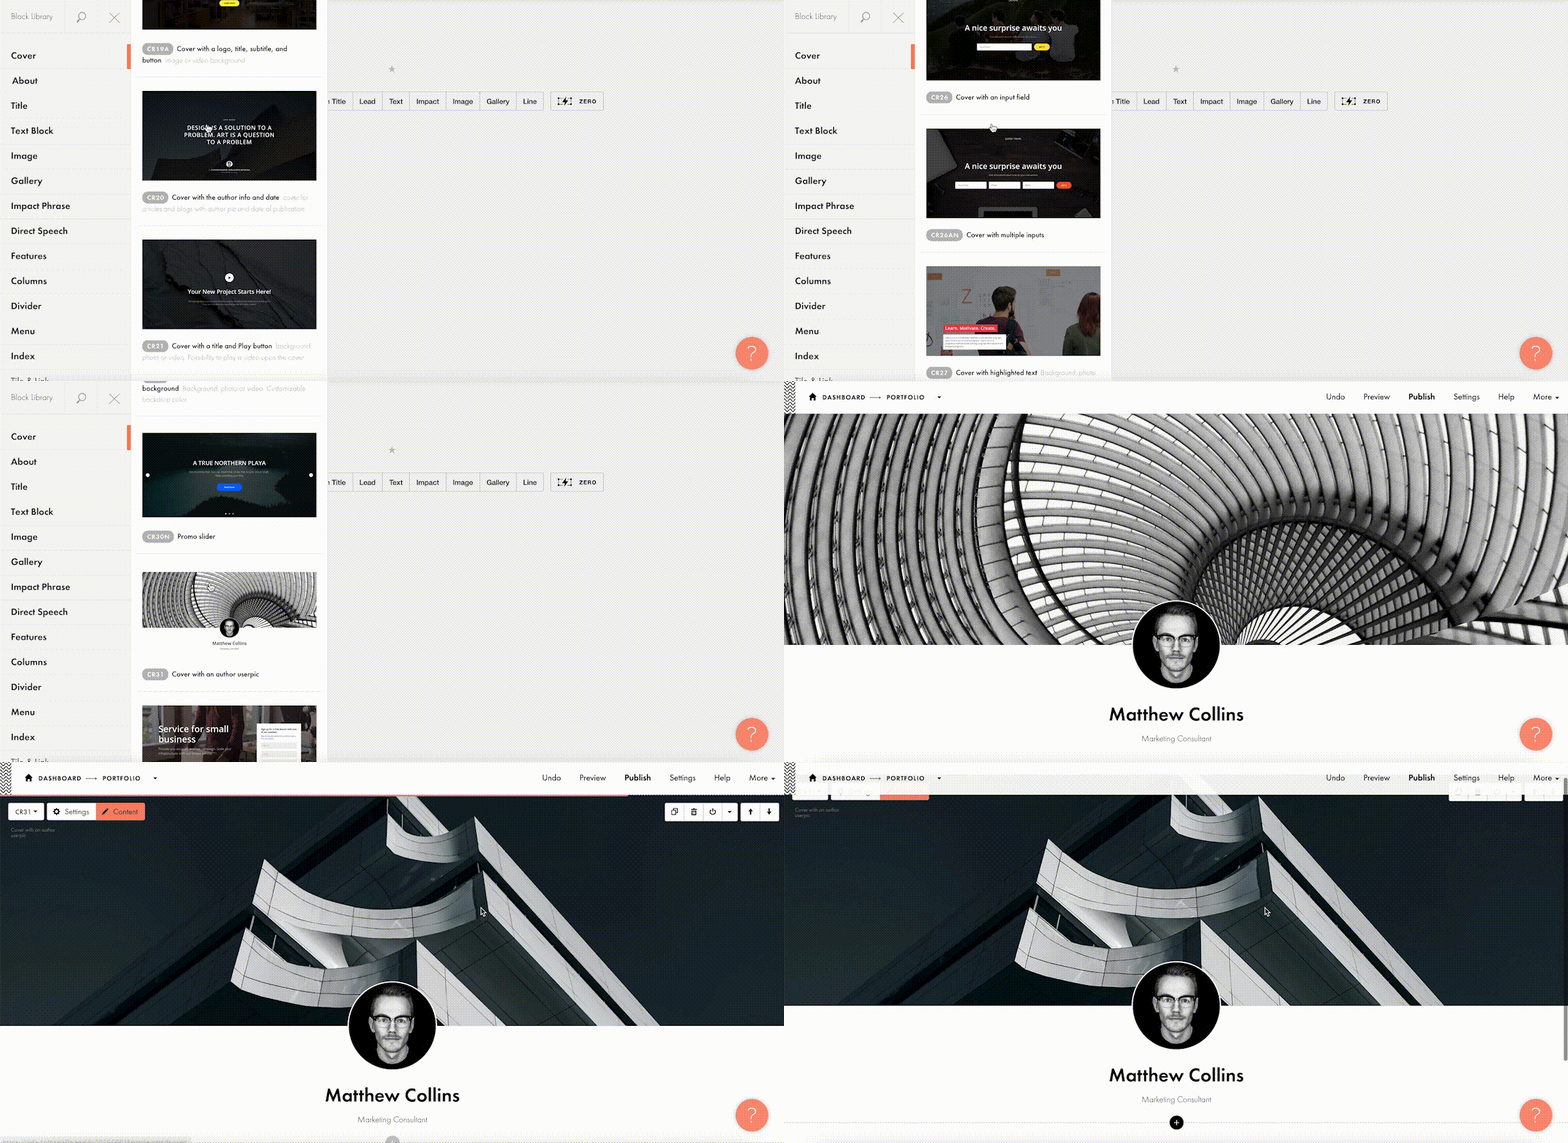
The beauty of Tilda is that it provides 550+ blocks in the ever-growing Block Library designed by professional designers. Thus, you can quickly build a website out of pre-designed blocks that encompass virtually all elements you might need for your website: menu, about us page, features, contact, pricing, etc. 

Customizing each block is a breeze with Tilda: You can drag-and-drop images, edit text right in the layout, alter block height, background color, padding, select the style of buttons, use custom fonts, and assign ready-made animation effects to specific parts of it. Also, Tilda provides a built-in free image library with 600K+ images, so you can find images that are just right for you without leaving Tilda, add them to your website with just one click, and use them for free.

Finally, all blocks fit together so well that it’s almost impossible to create a bad design on Tilda – even if you are a stranger to website building.

For a quick take-off, you can use 210+ ready-made templates for different kinds of websites and projects: online stores, landing pages, webinar promo pages, multimedia articles, blogs, and more. Each template is a sample of modern web design and consists of blocks. It means that templates don’t limit your creativity: you can modify them to your liking by playing with settings, adding extra or removing existing blocks, and embedding images and text. 

Each of the templates and blocks covers over 90% of use cases you’ll ever require and is mobile-ready, meaning that your website will look great on desktop computers, tablets, and smartphones by default.

#2 Jazz Up Your Site With Zero Block: Professional Editor For Web Designers 

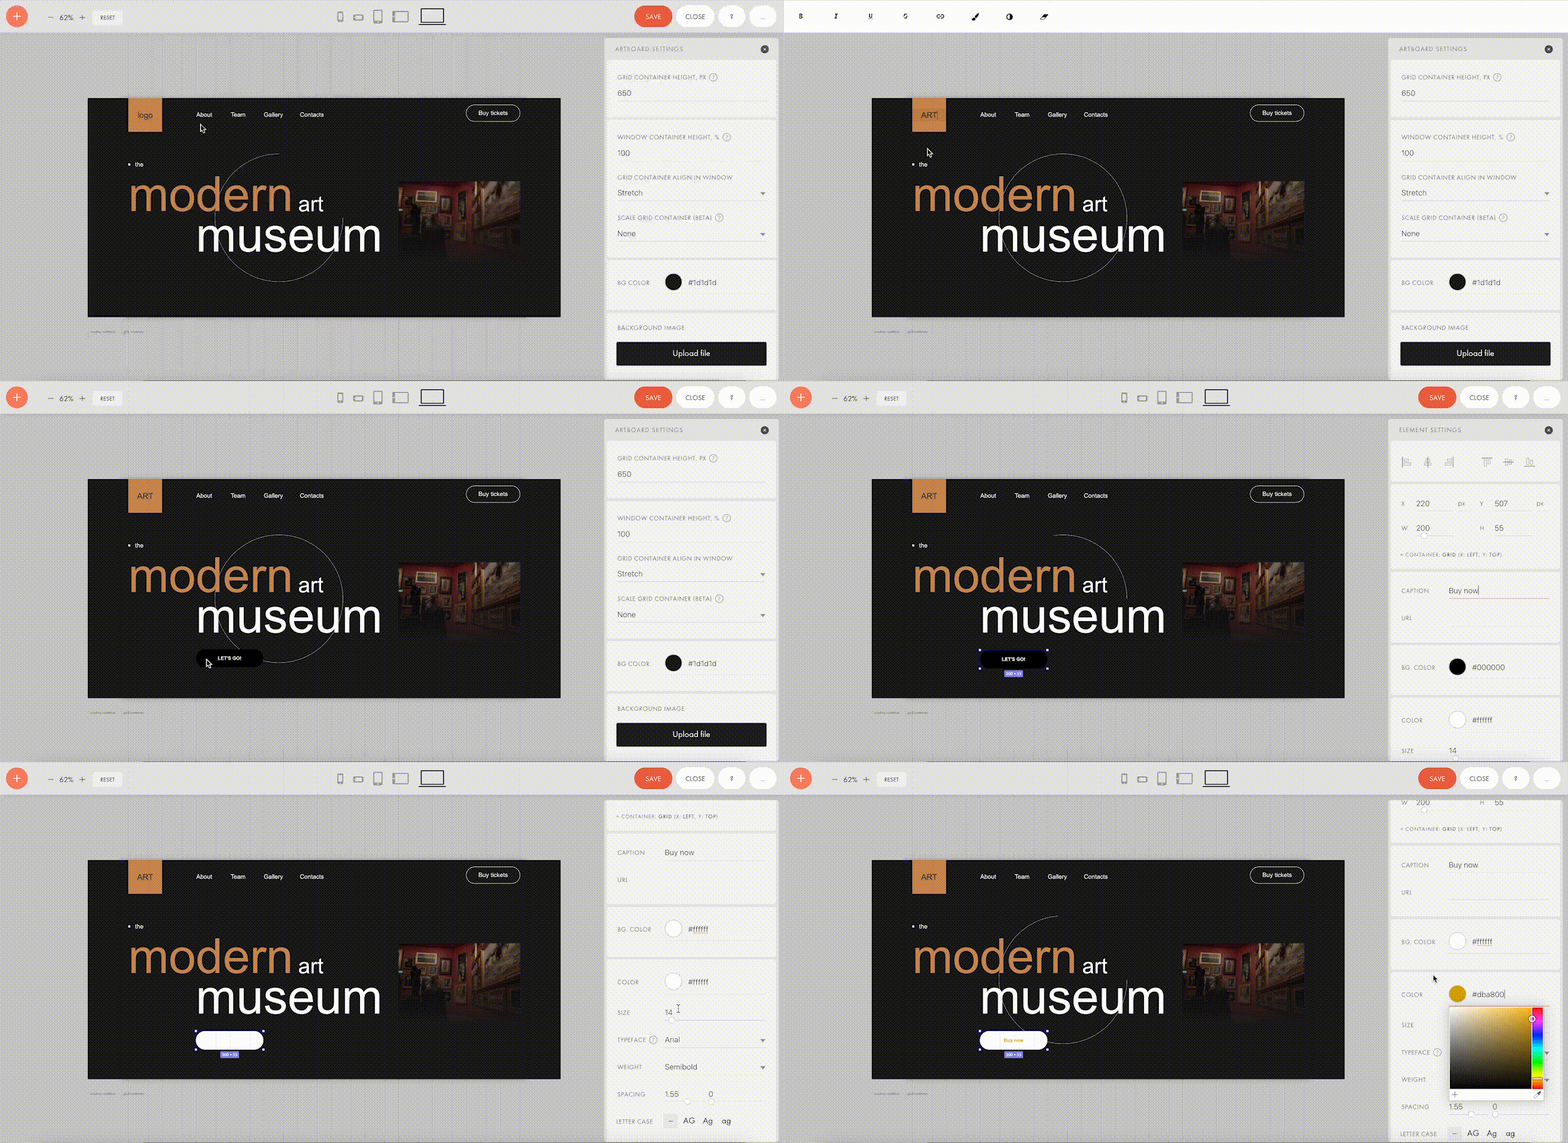
To better meet the demands of a creative brief and unleash your creativity, you can use Tilda’s secret weapon called Zero Block. It is a tool for creating uniquely designed blocks on Tilda.

You can control each element of the block, including text, image, button, or background, and decide on their position, size, and screen resolution on which they’ll appear. For example, you can work with layers to create depth with overlay and opacity techniques or set a transparency level on any element and shadow effects below them. Additionally, you can also insert HTML code to add more complex elements, such as calendars, paywall, comments, social media posts, and so much more.  

Finally, Zero Block allows you to fool around with basic and more advanced step-by-step animation for a more individual look. Here’re some animation examples that you can make on Tilda:

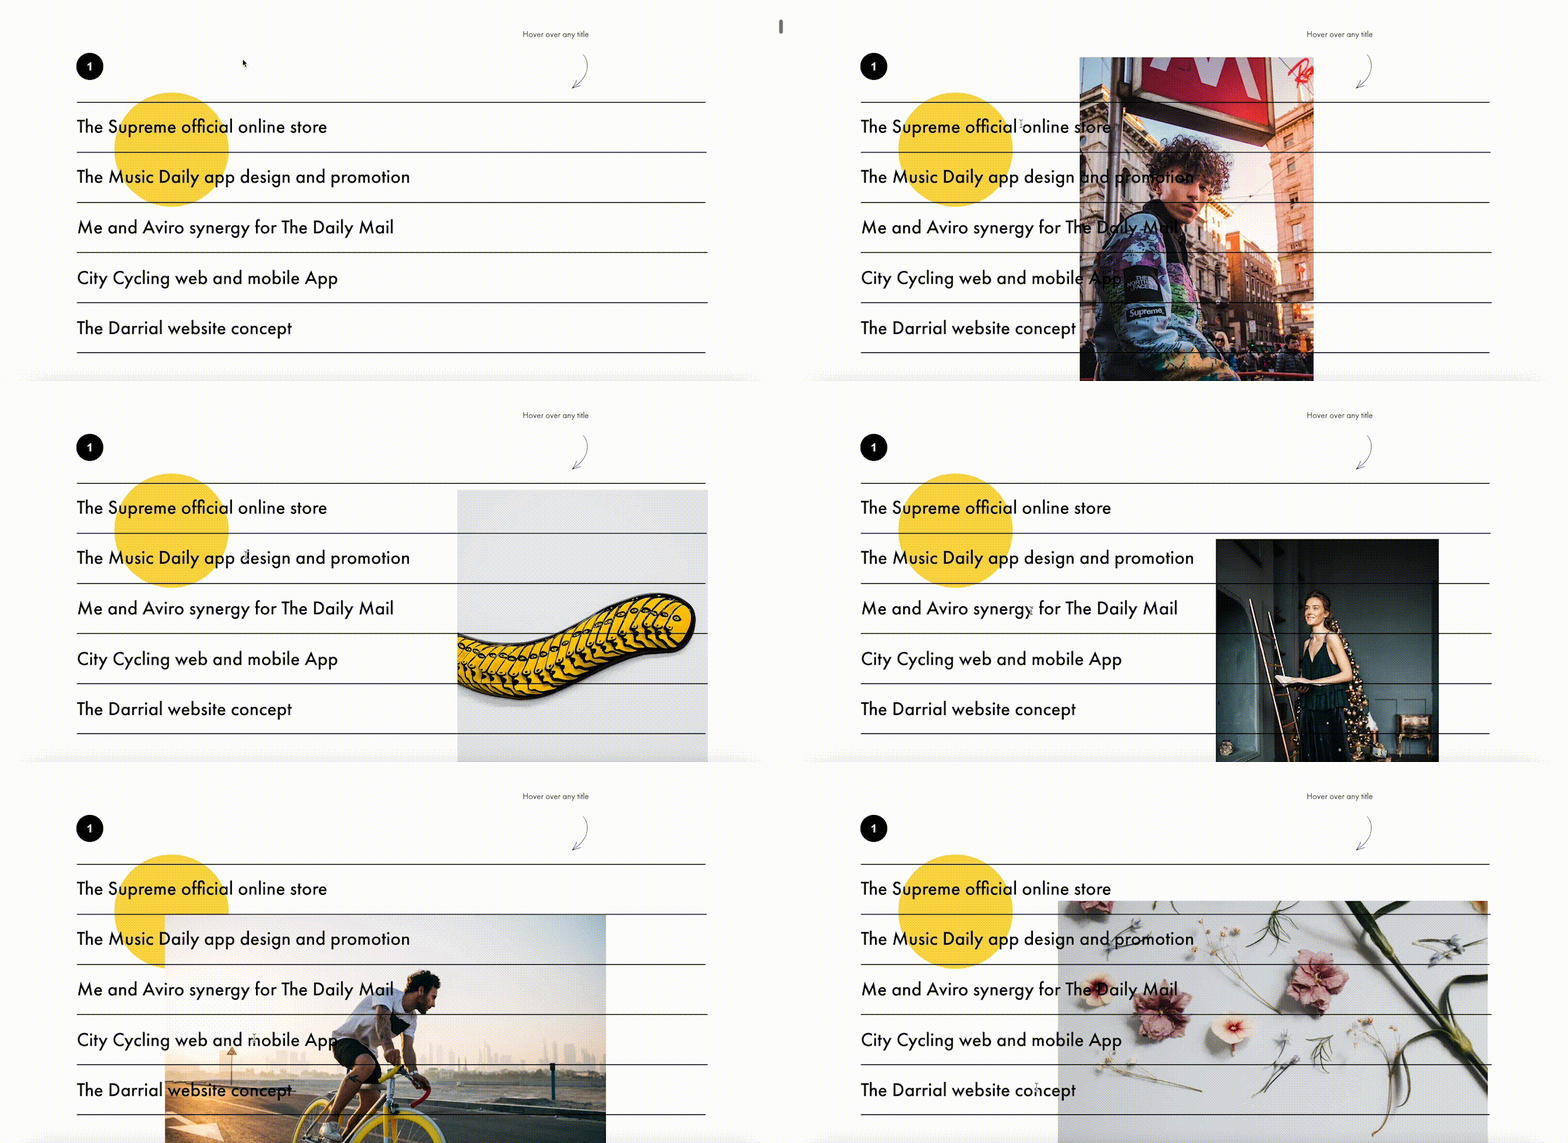
Animation on scroll (position of elements is changing on scroll).

Trigger animation (animation is triggered when pointing at or clicking on an object).

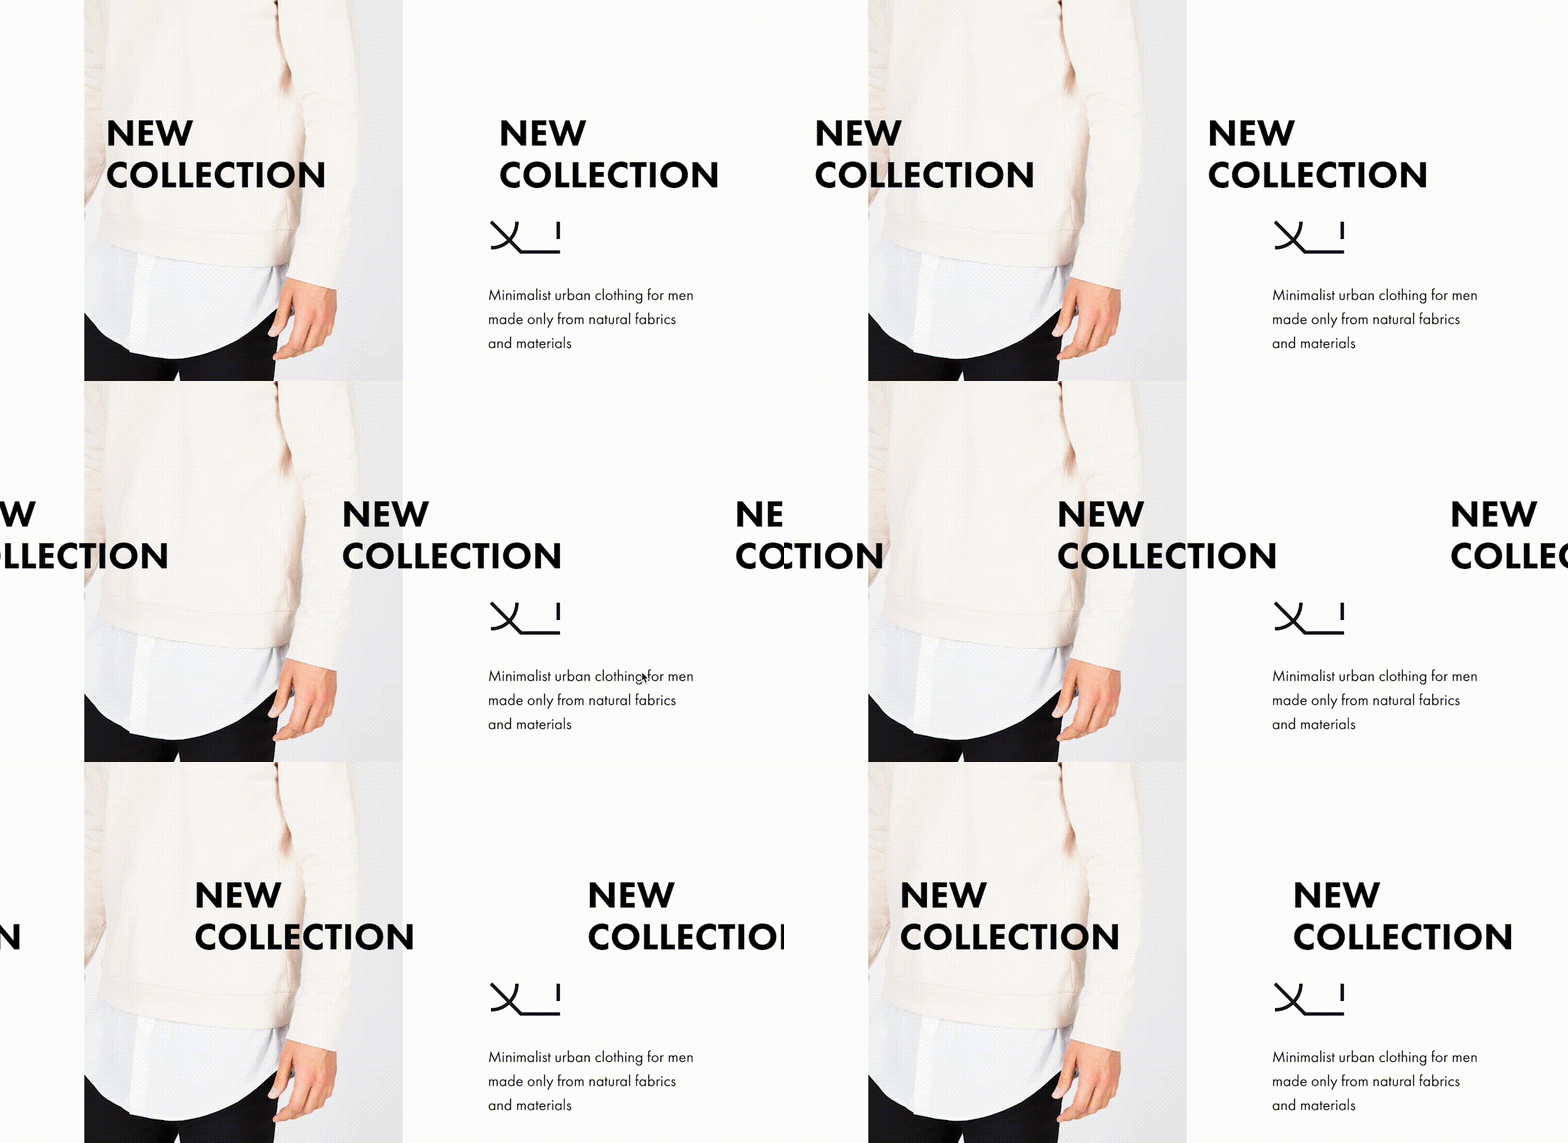
Infinite scrolling text.

#3 Import Designs From Figma To Tilda In Minutes

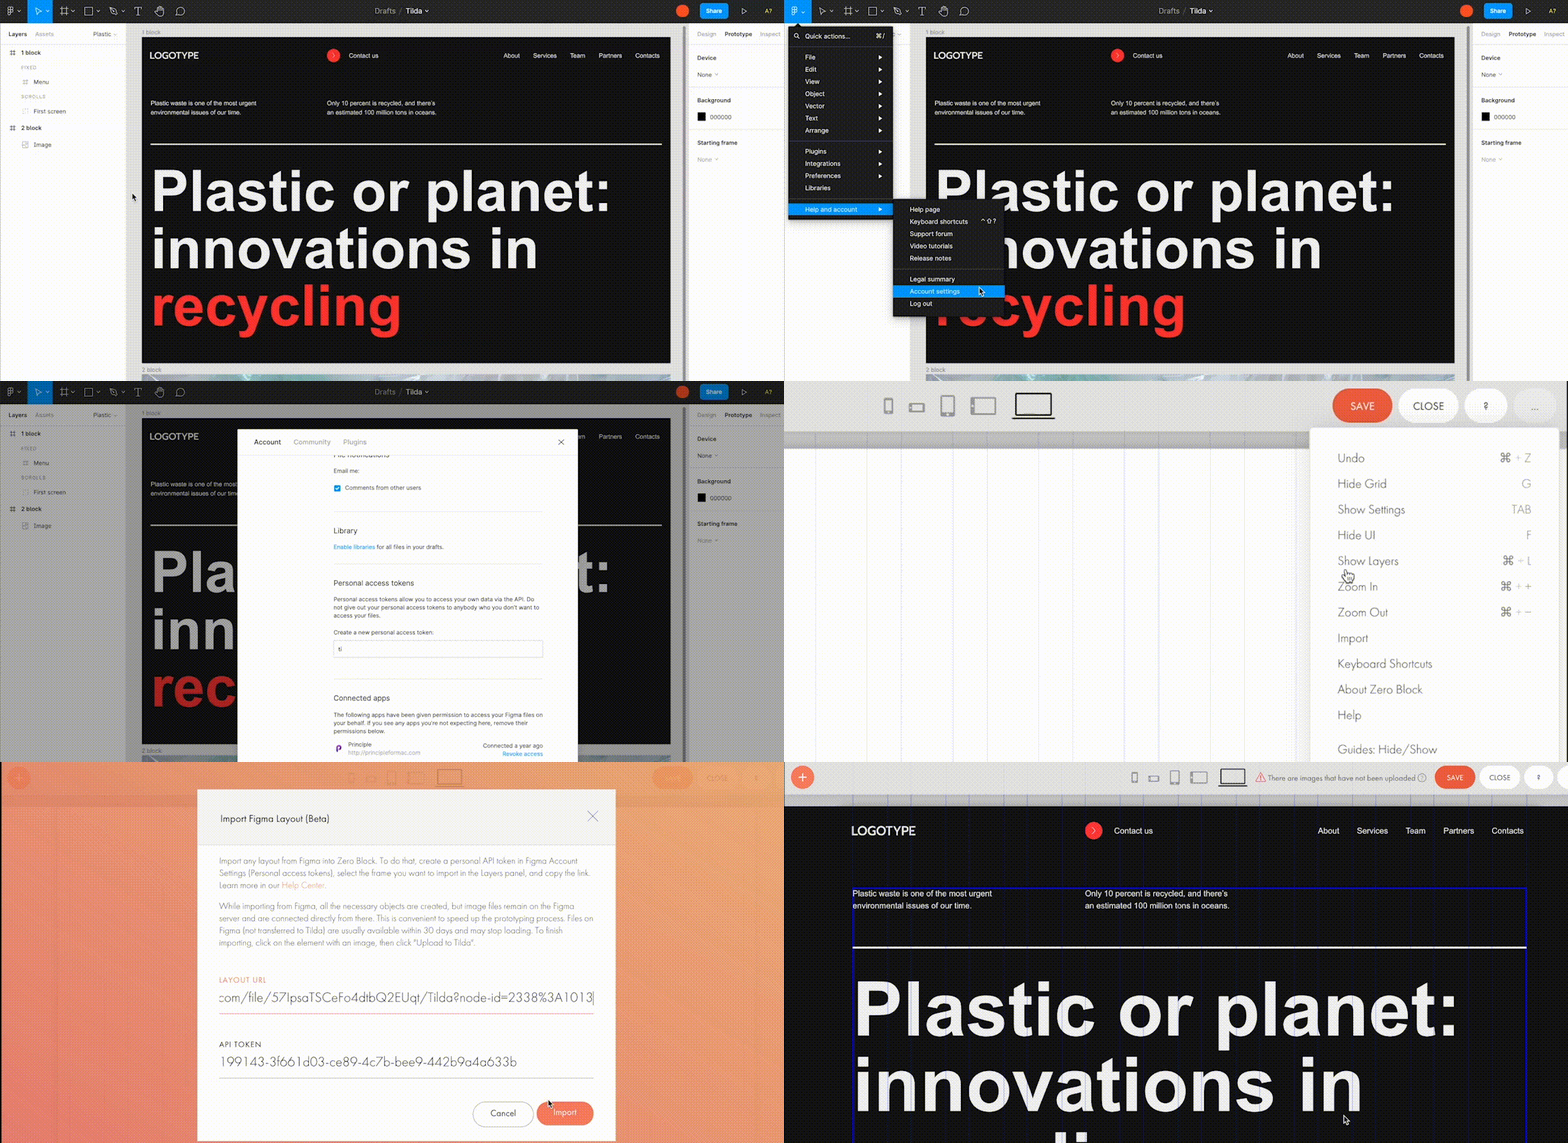
Creators love using Figma for prototyping, but when you have to transfer every element and rebuild your website design from scratch – that’s what’s killing the party. With Tilda, you can easily turn your static designs into an interactive website in no time. 

All it takes is to prepare your Figma design for import with a few easy steps, paste the Figma API token and your layout URL to Tilda, click import and let the magic happen. Once your design is imported, you can bring your project online just by clicking publish.

#4. Make Search Engines Love Your Website With Built-In SEO Optimization

Thanks to the consecutive positioning of blocks on the page, websites designed on Tilda are automatically indexed well by search engines. There is also a set of SEO parameters you can fine-tune right inside the platform to ensure that your web pages rank high even if you don’t have an SEO specialist in-house. These parameters include the title tag, description and keywords meta tags, reader-friendly URLs, H1, H2, and H3 header tags, alt text for images, and easily customizable social media snippets. 

As an additional value, Tilda provides an SEO Assistant that will show you what errors are affecting the indexing of your website and will help test the website for compliance with the search engines’ main recommendations.

#5. Turn Visitors Into Clients

Tilda gives you the power to set up data capture forms and integrate them with 20+ data capture services, such as Google Sheets, Trello, Notion, Salesforce, Monday.com, etc., to ensure seamless lead generation.

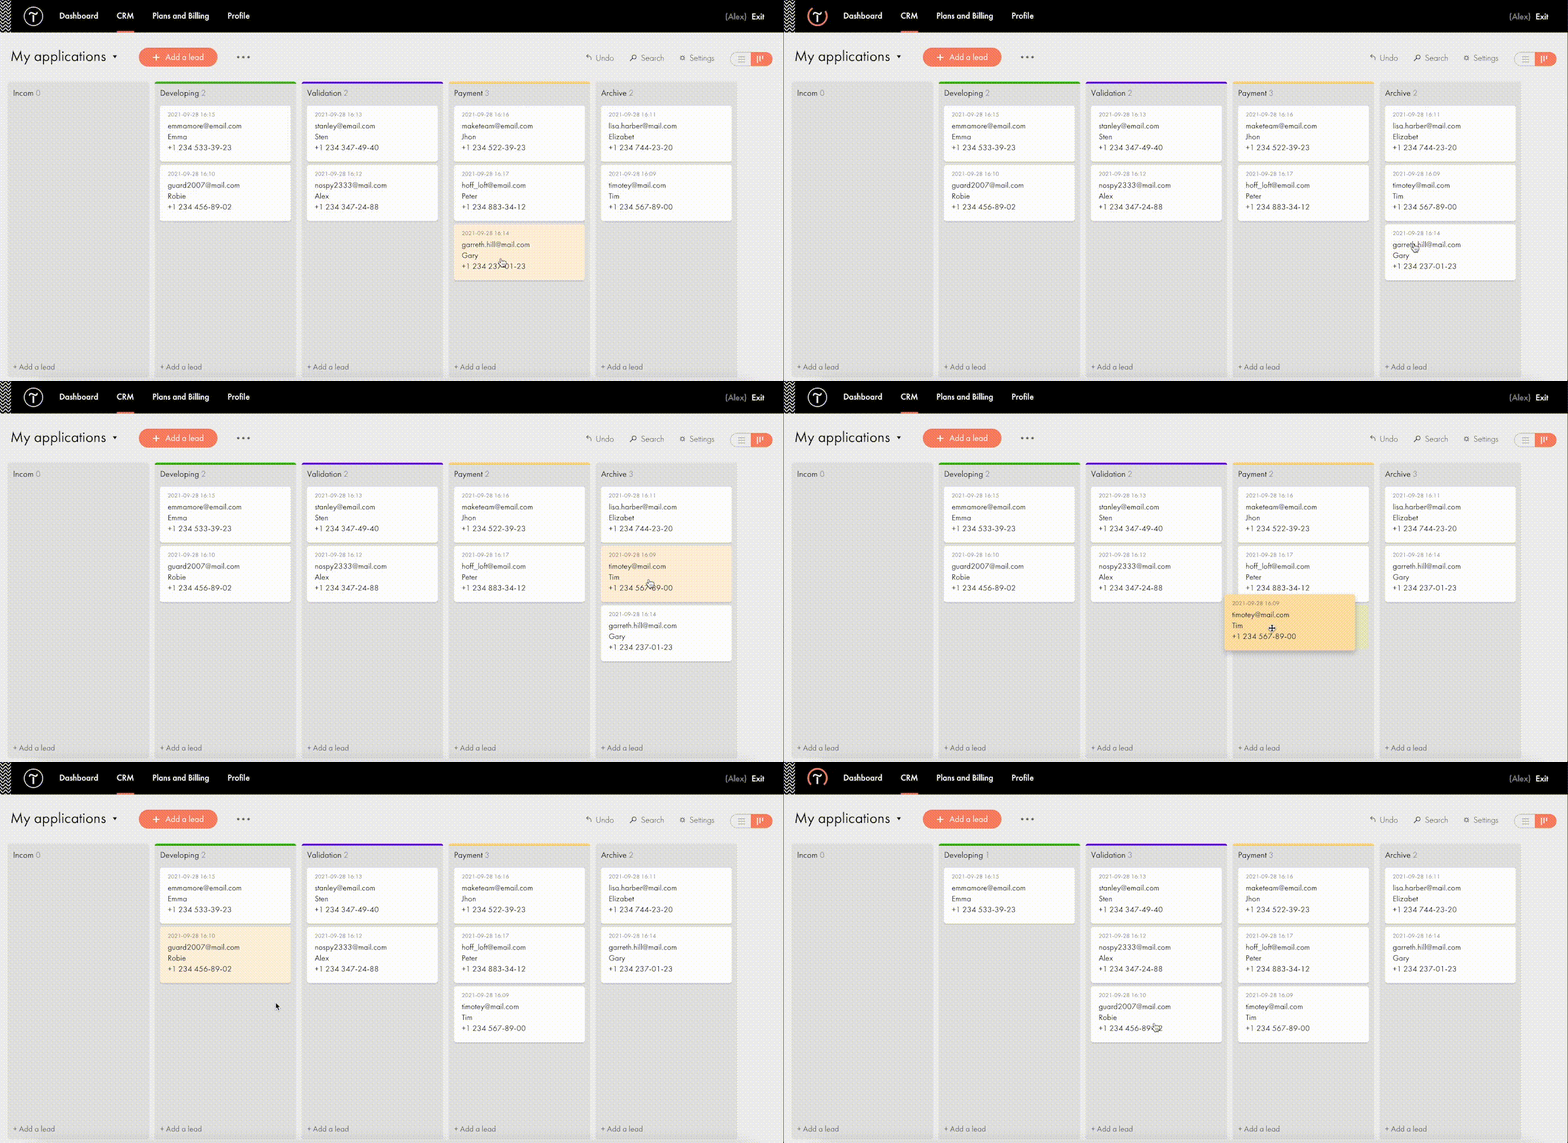
For more fun, Tilda developed its CRM to manage your leads better and keep your business organized right inside of a website builder. This is a very easy-to-use tool that automatically adds leads from forms and allows you to manually add leads you captured outside of the website. There is a kanban board that gives you an overall view of how leads are moving through your sales funnel and allows you to move leads between stages easily.

#6. Build A Powerful Online Store In One Day

Tilda provides a set of convenient features to create a remarkable online shopping experience. The platform gives you the power to sell online using ready-made templates or build an online store completely from scratch, add a shopping cart and connect a payment system of choice — Stripe, PayPal, 2Checkout, etc. — to accept online payments in any currency.

If you are looking to run a large ecommerce business, you should also consider Tilda. Thanks to the built-in Product Catalog, you can add up to 5000 items, import and export products in CSV files, easily manage stock, orders, and keep track of store stats.

And thanks to adaptive design, your store will look good across all devices, including tablets and smartphones. 

#7. Bring Your Project Online For Free

Tilda offers three subscription plans: Free, Personal ($10/month with annual subscription), and Business ($20/month with annual subscription). When you sign up for Tilda, you get a lifetime free account. It allows you to publish a website with a free subdomain and gives you access to a selection of blocks and a limited number of features that offer enough to create an impressive website. 

Personal and Business tariffs allow more advanced options, such as connecting custom domains, adding HTML code, receiving payments, and embedding data collection forms. The business plan also allows users to export their website and create five websites (while personal and free plans allow one website per account). 

To discover all features and templates on Tilda, activate a two-week free trial – no credit card required.

Source

The post Tilda – The Website Builder That Disrupted The Way We Create Websites first appeared on Webdesigner Depot.


Source de l’article sur Webdesignerdepot

Content is the king of the digital world. This is an undisputed fact among marketers and business owners alike.

However, not all content is created equal. Interactive content is a more immersive form of marketing specifically intended for the digital age. Great for companies that need to develop deeper relationships with their audience. 

There are various kinds of interactive content for brands to explore these days. For example, you can create a poll where your customers vote for certain answers to questions. In addition, some companies hire developers to build immersive gaming experiences with prizes and rewards. 

Even standard content like blogs and articles can become more interactive with things like animations, buttons, and elements that ask visitors to do something. 

One of the most valuable forms of interactive content is the quiz. So, how can companies use quizzes to engage their audience effectively? Let’s find out…

The Benefits of Quizzes in Interactive Content

According to studies, 93% of marketers believe interactive content is extremely effective for educating and entertaining customers. Interactive content is meaningful because it’s engaging, and many marketers state that creating engaging content is one of their toughest challenges. 

In an environment where the average attention span is constantly dwindling, interactive content reduces the risk that your customer will end up being distracted by something else before they have a chance to convert on your website. 

Quizzes are an excellent form of interactive content, but many marketers don’t take full advantage of them yet. Quizzes, like some other forms of interactive content, can come in different styles. For example, you could have a personality quiz that tells your customer what kind of vegetable they would be. That might sound odd, but it helps to give your customer a sense of belonging, gives them a feeling of being understood, and offers entertainment. 

Some quizzes can answer questions for your customer. 

For instance, a quiz on “what to buy your dad for father’s day” is an excellent way to solve a customer’s problem while guiding them towards potential products that you sell. 

Z Gallerie, a retail company, launched a quiz called “What is your Z Gallerie Style personality?” The quiz offers a personalized recommendation experience on what to purchase for every current and potential customer. 

The personality quiz became a great way of bringing product recommendations to leads without being pushy. Z Gallerie could, therefore, consistently provide a unique experience to each customer based on their results. 

So, how do you make a quiz that’s really effective for your content marketing plan?

Step 1: Creating the Quiz

Quizzes are a kind of interactive content that can almost feel like a conversation with a brand. They’re an opportunity for you to show your audience how well you understand them. 

According to TryInteract, people take quizzes because they want to know themselves better or want to confirm what they think they already know about themselves. These content solutions solve problems, even if they’re handling a person’s curiosity about what kind of celebrity they’re most like. 

Before you start making your quiz, you need to know your goal and what you’re trying to do for your audience. If your goal is to get more people to feel more attuned to your company, you might need to create something that demonstrates how well you know your visitors.

The goal for the company is to demonstrate a deep knowledge of the industry and target market. If the quiz is helpful and informative, it adds to the brand’s credibility and makes it more likely that customers will want to continue purchasing.

Before you build your quiz, ask yourself:

  • What do you want to get out of your audience taking this quiz? (More conversions, better brand loyalty, improved engagement?)
  • Why would your audience want to take the quiz? (Is it relevant to their interests, will it give them some vital information?)

Knowing exactly what you and your audience should accomplish with the quiz will give you a good platform to begin building on. 

Step 2: Choose the Title and Quiz Type

Titles are important in any content marketing. 80% of readers decide whether to check out an article based on its title. The same process is common for people who want to decide whether they should take a quiz or not. 

There are a lot of great ways to pique your visitor’s attention with a quiz title. For instance, you could challenge your audience to prove their knowledge with the word “actually.” For instance, “How much do you actually know about Kale?” That kind of title immediately appeals to the competitive nature of the human being. 

Another great example of a challenging title is to tell your audience that they can’t do something. Buzzfeed did that with its millennial quiz. The great thing about this quiz title is that it speaks to the competitive nature of the reader but also gives that reader a chance to show that they belong to a specific community. 

Another option could be to ask a question and hope that curiosity will do the rest of the work for you. For instance, “Which celebrity chef are you most like?” The key to success here is understanding your audience and knowing exactly what they most want to know. 

Once you’ve figured out the title, choosing the kind of quiz you want to create is the next step. For instance, you can try:

  • Personality quizzes: People like hearing good things about themselves because of a psychological phenomenon called self-serving bias. A personality quiz that recognizes the features your customers like about themselves will make them feel happier and more connected to your brand.
  • The knowledge test: Commonly found on social media, these quizzes challenge a person’s knowledge on a specific subject. The benefit here is that your audience can learn something and share their knowledge with their friends for social points. This quiz from Unicef is an excellent example of the “knowledge” style quiz.

Step 3: Crafting Quiz Questions

Once you have a good idea of the kind of quiz you want to create and the title you’re going to put alongside it, you’ll need to begin bringing your interactive content to life. That means designing the right questions. 

Writing questions for a quiz is just like creating any excellent content. First, you need to keep your target audience in mind. Next, think about the kind of personality you’re trying to appeal to. Breathing some life into your quiz by injecting your unique sense of personality into it will be an excellent way to strengthen your bond with your customers. 

Other tips for making the most of your quiz questions include:

  • Use visuals in your questions: Having text-only questions is fine in some cases, but it’s worth looking into images too. Using pictures helps to keep things relevant and interesting and makes your quiz feel a lot more immersive. 
  • Don’t make questions too long: In-depth and complicated questions will only scare your audience away. Remember that they’re looking for something fun and lighthearted to do. This means that your questions should be as short as possible. 
  • Make it interesting: Don’t just ask basic questions like “what’s your favorite color” try to go beyond what your customers usually see on quizzes and make it relevant to the quiz topic. Again, this is your chance to show your audience how much you know.

Step 4: Creating Results That People Want to Share

If you want to design a quiz that really blows your audience away, then the results are one of the most important things to focus on. The results you offer your customers dictate whether they enjoy your quiz so much that they want to share it with other people. Creating share-worthy results is how you boost your chances of finding new customers and even going viral. 

So, how do you design results that people want to share? Start by helping your customers to feel positive about themselves. The results should make them feel like a better person or confirm the good things they already believe about themselves. Research tells us that positive emotions are more likely to promote sharing

For instance, this quiz from the PBS company makes people feel good by demonstrating that they know their books. This confirms a customer’s idea that they are well-read.

Using share-worthy images is another way to improve your chances of designing results that people want to share. You’ll need to use interesting pictures here that speak to your audience. Bright and entertaining pictures will make results more eye-catching on a social media feed. 

Don’t forget to include a call-to-action on your results page too. It’s always helpful to give your audience a nudge in the direction you want them to move in. Providing a call-to-action that asks your customers to share their results increases your chances of positive sharing behavior. 

Step 5: Know How to Distribute Your Quiz

Once you’ve put all of the essential components of your quiz together, the next step is ensuring you can distribute that quiz and share it with as many people as possible. For instance, you can promote your quiz on social media to reach more possible customers. Twitter and Facebook are always great places to get started but don’t be afraid to experiment elsewhere. 

Sharing snippets of the quiz experience in an Instagram Story could be a great way to generate engagement or posting a picture on your Instagram feed. 

When promoting your interactive content on social media, use an attractive image to highlight the experience and ensure you make that captivating headline stand out. Share both the caption and image with a shortened link to measure results. Shorter links are more likely to attract audience attention and encourage sharing later. If your links are too long, they can end up looking spammy or unprofessional. That’s not the image you want to build with your quiz content. 

If you need an extra boost for your quiz, promoting through Facebook advertising could be the ideal solution. Paid ads are a great way to get extra attention, but you need to choose your target audience carefully. Select your audience according to demographics, behaviors, connections, and locations. 

Remember that Facebook gives you plenty of opportunities to track down the kind of customers you want to speak to. Creating a custom audience could be a handy step too. This is always useful if you have a lot of information from an email list or a collection of contacts you’ve generated over time.

Step 6: Following Up on Your Quiz

Once you’ve successfully attracted people to your quiz experience, the next step is to follow up on the leads you’ve hopefully collected. When designing a quiz, it’s always a good idea to ask your customer for their email addresses before you give their results. This ensures that you can collect plenty of leads in the long term for nurturing purposes. 

Marketing company, The Foundation, designed a quiz that asked customers whether they had an entrepreneurial mindset. The quiz was based on an existing eBook offered by the company. The quiz, combined with a Facebook ad campaign, helped the business collect new leads to advertise their ebook. The Foundation managed to reduce its cost per lead from $6 to $3.80 using this method. 

When following up on your quiz experience, make sure that you get the tone right. The first thing you need to do is thank your audience for taking the quiz in the first place. After someone opts in and offers their email address, send a quick email that shares their results and says “thanks.” 

After a couple of days, you can follow up on your thank you email by asking your audience to retake the quiz or take a new one. Encourage these repeat customers to share their testimonials and gradually introduce more interesting content you have that’s connected to your quiz. For instance, if you create a quiz to determine whether someone has an entrepreneurial mind, you could advertise articles that cover similar topics. 

Finally, after regular engagement from your audience, you can begin to implement strategies that might convince your audience to purchase your products. This could mean showing off your entrepreneurial eBook, asking someone to sign up for a webinar, or something else entirely.

Don’t forget to track the performance of every quiz too. Examining metrics like click-through rates for your quiz advertisements and conversion rates will help you see which quizzes generate the most attention and action from your intended audience. 

Time to Add Quizzes to Your Interactive Content Strategy?

A content marketing strategy is one of the best ways to engage with your audience and strengthen your position in any industry. The right content demonstrates your knowledge, develops trust, and helps you to attract new customers. With interactive content, you can take the relationship you build with your audience to the next level. It’s your chance to engage with your customers and create an emotional relationship. 

Quizzes are one of the most effective forms of interactive content, and they’re also one of the easiest to implement into your existing strategy. It doesn’t take a lot of time or money to create a good quiz, and you can usually find tools online to help you with things like structure and formatting. You could even hire a professional to design a quiz for you. 

Once you’ve got the kind of quiz that’s really going to interest your target audience, the next step is distributing it in a way that generates as much attention as possible. Remember, you can advertise on social media and various other channels. However, it’s also helpful to pay attention to your options for helping do your promotion for you. For example, many customers will be more than happy to share quiz results that confirm the identity they’re trying to build online.


Featured image via Unsplash.

Source

The post How to Use Quizzes More Effectively in Interactive Content first appeared on Webdesigner Depot.


Source de l’article sur Webdesignerdepot

Last week we hosted a webinar where Alex Omeyer interviewed Adam Tornhill about technical debt: what is it, why it’s important, and how to manage it effectively. For this article, we’ve chosen some of the most interesting questions we’ve got from the audience. If you’re curious to learn more — check out the full version of the webinar.

Alex: I’m Alex, the Co‑founder, and CEO of Stepsize. I spend all of my time talking about technical debt with Engineering team members, and I’m genuinely pumped to have Adam, CTO and Founder of CodeScene, with me today.

Source de l’article sur DZONE

This week, we take a look at API vulnerabilities in HashiCorp Vault, Azure App Services, and more. There is also an introductory video on finding information disclosure in JSON and XML API responses, and another cheat sheet and a webinar on OWASP API Security Top 10.

Vulnerability: HashiCorp Vault

Felix Wilhelm from Google’s Project Zero has written a very detailed write-up on an authentication bypass he found in the Amazon Web Services (AWS) and Google Cloud Platform (GCP) integration of HashiCorp Vault. As a central storage of credentials, Vault makes an attractive target for attackers, and therefore a vulnerability in it is also very bad news. Looking for the silver linings, this attack was definitely quite advanced, and thus not easily exploitable.

Source de l’article sur DZONE

This week, the OAuth 2.0 Token Exchange got its RFC, and there is an upcoming webinar on JWT. In addition, we take a look at where to start with securing your APIs, and how 2020 seems to be shaping up according to analysts.

Standard: OAuth 2.0 Token Exchange

IETF has published the RFC 8693 for OAuth 2.0 Token Exchange.

Source de l’article sur DZONE

NoSQL and NewSQL databases are popular solutions in the data management space. Both technologies offer their own unique benefits, but depending on the use case or application, one option may be a better fit than the other. And as you plan for next year, it’s important to have a clear understanding on which database technology is best suited to power your initiatives in 2019 and beyond.

WATCH NOW

Source de l’article sur DZONE

The seventh Hands-on Agile webinar Scrum Sprint Anti-Patterns analyzed 12 ways a Scrum team can improve its effectiveness by avoiding typical sprint anti-patterns. Learn more about gold-plating, delivering Y instead of X, absenteeism, side-gigs, and organizing people instead of the flow of work.

The video of the webinar is available now:

Source de l’article sur DZone (Agile)