Articles

A friend shared this youtube video on the Art of Code where FizzBuzz was demonstrated on SonicPi and also at end of the video (I won’t spoil it for you). After watching it, I was highly inspired to also implement it on Mule, because why not? I even searched the web to see if anyone had already done a FizzBuzz loop on Mule. The fact that I then did it last night kinda tells you that the answer was no.

It turns out that I also learned a thing or two implementing FizzBuzz on Mule 4. FizzBuzz is one of the ways loops are introduced when learning a programming language. Even the recent Golang course I took also introduces loops using FizzBuzz. For the uninitiated, FizzBuzz is derived from a children’s game, the problem statement for a FizzBuzz program is pretty straightforward. This is the same one you can find at HackerRank.

Source de l’article sur DZONE

When it comes to increasing sales for your ecommerce store, there are 3 levers you can pull: You can increase your average order value; You can increase the amount of traffic to your site; You can increase your conversion rate.

While all of the above are important, the cheapest, most effective way to grow your sales is by improving your conversion rate.

For most online stores, low conversion rates are typically the result of a poor design or a bad user experience. Your visitors may not resonate with the look and feel of your website or they may have problems finding the information they need in order to make a purchase.

In this post, I will walk you through the exact steps I took to increase my desktop conversion rate by 46% and my mobile conversion rate by 39% with my last site redesign. I will also show you how you can apply these same design principles to optimize the conversion rate for your own online store.

Even if your ecommerce business is already performing well, this post will help you achieve even better results.

What Is Considered A Good Ecommerce Conversion Rate? 

Monitoring your conversion rate is crucial to building a profitable ecommerce business. And most analytics tools can help you measure this data out of the box.

Your conversion rate is calculated by simply dividing the number of desired actions by the number of website visitors in a given period. For example, if your website is getting 50 conversions for every 5,000 visitors, your conversion rate is 1%.

Depending on the specific type of online business you run, your conversions may include online sales, email signups, add to carts, or any other KPI you wish to measure. But in the case of an ecommerce store, your primary focus should be your purchase conversion rate.

On average, ecommerce stores have a purchase conversion rate of 1% – 2%. What’s more, experts say a good conversion rate is anywhere from 2% to 5%. This should be your baseline as you measure your online store’s success.

The Conversion Results of My Last Site Redesign

Before we dive into the nitty gritty details of how I improved my conversion rate, here are my overall results and exactly how I conducted my experiment.

First off, I run Bumblebee Linens, an ecommerce store that sells handkerchiefs online.

Because my site gets a ton of traffic from content pages that do not directly convert to sales, I measured my conversion rate based on my most predictable traffic sources.

As a result, all of my conversion data was taken from targeted PPC ad traffic sources like Google Shopping and Google Adwords. After all, my Google ads traffic is very steady and always converts at a consistent percentage.

Before I redesigned my site, the conversion rate for my ecommerce store hovered at around 3% which is above average. But the look and feel of the site was dated and desperately needed a refresh. Overall, the entire redesign took approximately 7 weeks and cost me roughly $1840.

Here are the conversion results from my updated design compared to the original:

  • Desktop conversion rates increased by 46%
  • Mobile conversion rates increased by 26% 
  • Tablet conversion rates increased by 32% 

The remainder of this post will highlight the specific elements of the redesign that contributed to these increases. (Note: I made all of my redesign changes live simultaneously so it’s difficult to determine which specific optimization contributed the most gains.)

8 Ecommerce Design Tips To Optimize Your Conversion Rate

If your ecommerce store is not performing as well as it should, there are many aspects of the user experience that could be negatively impacting sales. Even a seemingly innocuous design choice like your font size or the color of your buttons can have a significant impact on your overall conversion rate.

If you want to systematically improve the conversion rate for your ecommerce store, you should follow these 8 design steps.

1. Use A Consistent and Complementary Color Scheme 
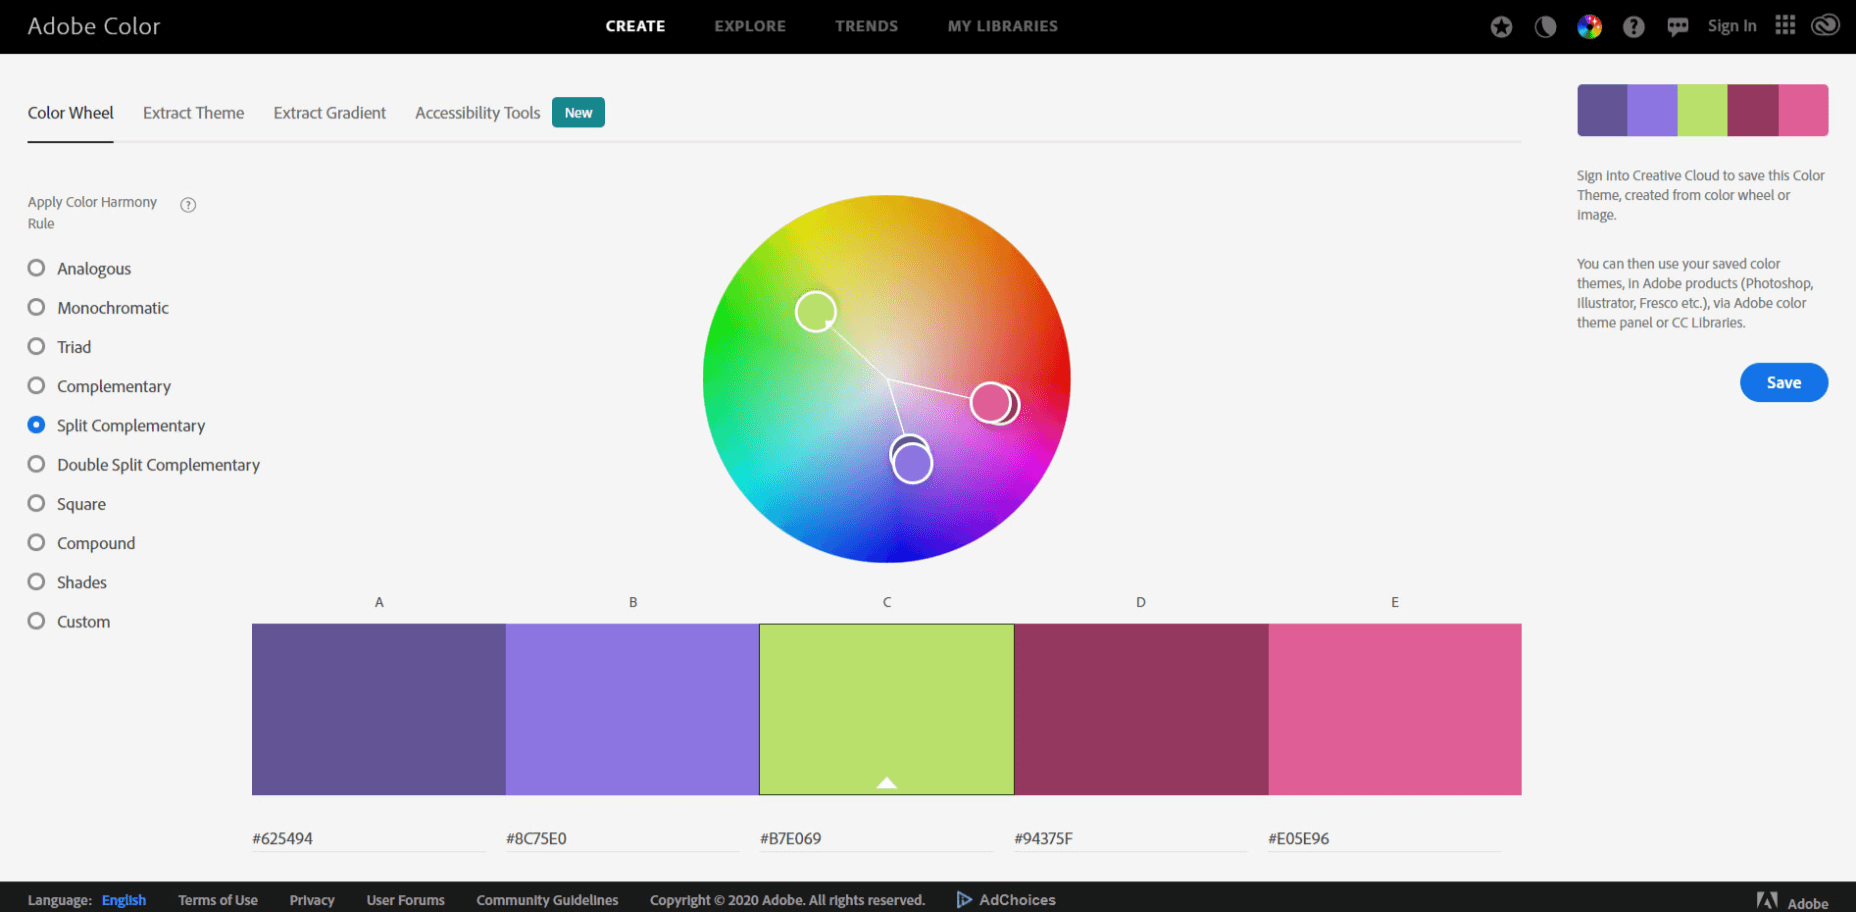
Use color.adobe.com to choose complementary colors when redesigning your website.

A well chosen color scheme can instantly attract a customer’s attention, evoke emotion, and drive users to take action. After all, how a customer feels about your website can be the deciding factor between completing checkout or bouncing from your shop.

A well designed ecommerce store should utilize at least 3 complementary colors that are consistently applied across every page of your website.

If you don’t have a good eye for color, you can use a free tool like color.adobe.com which will help you mix and match different colors that go well together.

For my site redesign, I wanted a modern feel so I chose teal, hot pink, and yellow for my color palette.

I also assigned each color a specific purpose on my site:

  • Teal was applied to give the site a bright, overall color for a young and hip feel;
  • Yellow was used to draw attention to marketing elements like free shipping and special offers;
  • Hot Pink was used for all action buttons on the site.
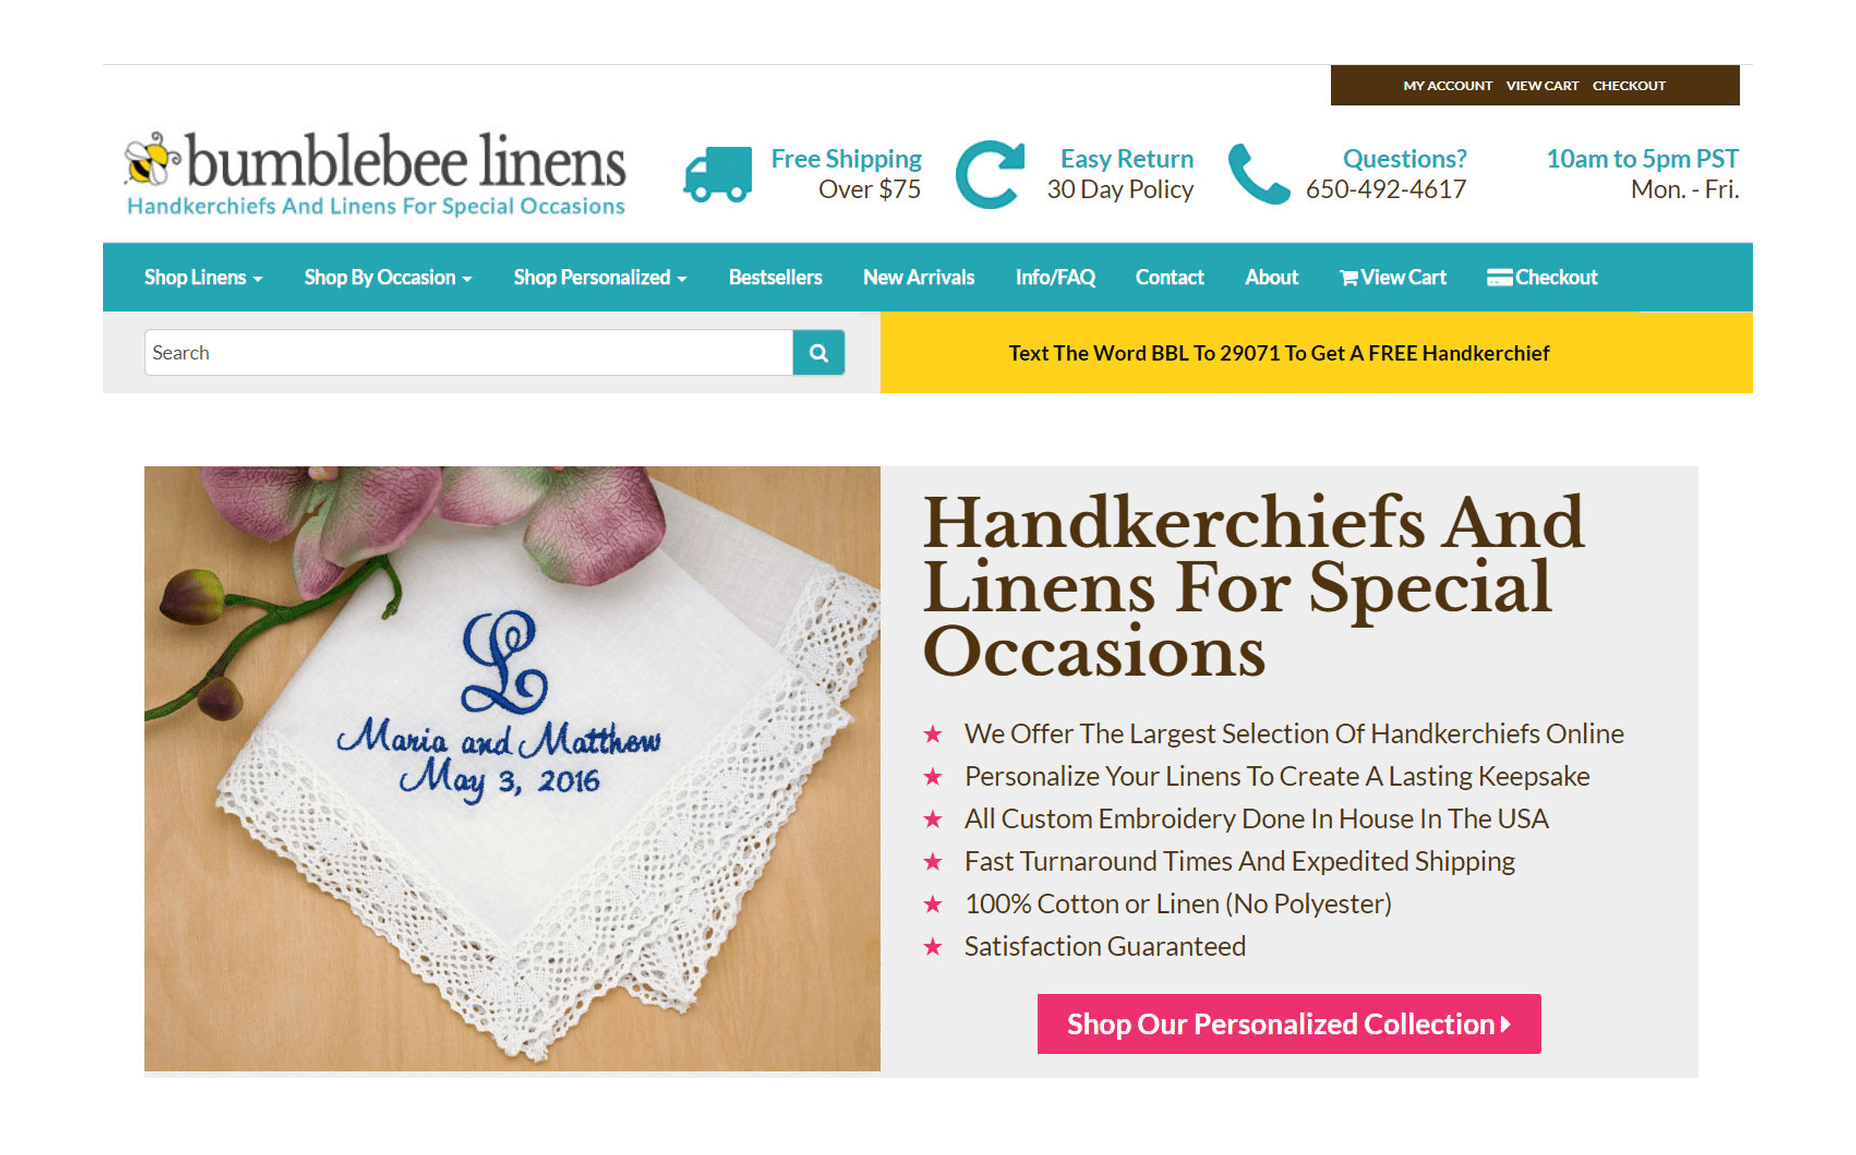
Overall, every single page of your ecommerce store should have 1 main call to action (using a bright color like hot pink) that guides a customer closer towards checkout.

For example on my front page, the hot pink button “Shop Our Personalized Collection” pops out of the page and catches a user’s attention right away. We want visitors to shop our personalized collection because our personalized products are the highest margin products in our store.

2. Simplify Your Navigation 

Is your menu too complicated? Is your navbar taking up too much screen real estate?

A good rule of thumb for an ecommerce store is to minimize the number of clicks for a customer to add to cart. As a result, you should avoid nesting your product categories in more than 1 level of hierarchy.

If you have too many categories in your shop to display all at once, choose your best selling categories for your main menu and lump your less trafficked categories in a separate tab.

For my store, I decided to use a top-level, hover style drop-down menu as shown in the photo below.
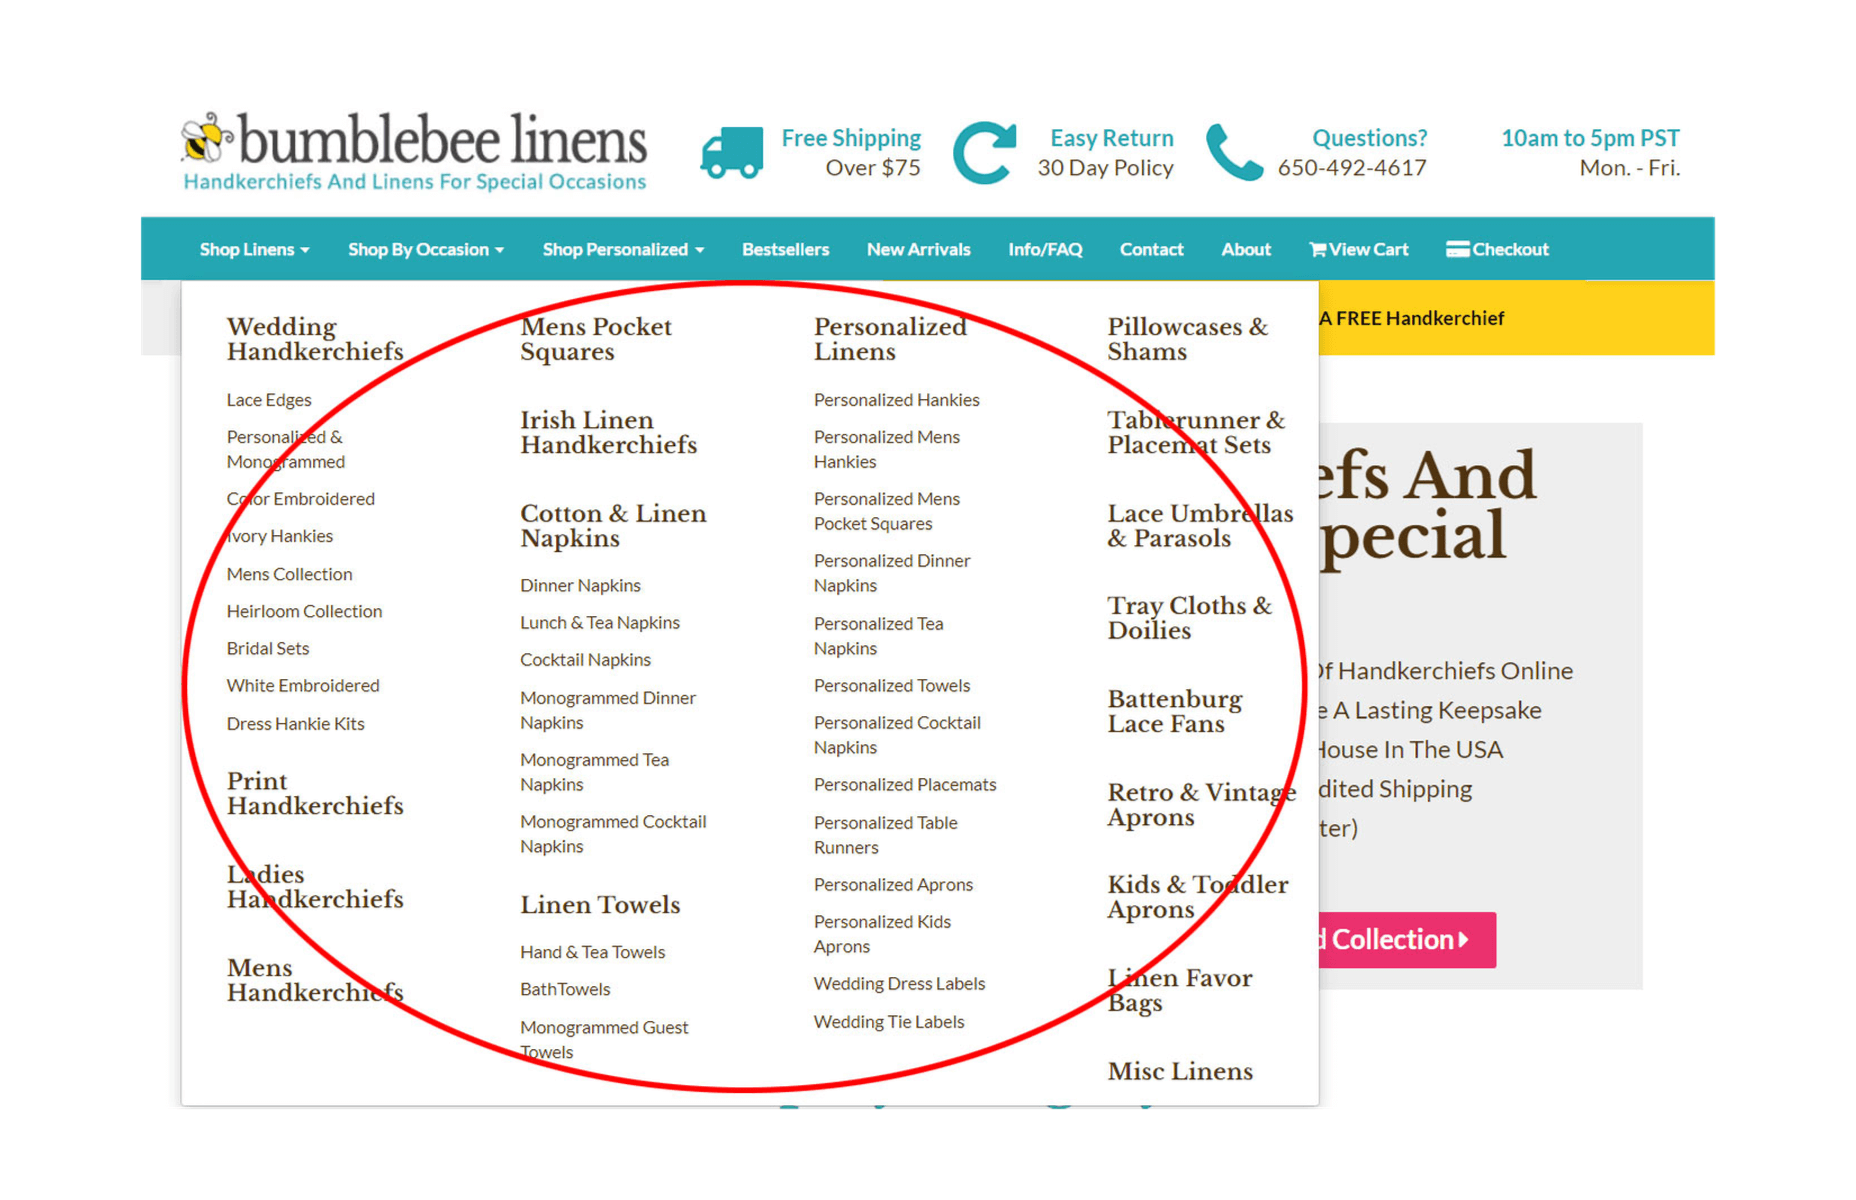
Top-level navigation is one way to organize and display your product categories.

My old design utilized left hand style navigation which took up too much screen real estate. And freeing up the extra space allowed me to blow up my category and product images by 300%. With my new navigation menu, every visitor can add to cart in just three clicks: One click to find a product category; One click to view the product description; One click to add to cart.

Once you’ve designed your menu, pretend that you are a customer and try to shop on your site. Is the content easy to read? Do the important elements pop out? Can you find the information you need right away? Analyzing your site from a customer’s perspective will help you improve your users’ shopping experience.

3. Display Trust Factors On Every Page 

Free shipping, easy returns, and trust are crucial to driving conversions. 

Trust is the most important value you must establish with your customer.

Unless you’re Amazon or a big box store, people have likely never heard of your brand and you have to reassure them that it’s safe to buy from your store.

Due to Amazon’s influence in the ecommerce space, most customers look for 3 things when shopping at an online boutique for the first time:

  • Fast and free shipping;
  • Easy returns;
  • A way to reach customer support.

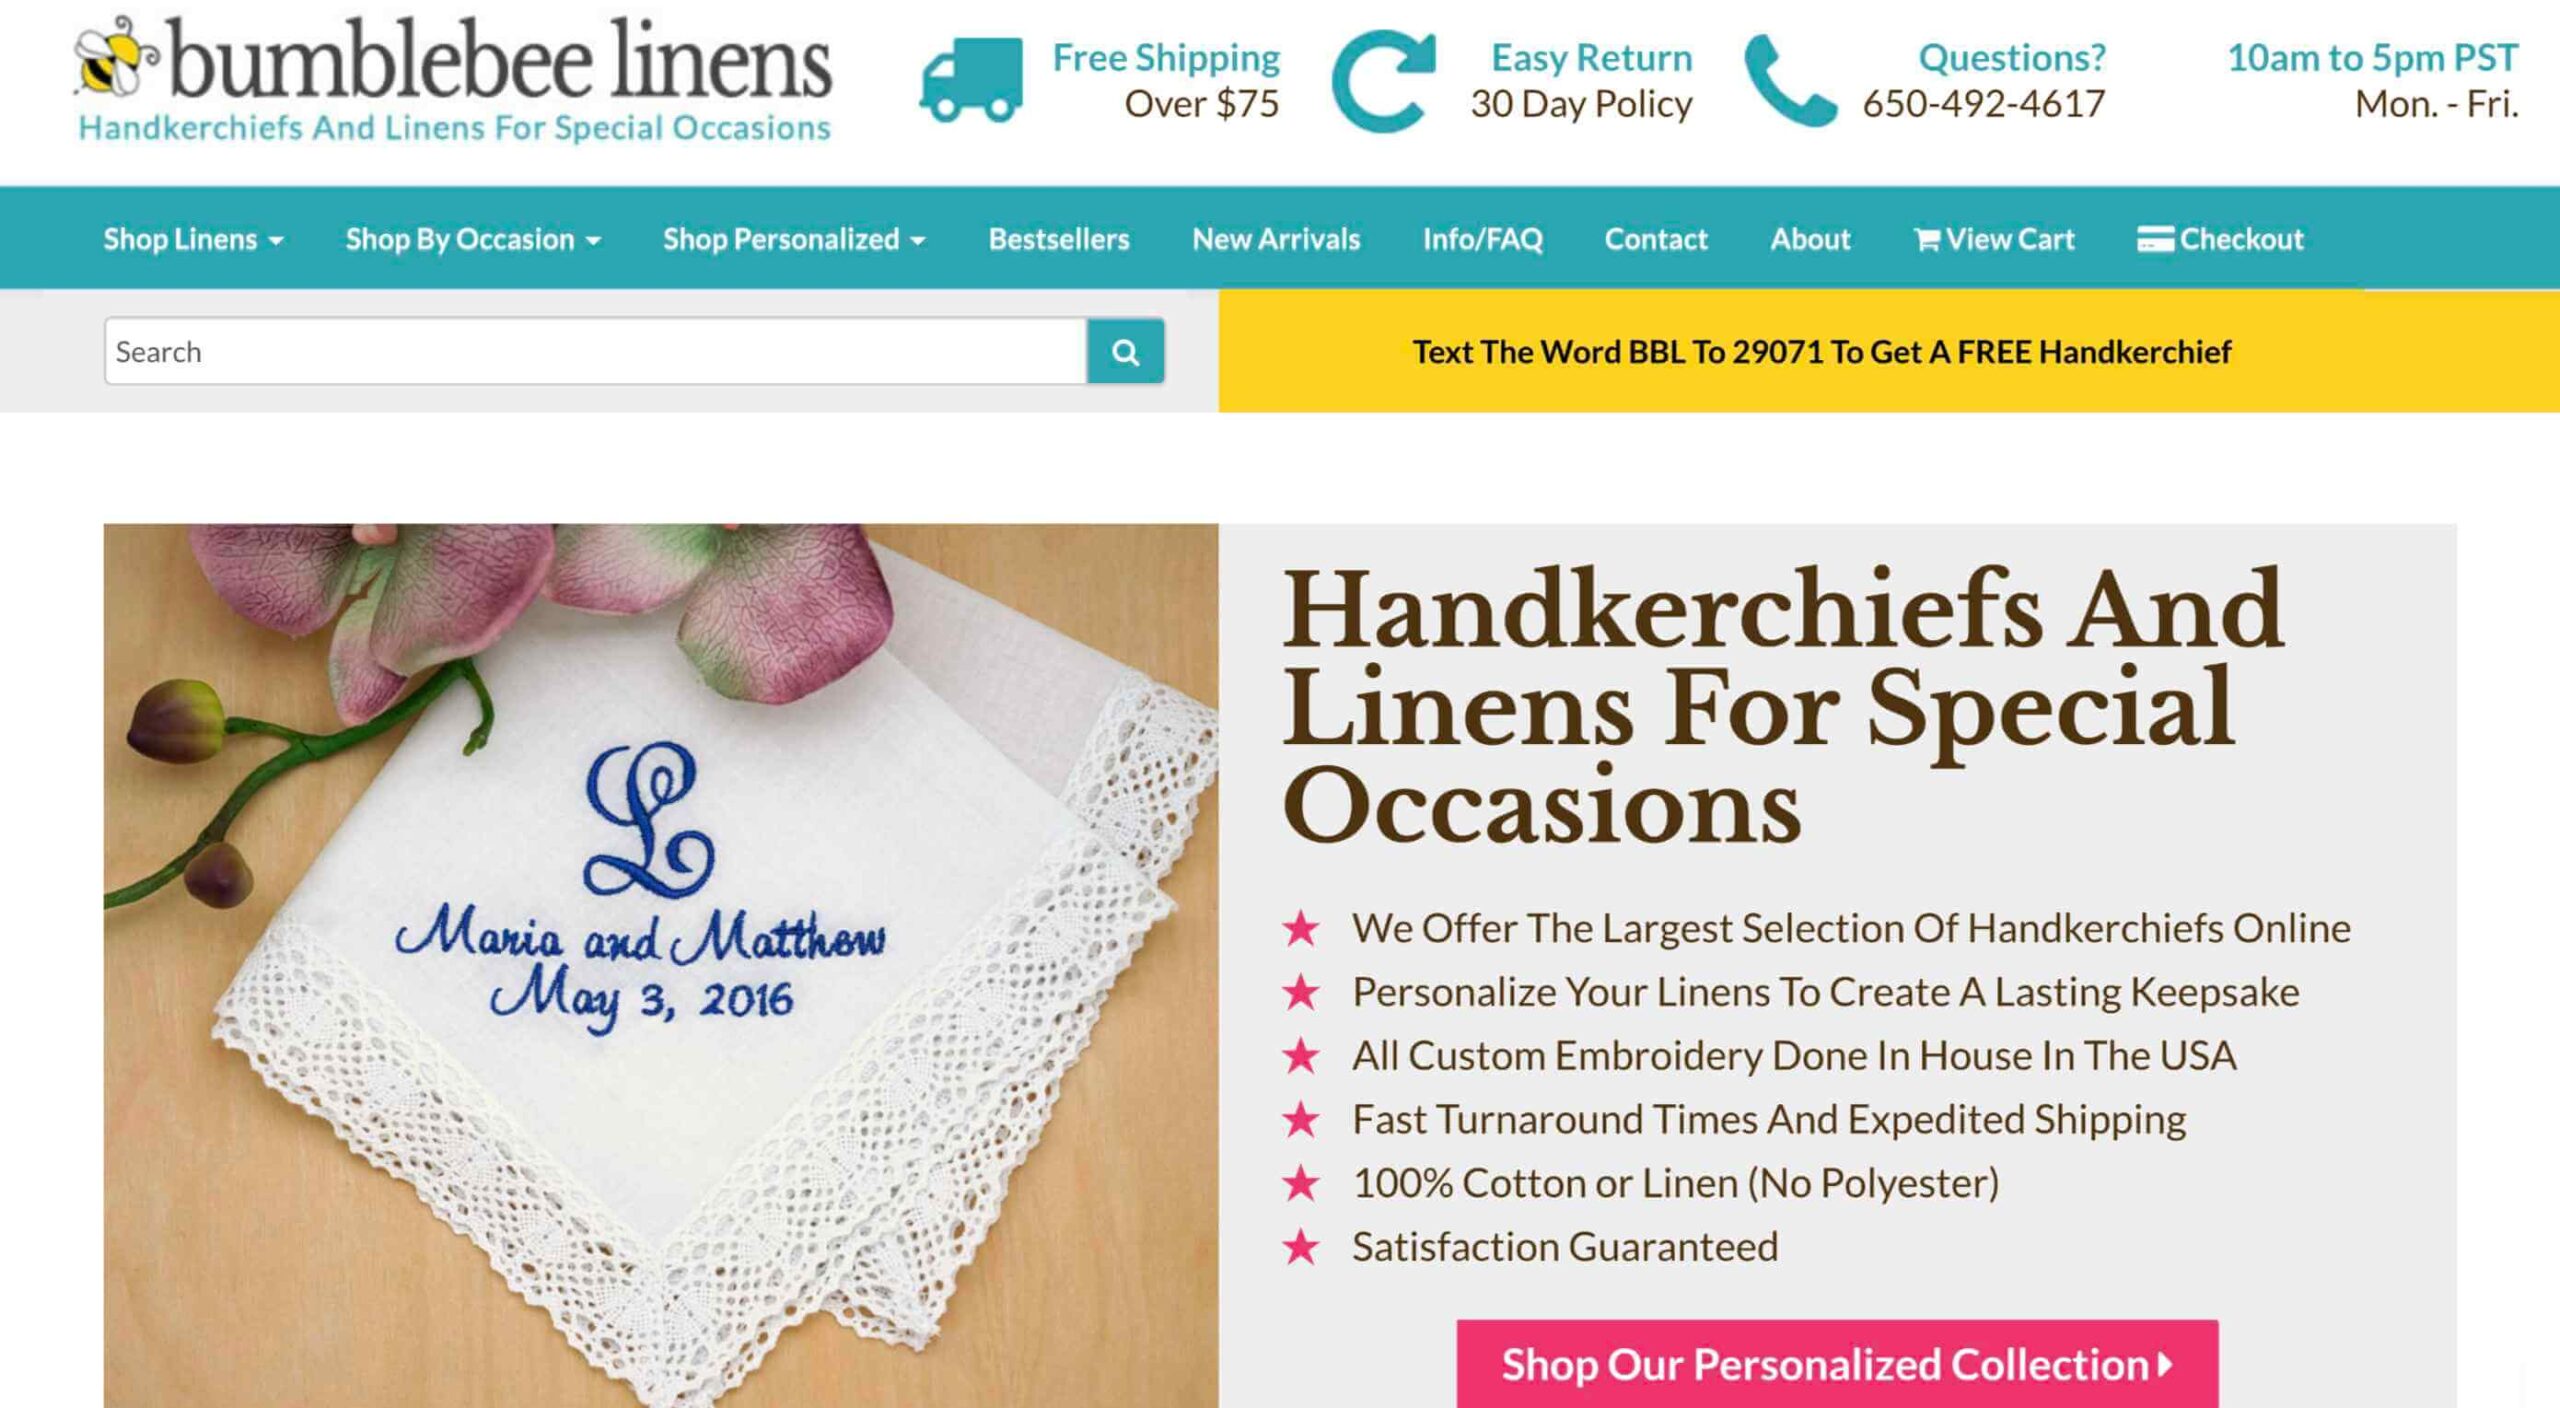
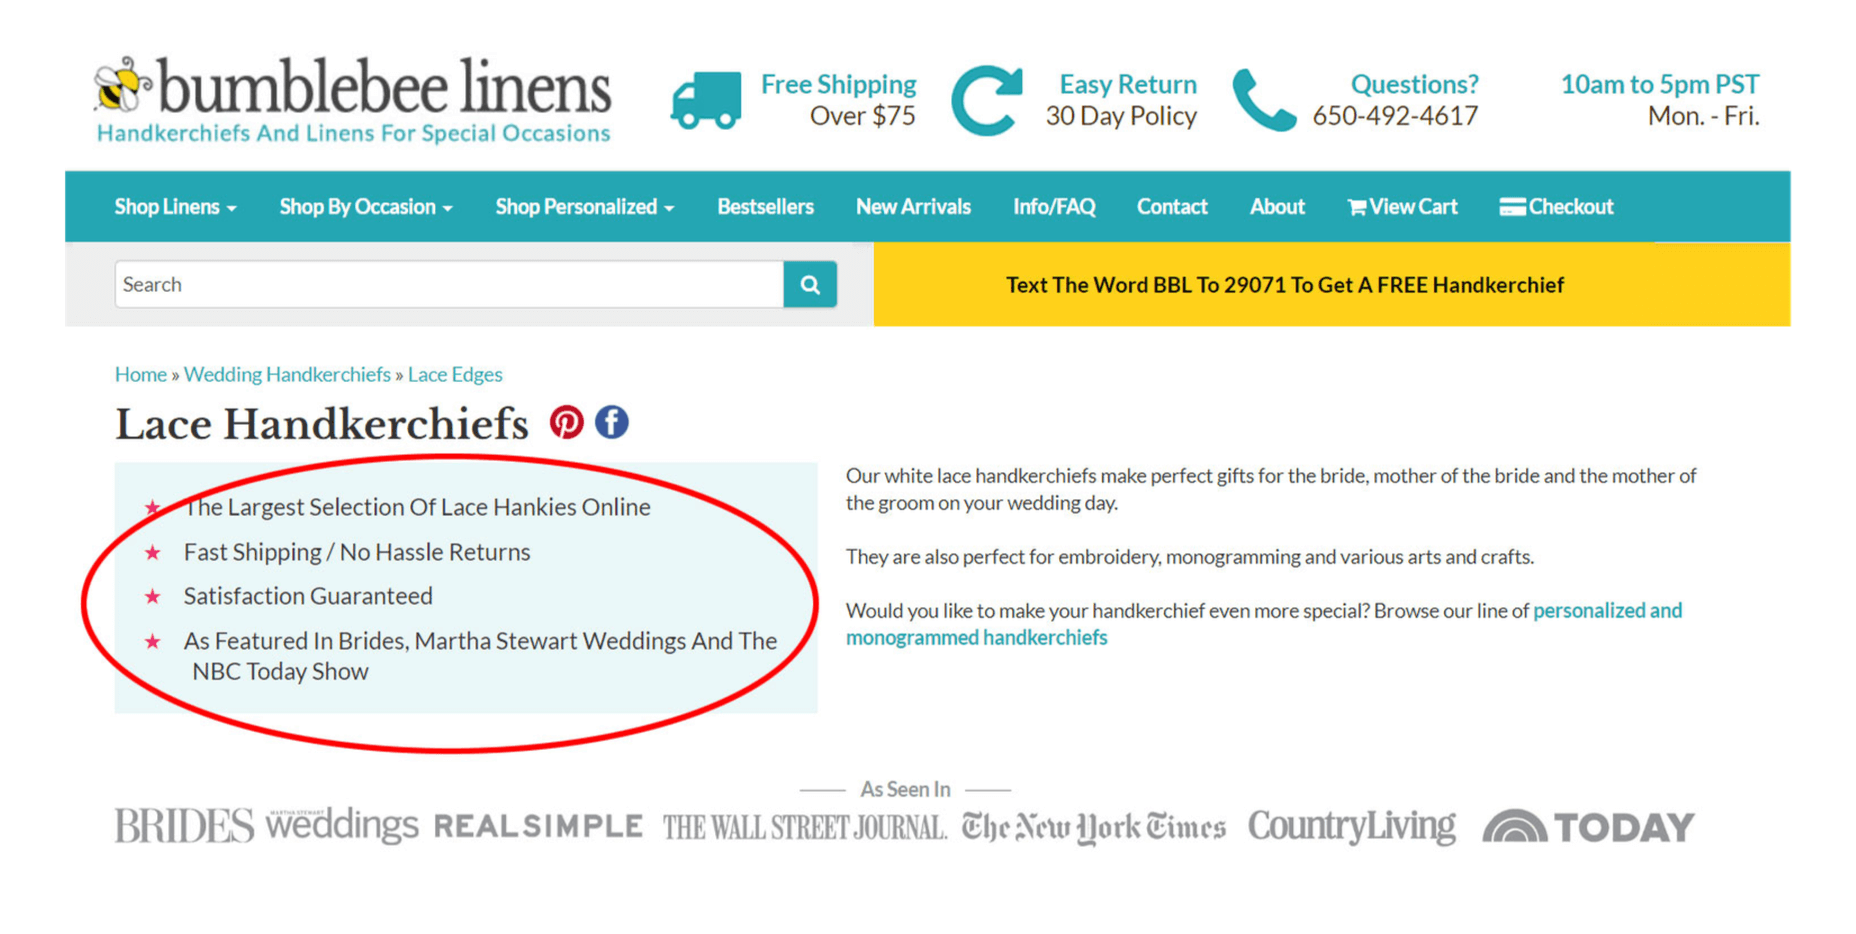
Displaying your phone number and email address is very important! Adding your store hours also helps to make your site look legit to new visitors. If you don’t have a recognizable brand, customers will want to know that they can reach a real human in case of problems or questions.

In the above image, you’ll notice that I placed my trust factors in the header, so they can be seen above the fold on every single page. We’ve also been featured on the Today show and a bunch of magazines. So I made sure to display this social proof on the bottom of every page.
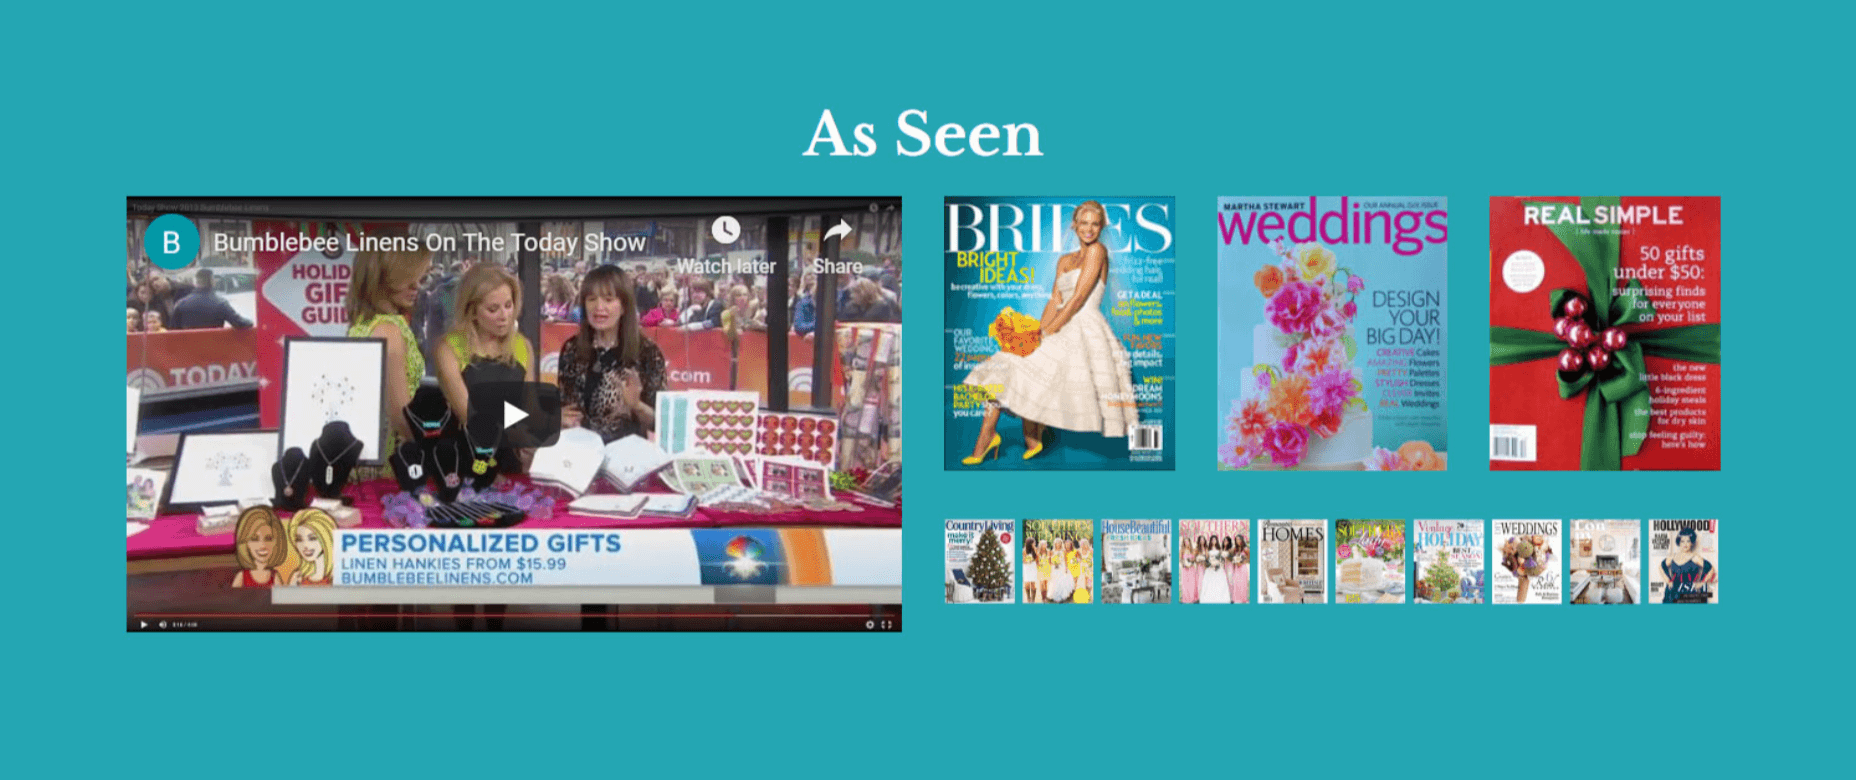
Don’t hesitate to flaunt your achievements to reinforce trust. 

In addition, customer testimonials provide social proof and credibility to your website. As a result, it’s important to regularly reach out to happy customers for testimonials and endorsements. On our redesigned site, you’ll find the testimonials section right below our press mentions.
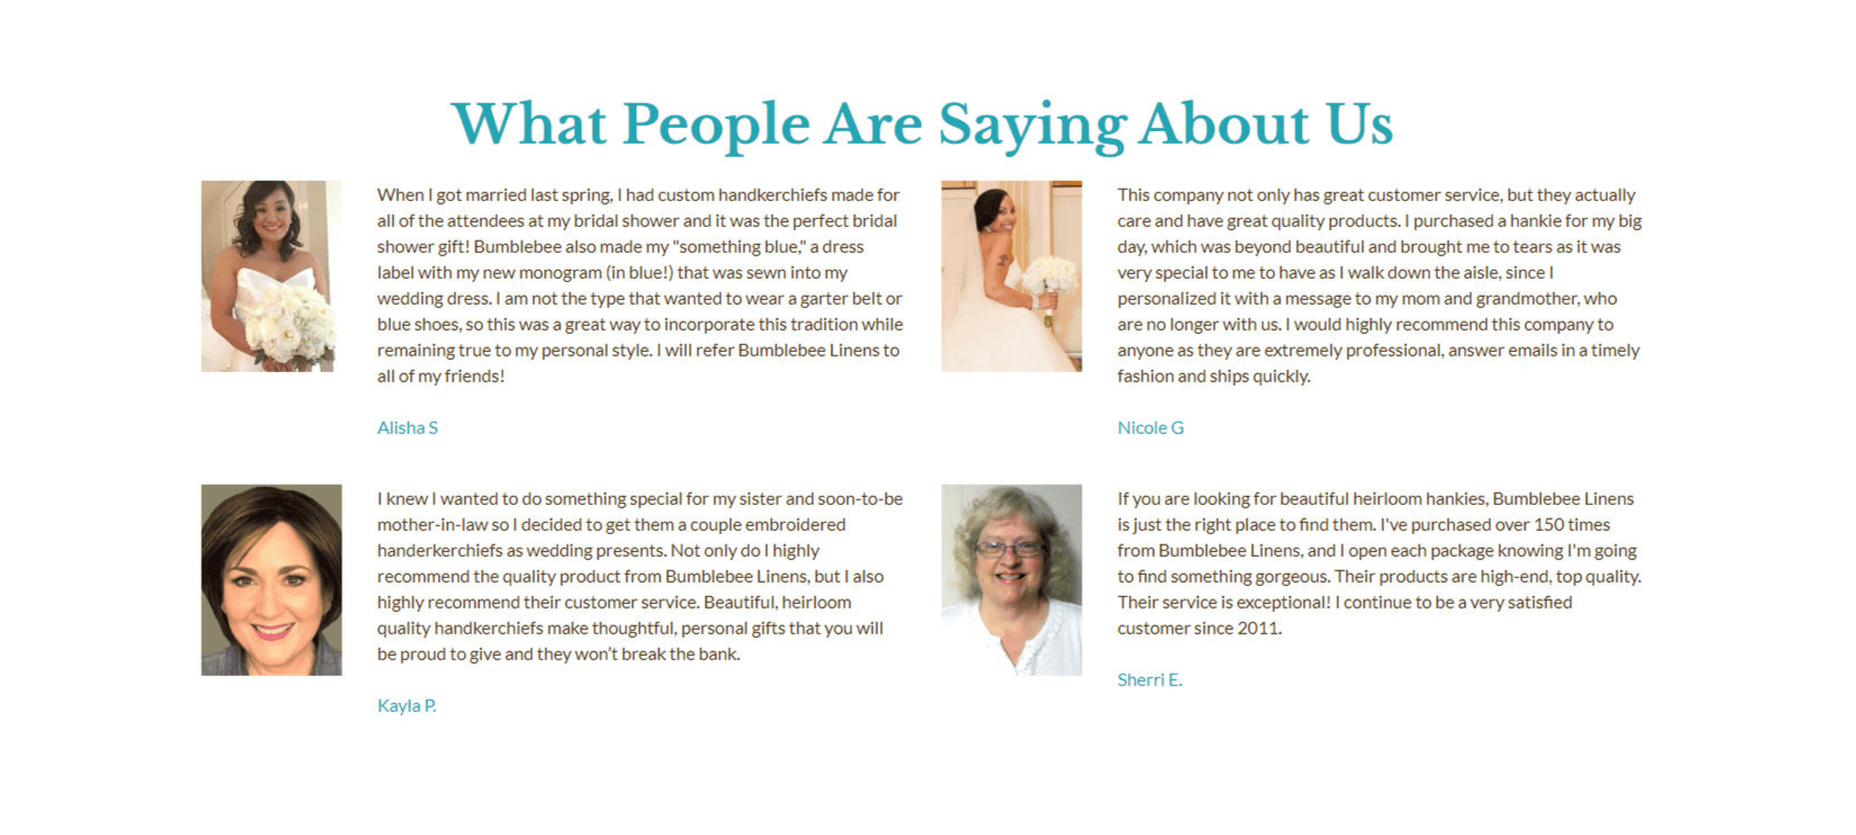
Testimonials lend social proof and credibility to your website.

Remember, to generate conversions as an unknown store or brand, you first have to gain your customers’ trust. Make it easy for them to contact you or get a full refund if anything goes wrong with their purchase. By showing a genuine concern for customer satisfaction, you’ll be able to build a solid reputation over time.

4. Emphasize Your Unique Value Proposition

Users spend an average of 5.59 seconds looking at your website’s written content. And in those 5.59 seconds, you must capture their interest or else they’ll bounce from your page. Right off the bat, you must convey to a user exactly what you sell and why they should buy from your store over a competitor.

What’s more, every single page on your site should communicate your unique value proposition. A unique value proposition is a concise statement that describes what makes your business special and outlines what your store does better than anyone else. The best way to show off your unique value proposition is to use an eye-catching image alongside compelling copy.

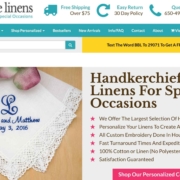
For example, here’s the first thing a user sees on my home page above the fold:
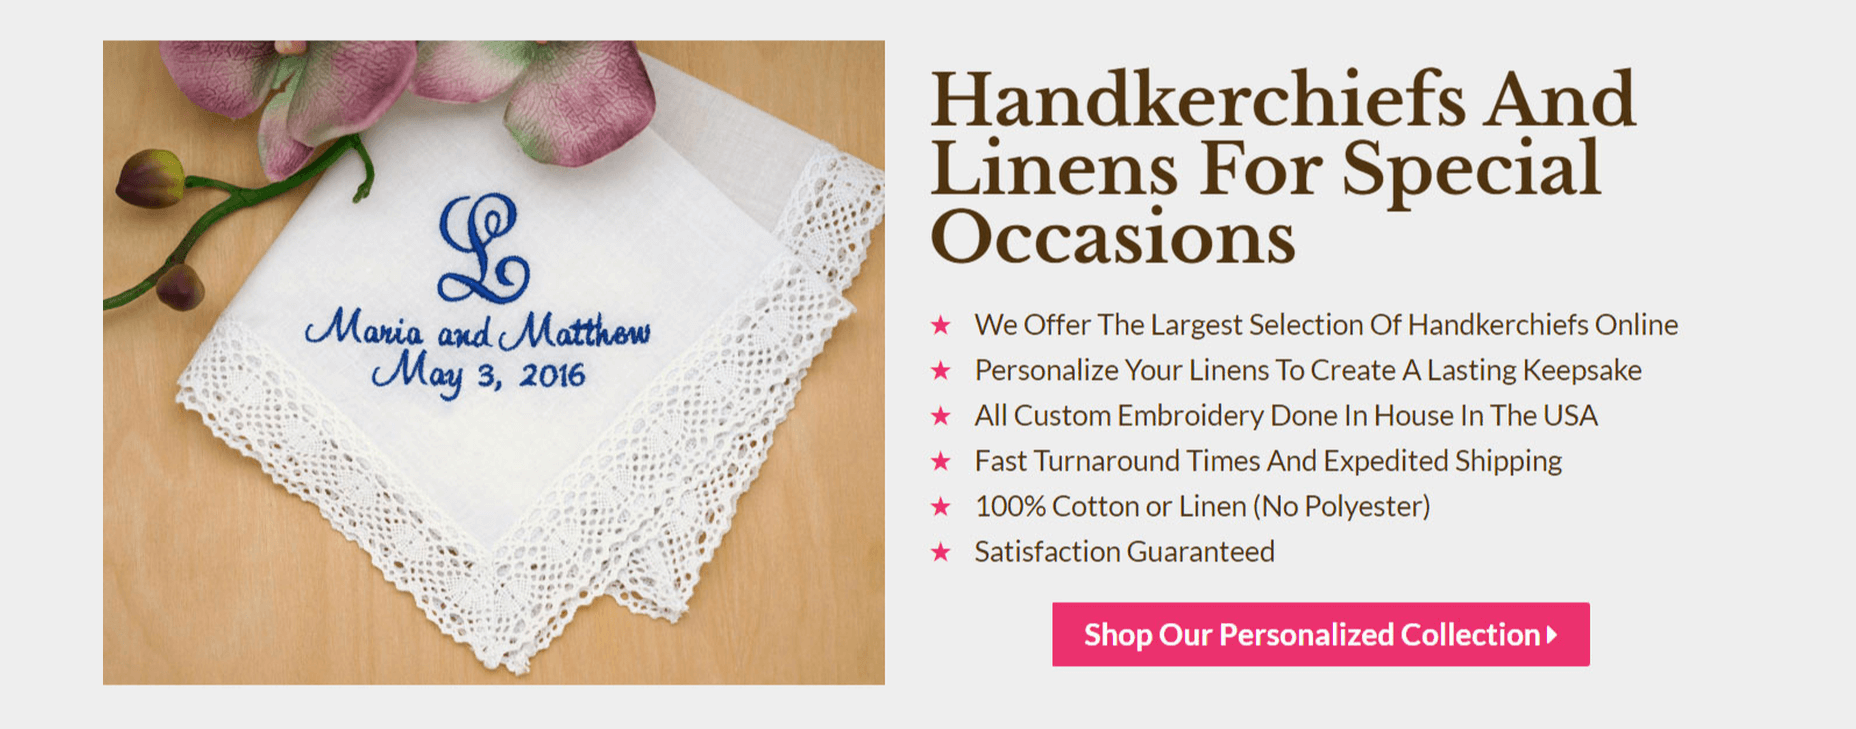
Right away, a user is shown a large image of one of our best selling personalized handkerchiefs. And right beside that image is a clear and concise value proposition, followed by a call to action to shop in our store.

Displaying your value proposition should not be limited to your home page. We also include our unique value proposition on every category page as well. Overall, you should include your value proposition on every landing page on your website.
5. Optimize The Visual Hierarchy Of Your Product Pages 

Every page on your site should have a single objective. And for your product pages, your goal is to get a customer to add to cart.

When designing a product page, you must apply a logical visual hierarchy to your design. A visual hierarchy is the order in which a user processes information on a page and in the case of a product page, there must be a clear path to your add to cart button with as few distractions as possible.

Here’s a screenshot of my old product page:
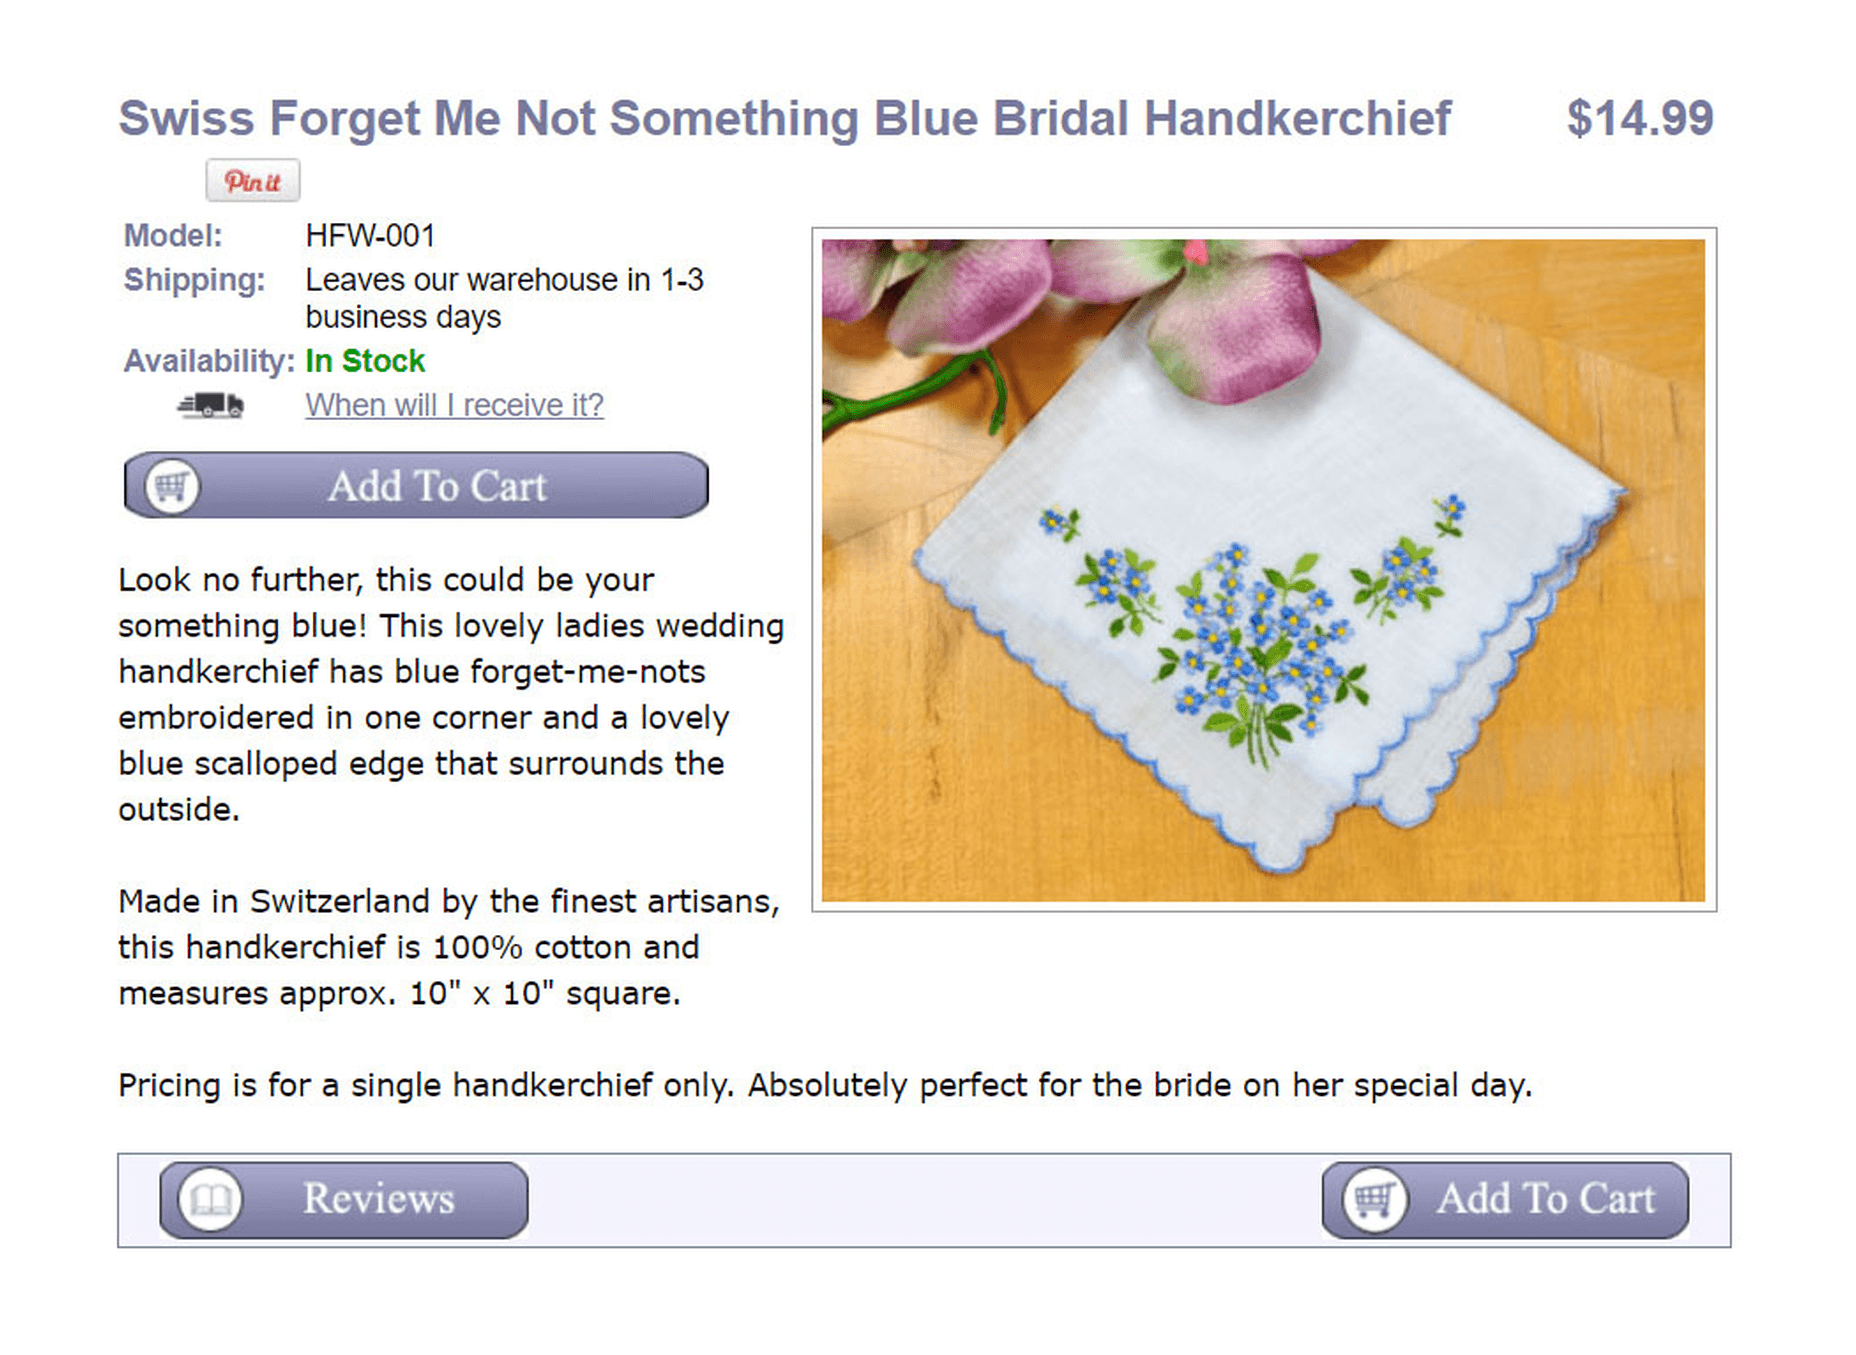
As you can see, my old product page is overwhelming. All of the design elements try to grab your attention at the same time and there are many different calls to action that blend together. To improve my product descriptions, I freshened up the color scheme and enlarged my product image by 266%. I also changed the placement of the buttons in a more logical flow.

Here’s what the redesigned product page looks like today:
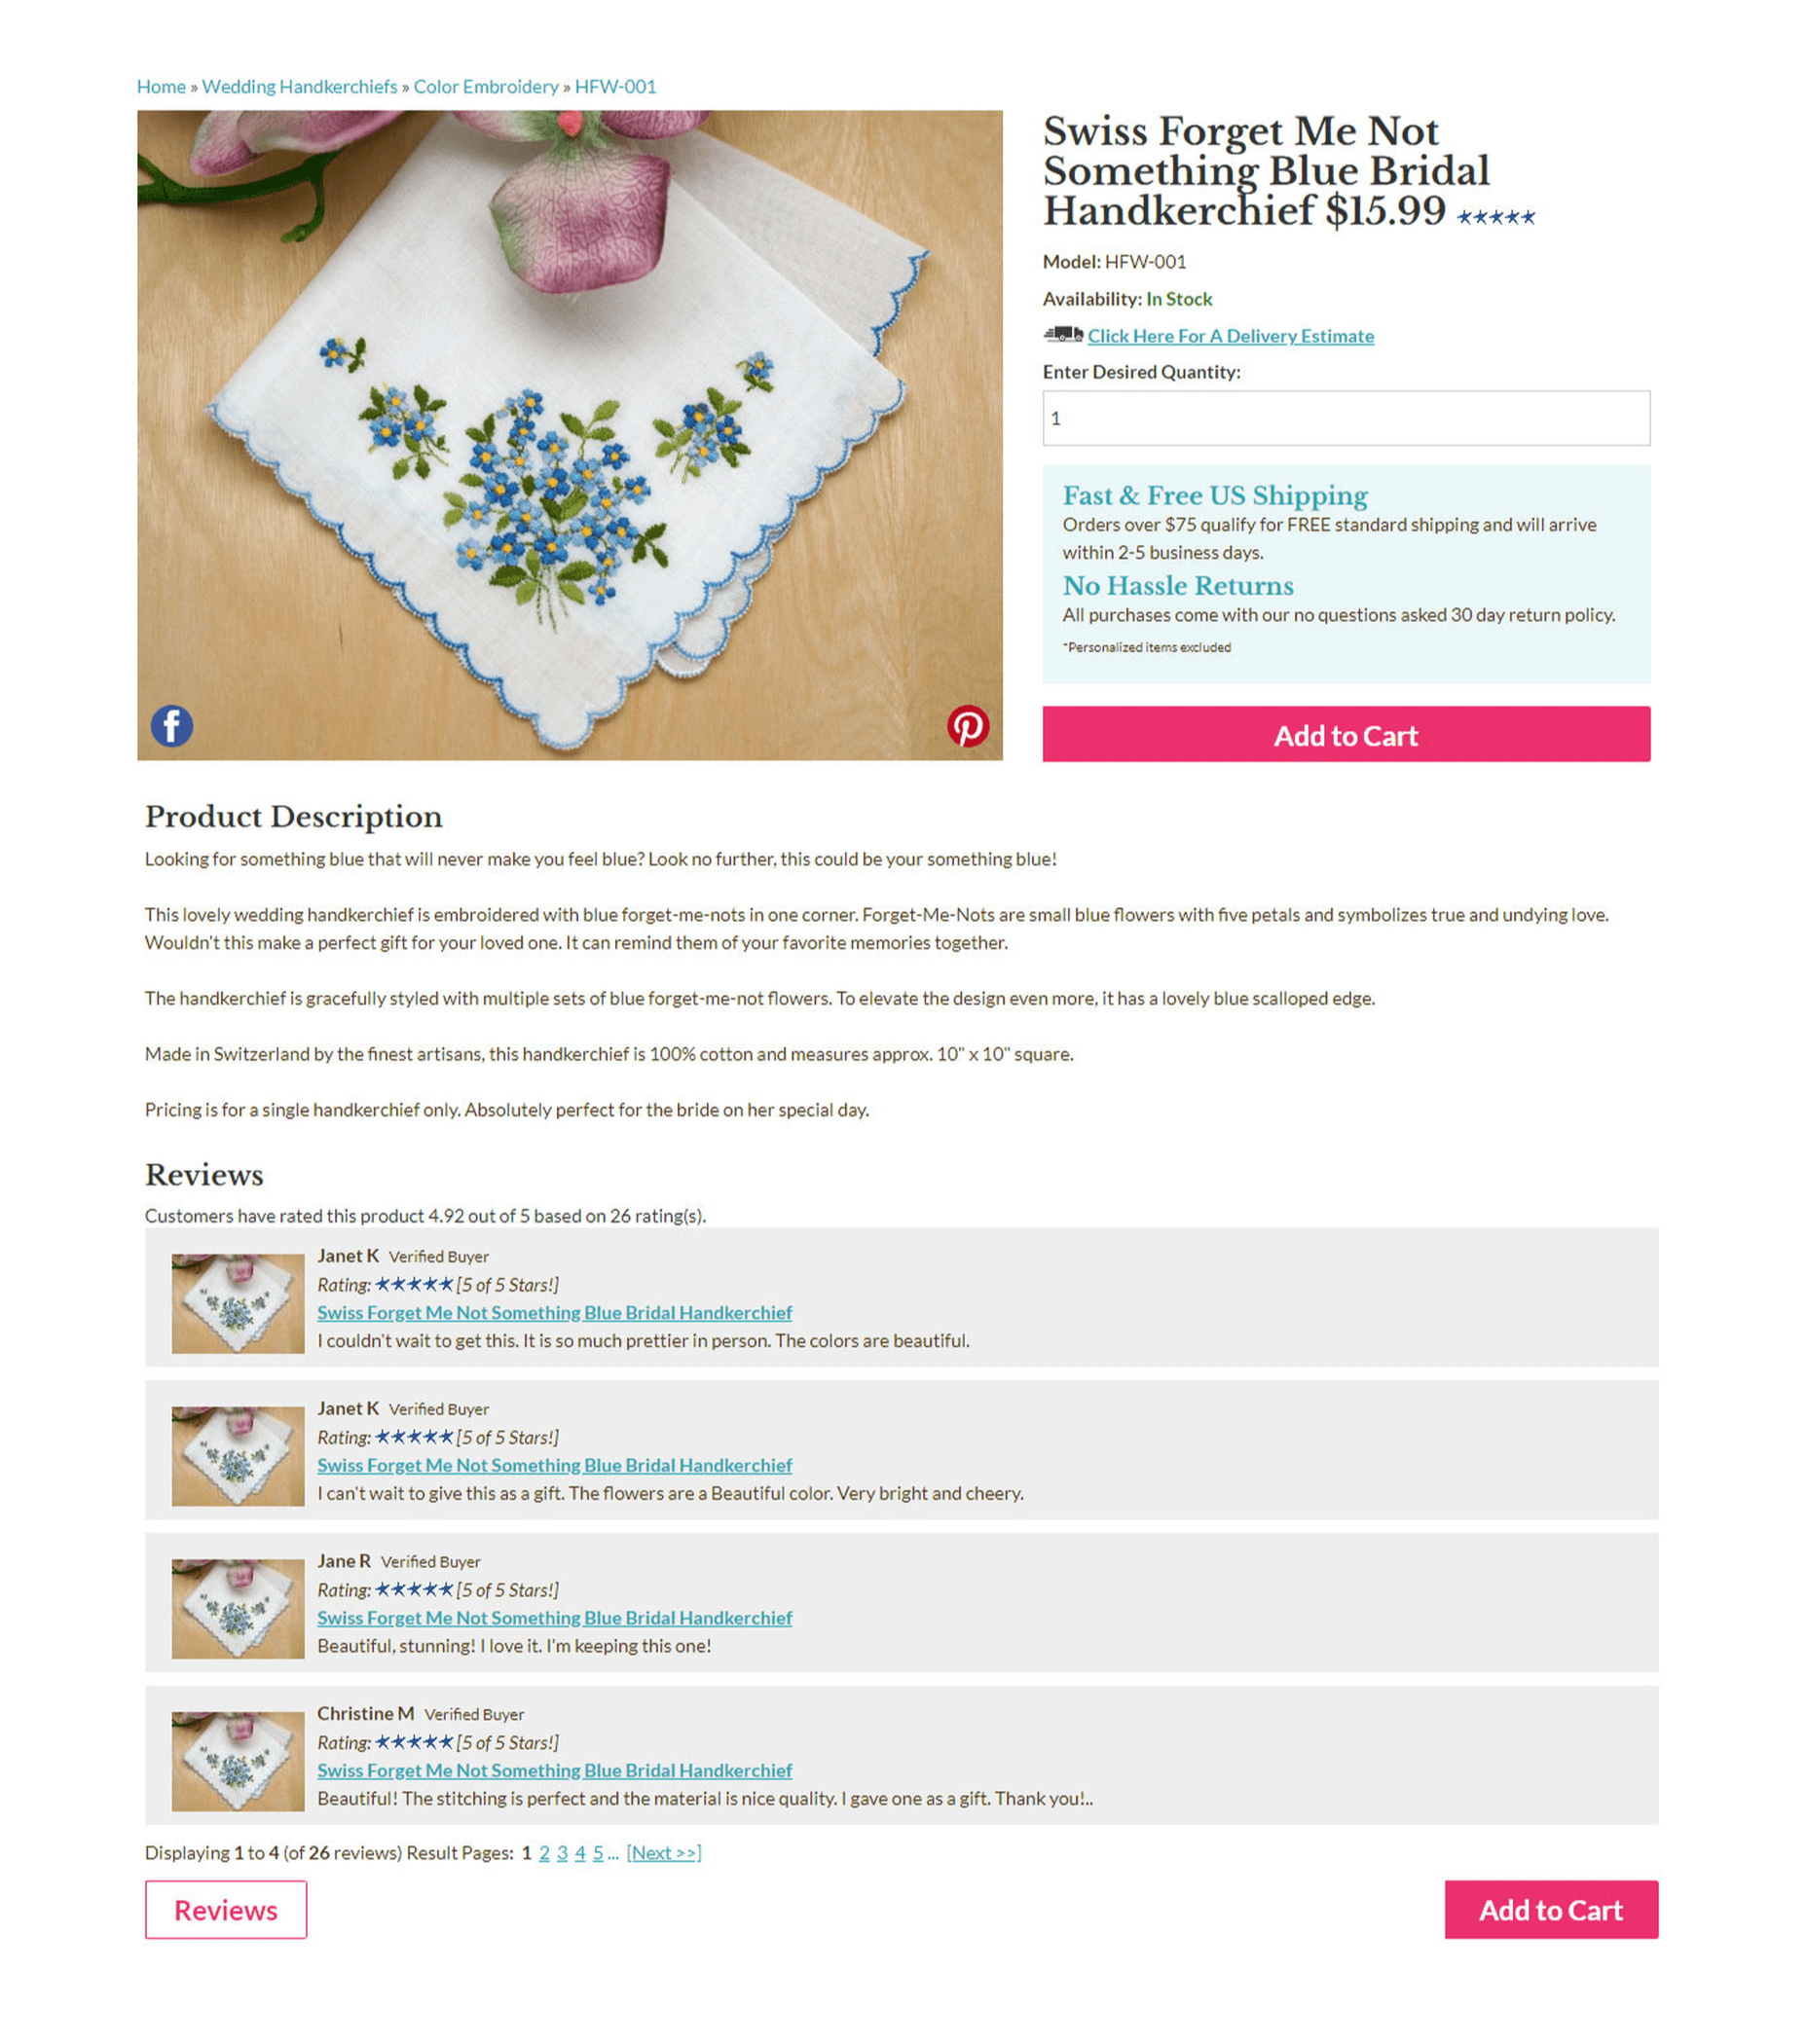
By adjusting the size, color, contrast, and alignment of the page elements, I now force the customer to process my product information in a set path that leads directly to my primary call to action. For example, the hot pink color draws attention to the “Add to Cart” button over the “Reviews” button. Also, by applying a blue text color and teal background, I reassure customers that shopping with us is safe and risk free.

Overall, rearranging the design elements this way nearly doubled my add to cart percentage.

6. Simplify Your Checkout Process 

With our old site design, we would regularly receive feedback from confused customers who weren’t sure if they needed an account to purchase our products.

Here’s what our old checkout page looked like:
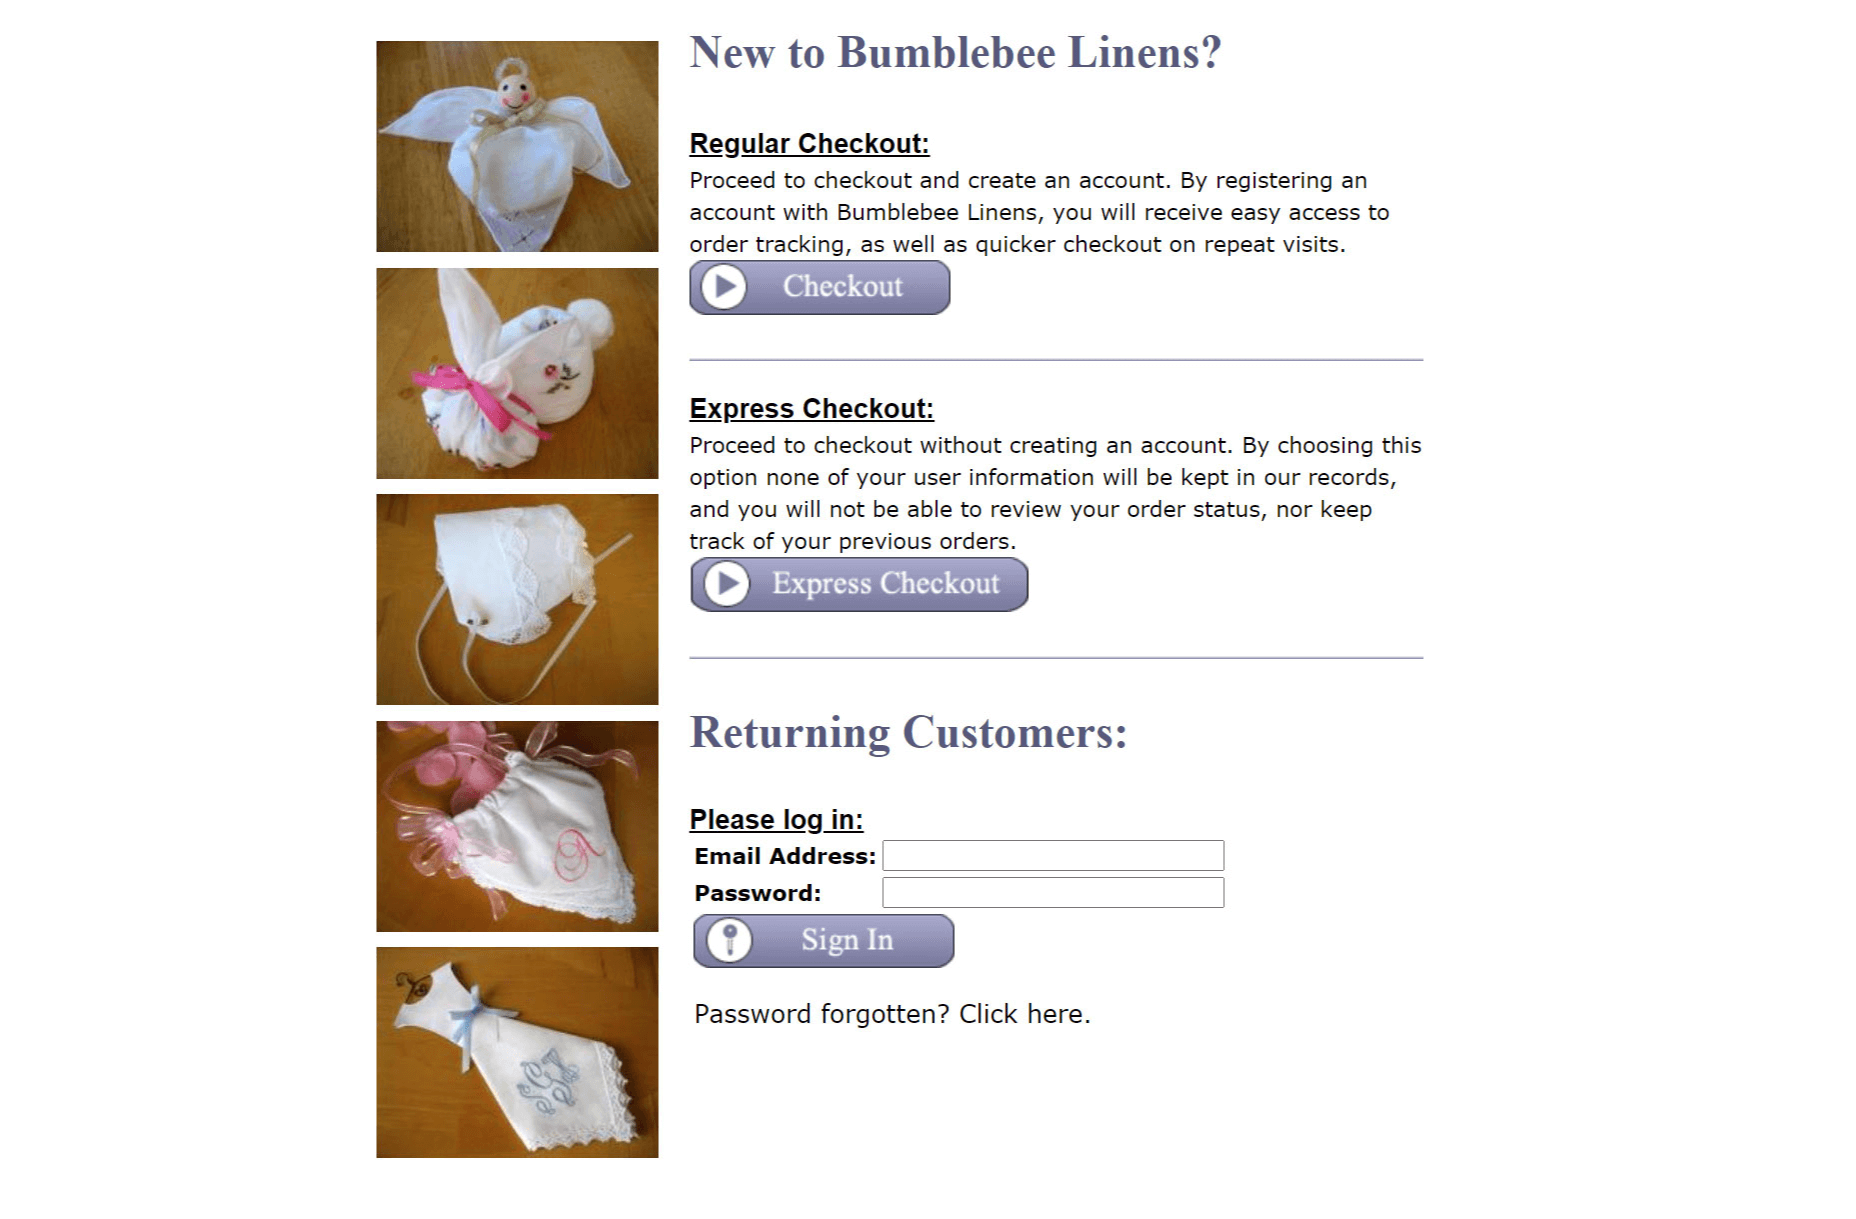
As you can see, there are too many choices. After all, a customer doesn’t need 3 ways to checkout and the choices are a little overwhelming.

Here’s what the checkout page looks like now:
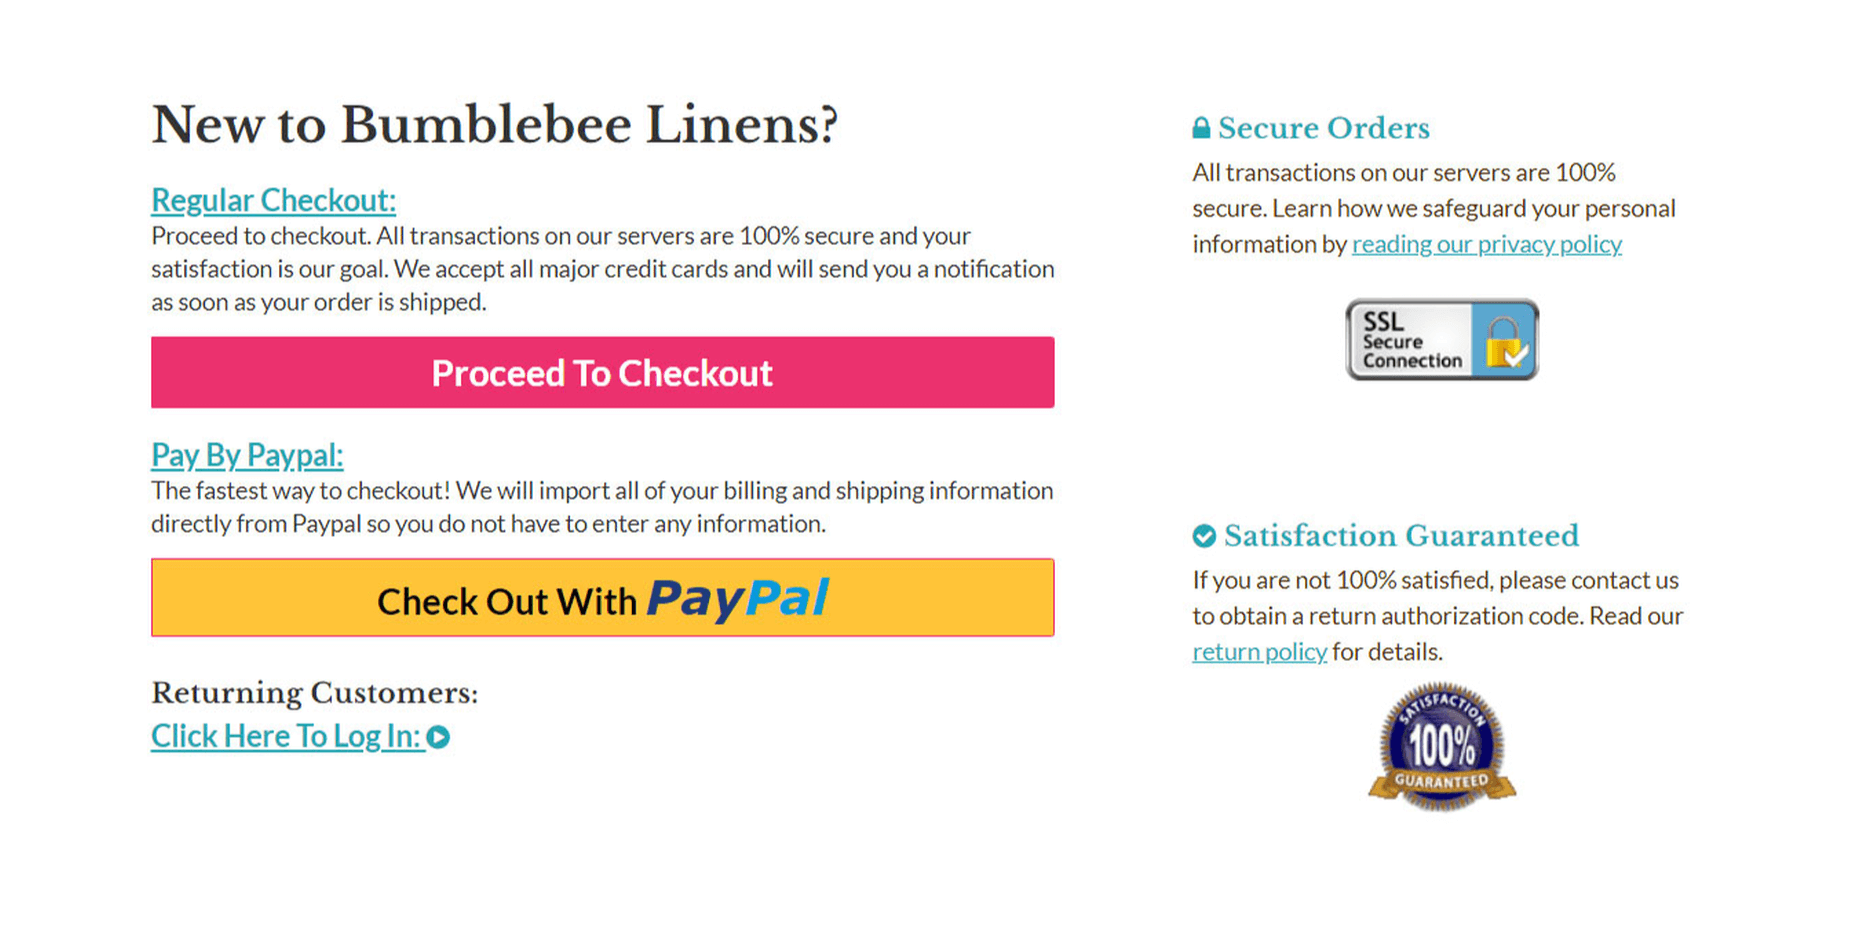
Instead of offering 3 separate options for checkout, I consolidated them all into one and added a separate Paypal option (more on this later). First off, less than 6% of customers create an account so there was no reason to offer account creation as a separate option. Furthermore, displaying a login form was causing more headaches than it was worth because the majority of customers don’t even have an account. As a result, I decided to hide the form altogether by default.

Overall, when you are designing your checkout process, keep these optimization principles in mind.

Principle #1: Remove all unnecessary elements from the page. Don’t make the customer think and hide all elements that are not frequently used.

Principle #2: Display trust logos to assure customers of a secure checkout. In the image above, you’ll find trust logos on the right-hand side of the checkout page.

7. Optimize The Checkout Process For Mobile Users

4 out of 10 mobile users abandon their carts if they have a hard time entering their personal information. People don’t like entering their contact and credit card information using a tiny keyboard. What’s more, small buttons and too many form fields drive away mobile users. 79% of smartphone users shop online with their mobile devices, which is why you should optimize for mobile.

These days, a responsive design is par for the course but you can still screw things up if you are not careful. Here’s what my checkout process looks like on a desktop:
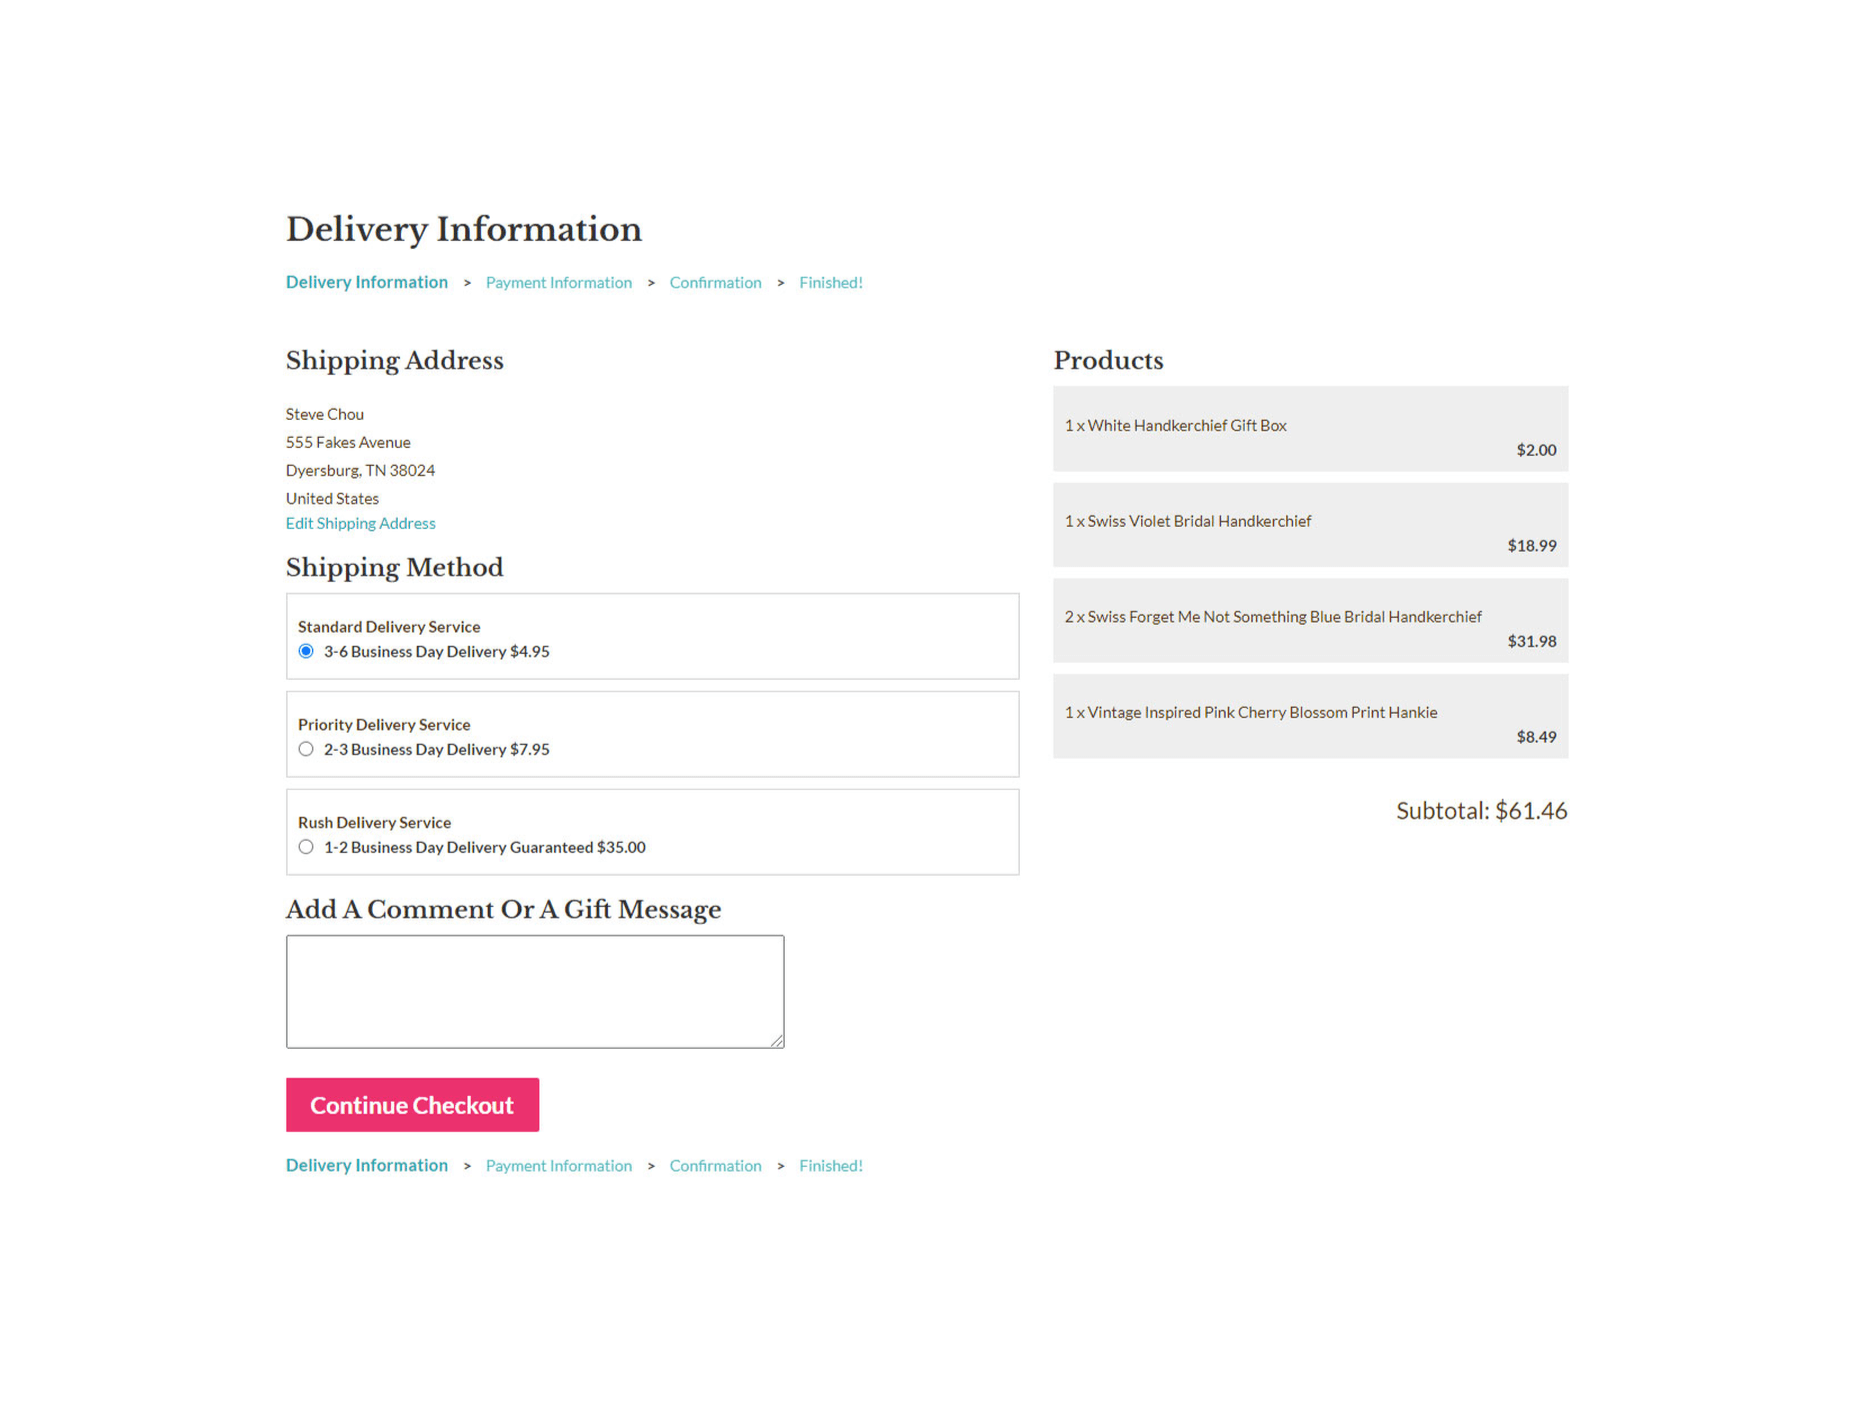
And here’s how the checkout page looks on a mobile device:
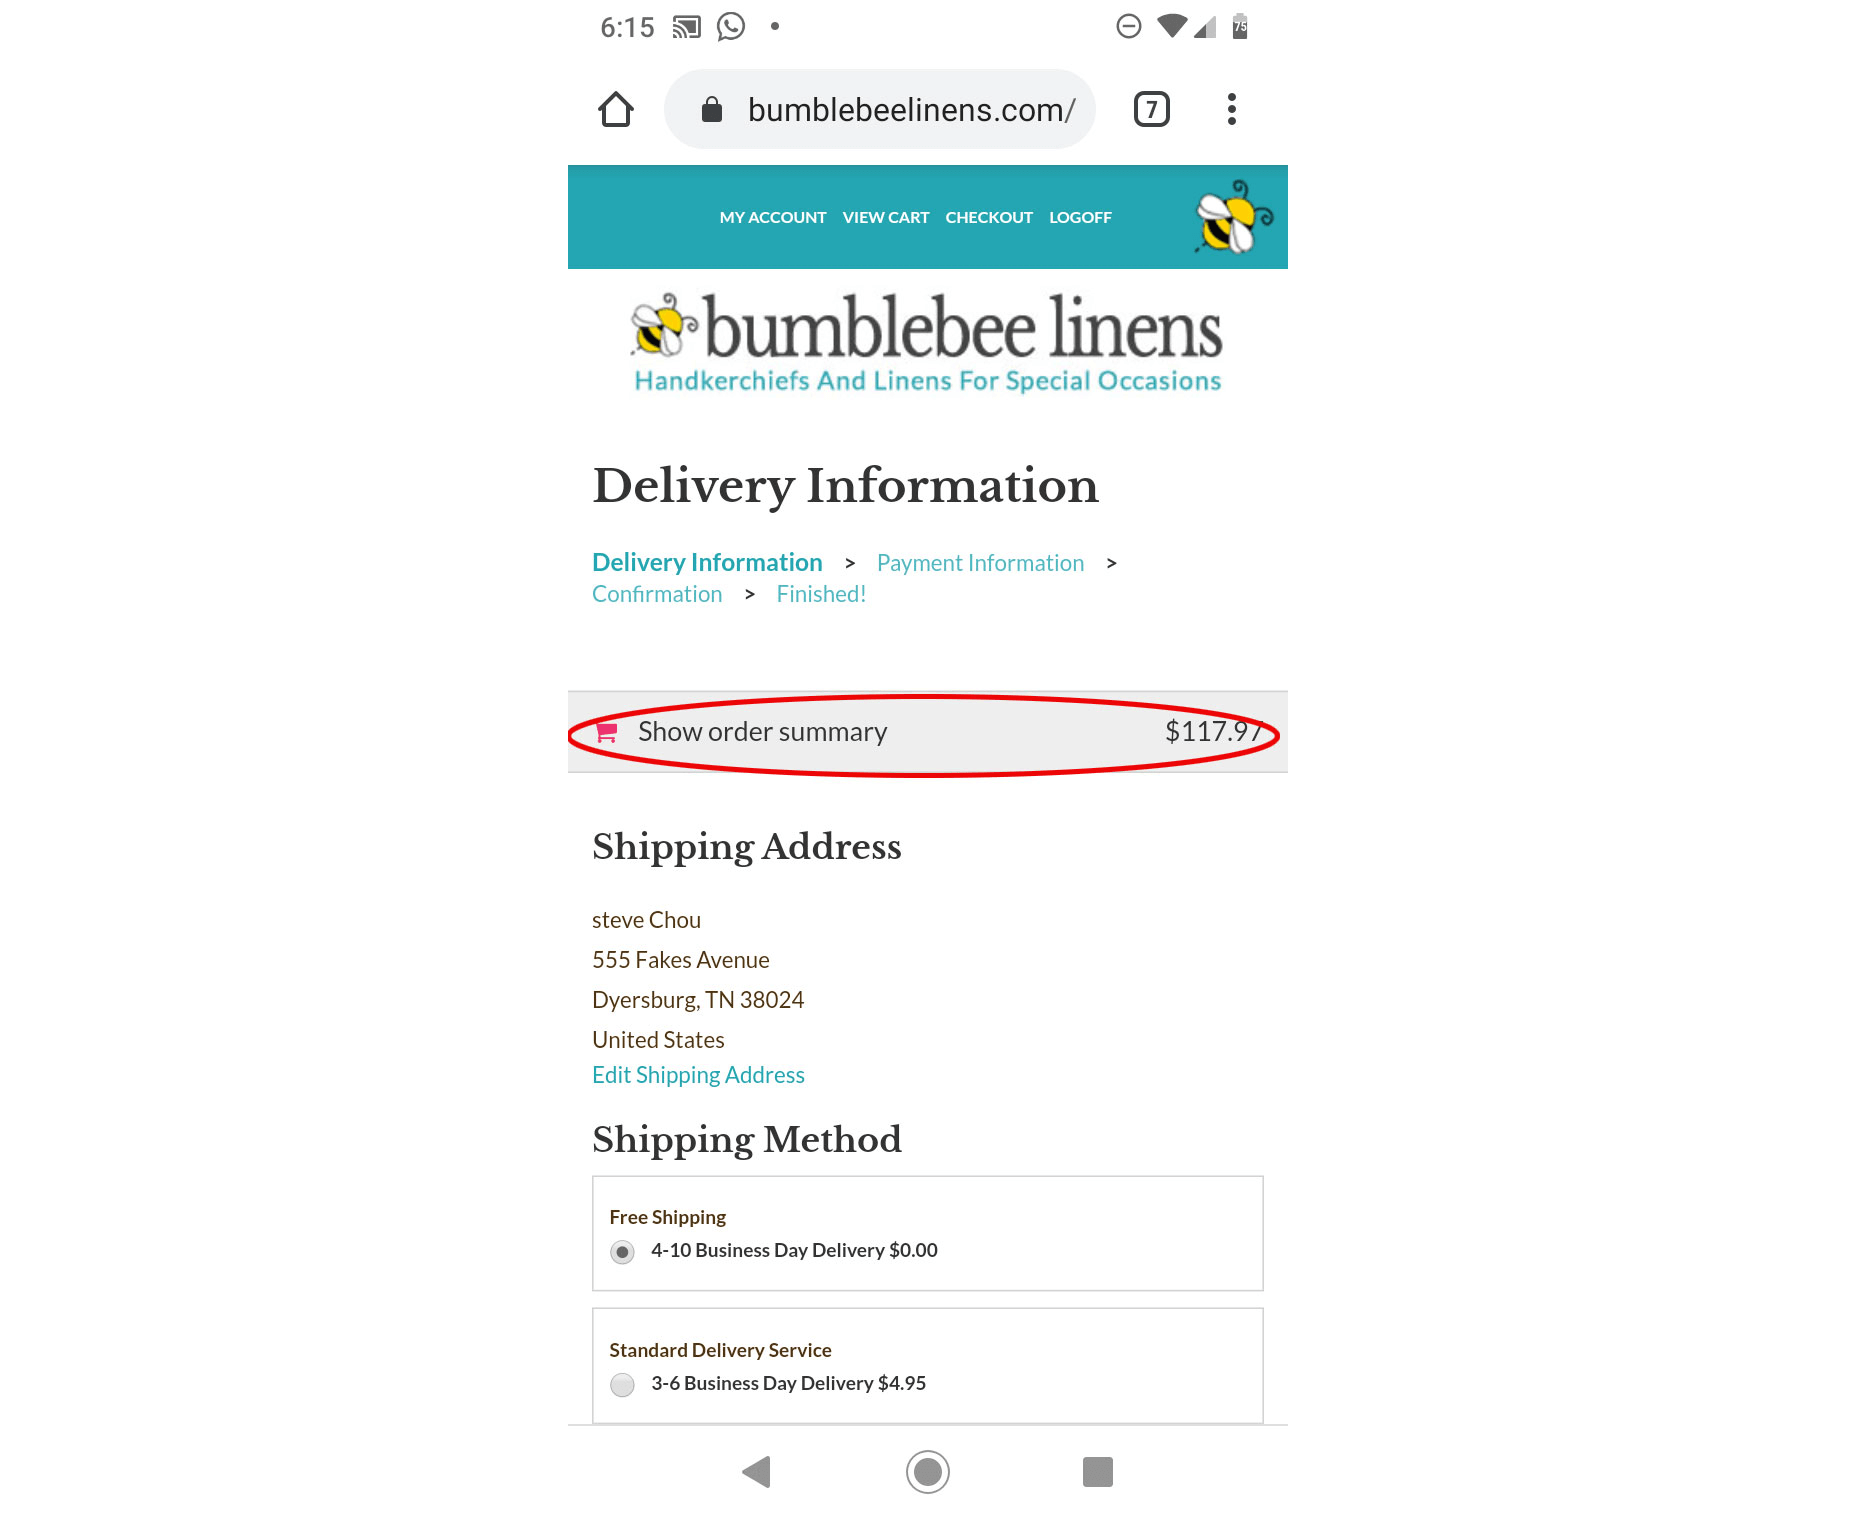
On mobile, the user’s cart contents are collapsed so it doesn’t occupy the entire screen. Overall, here were the mobile optimizations I made to checkout:

Optimization #1: Keep Your Checkout Form Short And Sweet

A mobile user should be able to tap buttons on your checkout page without accidentally hitting another option. Also, the buttons should be large enough to tap on a mobile device.

Given the smaller screen size of a mobile phone, keep your checkout form short and sweet with no extraneous options. Also, make sure you turn off autocorrect for your form fields. Otherwise, your phone’s autocorrect feature may frustrate users when they try to enter their address. In fact, we once had a customer get so frustrated trying to type in their city on their iPhone that they called us up and complained in frustration.
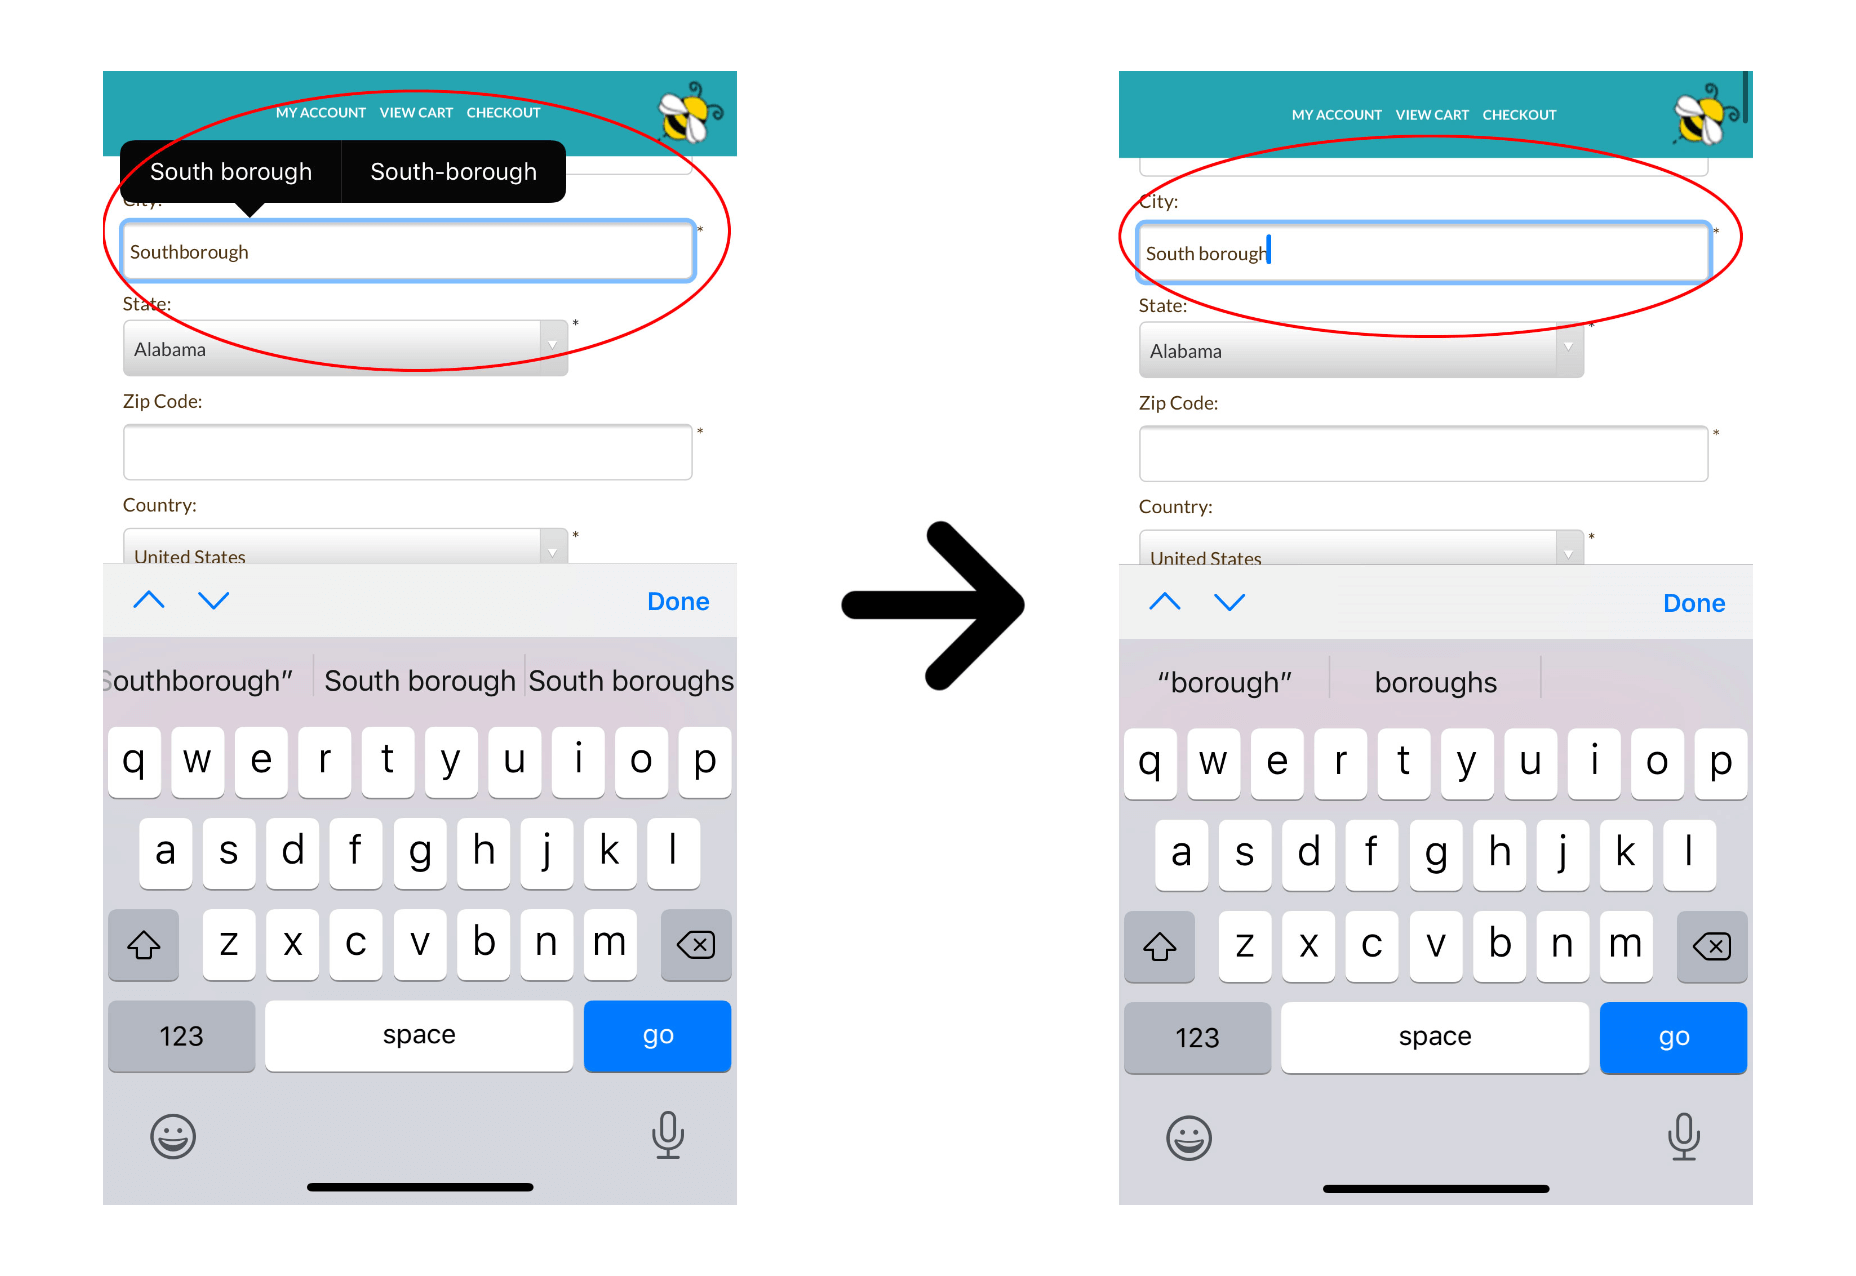
To fix this, you simply need to add the following tag to all of your text input fields.

<input type="text" name="name" autocorrect="off">

And to reduce frustration, you should also turn off auto-capitalization and auto-complete by adding auto-capitalization=”off” and auto-complete=”off” to all of your forms as well:

<input type="text" name="name" autocorrect="off" auto-capitalization="off" auto-complete="off">

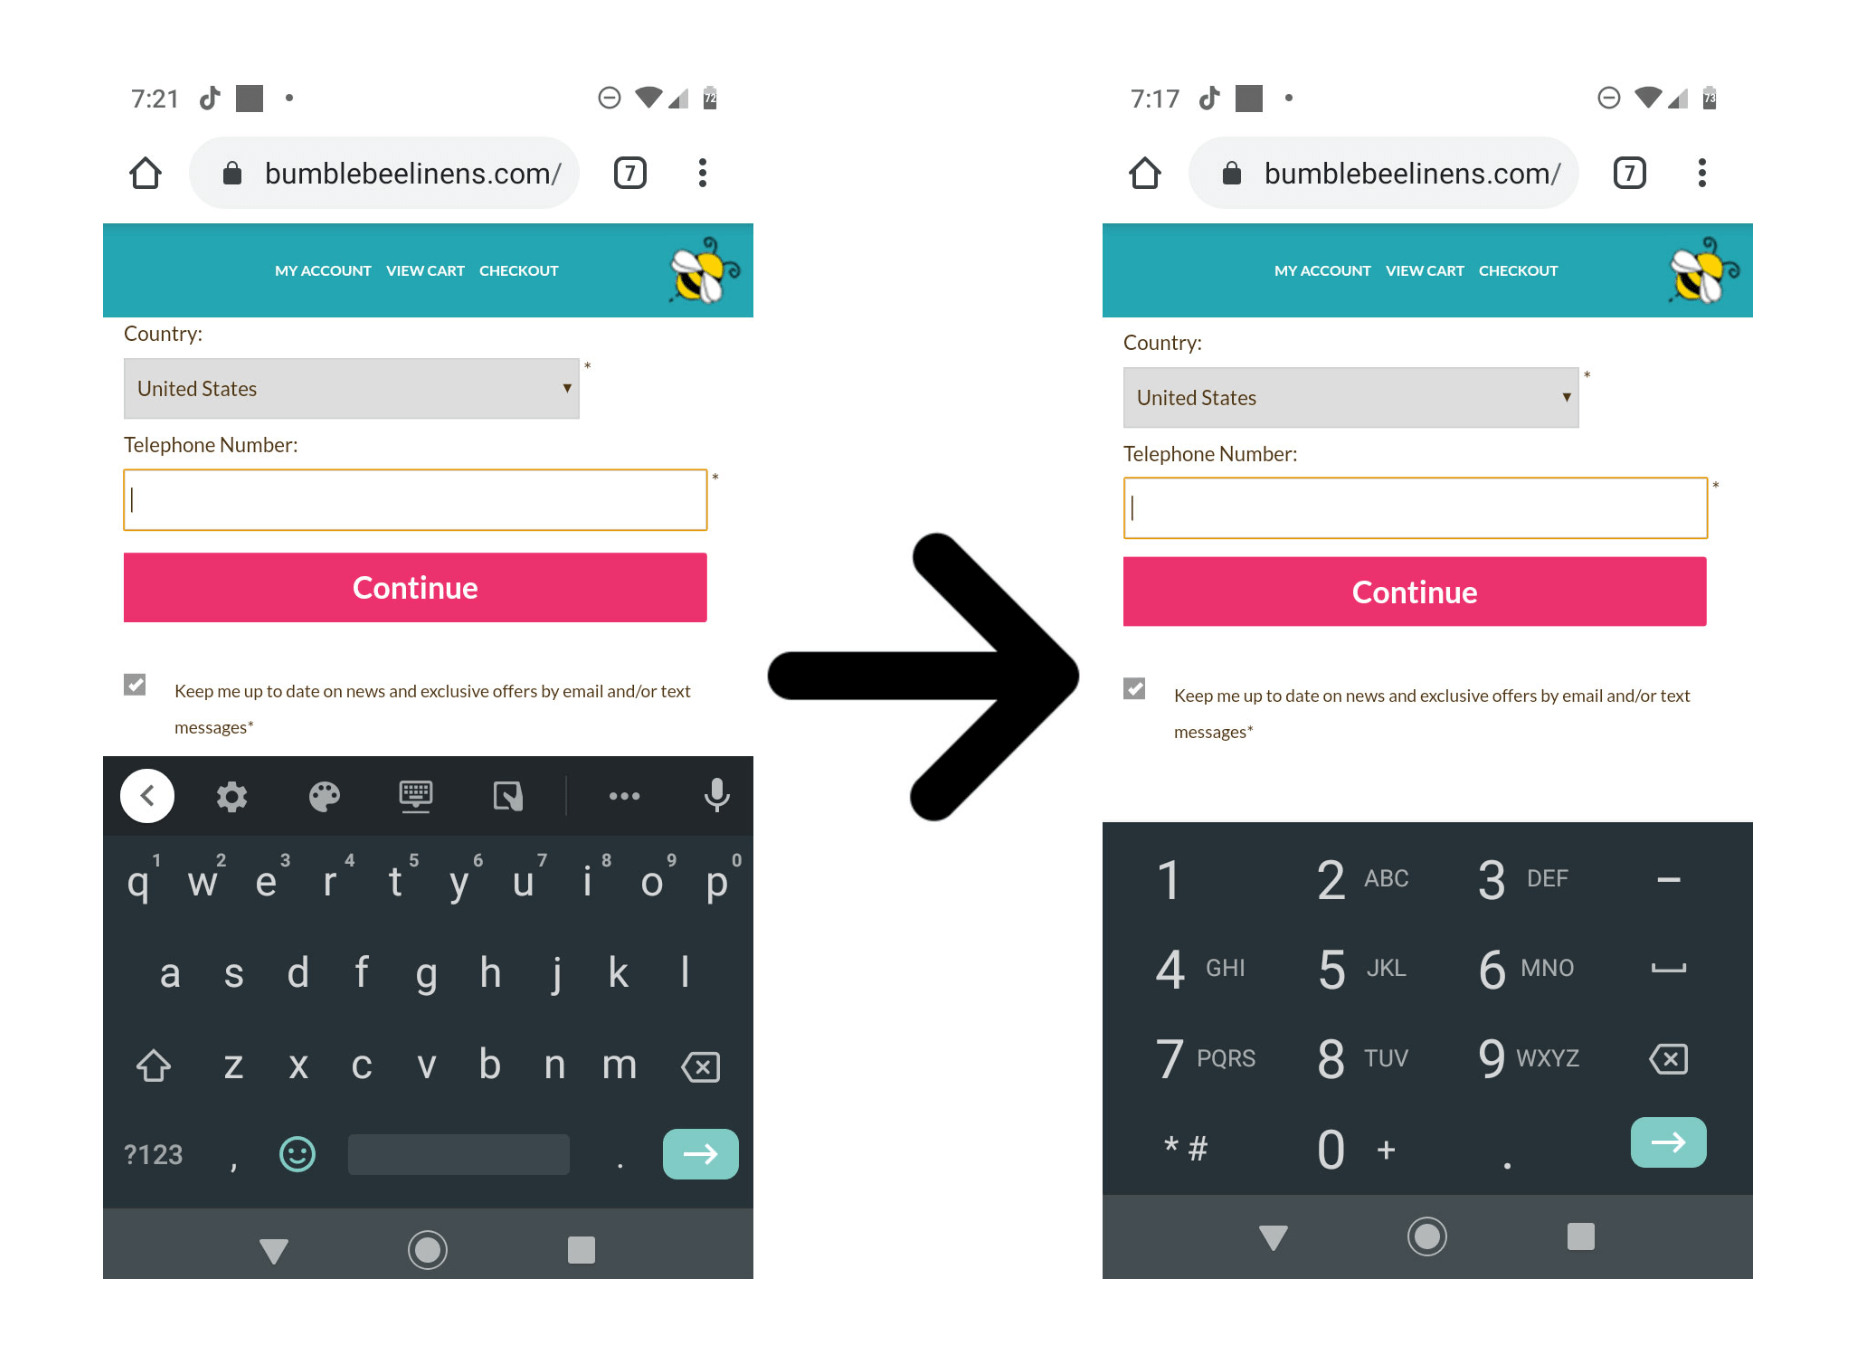
In addition, for phone number entry, you should always display a numeric keypad as opposed to a regular keyboard:
Optimization #2: Automatically Import Your Customer Data If Possible

The less information mobile users have to enter in, the better. Payment options like Paypal Express and Amazon Payments can simplify the checkout process. These third-party payment processors automatically fill out a customer’s billing and shipping information which reduces typing and increases conversion rates.

To offer a more convenient checkout, I implemented PayPal One Touch, which alone increased my mobile conversion rates by 31%.

Here’s a quick tip when implementing Paypal: Make sure you display the Paypal button early in the checkout process before a user has entered in their information. Otherwise, it defeats the purpose of importing their information! In the first step of my checkout process, I explain each payment option in depth.

These simple changes made a huge difference in my conversion rate. And the number of PayPal users on my site nearly doubled from 13% to 23%!

8. Add A Sense Of Urgency

Most customers like to window shop and the best way to get a visitor to take action is to create a sense of urgency.

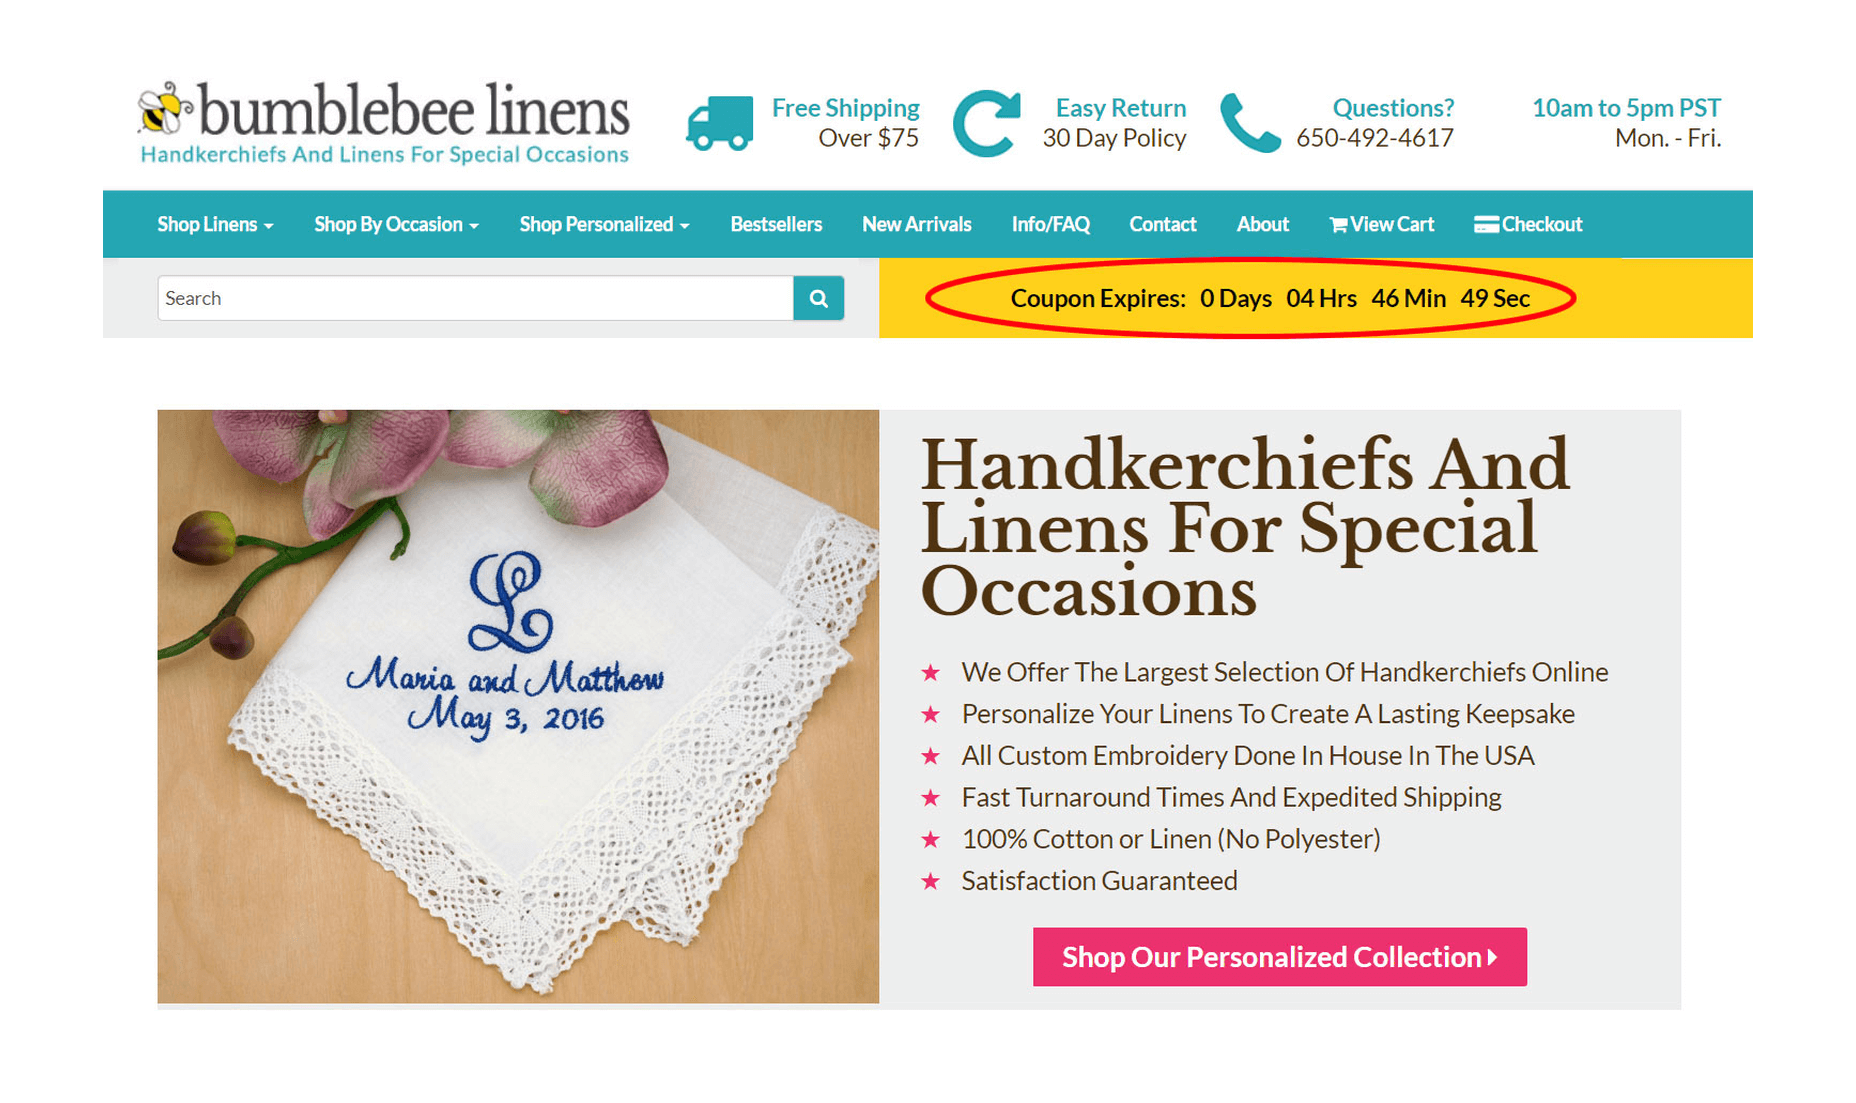
Whenever I run a sale, a big yellow countdown timer is displayed on every page of the website.

Note: It’s important to note that we only utilize this timer when there is actually a sale going on. Otherwise, you risk desensitizing your customers or losing trust.
In addition, I also display a countdown timer on the checkout page to create a sense of urgency to complete the payment process:
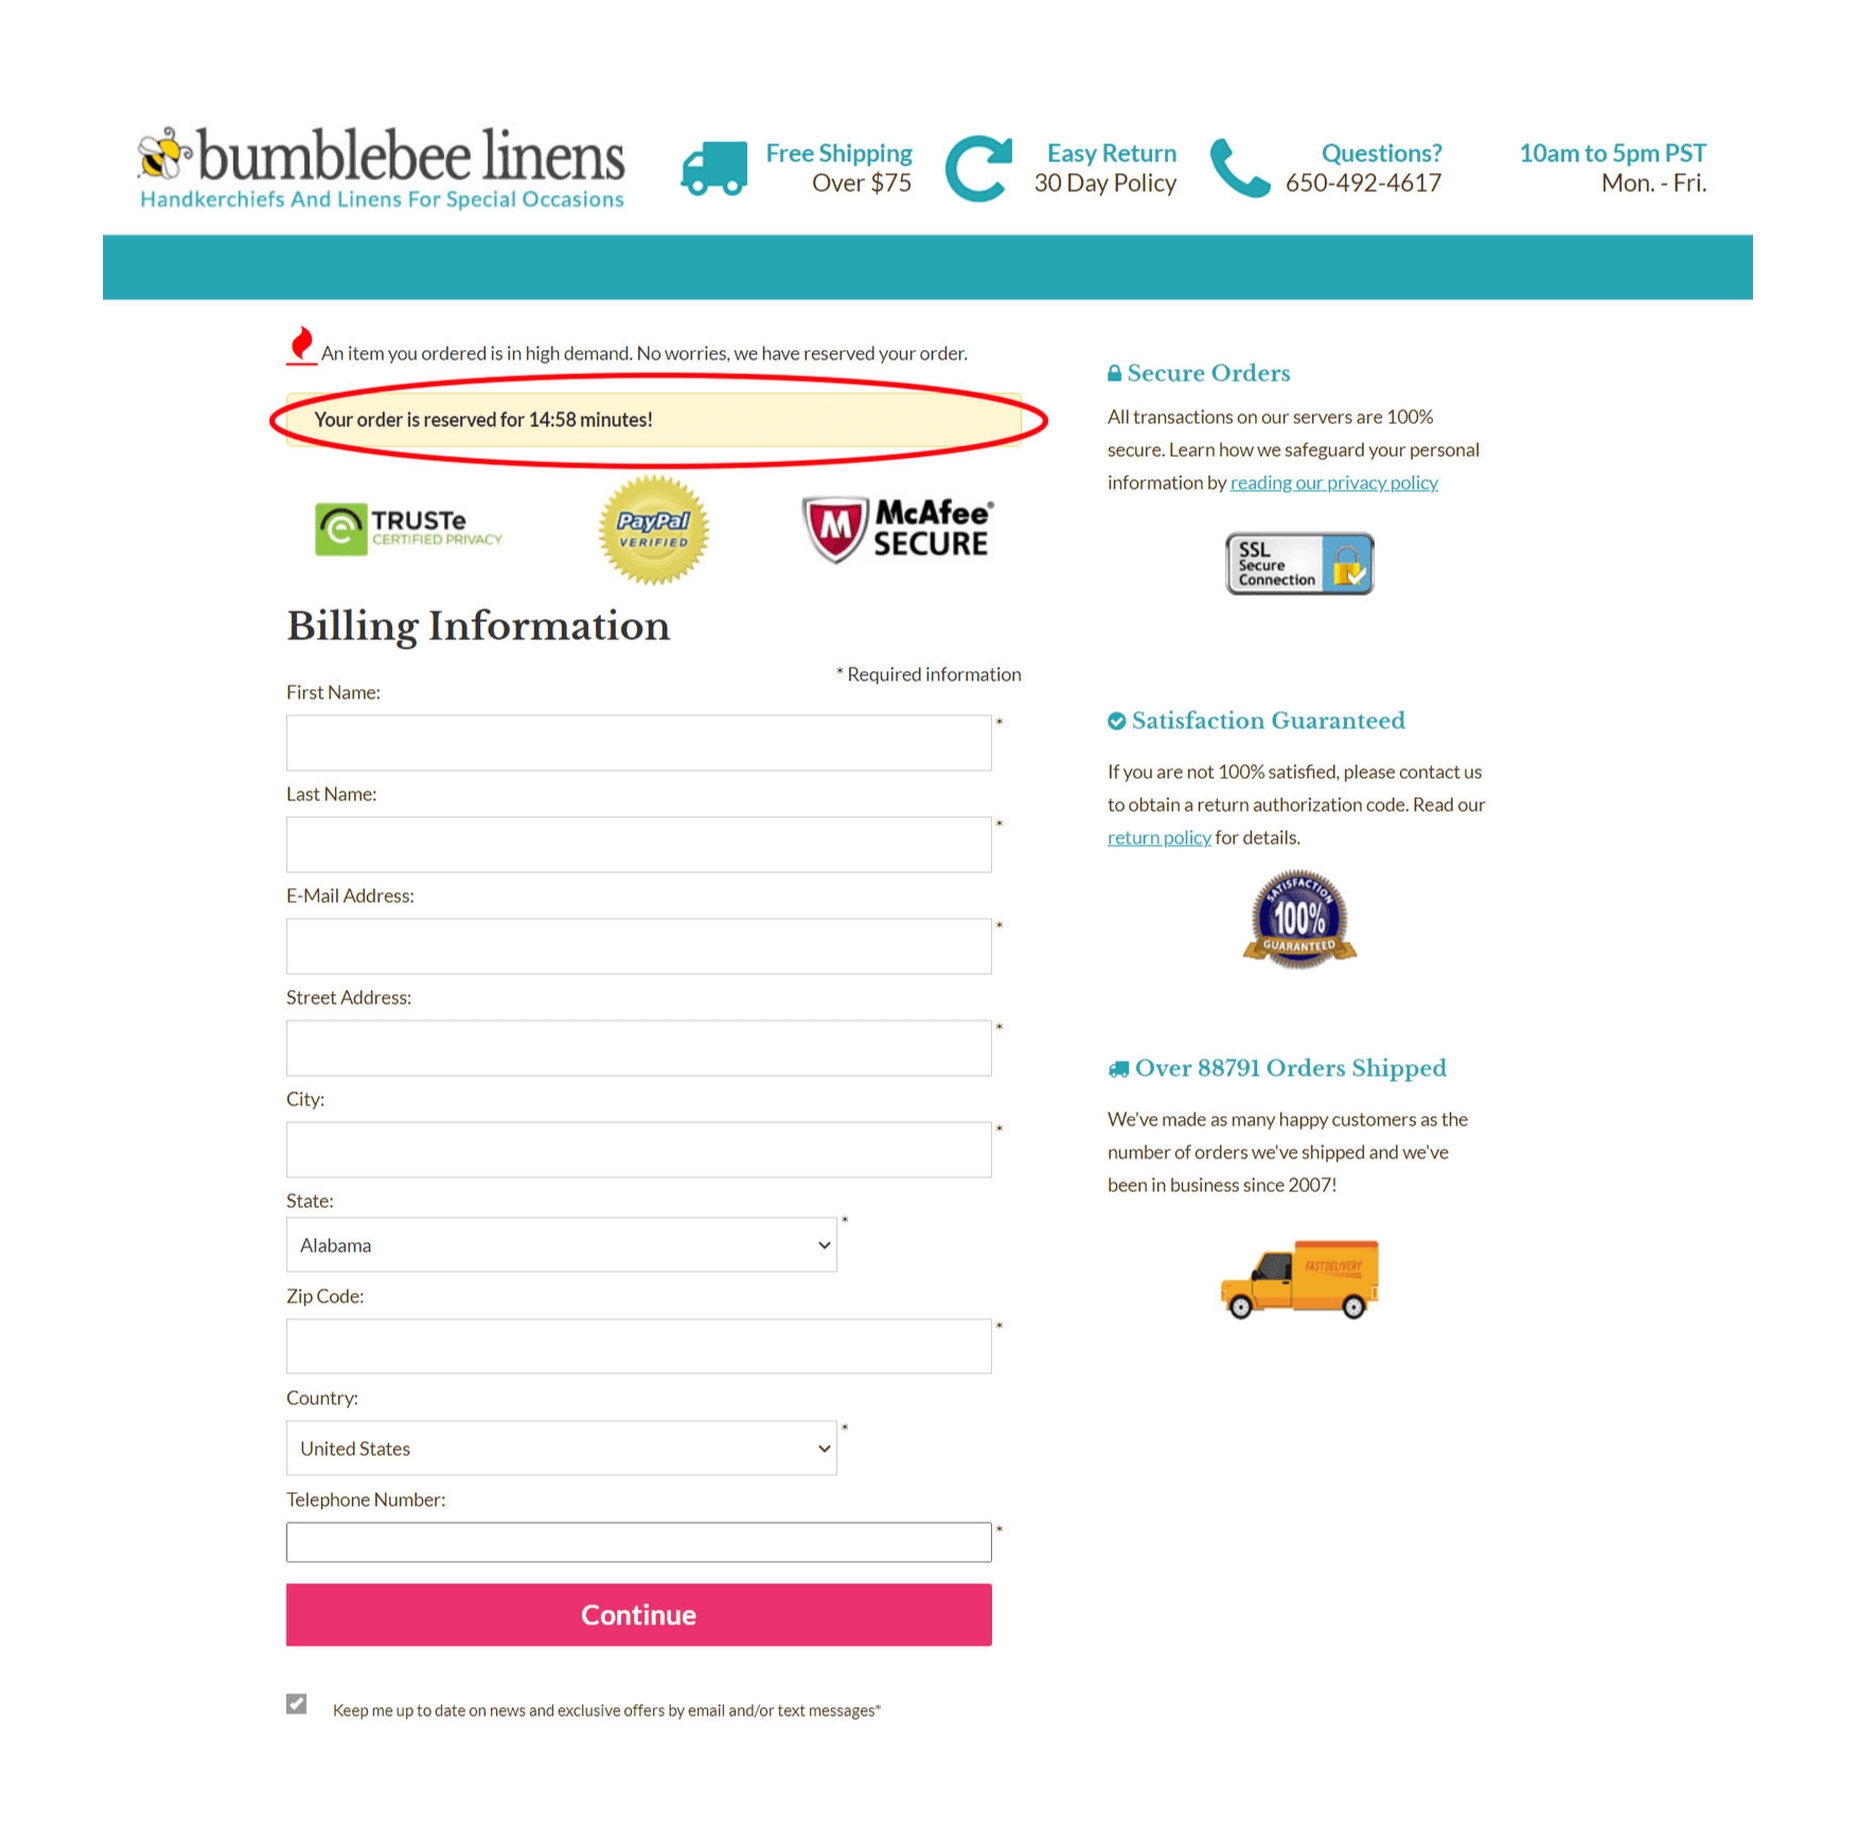
These extra design elements force a customer to take action sooner rather than later.

Final thoughts

Optimizing your conversion rate is an ongoing process. And testing your results is the only way to track your improvement.

Never go with your gut and always listen to the data. After all, sometimes an ugly site can out-convert a beautiful one.

Regardless, the design tips I demonstrated above will give you a solid foundation to start with. From there, you can further improve your website and optimize your conversion rate through repeated testing and tweaks. Good luck!

Source


Source de l’article sur Webdesignerdepot

Contentful; Webster’s Dictionary defines “contentful” as… not found. Clearly someone made up this word, but that is not necessarily a bad thing.

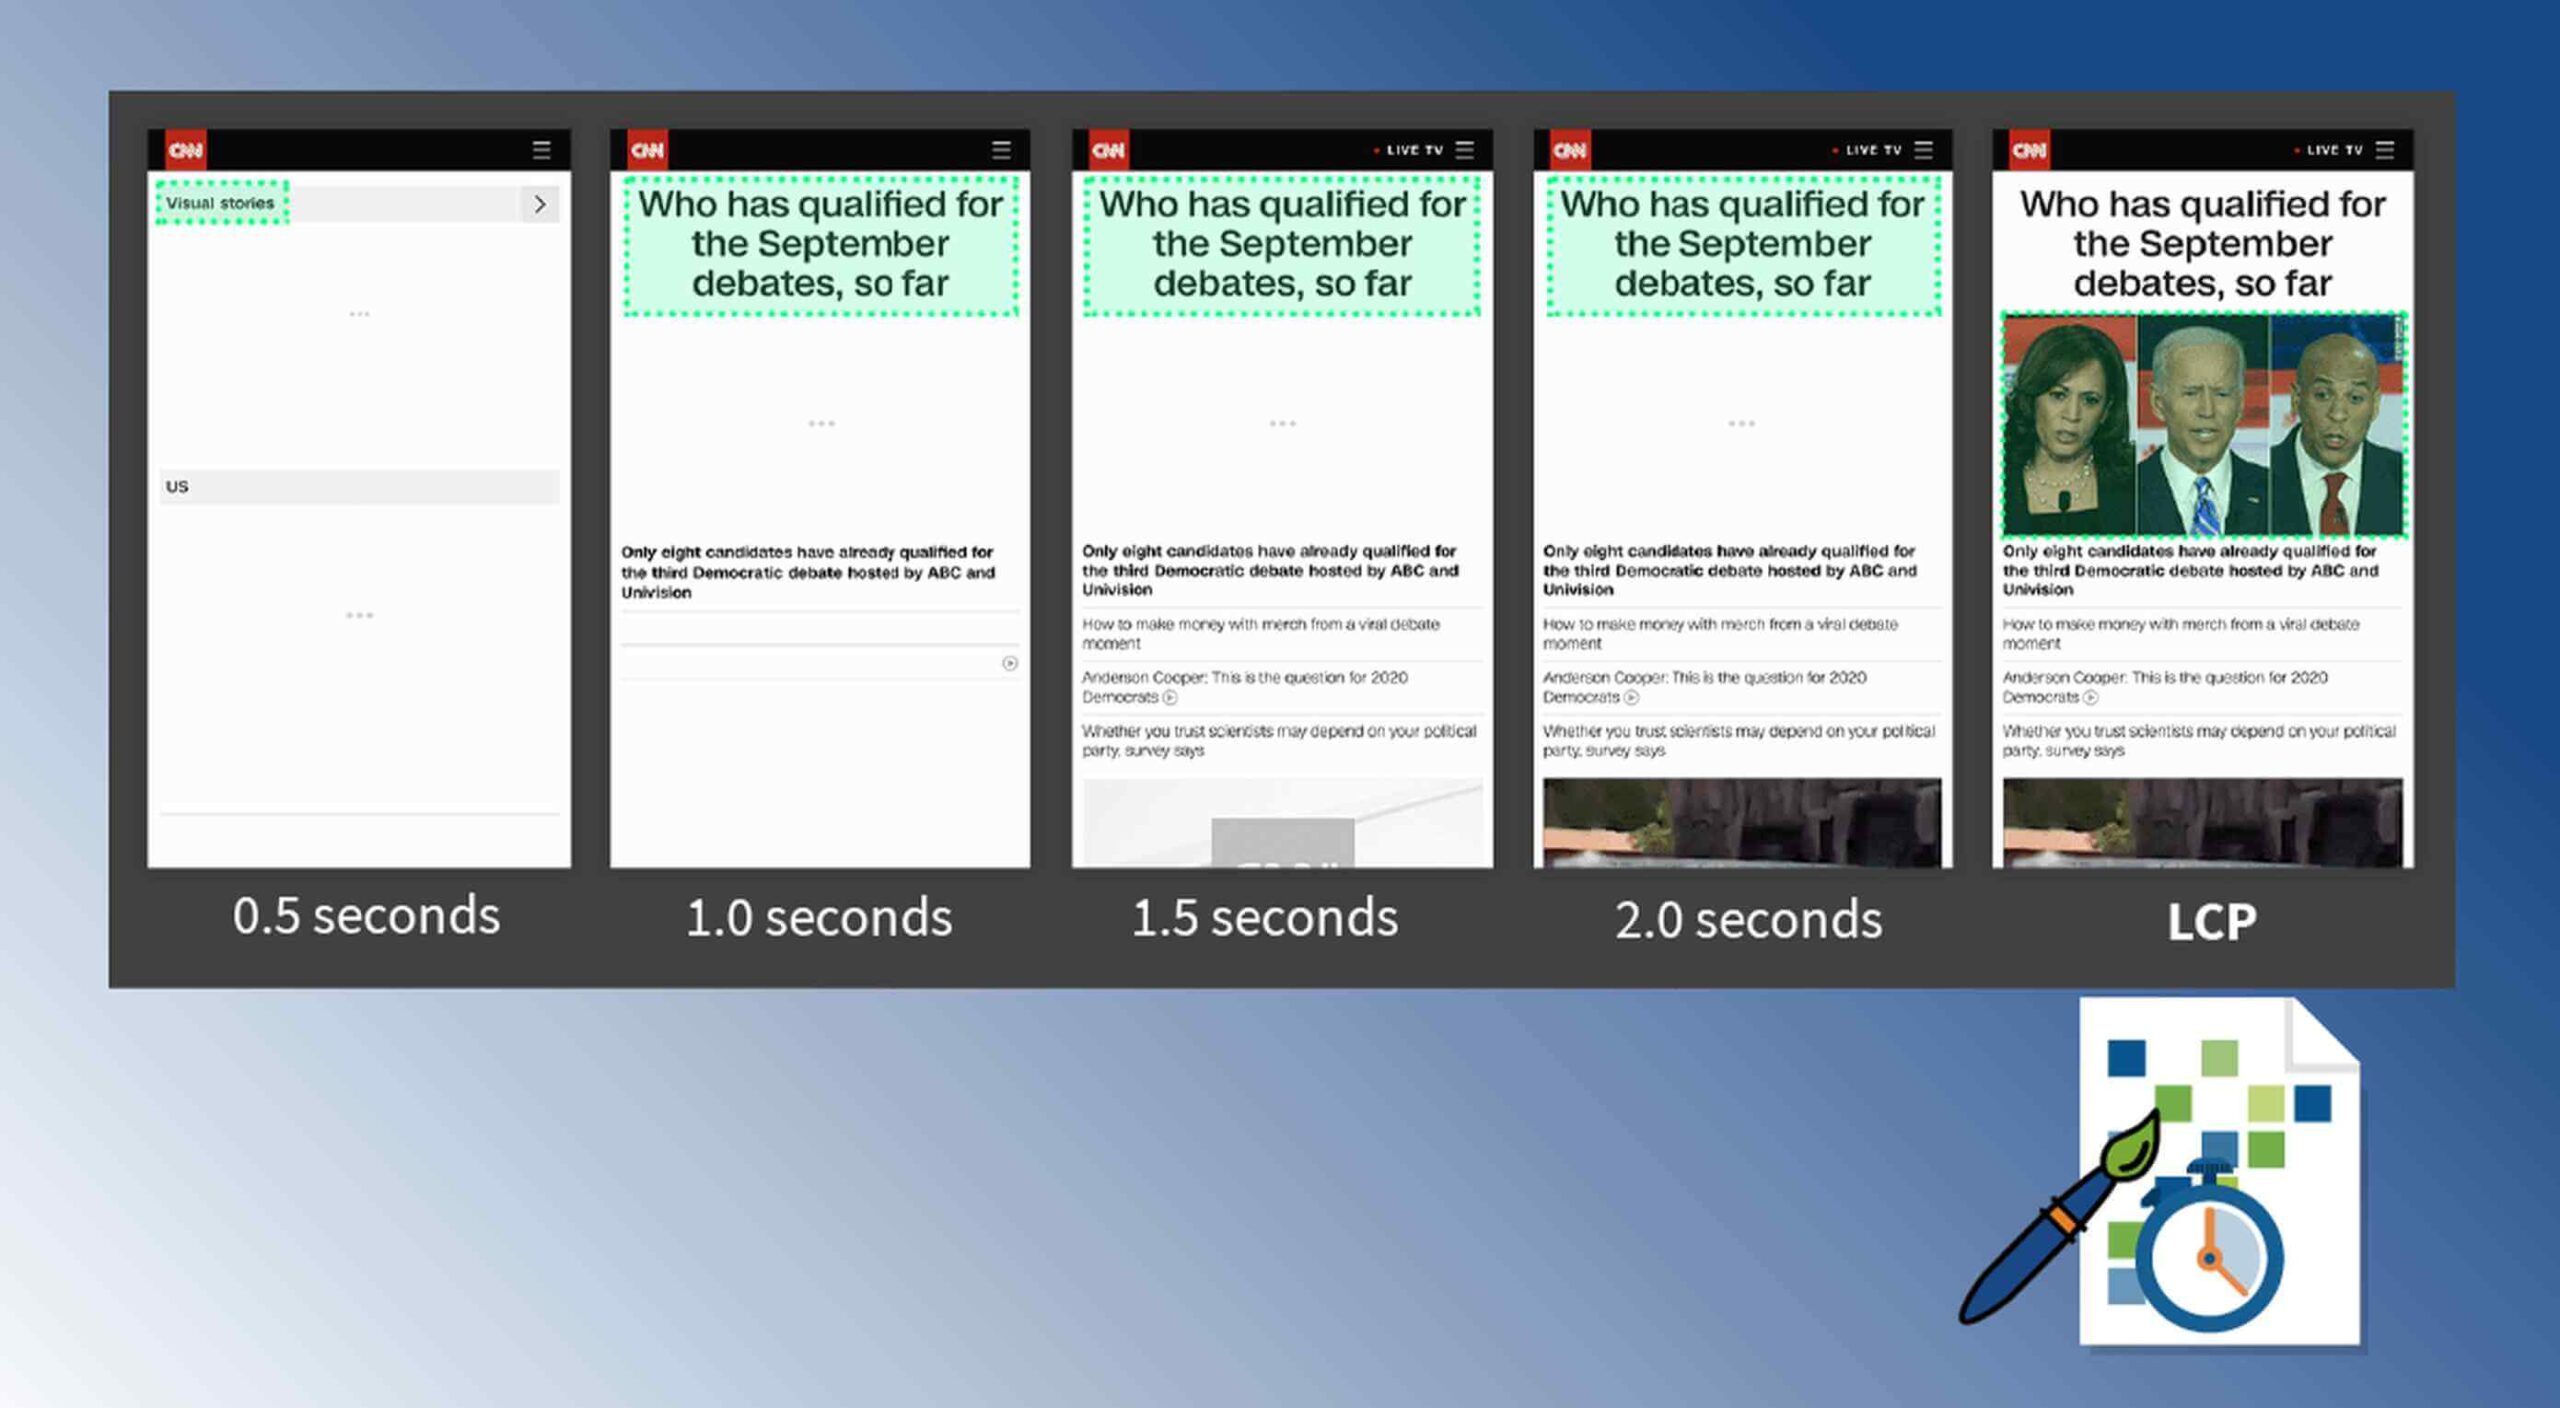
The world of user experience metrics is moving quickly, so new terminology is needed. Largest Contentful Paint (LCP) is one of a number of metrics measuring the render time of content on a web page.

What is Largest Contentful Paint?

Google defines LCP as “the render time of the largest content element visible within the viewport.” For what we are talking about in this blog, we will consider “content” to be an image, typically a JPEG or PNG file. In most cases, “largest” points to a hero image that is “above the fold” and is one of the first images people will notice when loading the page. Applying optimization to this largest content is critical to improving LCP.

It is probably more instructive to view LCP relative to other metrics. For example, First Contentful Paint (FCP) and Visually Complete book end LCP.

Each metric has its pros and cons, but LCP is a happy medium. LCP marks when web page loading starts to have a substantial impact on user experience.

In Google’s opinion, to provide a good user experience, LCP should occur within 2.5 seconds of when the page first starts loading. Poor values are anything greater than 4 seconds.

How Does Largest Contentful Paint Impact Lighthouse Scores and SEO?

LCP is now part of several “Core Web Vitals” scores that Google will measure in its ranking algorithm. Each of the Core Web Vitals represents a distinct facet of the user experience, is measurable in the field, and reflects the real-world experience of a critical user-centric outcome.

In the case of the overall Google Lighthouse score, LCP represents 25% weighting on the performance score of Lighthouse version 6.0. This makes LCP the most important Core Web Vitals metric in determining the performance score.

While Google has indicated that content is still the most important factor in SEO ranking, a better user experience (as measured by Core Web Vitals) will generate higher rankings in a crowded field. If there are many websites competing for the top search engine spots, then Largest Contentful Paint will play a critical factor in rankings.

How to Improve Largest Contentful Paint

Now that you know that LCP is important, what can you do to improve it by making content load faster? Google provides a number of suggestions, but the most effective technique is to optimize content for the device requesting it.

For example, a website includes an 800kb JPEG image that is intended for high resolution desktops. On a smartphone, that would be optimized down to less than 100kb, with no perceptible impact on quality. LCP can improve by more than 60% — or several seconds — through this single optimization.

Find Savings in Largest Contentful Paint by using Image Speed Test

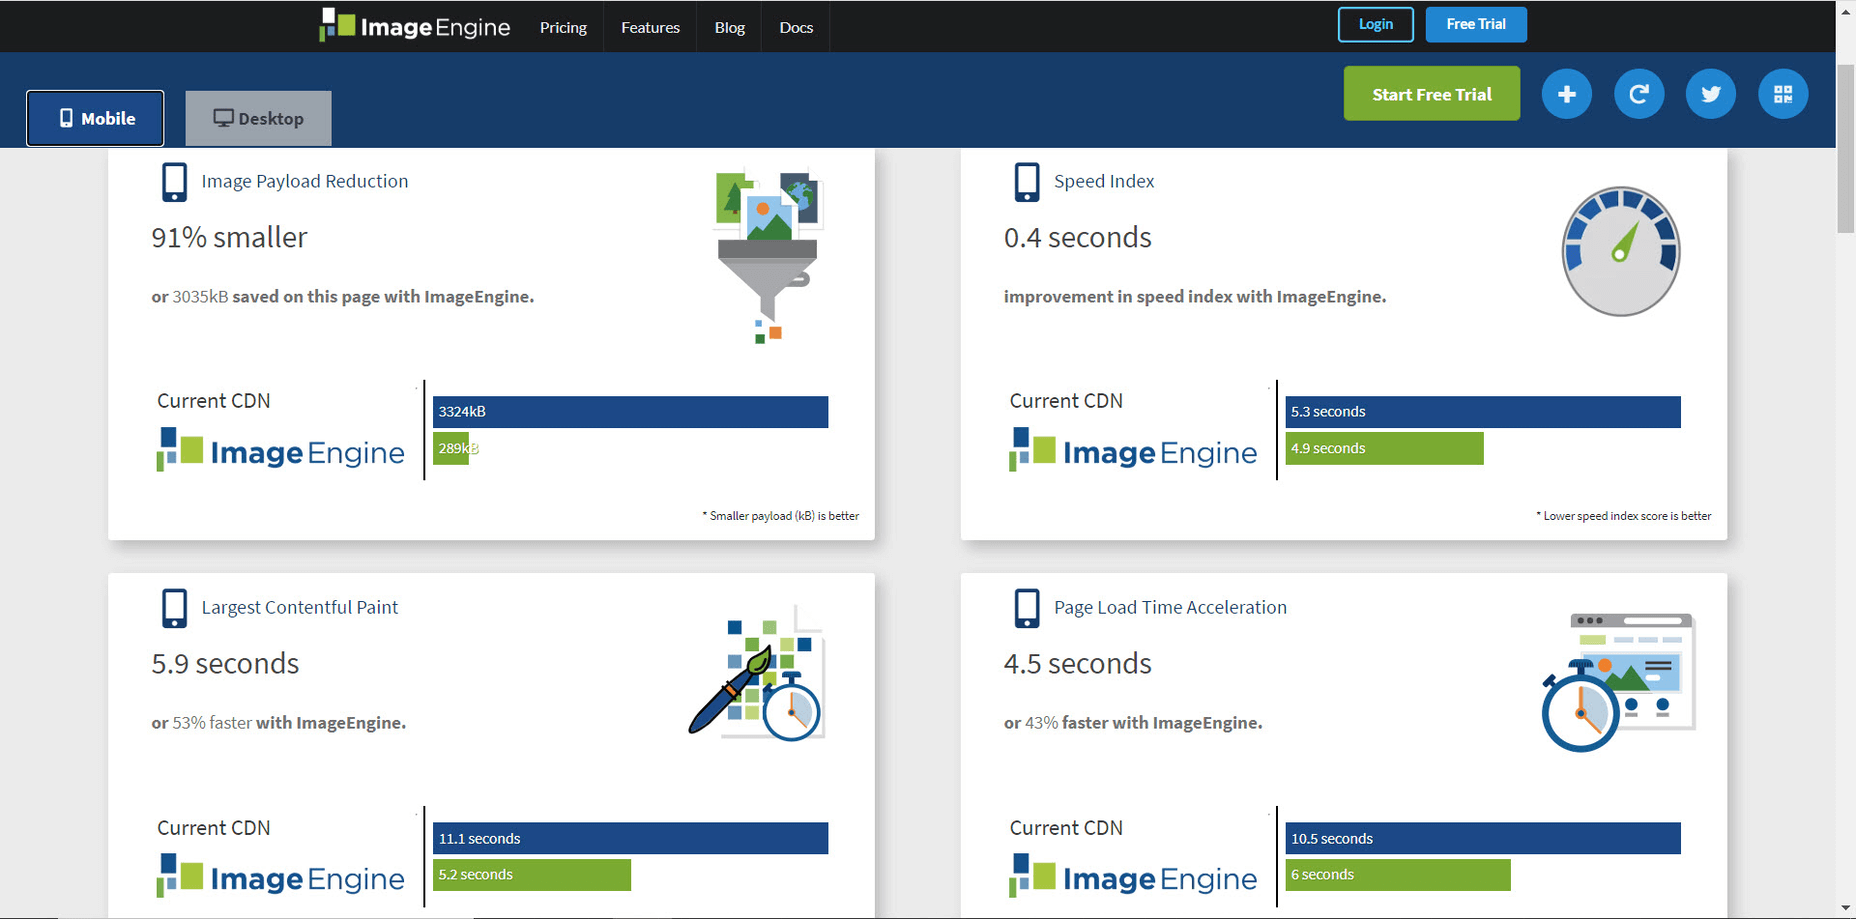
Image Speed Test is a great tool offered by ImageEngine.io that provides an analysis of LCP improvement opportunities. Just paste in the URL of the web page you are interested in optimizing, and the test will show you:

  • Image Payload Reduction
  • Speed Index
  • Largest Contentful Paint
  • Page Load Time (Visually Complete)

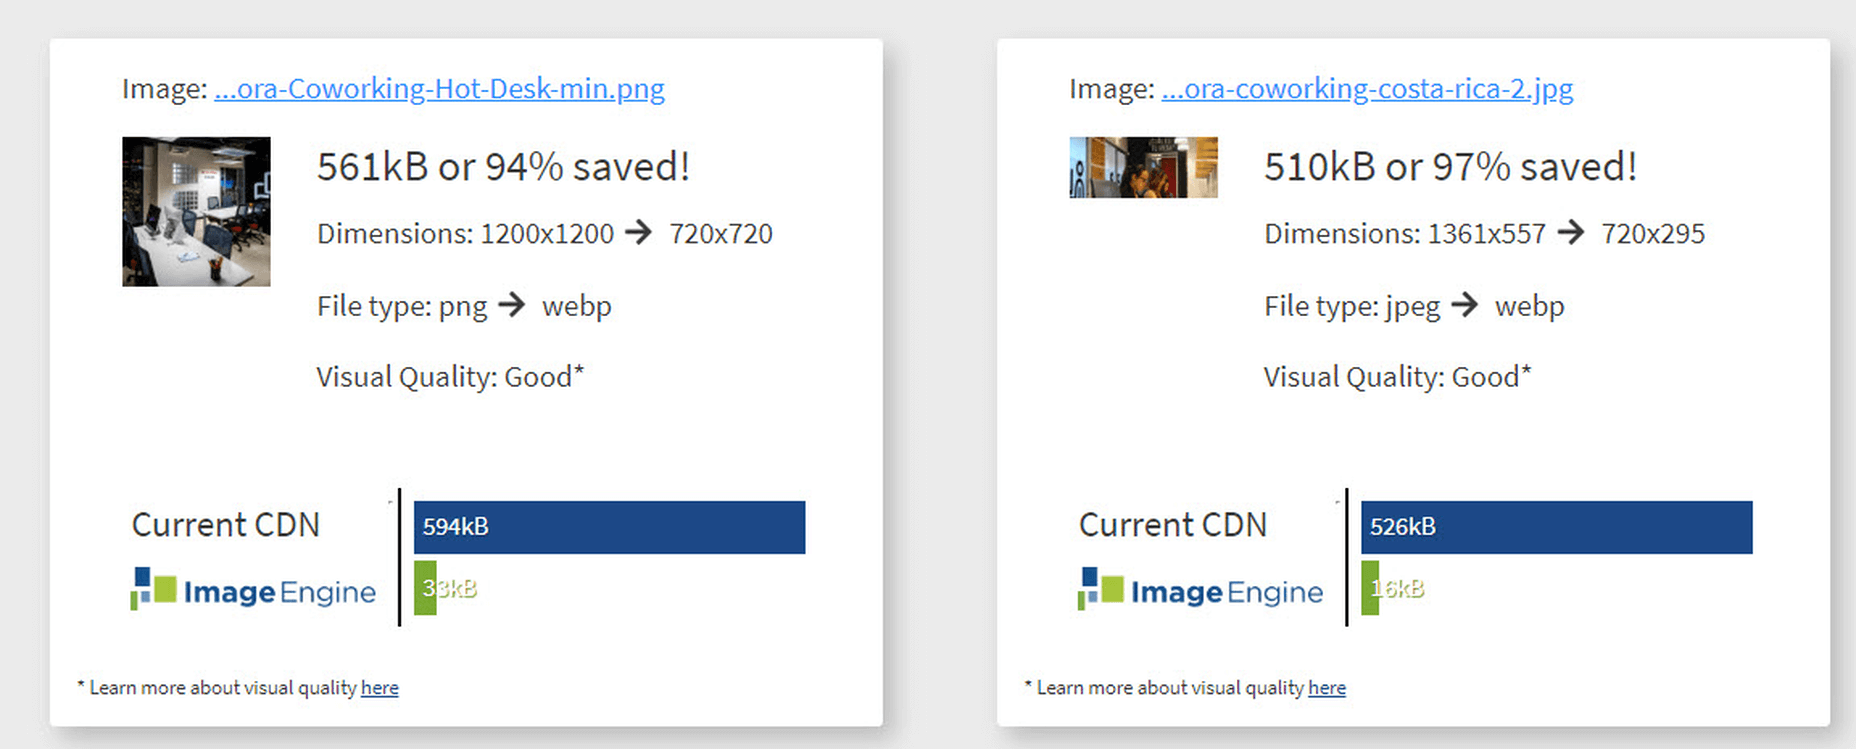
It also provides a video of the web page loading with and without optimizations. Finally, it analyses each image to provide an estimate of payload savings. In this case, the “largest content” on the page is this image. With optimizations, the image payload is reduced by 94%. That delivers a huge improvement in LCP.

How Does ImageEngine Improve LCP

ImageEngine is an image content delivery network (CDN) service that makes image optimization simple. Basically, for each image on the page, the image CDN will:

  1. Detect the device model requesting the web page;
  2. Optimize the image in terms of size, compression, image format;
  3. Deliver via a CDN edge server that is geographically closest to the user.

ImageEngine improves web performance for every image on the page, including the largest. You can learn more about ImageEngine here, and also sign up for a free trial.

Best Practices: Preconnect

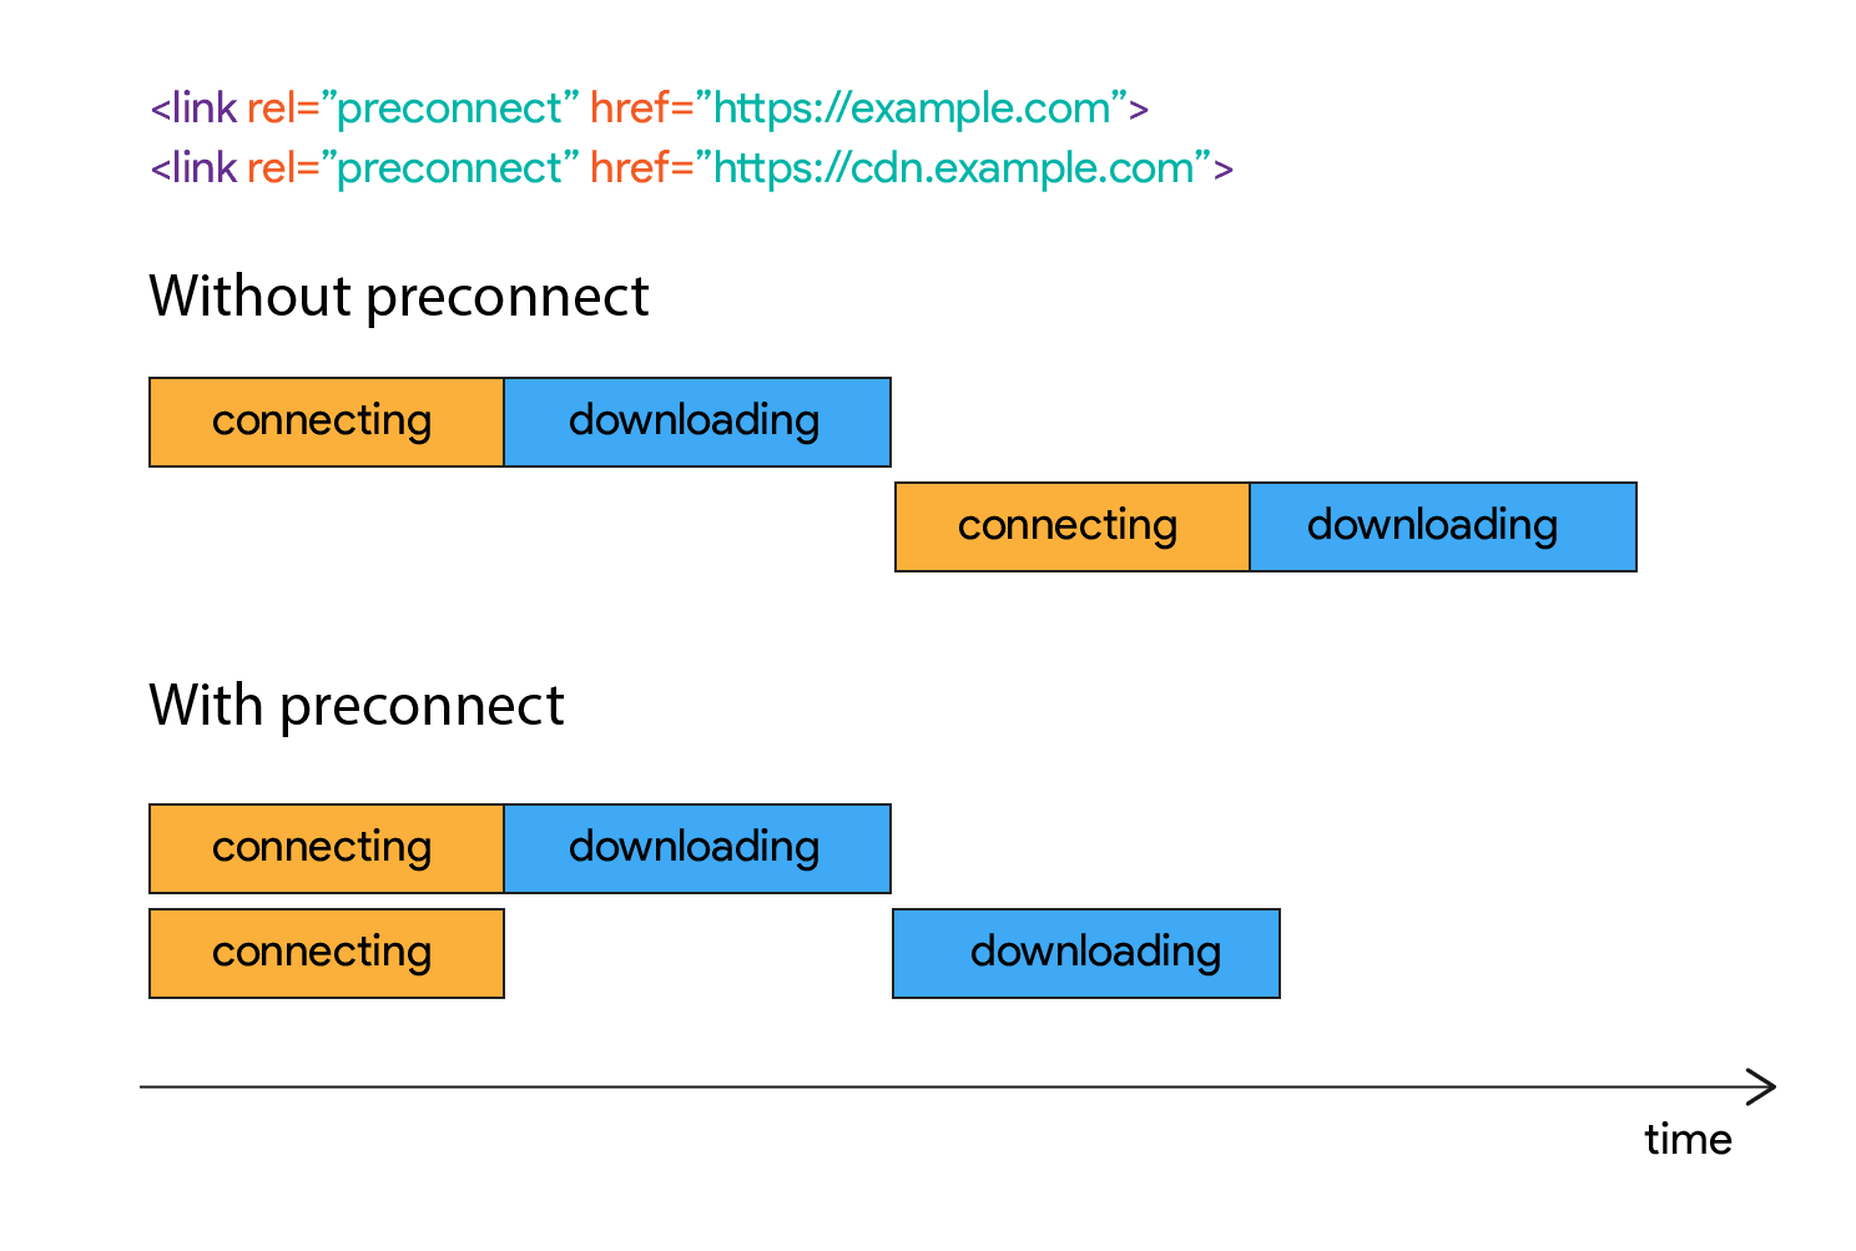
In addition to using an image CDN like ImageEngine, a few other best practices can improve LCP. Using the resource hints to provide a preconnect for your content can streamline the download process.

For example, putting the following link statement in the HTML will accelerate the download process. The link statement will make the browser connect to the third party as early as possible so that download can start sooner. ImageEngine’s optimizations make each image download smaller and faster, but preconnect save time in the connection phase.

Best Practices: Minimize Blocking JavaScript and CSS

When JavaScript or CSS is “blocking” it means that the browser needs to parse and execute CSS and JavaScript in order to paint the final state of the page in the viewport.

Any website today relies heavily on both JavaScript and CSS, which means that it is almost impossible to avoid some render blocking resources. On a general note: be careful with what kind of CSS and JavaScript is referenced inside the <head> element. Make sure that only the strictly necessary resources are loaded in <head>. The rest can be deferred or loaded asynchronously.

When looking to improve the LCP specifically, there are some practices worth looking into more deeply.

Inline Critical CSS

It is not an easy task, but if the browser can avoid making a request to get the CSS needed to render the critical part of the page – usually the “above the fold” part – the LCP is likely to occur earlier. Also you will avoid content shifting around and maybe even a Flash of Unstyled Content (FOUC).

The critical CSS — the CSS needed by the browser to set up the structure and important styles of the part of the page shown above the fold — should in-inlined. This inlined CSS may also refer to background images, which of course should also be served by an Image CDN.

Do Not Use JavaScript to (lazy) Load Images

Many modern browsers natively support lazy loading, without the use of JavaScript. Because images usually are heavily involved in the performance of LCP, it is best practice to leave image loading to the browser and avoid adding JavaScript in order to lazy load images.

Lazy loading driven by JavaScript will add additional latency if the browser first has to load and parse JavaScript, then wait for it to execute, and then render images. This practice will also break the pre-parser in the browser.

If an image CDN is used to optimize images, then the benefits of lazy loading become much smaller. Especially large hero images that are above the fold have a large impact on LCP and will not benefit from being lazy loaded with JavaScript. It is best not to make JavaScript a blocking issue for rendering images, but rather rely on the browser’s own ability to select which images should be lazy loaded.


[– This is a sponsored post on behalf of ImageEngine –]

Source


Source de l’article sur Webdesignerdepot
We are gathered here today….

Today I write in memory of Adobe Flash (née Macromedia), something that a bunch of people are actually too young to remember. I write this with love, longing, and a palpable sense of relief that it’s all over. I have come to praise Flash, to curse it, and finally to bury it.

We’ve been hearing about the death of Flash for a long time. We know it’s coming. December 2020 has been announced as the official timeframe for removal, but let’s be real about this: it’s dead. It’s super-dead. It’s people-are-selling-Flash-game-archives-on-Steam dead.

That last bit actually makes me happy, because Flash games were a huge part of my childhood, and the archives must be preserved. Before I’d ever heard of video cards, frames per second, and “git gud”, I was whiling away many an hour on disney.com, cartoonnetwork.com, MiniClip, Kongregate, and other sites, looking for games.

I think we’ve established in my previous work that even as a missionary kid, I did not have a social life.

The Internet itself gave me a way to reach out and see beyond my house, my city, and my world, and it was wonderful. Flash was a part of that era when the Internet felt new, fresh, and loaded with potential. Flash never sent anyone abuse, or death threats. Flash was for silly animations, and games that my parent’s computer could just barely handle, after half an hour of downloading.

I even built my first animated navigation menus in Flash, because I didn’t know any better. At all. But those menus looked exactly like the ones I’d designed in Photoshop, so that’s what mattered to me, young as I was.

That was a part of Flash’s charm, really.

What Flash Got Right

Flash Brought Online Multimedia into the Mainstream

Funny story, JavaScript was only about a year old when Flash was released. While HTML5 and JS are the de-facto technologies for getting things done now, Flash was, for many, the better option at launch. JS had inconsistent support across browsers, and didn’t come with a handy application that would let you draw and animate whatever you wanted.

It was (in part) Flash that opened up a world of online business possibilities, that made people realize the Internet had potential rivalling that of television. It brought a wave of financial and social investment that wouldn’t be seen again until the advent of mainstream social networks like MySpace.

The Internet was already big business, but Flash design became an industry unto itself.

Flash Was Responsive

Yeah, Flash websites could be reliably responsive (and still fancy!) before purely HTML-based sites pulled it off. Of course, it was called by other names back then, names like “Liquid Design”, or “Flex Design”. But you could reliably build a website in Flash, and you knew it would look good on everything from 800×600 monitors, to the devastatingly huge 1024×768 screens.

You know, before those darned kids with their “wide screens” took over. Even then, Flash still looked good, even if a bunch of people suddenly had to stop making their sites with a square-ish aspect ratio.

Flash Was Browser-Agnostic

On top of being pseudo-responsive, the plugin-based Flash player was almost guaranteed to work the same in every major browser. Back in a time when Netscape and Internet Explorer didn’t have anything that remotely resembled feature parity, the ability to guarantee a consistent website experience was to be treasured. When FireFox and Chrome came out, with IE lagging further behind, that didn’t change.

While the CSS Working Group and others fought long and hard for the web to become something usable, Flash skated by on its sheer convenience. If your site was built in Flash, you didn’t have to care which browsers supported the <marquee> tag, or whatever other ill-conceived gimmick was new and trendy.

Flash Popularized Streaming Video

Remember when YouTube had a Flash-based video player? Long before YouTube, pretty much every site with video was using Flash to play videos online. It started with some sites I probably shouldn’t mention around the kids, and then everyone was doing it.

Some of my fondest memories are of watching cartoon clips as a teenager. I’d never gotten to watch Gargoyles or Batman: The Animated Series as a young kid, those experience came via the Internet, and yes… Flash. Flash video players brought me Avatar: The Last Airbender, which never ever had a live action adaptation.

Anyway, my point: Flash made online video streaming happen. If you’ve ever loved a Netflix or Prime original show (bring back The Tick!), you can thank Macromedia.

What Flash Got Wrong

Obviously, not everything was rosy and golden. If it was, we’d have never moved on to bigger, better things. Flash had problems that ultimately killed it, giving me the chance, nay, the responsibility of eulogizing one of the Internet’s most important formative technologies.

Firstly, it was buggy and insecure: This is not necessarily a deal-breaker in the tech world, and Microsoft is doing just fine, thank you. Still, as Flash matured and the code-base expanded, the bugs became more pronounced. The fact that it was prone to myriad security issues made it a hard sell to any company that wanted to make money.

Which is, you know, all of them.

Secondly, it was SEO-unfriendly: Here was a more serious problem, sales-wise. While we’re mostly past the era when everyone and their dog was running a shady SEO company, search engines are still the lifeblood of most online businesses. Having a site that Google can’t index is just a no-go. By the time Google had managed to index SWF files, it was already too late.

Thirdly, its performance steadily got worse: With an expanding set of features and code, the Flash plugin just took more and more resources to run. Pair it with Chrome during that browser’s worst RAM-devouring days, and you have a problem.

Then, while desktops were getting more and more powerful just (I assume) to keep up with Flash, Apple went and introduced the iPhone. Flash. Sucked. On. Mobile. Even the vendors that went out of their way to include a Flash implementation on their smartphones almost never did it well.

It was so much of a hassle that when Apple officially dropped Flash support, the entire world said, “Okay, yeah, that’s fair.”

Side note: Flash always sucked on Linux. I’m just saying.

Ashes to Ashes…

Flash was, for its time, a good thing for the Internet as a whole. We’ve outgrown it now, but it would be reckless of us to ignore the good things it brought to the world. Like the creativity of a million amateur animators, and especially that one cartoon called “End of Ze World”.

Goodbye Flash, you sucked. And you were great. Rest in peace. Rest in pieces. Good riddance. I’ll miss you.


Featured image via Fabio Ballasina and Daniel Korpai.

Source


Source de l’article sur Webdesignerdepot

Attention is the new gold; brands are in a constant competition for our attention.
A big portion of our time we spend online, where we are bombarded with insane amounts of information and advertisements. It’s hard not to become overwhelmed in this world of consumerism. We have had to become good at quickly evaluating which information is important, especially on the internet.

Good marketing specialists know that they have mere seconds to turn a potential customer into a lead. People are not going to spend a lot of time examining your advertisement or landing page, either it clicks or not. Moreover, most users do not read the articles, they scan them. First impression plays a huge role in the success of your business, so do not leave that to a chance.

You really don’t want your customer to ignore that special sale, subscription option, or another call to action on your webpage. That is why you need to know where that gold-worthy attention goes when a user opens your landing page. Here’s where technology can come in handy.

Eye-Tracking in Web Design

It is very important to know where your website visitor’s attention goes first. How to get that info? Eye-tracking is the answer.

Eye-tracking technology can be used to optimize your website conversions. By tracking eye movements, technology will recognize which content is most intriguing for the users. It will reveal whether people pay most attention where you want them to, which elements are distracting or not visible enough, and where sales are lost. This information is invaluable if you want to succeed in the current market.

This information is invaluable if you want to succeed in the current market

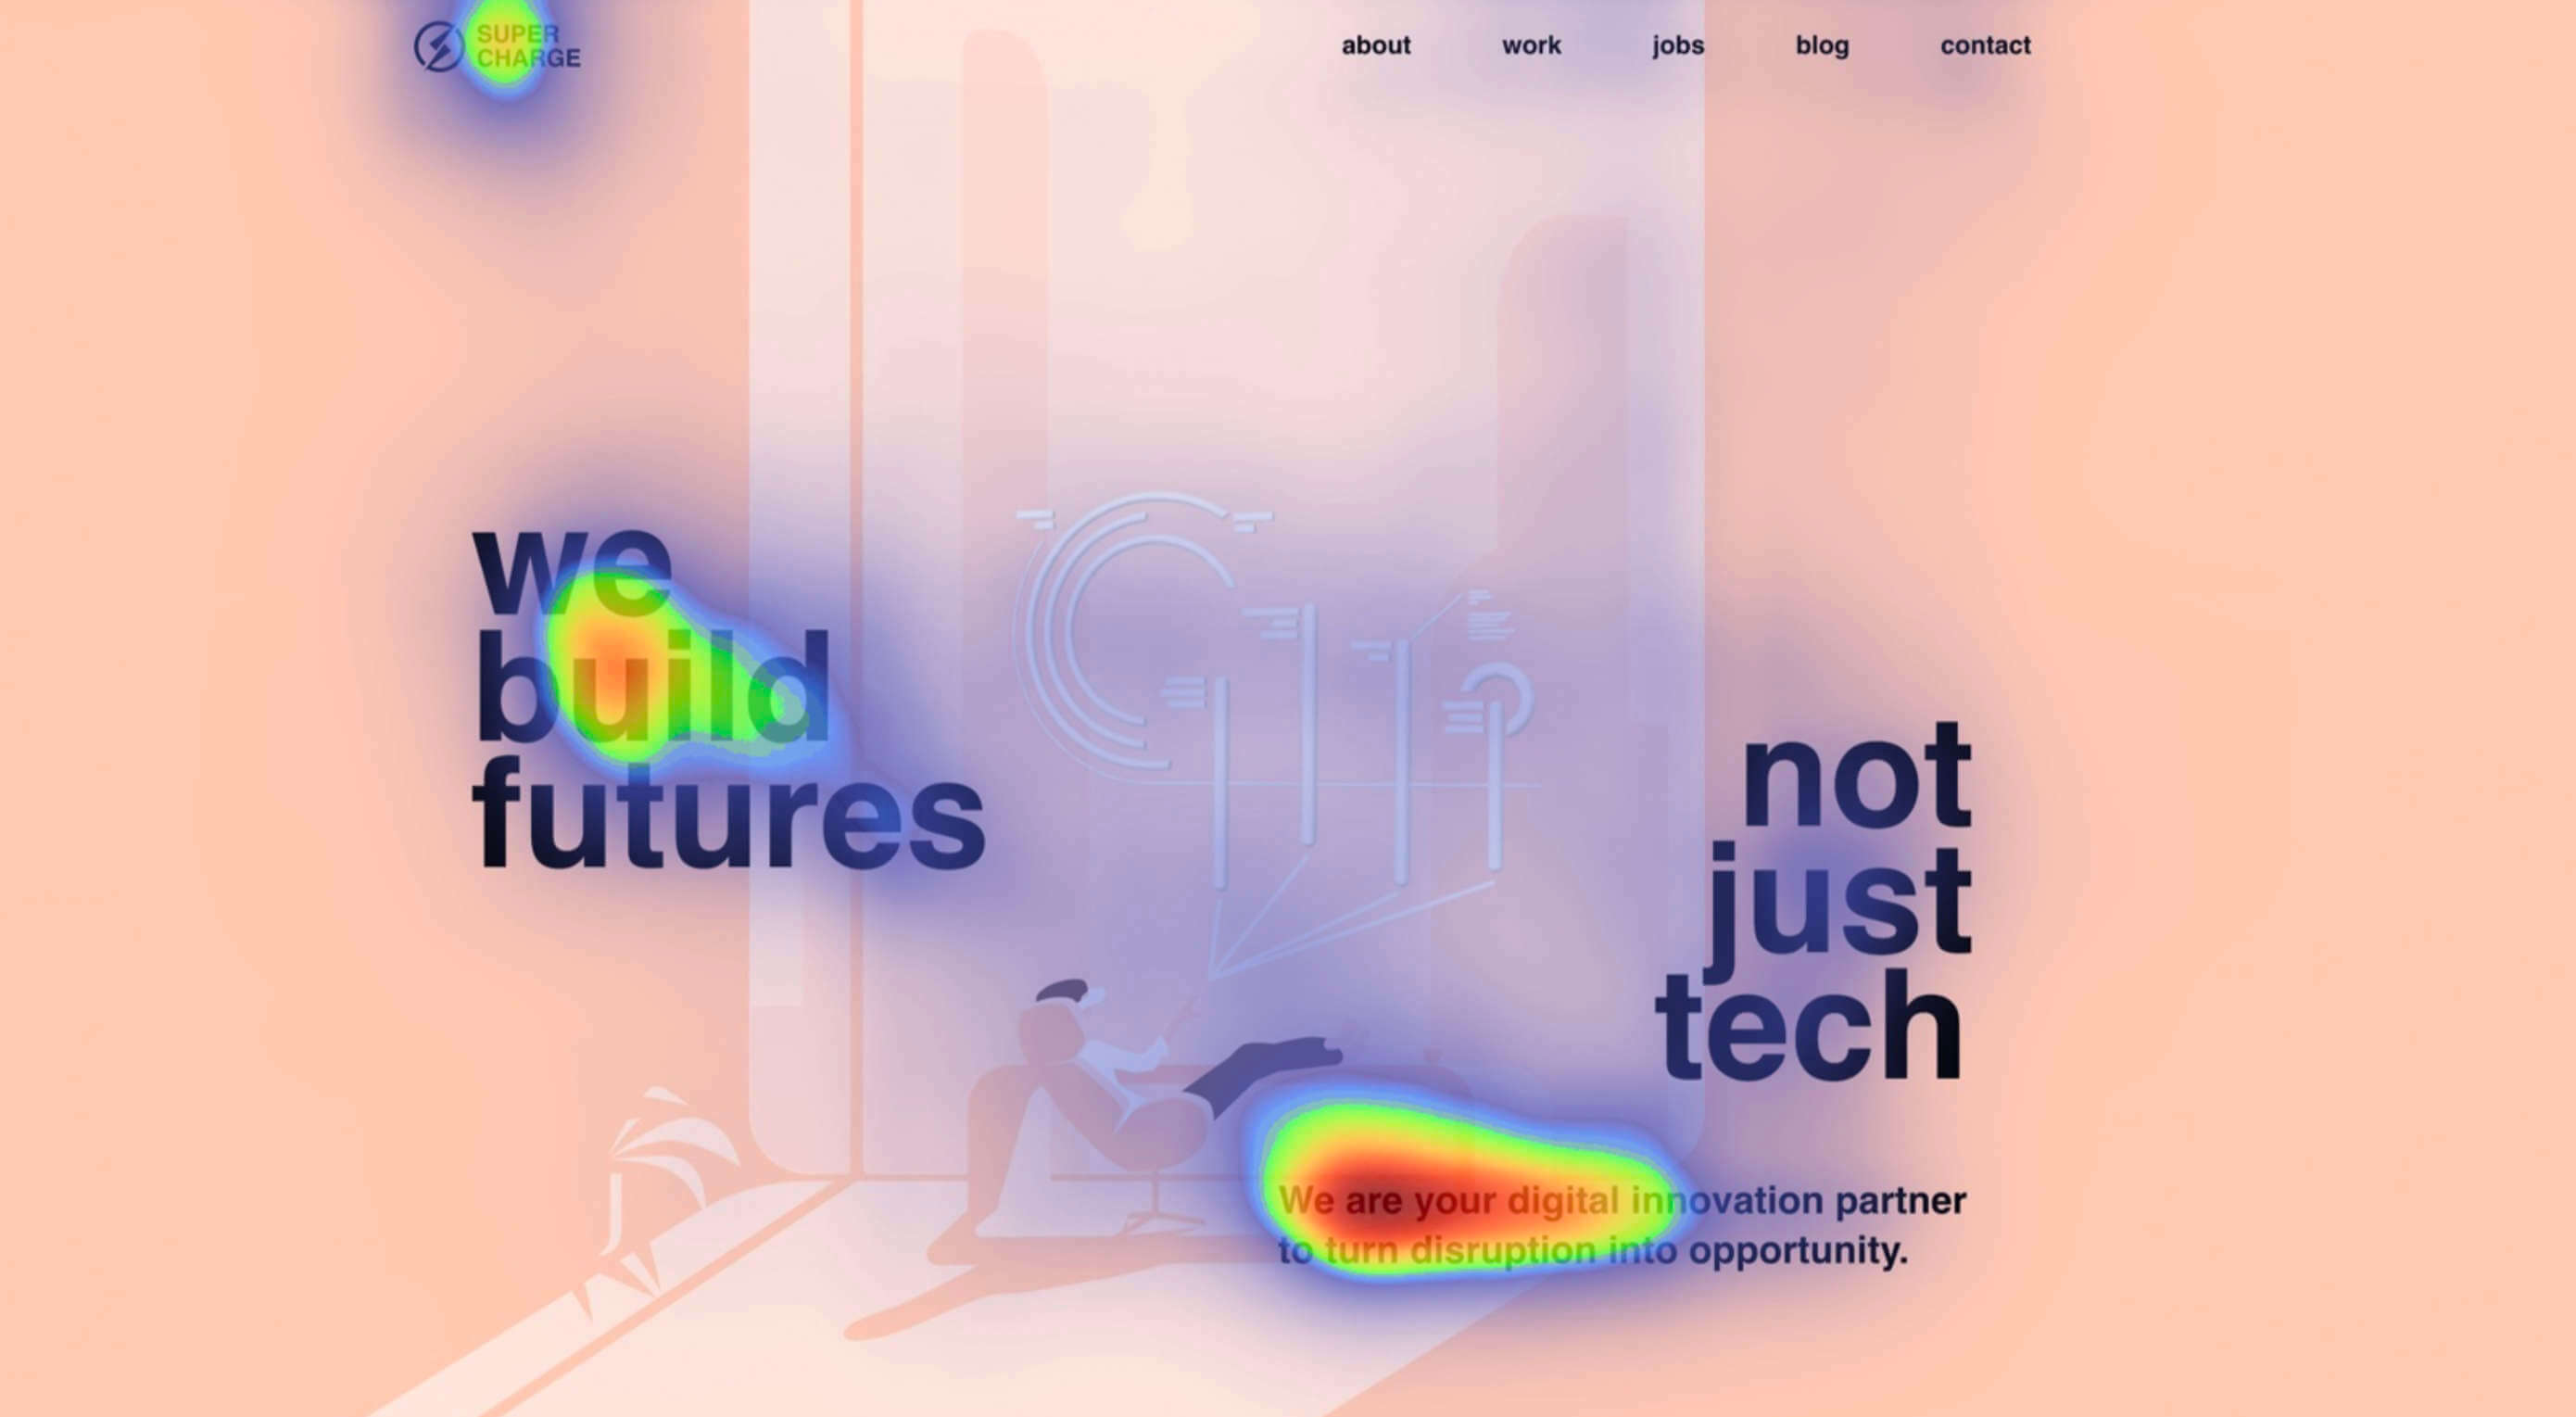
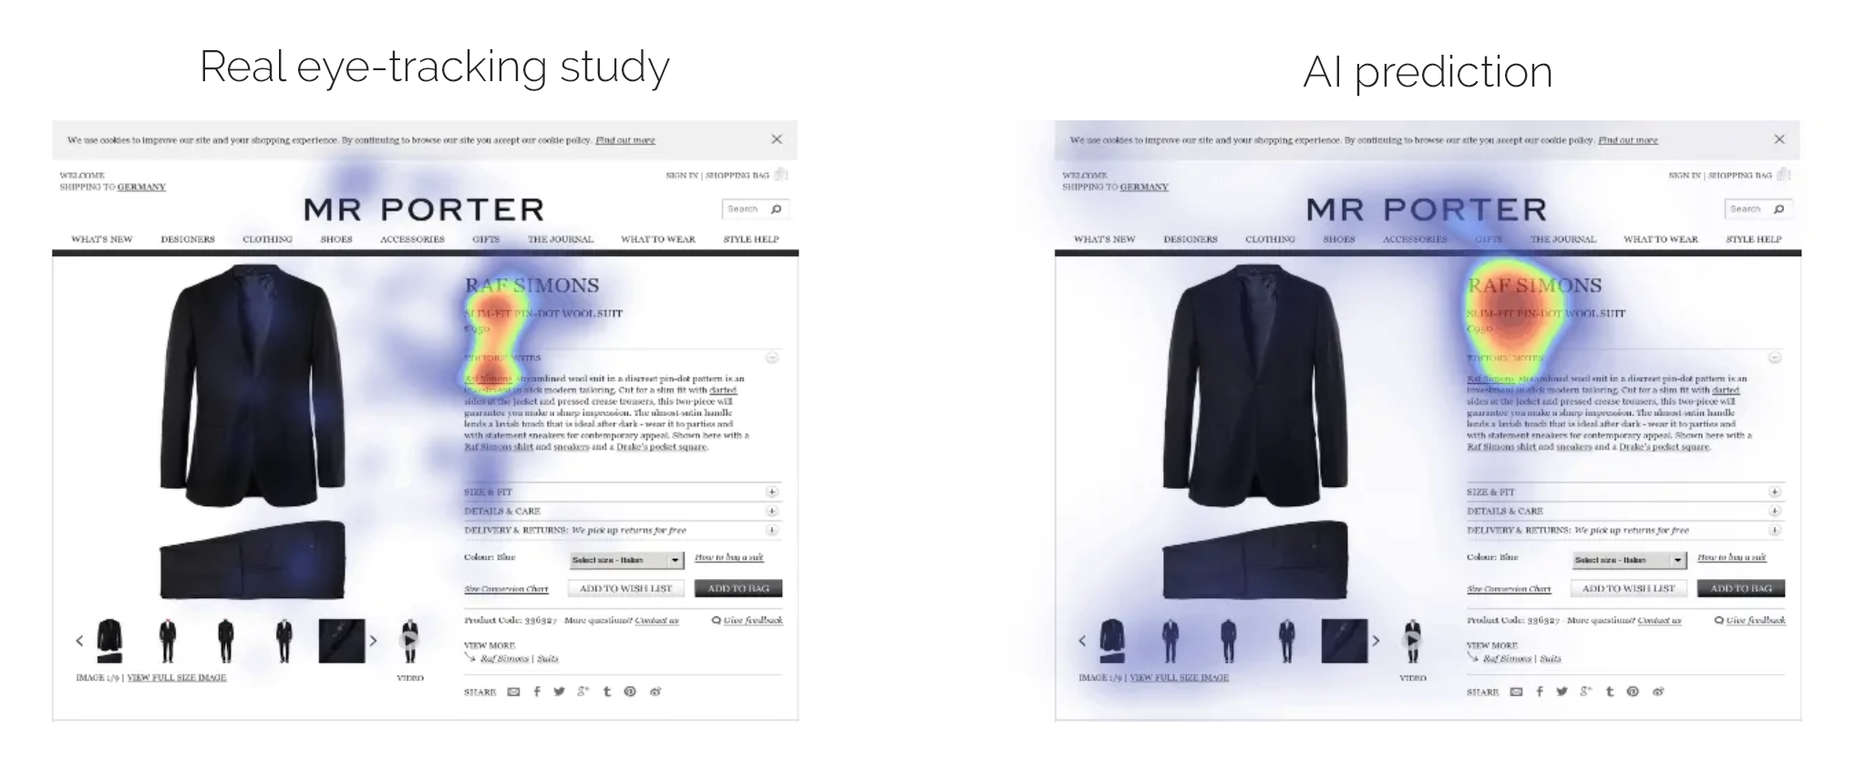
How does it work? An eye tracker, such as webcam or goggles, measures movement of an eye. Collected data is analyzed and presented as a heatmap, highlighting which elements of your design attract most attention. Having in mind that browsing time rarely exceeds a few seconds, this information is very valuable when you try to understand your audience.

You wouldn’t want to spend much time on your website design just to discover it does not generate desired conversion rate. By employing this technology you can make changes based on reliable data rather than intuition and guarantee your business future success.

By now you may think that you definitely need to carry out this eye-tracking study, but there is a catch. A high-quality behavioral observation or eye-tracking is a time-consuming, budget eating complicated process.

If you want to draw conclusions from heatmaps, you would need to include at least 39 participants in a study. One individual test may last from 20 minutes to an hour. Time quickly adds up when you include preparation and analysis of the results. The average eye tracker price is around $17,500 and it may vary between several thousand dollars and $50 000. Of course you can hire a company to carry out this research for you but it may cost you several hundred dollars a month. Luckily, technological innovations allow us to acquire the same insights about users’ attention flow much cheaper and faster than conducting or buying an actual eye-tracking study.

Technological innovations replace real eye-tracking study

AI-Powered Automatization of Eye-Tracking

In this task of understanding how internet users are interacting with your website, Artificial Intelligence (AI) seems to be an answer. AI-based technologies already have become prevalent in various services we use on a daily basis. For example, Netflix’s highly predictive algorithm offers viewers personalized movie recommendations. Medical researchers utilize eye tracking to diagnose conditions like Alzheimer’s disease or Autism. As these algorithms become better every year, AI also becomes an irreplaceable tool in business.

Over the years researchers have collected so much data that human behavior becomes really predictable

How can AI help you to understand your customer’s attention? The main feature of AI is that it can mimic human intelligence and constantly improve itself by learning from data. Predictive eye-tracking is based on deep learning and trained with previous eye tracking study data. Over the years researchers have collected so much data that human behavior becomes really predictable. Technology predicts which specific areas of your website attract most interest. In this way, AI enables you to speed up the UX research process and get insights about your design in a matter of seconds.

Too good to be true? There are already several available tools on the market, such as Attention Insight or EyeQuant. These predictive design tools are based on deep learning and trained with previous eye-tracking studies data. Up to date, they have achieved an 84-90% accuracy.

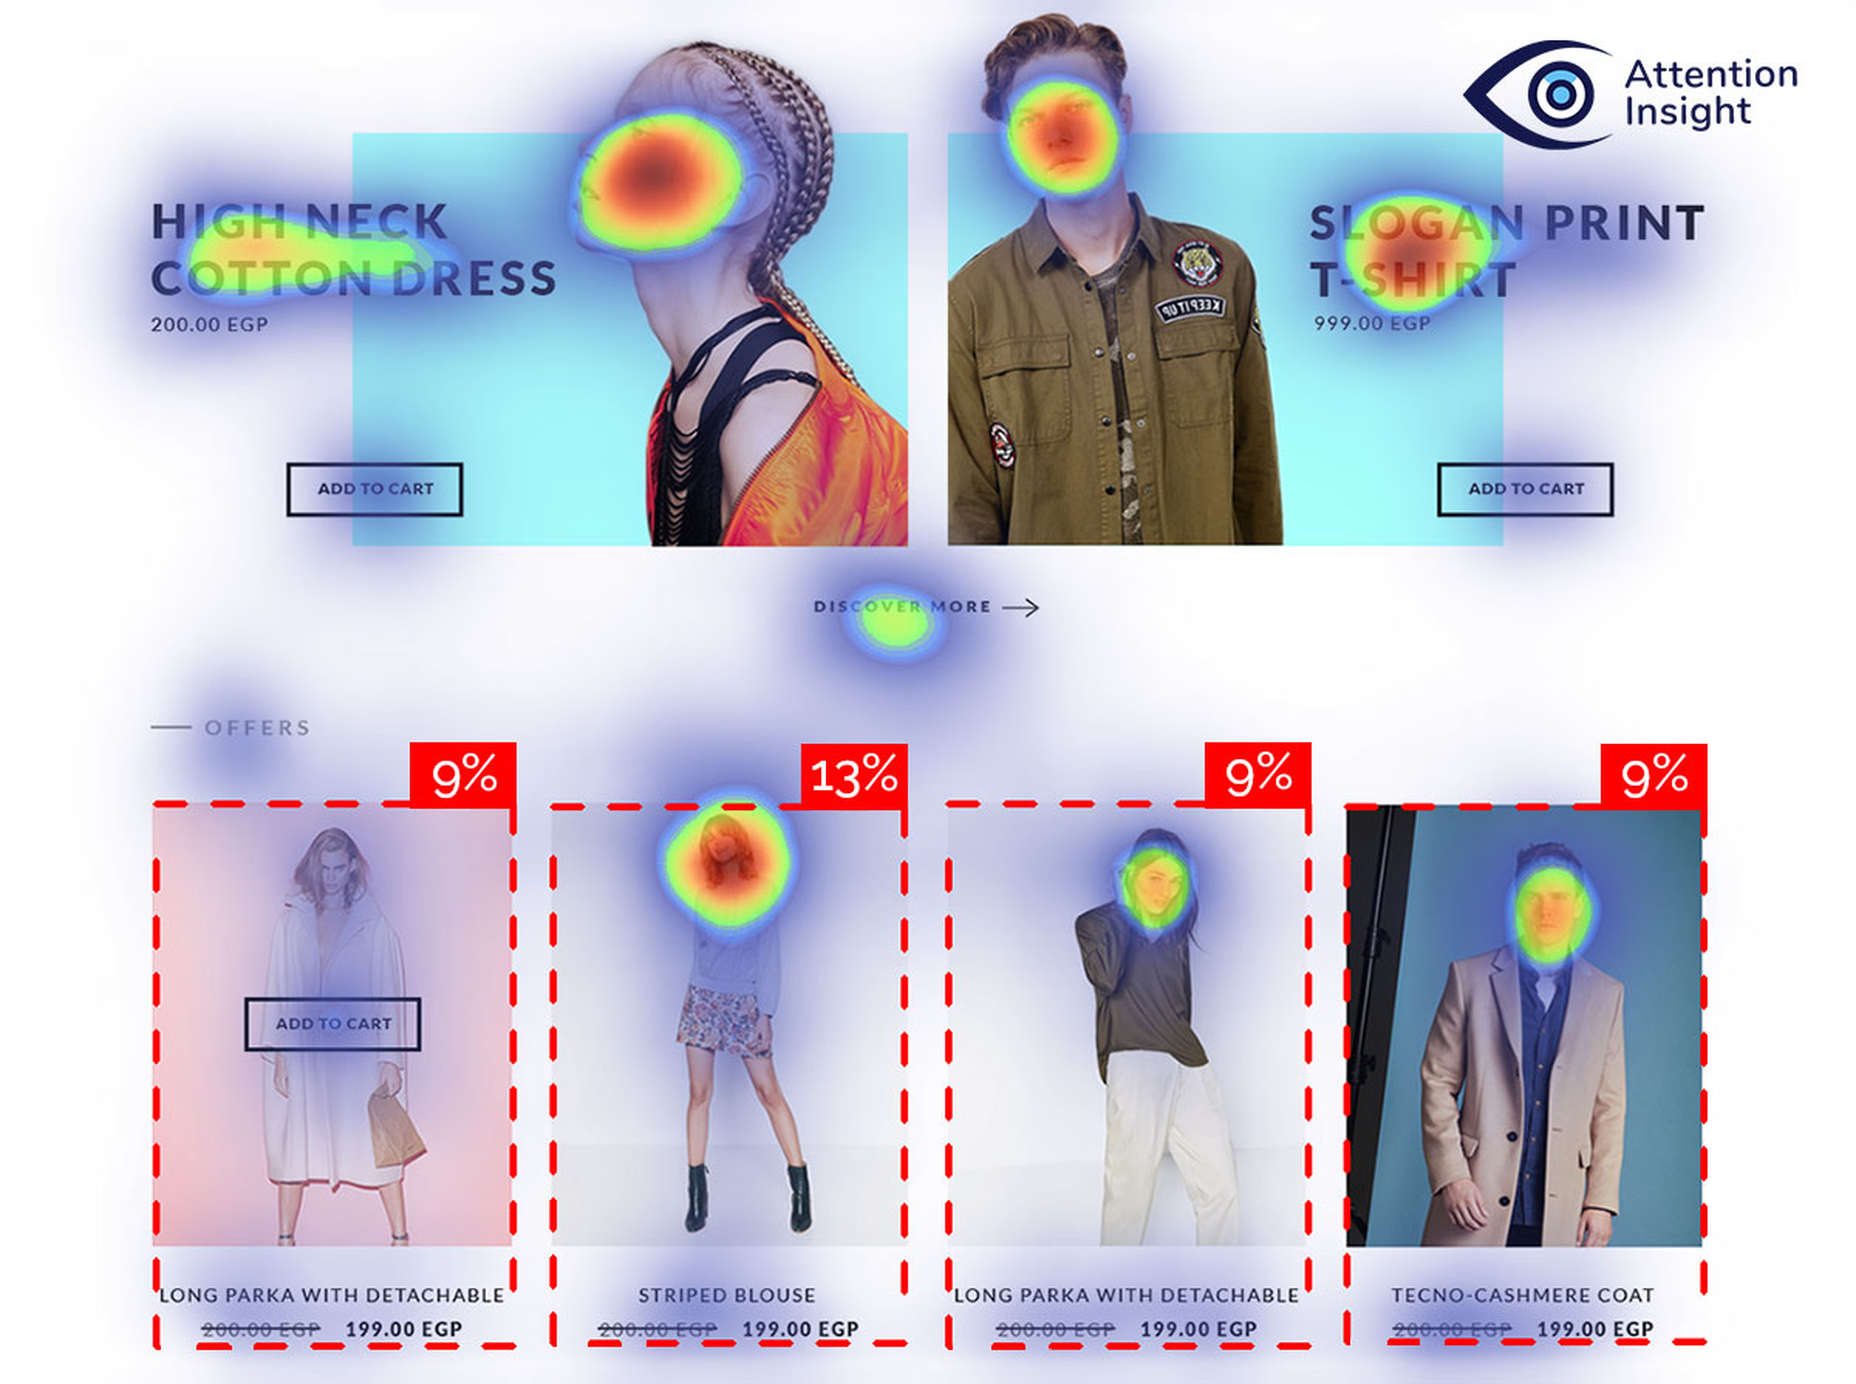
AI-powered attention heatmap

AI solutions for designers and marketers have already become major competitors to traditional eye-tracking studies. Due to active competition, predictive eye-tracking tools are constantly innovating and recently started generating heatmaps for videos. Another useful feature that provides decision-makers with quantitative data is a percentage of attention. Users can define an object that they want to test and get an exact percentage of attention that the object receives.

Conclusion

Since all digital products are competing for user’s limited attention, it has become one of the most valuable resources. Due to fierce competition, it is not enough to rely on your intuition and gut instinct while making important decisions anymore. Designers have a choice in this economy of attention, though.

Yes, there are eye-tracking studies that require a significant amount of time and financial resources.

However, you can make user-centric, data-driven decisions in a quick, scalable, and private way while your product is still under development. AI-powered predictive eye-tracking tools might be an answer. Attention is a new currency, and you must measure it.

Source

p img {display:inline-block; margin-right:10px;}
.alignleft {float:left;}
p.showcase {clear:both;}
body#browserfriendly p, body#podcast p, div#emailbody p{margin:0;}

Source de l’article sur

If we don’t question this kind of design homogenization, do we put ourselves at risk of perpetuating the same mistakes in the years to come? Or is it even a mistake to begin with?
Today, I’m going to look at four things that are likely causing this, and what you can do to break the mold.

1. Education

We used to have a design school in every city in the world, each with its own design style or, at the very least, the encouragement of its designers to be creative and come up with something new.

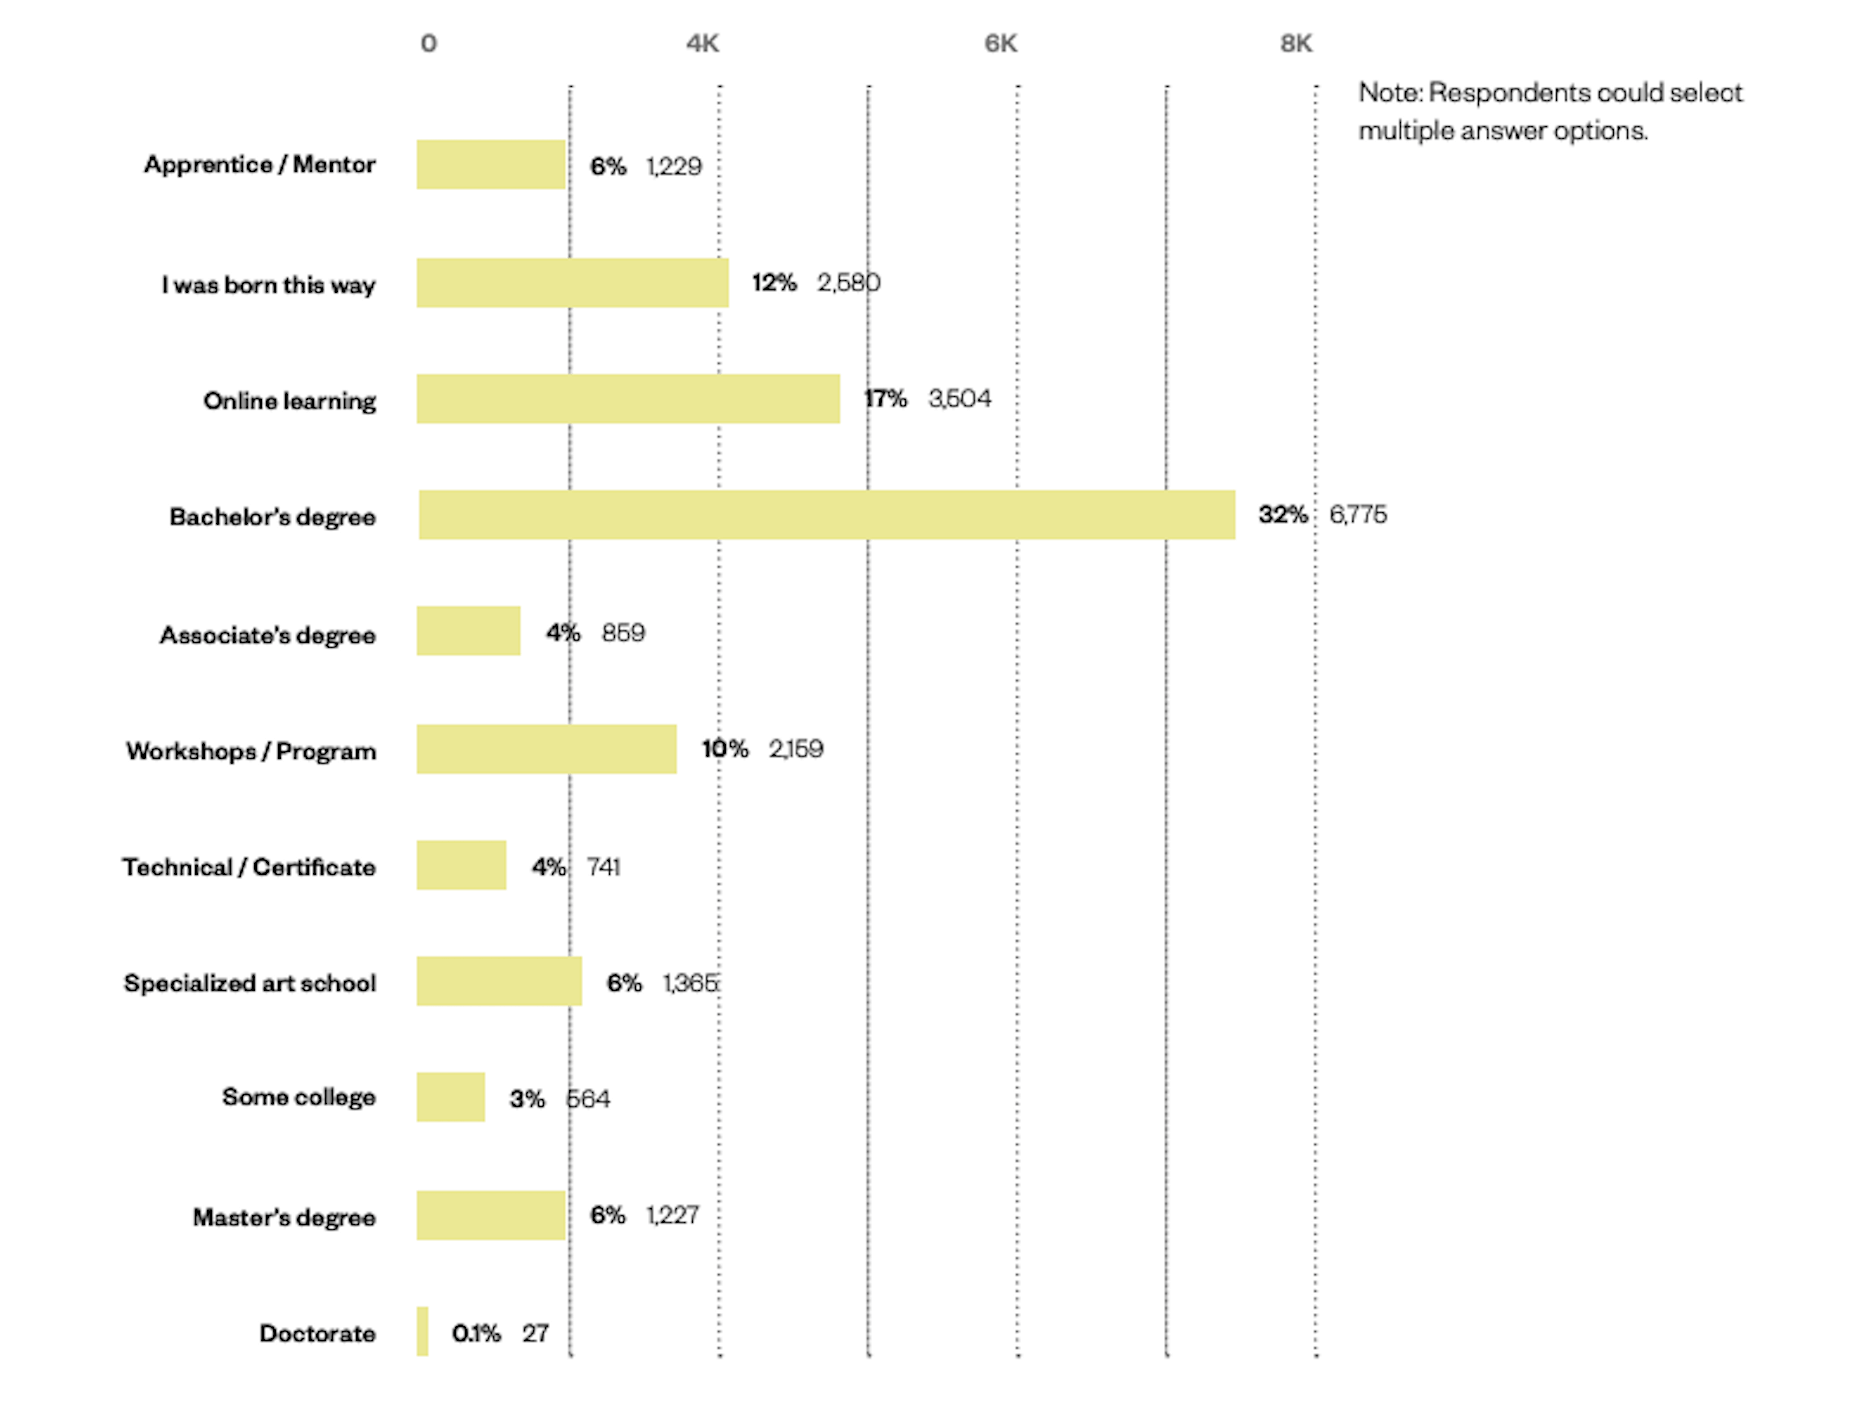
These days, though, traditional design education isn’t as popular as it once was. According to Design Census 2019, only about a third of working designers have a formal education and degree:

The rest have been trained through a variety of means:

  • Online learning (17%)
  • Self taught (12%)
  • Workshops (10%)
  • Mentorship (6%)
  • Certificate programs (4%)

Cost and convenience are definitely two factors influencing this shift towards online learning methods. And with a wealth of resources online to teach them how to design and code, why not go that route? Plus, designers have to keep learning new things in order to remain competitive, so it’s not as though a degree is the be-all and end-all of their design training.

Plus, there isn’t as much demand for it from employers. Unless you plan on working for one of the top global marketing agencies, many hiring companies just want to see proof in the form of a portfolio and maybe have you do a test job.

Now, I’m not saying that online courses and other informal design education don’t foster creativity. However, in order to make them cost-efficient and quick to get through, they have to focus on teaching essential best practices, which means less room for experimentation. Perhaps more importantly, their curriculums are guided by fewer voices. So, this could likely be one of the culprits.

2. Design Blogs and Vlogs

You have to wonder if all the design blogs out there (yes, like Webdesigner Depot) impair designers’ ability to break free from the homogeneity of websites.

I think the answer to that is both “yes,” and “no”.

Why, Yes?

What is the purpose of a web design blog? Mainly it’s to educate new and existing designers on best practices, new trends, and web standards.

By their very nature, they really should be teaching web designers the same kinds of things. Let me show you an example.

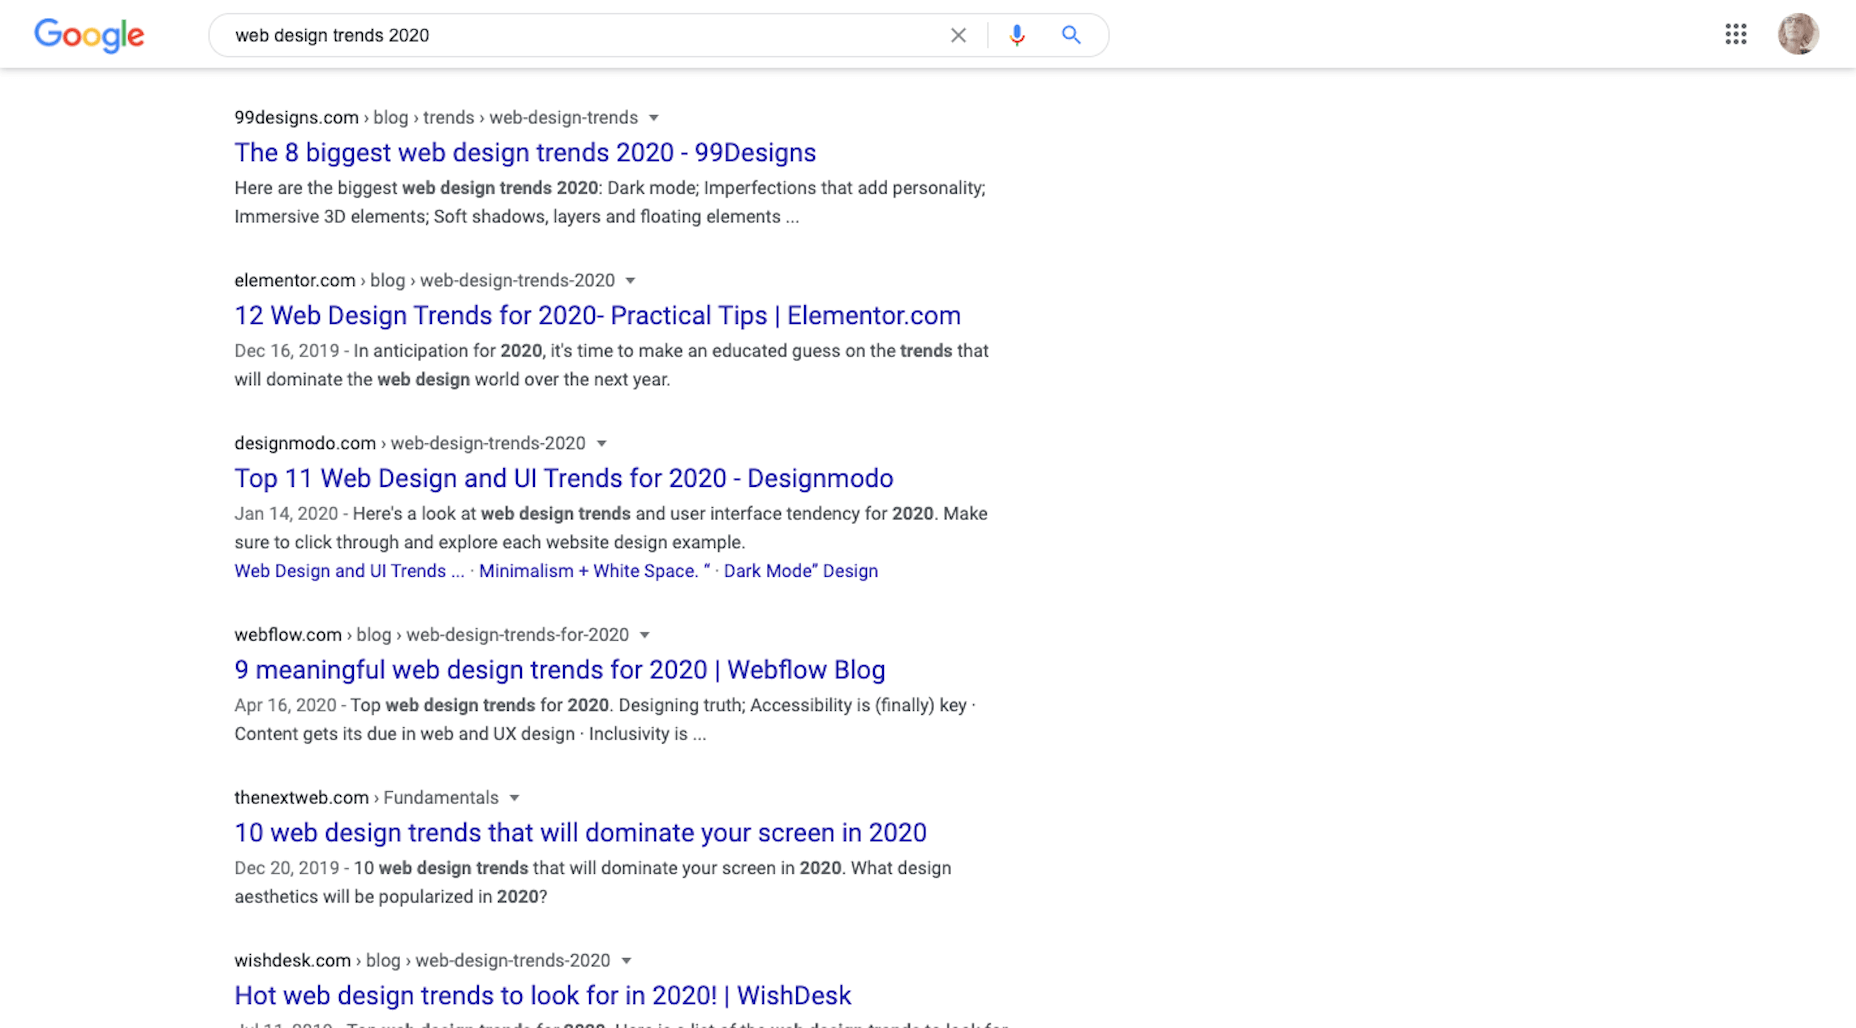
This is a Google search for “web design trends 2020”:

Most design blogs will publish trends predictions around January 1. And herein lies the problem. The writers/designers can only deviate so far from what we know to be true when writing on the same topic… so these sites end up with similar recommendations.

For instance, the top search results recommended similar things for 2020:

  • Dark mode
  • Hand-drawn illustrations
  • Immersive 3D
  • Glowing colors
  • Minimalist navigation
  • Geometric shapes
  • Inclusivity
  • Accessibility

When web designers receive the same guidance no matter where they turn, it’s only logical that they’d end up creating websites that adhere to those same practices.

Why, No?

Because I write for web design publications, I can tell you that there’s a big difference in the kinds of content some of them publish.

For instance, I find that WebDesigner Depot isn’t interested in rehashing what everyone else is writing about this month. We’re given topics that challenge us to think outside the box and present readers with meaningful insights and recommendations.

So, I think that finding design blogs that push the boundaries and don’t just want to recap what everyone else is saying is really important. That’s how web designers are going to master the basic skills they need to succeed while getting inspired to try new things.

3. Designs Tools and Frameworks

This is another one that’s not as cut and dried. I think it depends on the tools used and the intent to use them.

Where Issues Start to Arise

There are certain site builder solutions that you’re going to be hard-pressed to create something innovative with. The same goes with using templates from sources like Dribbble. It’s just the nature of the beast.

If your goal is to create a cheap website very quickly for a client, then you’re probably going to use a cheap builder to do so. With ready-made templates and a lot of the work already done for you, you can create something that looks good with little effort.

When you’re limited by time and cost, of course you’re going to rely on shortcuts like cheap site builders or boring (but professional) design templates.

How to be More Careful

You can run into these kinds of issues with more flexible content management systems like WordPress or frameworks like Bootstrap, too.

Whenever you rely heavily on ready-made templates, pre-defined styles, or pre-built components, you run the risk of someone else’s work informing your own.

The solution is simple: Use demos, templates, UI kits, and so on as a base. Let them lay down the foundation that you work from.

But if you want your website to look different from the sea of lookalikes, you’re going to have to spend much more time developing a unique visual style that’s equally as effective in its mission. Which also means moving beyond clients that have small budgets or low expectations.

4. User Data

Data gathering is an important part of the job you do as a web designer.

You research the target user (or the existing user, when applicable). You look at industry trends as well as the competition to formulate an idea of what you need to build and how you’re going to do it. And you also use resources like Nielsen Norman Group and Think with Google that put out definitive research on what users want.

Even with the most niche of audiences, consumers’ wants and needs are all basically the same. So, obviously, you have to design experiences that align with them. If you deviate too much from what they expect from your site or brand, you run the risk of creating too much friction.

Is This a Bad Thing?

It’s not in terms of usability. If we build simple, predictable and user-friendly interfaces based on data that successfully drive visitors to convert, that’s great. So long as the content remains strong and the UI attractive, there’s nothing wrong with that approach.

But…

This is the same issue presented by templates and site builders. If you do exactly what’s needed and not much more, your site is going to look and act just like everyone else’s. Which comes at the cost of your brand reputation.

Just look at Google’s Material Design. This design system may have made it easier for web and app designers to create new solutions that were user-friendly and responsive, but there was just too much spelled out. And this led to a slew of Material Design lookalikes everywhere you turned.

This is the whole reason why companies take the time to craft a unique selling proposition. Without a USP, brands become interchangeable in the eyes of consumers.

So, again, my suggestion here is to use data to formulate a strategy for building your website. But don’t forget to spend time adding a unique style, and voice of the brand to the site.

Wrap-Up

It seems like, despite all that we’ve learned to do, websites are becoming less and less diverse in terms of design. And I think a lot of that is due to the fact that it’s much easier to design websites today than it was ten, or even five years ago.

Modern-day education, resources, tools, and consumer data take a lot of the questions and the work out of building websites. Which is good… but only to a point.

Unless you’re building websites for clients who have absolutely no budget, you can’t afford to skimp on the creativity and personalization that will set their website apart. Yes, you need to adhere to tried-and-true practices and standards, but beyond that, you should be experimenting.


Featured image uses photo by Kari Shea.

Source

p img {display:inline-block; margin-right:10px;}
.alignleft {float:left;}
p.showcase {clear:both;}
body#browserfriendly p, body#podcast p, div#emailbody p{margin:0;}

Source de l’article sur

I woke up Friday morning at 3 am for the second consecutive day and yet again I couldn’t fall back asleep. The day before was the second and final day of my first experience co-training the new Scrum.org Professional Scrum Master II course. My head is full of new information and experiences which has seemingly created an endless loop in my brain.

I attended the PSM II course myself back in June at a Train the Trainer event at Scrum.org HQ ahead of its launch. It was a privilege to experience the course stewards Barry Overeem and Christiaan Verwijs facilitate the course in a way that I could only strive to reach. The experience was powerful and provided a mirror into my experiences as a Scrum Master. It changed the way I think.

Source de l’article sur DZone (Agile)