Articles

Not so long ago, customers only had a couple of ways to interact with brands. 

If you had an issue with a product or service, you could reach out through the customer service phone number or send an email. Occasionally, sites would introduce dedicated forms on their website that allowed consumers to send support tickets straight to the service desk – but that was it.

The problem with this kind of service was all the waiting. 

Send an email or ticket, and you have no idea when the company is going to get back to you. Customers end up refreshing their inbox all day, waiting for a response. Call the company, and 9 times out of 10, you’ll be placed on hold. You can’t exactly do much when you’re stuck listening to hold music, so customers are gradually getting more frustrated as they wait for a response. 

Fortunately, the evolving digital age has introduced a new solution: live chat.

Transforming Your CX With Live Chat

Live chat is a quick and convenient way for your customers to contact your business and get a response immediately. The result is happier clients, better customer satisfaction scores, and even opportunities for bigger sales. 

More than 41% of customers say they expect to see live chat on a site. 

Even if you don’t have an agent on hand to answer a chat message immediately, you can create an automated system that notifies your customer when someone is available. That means they can go and do other things while they’re waiting for a response. Live chat solutions with bots can even allow your customers to fix problems for themselves. That’s pretty convenient!

Widgets equipped with answers to commonly asked questions can automatically deal with customer queries or help them find solutions to their problems before passing them over to an agent. This means that your customer gets a solution faster, and your agents don’t have as much pressure to deal with. It’s a win-win – as long as you get it right. 

Unfortunately, a lot of companies don’t know how to implement live chat experiences correctly. 

Kayako’s study into 400 customers found that 47% couldn’t remember the last time they’d had a positive experience through a live chat tool.  

How to Upgrade Live Chat CX

The evidence shows that customers love the idea of live chat, but the reality of how businesses implement this technology isn’t always ideal. 

However, since 86% of customers say they’re willing to spend more on a better customer experience, it’s worth figuring out what separates a good live chat interaction from a bad one. 

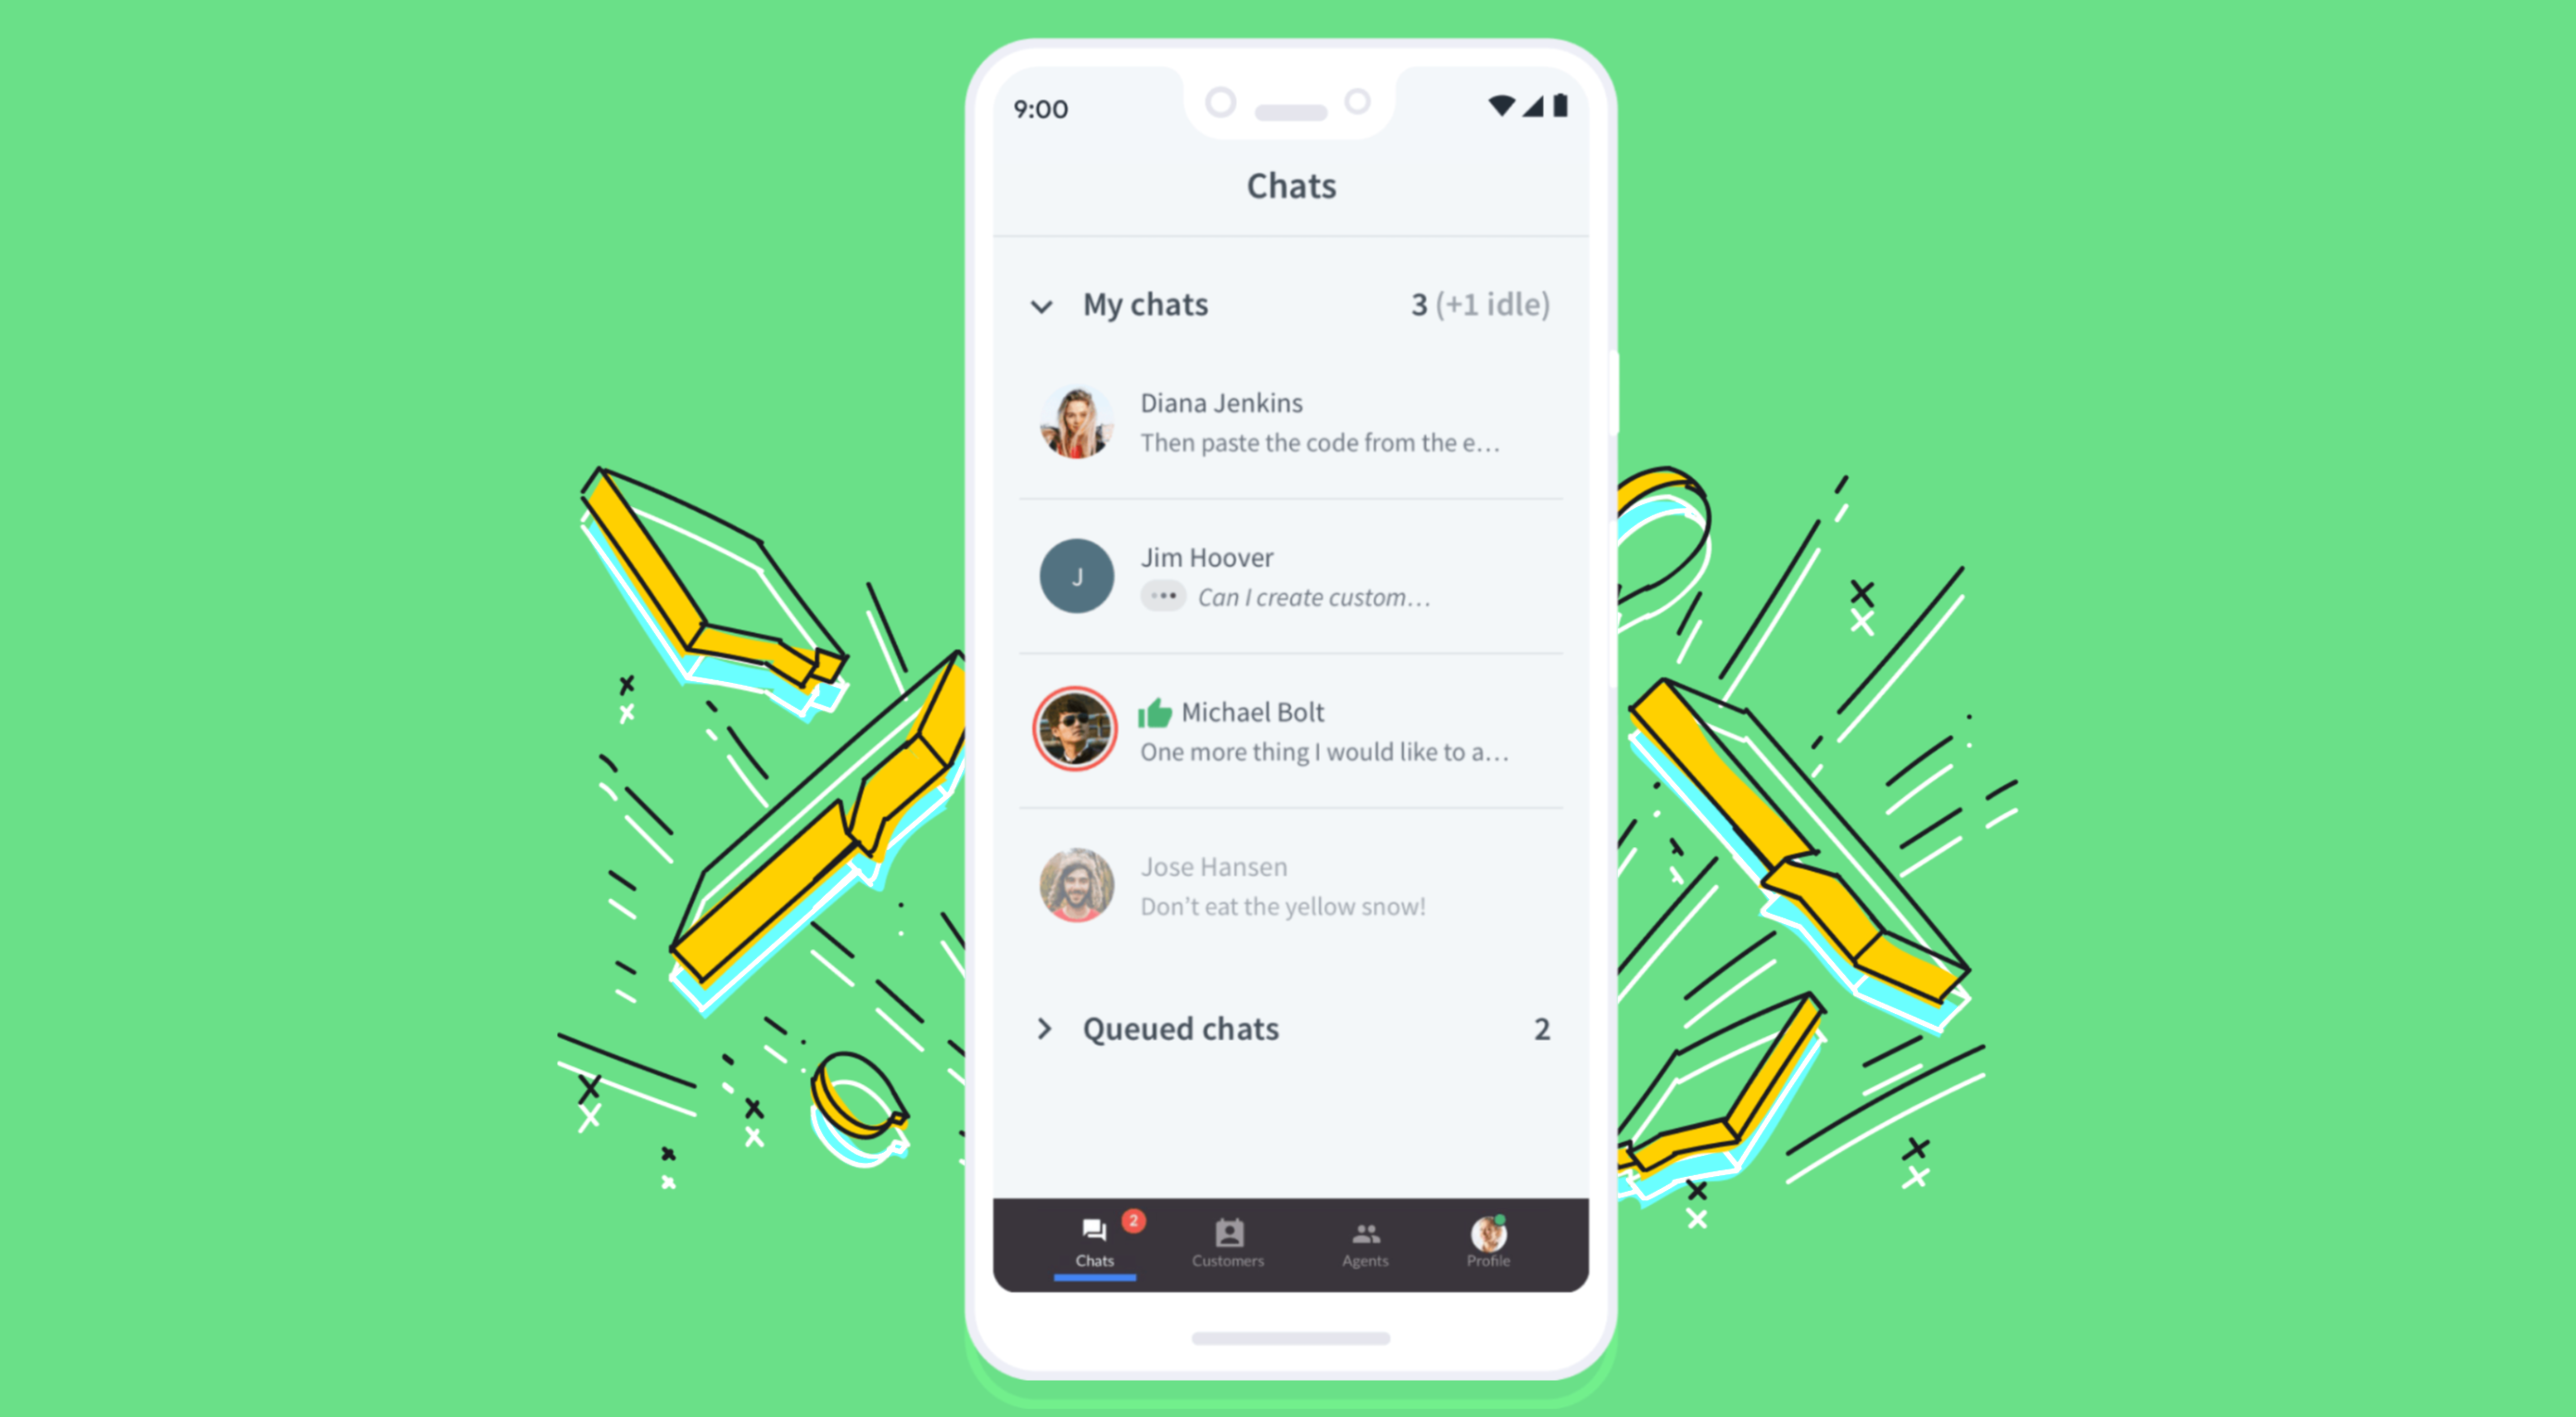
1. Set Expectations Instantly

Setting the right expectations is crucial if you want to generate better satisfaction for your customers at a later date. When customers know what to expect from your live chat strategy, they can also make more informed decisions about which support channels they’re going to use, and whether they want to hang around for someone to answer their messages. 

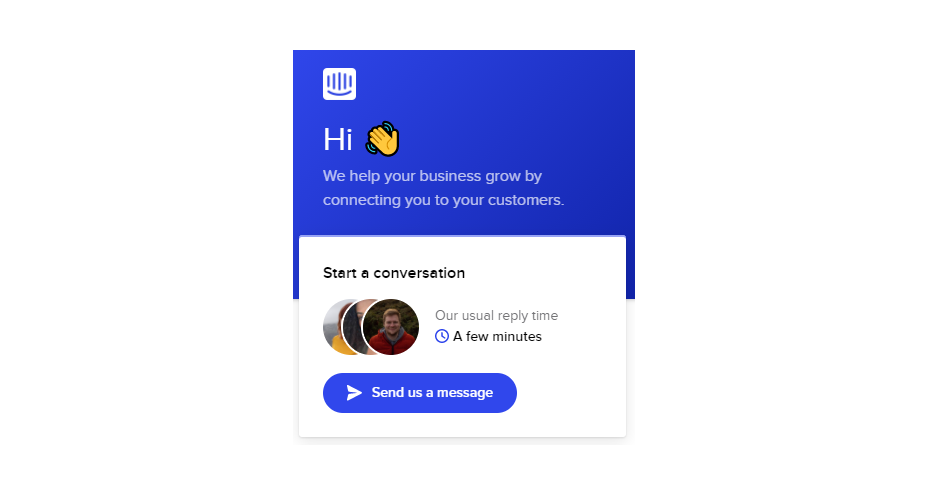
The first thing you should do is showcase your agent’s availability. In this example from Help Scout, you can see whether the team is active, online, and ready to talk. The company also sets expectations for how quickly you can get an email response if you don’t want to chat.

Other ways to set expectations include:

  • Showing your opening hours: List when team members are usually available to answer questions if you’re not currently online. 
  • Topics: Offer your customers some topics that they can ask about or use the welcome message on your chat tool to direct your customers to an FAQ page. 
  • Restrictions: If there’s anything you can’t deal with over live chat, like changing a customer’s password, let them know in advance so they don’t waste time.

2. Leverage Pre-Chat Forms

Pre-chat forms are some of the most important parts of the live chat experience. They ask your customer to explain their issue to your chatbot so that they can be directed towards the right agent. Using these forms correctly ensures that your agent has all the information they need to solve a problem fast. 

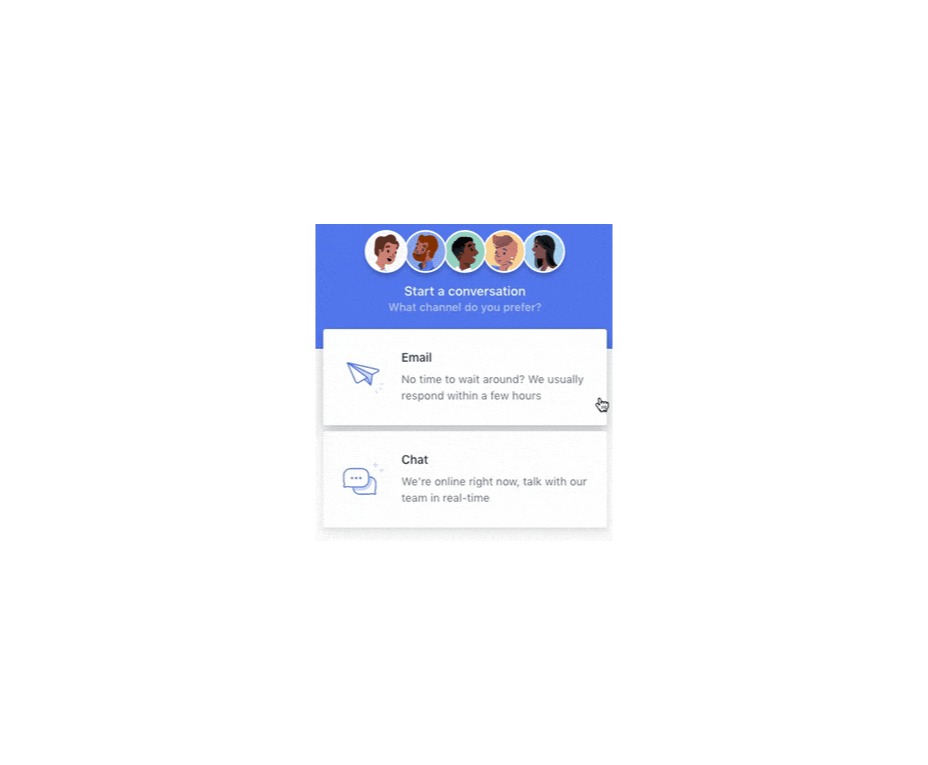
You can even set up automated systems that direct customers to different agents and teams based on their needs. For instance, the live chat app on Outgrow.co gives customers the option to fill out different forms depending on whether they want answers to a question, a demo, or something else.

The button you click on dictates which professional you’ll get through to. Although filling out a form can seem like an extra friction point for your customer at first, it helps to streamline the customer journey. After all, if you can direct the customer to the right agent the first time, there are fewer chances that they’ll need to explain their issue to various different people. 

Here are a few things you can ask for in the live chat form to make it more effective:

  • The customer’s name: This will help to personalize the conversation. It could also be an opportunity to track down any background information you have about an existing customer and the orders that they may want to speak to you about.
  • An email address: Having an email address will allow you to bring up a customer’s record on your CRM. It also means that you can send any information that the customer needs to their email inbox at the end of the conversation.
  • A brief explanation: Ask your customers to share what they’re reaching out to you about and use keywords in their message to assign the chat to the right agent or professional. You could even add a drop-down menu of topics for them to choose from. 

Remember, don’t ask for too much information straight away, or you’ll risk your clients feeling that the service experience is too complicated. 

3. Make Sure It Works Everywhere

We’ve reached the point now where every customer expects a brand’s website to be responsive on any device. Most web-building templates automatically work on mobile tablets and smartphones. Additionally, it’s becoming increasingly easy for companies to transform their website and online store experiences into dedicated apps too. 

However, while most businesses know that their site needs to be responsive, they often forget about the mobile element when it comes to live chat. If your live chat function is only available on the web browser version of your website, then this is going to end up making your mobile customers pretty unhappy. They don’t want to have to stop browsing on their phone just to connect with you. 

Ideally, you’ll want to create a separate component for your mobile app where your customers can easily access the same live chat functions they’d have on your browser-based site.

If you’re just offering live chat through a mobile version of your website, make sure that it’s easy for your customer to click into the chat section and send messages without accidentally ending up on a different tab or page. It might also be worth setting up functions that allow your chat app to send push notifications to your customer’s phone whenever they get a new message. 

Being able to put their smartphone down or switch to another app while they wait for a response will provide a much more intuitive experience for your audience. 

4. Make Sure You Support All the Right Languages

You’d think that this CX tip for live chat would be obvious, but it’s shocking how many companies fail to offer support for all the languages that their customers might use. If you’re selling your products throughout the world, and you know you have customers in China, then it doesn’t make much sense to only offer live chat in English. 

Some of the available live chat apps on the market today come with features that allow you to automatically translate languages when your agents are talking to foreign customers. For instance, LiveChat currently supports 45 languages

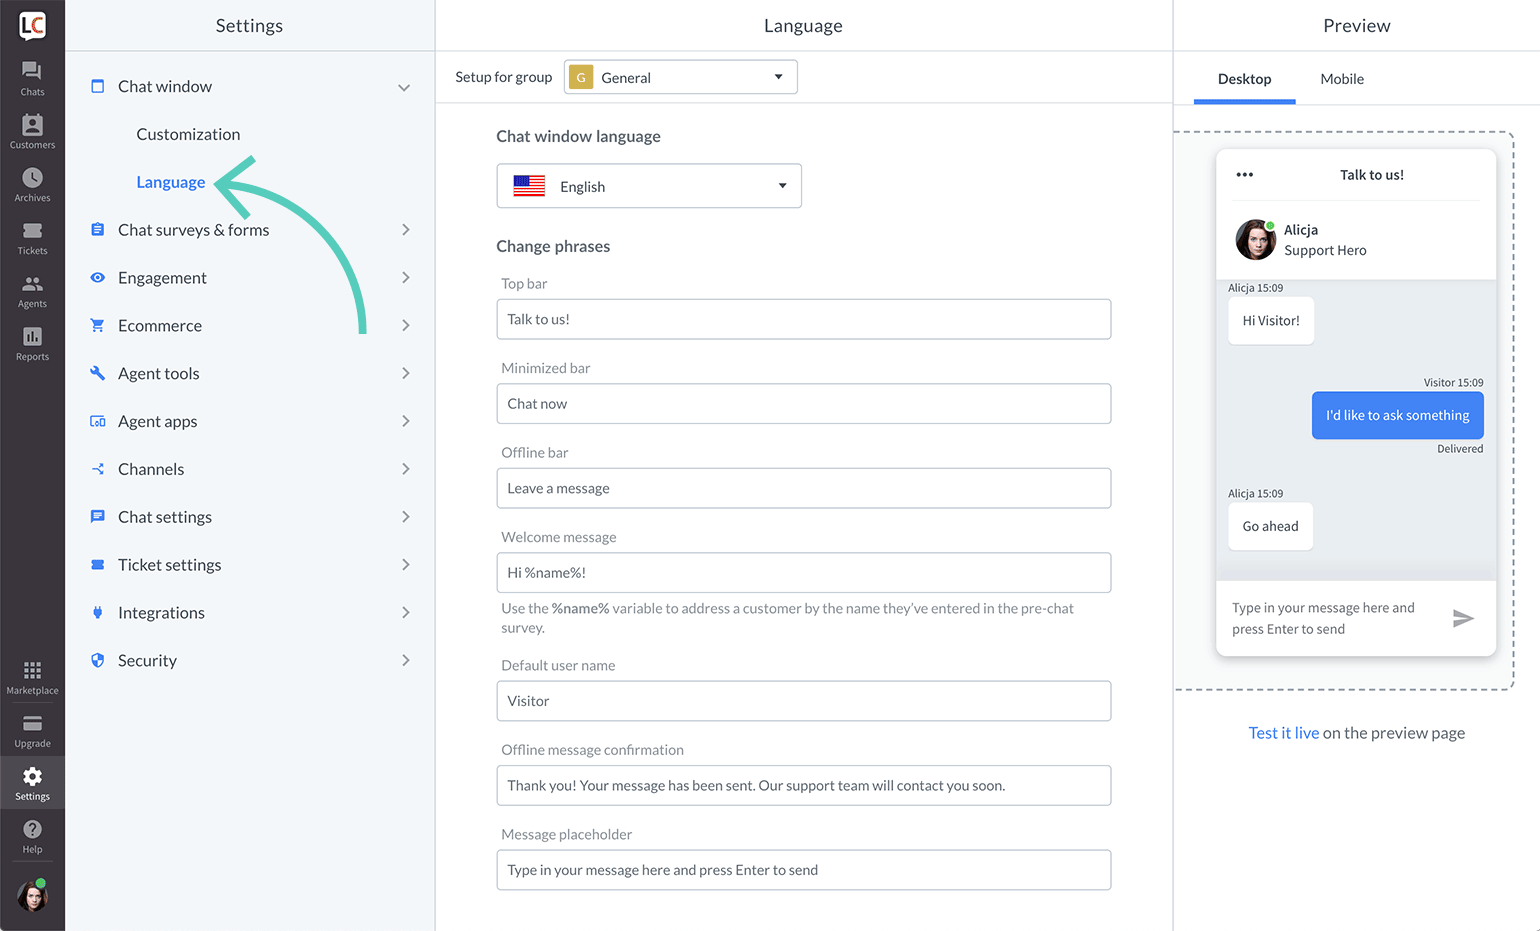
If you’re creating your own chat app from scratch, then you’re going to need to work with your developer or designer to make sure that the right languages are supported. Remember, you don’t have to cover everything, but at least make sure that you can connect with the most common groups of customers in your CRM. 

Ensure that if you are using multiple languages, your customers know how to switch to their preferred option too. Usually, the best way to do this is with a drop-down menu. You could also use little flag icons of the countries that you support. 

5. Find Ways to Reduce First Response Time

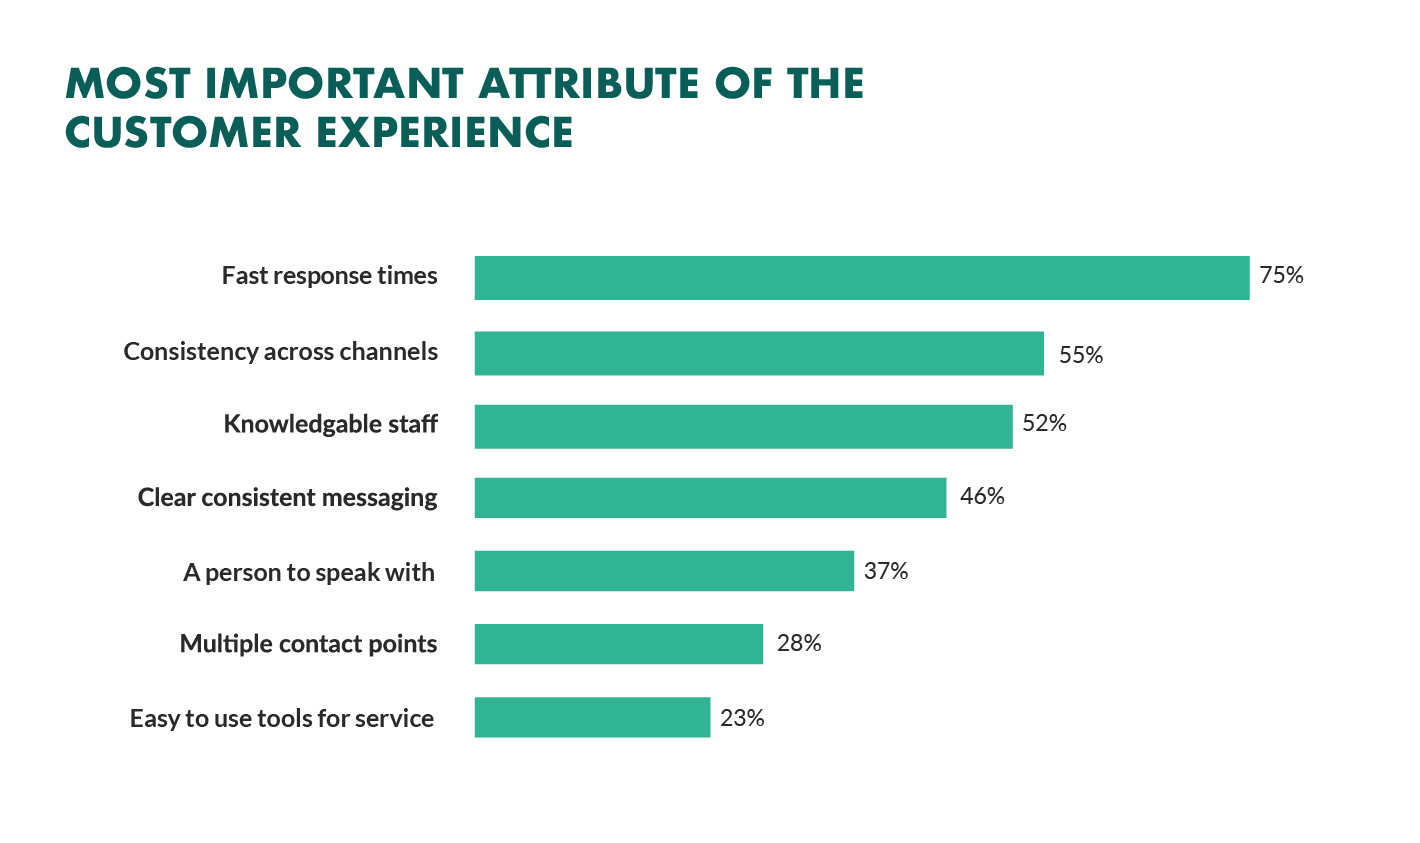
Speed is probably one of the biggest advantages of live chat, and the main reason that customers like it so much. According to the CMO council, fast response time is the number one thing that a customer looks at when measuring satisfaction. 

While you might not be able to have someone on-hand to answer your customers 24/7, you can improve the way they perceive your load times in a variety of ways. For instance, start by making it clear when your people are online to talk to your customers. Setting expectations on when you’ll be available to immediately respond should help to avoid frustration.

  • Keep all chats in the same place for agents: Having a combined contact center solution on the back-end makes responding to queries much easier for your agents. If they can see all of your brand’s live chat, social, and email conversations in one place, they don’t have to waste time jumping between different platforms and tabs. 
  • Set routing queues: Use an automated system to send every message you get to the most appropriate agent available. You can intelligently route conversations based on the issues that your customers have or the things they want to discuss. It’s also worth ensuring that your system prioritizes routing conversations to the first agent available. 
  • Send notifications: Make sure that you set your live chat system up to send push notifications to agents when a new message is waiting. It’s also with notifying your customer when they have a response, just in case they’ve switched to another tab. 

The notifications you send to your agents could come with access to a customer’s CRM file, so that your agent can go into a conversation with the context they need. Agents that instantly get context on a conversation don’t have to waste as much time tracking down the right information. Giving your agents context also means that they don’t have to ask repetitive questions, which could annoy your customer. 

6. Make the Chat Experience On-Brand

Every company wants to give their customer a slick experience with live chat. The solution you build needs to be easy to use, and responsive across every device. However, it also needs to be something that your customer associates with your brand. 

Companies generally have a lot of options for how a live chat window can look. You can adjust the appearance to suit your brand by picking specific colors, tweaking button shapes, and even changing the available fonts. 

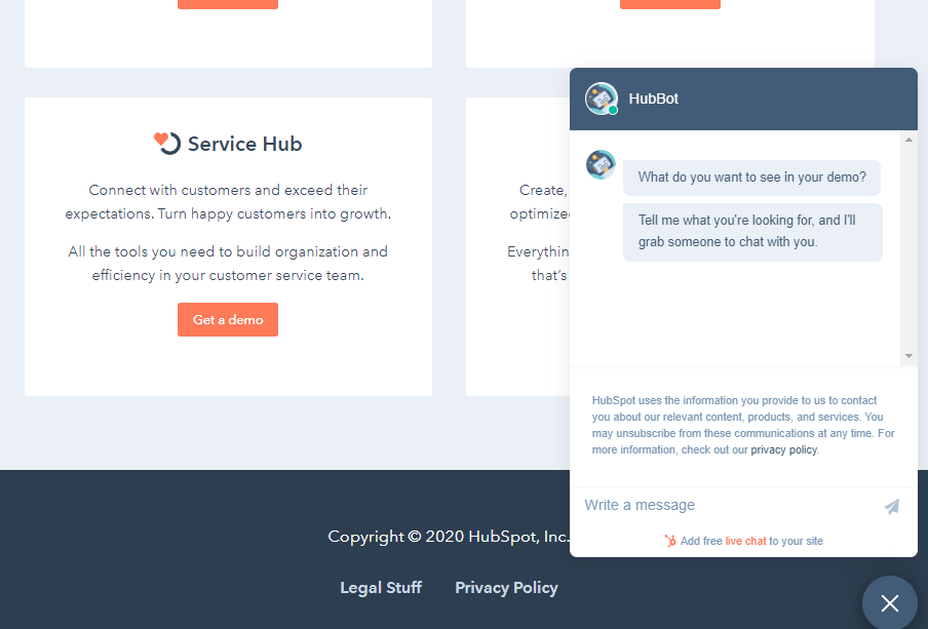
Working the visual elements of your brand into the design of the live chat experience is the best way to make your customers feel comfortable and confident that they’re dealing with your company. For instance, Hubspot uses matching colors, rounded edges on chat bubbles, and even a fun illustration to make their chat experience more “branded.”

Remember, when you’re creating a Live Chat experience that’s “on brand”, it’s also a good idea to think about things like voice and tone. Infusing live chat with the unique personality of your brand will make the experience more memorable. 

If you usually stick with informal language and use a lot of slang, then it makes sense to continue that in live chat – even when you’re sending automated messages. To make sure your brand identity really shines through:

  • Write scripts for your automated messages in your brand’s tone of voice
  • Write guidance scripts for employees that highlight your tone for agents
  • Provide training on brand tone of voice for your support team
  • Encourage support agents to connect with customers on a personal level
  • Remember to set guidelines on how to use things like gifs, slang, and emojis too!

7. Make a Checklist For Security and Tech Issues

One of the most significant things that will affect the experience your customer has with your live chat service, is technical and security issues. Choose the right developer or designer to help with your app, and the risk of problems dwindle. You can also address the issue of having to constantly maintain, check, and update your live chat experience by using a pre-existing solution, like Intercom.

No matter how you choose to approach live chat, these are the things you’ll need to check for most:

  • Page load times: Page load times are crucial for user experience and SEO, so you should be taking them seriously already. Check your web chat software isn’t dragging down the performance of your page or causing unnecessary problems.
  • Cross-channel conversations: If your website has various subdomains, make sure that moving through these in chat won’t mean you lose the session. Customers don’t want to have to repeat themselves!
  • Functionality with browsers: Your chat app needs to work just as well on every browser and operating system – including mobile devices. 
  • Data management: Under things like GDPR, you need to ensure that you’re controlling user information safely. Ensure you have a DPA in place, and make sure that your web channel doesn’t affect any PCI-DSS compliance systems you have in place. Your chat solution may need to automatically mask credit card information, for instance.

Time to Enhance Your Live Chat Strategy

Ultimately, whether you like it or not, your customers love live chat technology, and they’re not going to stop looking for it on your website. Today’s consumers expect you to serve their interests by delivering customer support on the channels that they choose. Unfortunately, most companies just aren’t living up to expectations.

Following the tips above could help you to transform the way that you interact with your clients and improve your chances of better satisfaction overall.

Source

The post 7 Tips for Transforming CX with Live Chat first appeared on Webdesigner Depot.


Source de l’article sur Webdesignerdepot

We had a request from a customer asking us if they could implement different integration logic depending on the header of a HTTP request. 

In this use case we will accept a payload via HTTP, inspect the header of the request and then depending on the value in the header, write the payload to a SQL database. 

Source de l’article sur DZONE

Content is the king of the digital world. This is an undisputed fact among marketers and business owners alike.

However, not all content is created equal. Interactive content is a more immersive form of marketing specifically intended for the digital age. Great for companies that need to develop deeper relationships with their audience. 

There are various kinds of interactive content for brands to explore these days. For example, you can create a poll where your customers vote for certain answers to questions. In addition, some companies hire developers to build immersive gaming experiences with prizes and rewards. 

Even standard content like blogs and articles can become more interactive with things like animations, buttons, and elements that ask visitors to do something. 

One of the most valuable forms of interactive content is the quiz. So, how can companies use quizzes to engage their audience effectively? Let’s find out…

The Benefits of Quizzes in Interactive Content

According to studies, 93% of marketers believe interactive content is extremely effective for educating and entertaining customers. Interactive content is meaningful because it’s engaging, and many marketers state that creating engaging content is one of their toughest challenges. 

In an environment where the average attention span is constantly dwindling, interactive content reduces the risk that your customer will end up being distracted by something else before they have a chance to convert on your website. 

Quizzes are an excellent form of interactive content, but many marketers don’t take full advantage of them yet. Quizzes, like some other forms of interactive content, can come in different styles. For example, you could have a personality quiz that tells your customer what kind of vegetable they would be. That might sound odd, but it helps to give your customer a sense of belonging, gives them a feeling of being understood, and offers entertainment. 

Some quizzes can answer questions for your customer. 

For instance, a quiz on “what to buy your dad for father’s day” is an excellent way to solve a customer’s problem while guiding them towards potential products that you sell. 

Z Gallerie, a retail company, launched a quiz called “What is your Z Gallerie Style personality?” The quiz offers a personalized recommendation experience on what to purchase for every current and potential customer. 

The personality quiz became a great way of bringing product recommendations to leads without being pushy. Z Gallerie could, therefore, consistently provide a unique experience to each customer based on their results. 

So, how do you make a quiz that’s really effective for your content marketing plan?

Step 1: Creating the Quiz

Quizzes are a kind of interactive content that can almost feel like a conversation with a brand. They’re an opportunity for you to show your audience how well you understand them. 

According to TryInteract, people take quizzes because they want to know themselves better or want to confirm what they think they already know about themselves. These content solutions solve problems, even if they’re handling a person’s curiosity about what kind of celebrity they’re most like. 

Before you start making your quiz, you need to know your goal and what you’re trying to do for your audience. If your goal is to get more people to feel more attuned to your company, you might need to create something that demonstrates how well you know your visitors.

The goal for the company is to demonstrate a deep knowledge of the industry and target market. If the quiz is helpful and informative, it adds to the brand’s credibility and makes it more likely that customers will want to continue purchasing.

Before you build your quiz, ask yourself:

  • What do you want to get out of your audience taking this quiz? (More conversions, better brand loyalty, improved engagement?)
  • Why would your audience want to take the quiz? (Is it relevant to their interests, will it give them some vital information?)

Knowing exactly what you and your audience should accomplish with the quiz will give you a good platform to begin building on. 

Step 2: Choose the Title and Quiz Type

Titles are important in any content marketing. 80% of readers decide whether to check out an article based on its title. The same process is common for people who want to decide whether they should take a quiz or not. 

There are a lot of great ways to pique your visitor’s attention with a quiz title. For instance, you could challenge your audience to prove their knowledge with the word “actually.” For instance, “How much do you actually know about Kale?” That kind of title immediately appeals to the competitive nature of the human being. 

Another great example of a challenging title is to tell your audience that they can’t do something. Buzzfeed did that with its millennial quiz. The great thing about this quiz title is that it speaks to the competitive nature of the reader but also gives that reader a chance to show that they belong to a specific community. 

Another option could be to ask a question and hope that curiosity will do the rest of the work for you. For instance, “Which celebrity chef are you most like?” The key to success here is understanding your audience and knowing exactly what they most want to know. 

Once you’ve figured out the title, choosing the kind of quiz you want to create is the next step. For instance, you can try:

  • Personality quizzes: People like hearing good things about themselves because of a psychological phenomenon called self-serving bias. A personality quiz that recognizes the features your customers like about themselves will make them feel happier and more connected to your brand.
  • The knowledge test: Commonly found on social media, these quizzes challenge a person’s knowledge on a specific subject. The benefit here is that your audience can learn something and share their knowledge with their friends for social points. This quiz from Unicef is an excellent example of the “knowledge” style quiz.

Step 3: Crafting Quiz Questions

Once you have a good idea of the kind of quiz you want to create and the title you’re going to put alongside it, you’ll need to begin bringing your interactive content to life. That means designing the right questions. 

Writing questions for a quiz is just like creating any excellent content. First, you need to keep your target audience in mind. Next, think about the kind of personality you’re trying to appeal to. Breathing some life into your quiz by injecting your unique sense of personality into it will be an excellent way to strengthen your bond with your customers. 

Other tips for making the most of your quiz questions include:

  • Use visuals in your questions: Having text-only questions is fine in some cases, but it’s worth looking into images too. Using pictures helps to keep things relevant and interesting and makes your quiz feel a lot more immersive. 
  • Don’t make questions too long: In-depth and complicated questions will only scare your audience away. Remember that they’re looking for something fun and lighthearted to do. This means that your questions should be as short as possible. 
  • Make it interesting: Don’t just ask basic questions like “what’s your favorite color” try to go beyond what your customers usually see on quizzes and make it relevant to the quiz topic. Again, this is your chance to show your audience how much you know.

Step 4: Creating Results That People Want to Share

If you want to design a quiz that really blows your audience away, then the results are one of the most important things to focus on. The results you offer your customers dictate whether they enjoy your quiz so much that they want to share it with other people. Creating share-worthy results is how you boost your chances of finding new customers and even going viral. 

So, how do you design results that people want to share? Start by helping your customers to feel positive about themselves. The results should make them feel like a better person or confirm the good things they already believe about themselves. Research tells us that positive emotions are more likely to promote sharing

For instance, this quiz from the PBS company makes people feel good by demonstrating that they know their books. This confirms a customer’s idea that they are well-read.

Using share-worthy images is another way to improve your chances of designing results that people want to share. You’ll need to use interesting pictures here that speak to your audience. Bright and entertaining pictures will make results more eye-catching on a social media feed. 

Don’t forget to include a call-to-action on your results page too. It’s always helpful to give your audience a nudge in the direction you want them to move in. Providing a call-to-action that asks your customers to share their results increases your chances of positive sharing behavior. 

Step 5: Know How to Distribute Your Quiz

Once you’ve put all of the essential components of your quiz together, the next step is ensuring you can distribute that quiz and share it with as many people as possible. For instance, you can promote your quiz on social media to reach more possible customers. Twitter and Facebook are always great places to get started but don’t be afraid to experiment elsewhere. 

Sharing snippets of the quiz experience in an Instagram Story could be a great way to generate engagement or posting a picture on your Instagram feed. 

When promoting your interactive content on social media, use an attractive image to highlight the experience and ensure you make that captivating headline stand out. Share both the caption and image with a shortened link to measure results. Shorter links are more likely to attract audience attention and encourage sharing later. If your links are too long, they can end up looking spammy or unprofessional. That’s not the image you want to build with your quiz content. 

If you need an extra boost for your quiz, promoting through Facebook advertising could be the ideal solution. Paid ads are a great way to get extra attention, but you need to choose your target audience carefully. Select your audience according to demographics, behaviors, connections, and locations. 

Remember that Facebook gives you plenty of opportunities to track down the kind of customers you want to speak to. Creating a custom audience could be a handy step too. This is always useful if you have a lot of information from an email list or a collection of contacts you’ve generated over time.

Step 6: Following Up on Your Quiz

Once you’ve successfully attracted people to your quiz experience, the next step is to follow up on the leads you’ve hopefully collected. When designing a quiz, it’s always a good idea to ask your customer for their email addresses before you give their results. This ensures that you can collect plenty of leads in the long term for nurturing purposes. 

Marketing company, The Foundation, designed a quiz that asked customers whether they had an entrepreneurial mindset. The quiz was based on an existing eBook offered by the company. The quiz, combined with a Facebook ad campaign, helped the business collect new leads to advertise their ebook. The Foundation managed to reduce its cost per lead from $6 to $3.80 using this method. 

When following up on your quiz experience, make sure that you get the tone right. The first thing you need to do is thank your audience for taking the quiz in the first place. After someone opts in and offers their email address, send a quick email that shares their results and says “thanks.” 

After a couple of days, you can follow up on your thank you email by asking your audience to retake the quiz or take a new one. Encourage these repeat customers to share their testimonials and gradually introduce more interesting content you have that’s connected to your quiz. For instance, if you create a quiz to determine whether someone has an entrepreneurial mind, you could advertise articles that cover similar topics. 

Finally, after regular engagement from your audience, you can begin to implement strategies that might convince your audience to purchase your products. This could mean showing off your entrepreneurial eBook, asking someone to sign up for a webinar, or something else entirely.

Don’t forget to track the performance of every quiz too. Examining metrics like click-through rates for your quiz advertisements and conversion rates will help you see which quizzes generate the most attention and action from your intended audience. 

Time to Add Quizzes to Your Interactive Content Strategy?

A content marketing strategy is one of the best ways to engage with your audience and strengthen your position in any industry. The right content demonstrates your knowledge, develops trust, and helps you to attract new customers. With interactive content, you can take the relationship you build with your audience to the next level. It’s your chance to engage with your customers and create an emotional relationship. 

Quizzes are one of the most effective forms of interactive content, and they’re also one of the easiest to implement into your existing strategy. It doesn’t take a lot of time or money to create a good quiz, and you can usually find tools online to help you with things like structure and formatting. You could even hire a professional to design a quiz for you. 

Once you’ve got the kind of quiz that’s really going to interest your target audience, the next step is distributing it in a way that generates as much attention as possible. Remember, you can advertise on social media and various other channels. However, it’s also helpful to pay attention to your options for helping do your promotion for you. For example, many customers will be more than happy to share quiz results that confirm the identity they’re trying to build online.


Featured image via Unsplash.

Source

The post How to Use Quizzes More Effectively in Interactive Content first appeared on Webdesigner Depot.


Source de l’article sur Webdesignerdepot

In my experience, the biggest challenge that freelancers face — more than winning clients or setting prices — is project management; take on too much work, and you’ll start missing deadlines, take on too little, and you’ll start missing your rent.

Some people are naturally organized; they rock up at their desk at 08:59, fully confident in what they will spend the next 8–12 hours working on. Let’s be kind and say that I am not one of them, and leave it at that. The only way I have managed to survive the industry is by self-consciously micro-managing my schedule on a daily basis.

When I worked in an agency, I knew what I would be working on days in advance. Now, I know 90% of what I’ll be working on, weeks in advance.

That level of organization requires very, very, very careful planning. I hold team meetings at the end of the day, yes, “team” meetings of one person. To do that I use a number of tools that suit me.

How to Choose a Project Management App

The most important aspect of any project is the end. That’s when the client will assess your work, and that’s when you get paid. So when you choose a project management solution, make sure it gives you a clear path to the project conclusion.

I know one freelancer who sets himself a hard stop at 7 pm every day. At 7 pm, he downs tools switches off, and walks away. I once heard him end a client call at 7 pm because he’d reached his cut-off point. It made me wince — I would have stayed on until the call concluded — but it hasn’t affected his business.

I know another successful freelancer who works on a budget. When she has earned the money she needs for that day, she stops. She bills by the hour to make this work, so when she sits down in the morning, she knows exactly what time she’ll finish.

Personally, I prefer a task-based approach. I know what I have to get done; if I can get ahead, then great, but my main focus is ensuring I don’t fall behind. I believe that if you hit your deadlines, everything else will take care of itself. Admittedly, there have been a few late-nights (and all-nights) over the years, but thankfully they’re less common these days.

No one style of project management suits everyone. And it doesn’t matter what approach you take, provided you take an approach.

8 Best Project Management Apps for Freelancers

As a freelancer, the most important thing characteristic you can have is reliability. Cultivate a reputation for delivering on your promises, and you’ll become invaluable to your clients. The best project management app is the one that helps you keep your promises.

There are some excellent tools on the market that facilitate project management, but most are aimed at SMEs, or project managers running a team of freelancers.

The tools here are listed from least, to most useful for the average freelancer. I’ve avoided too many time-tracking apps because I find these tend to encourage billing by the hour, which is potentially damaging to your business long term. If you do need pure time-tracking, check out Harvest. I’ve also avoided solutions that are too large-scale to benefit freelancers. If you’re looking for a project management tool for teams, then Basecamp, Jira, Project.co, and Redbooth are all worth considering.

Sadly none of these apps are perfect, and there’s a good chance you’ll need to use two or three to manage your projects.

8. Todoist

Todoist is hands down the best to-do app on the market. The downside is that its feature set is minimal.

Todoist really excels at lists. You can break down tasks into sub-tasks, and sub-sub-tasks. The downside is there’s no real scheduling or comparison of multiple projects in a single view.

The mobile apps are great, and Todoist recently introduced boards, a form of kanban board that gives you a good overview of everything. If it introduces a gantt chart, I can see myself relying on it more.

Todoist has a free forever plan that is fine for most freelancers, and the paid plans start at just $3 per month.

7. Bonsai

Bonsai is an excellent service for freelancers that grew from a simple invoicing app to include proposals, contracts, time-tracking, and more.

I used Bonsai for invoicing for a couple of years, and it does everything it claims to do. However, there are a couple of significant areas where it falls down. Firstly, its invoicing is super-aggressive and cannot be customized — make sure you’re on friendly terms with any client you send a Bonsai invoice to. Secondly, while it does a good job of tracking what you have done, it doesn’t help you plan what needs to be done beyond a formal proposal.

If you’re running a few simple projects, then it’s possible Bonsai is right for you. Pricing starts at $19 per month.

6. Monday

Monday is one of the biggest players in the project management market. It offers a dizzying array of options, and if this list were aimed at project management for agencies, Monday would be further along our countdown. Monday may suit freelancers, particularly those who have migrated from agency work, but for most, it’s more than we need.

There is a free-forever plan that covers almost everything you could want. However, if you need to view your projects as a gantt chart — and I strongly suggest you do — then you’ll need to update to the standard plan, which starts at $8 per user per month, with a minimum of three seats, meaning at least $24 per month when billed annually.

5. AND.CO

AND.CO stands out as a slick, easy-to-use option for managing a freelance business. Like Bonsai, it allows you to manage proposals, invoicing, time-tracking, expenses, and more.

AND.CO also has extremely well-liked customer support. An underestimated consideration when you don’t have your own accounts team to resolve problems.

As with other solutions of this type, the task-management is lacking. It does include a simple to-do list, but in my opinion, it’s not sufficient, and you’ll need to supplement it with something that supports gantt charts.

There’s a free forever plan, but it’s barely more than a free trial. Pricing for full-featured access starts at $18 per month when billed annually.

4. ClickUp

ClickUp is a SaaS that aims to replace just about everything else you could need. Unlike some options on this list, it includes a CRM, which is a bonus because there’s nothing worse than relying on the search function in your email to track down someone’s contact details.

ClickUp also offers a genuinely free-forever account with enough features to make it usable. If you choose to upgrade to a paid plan, it’s just $5 per user per month, which is excellent value.

If anything, there’s just too much in here. If you’re someone who considers themselves a power-user who enjoys digging into every nuance of a UI, then ClickUp could be for you. But, if, like me, you favor a simple tool that does what it’s told and gets out of the way, then there are better options.

3. Asana

Asana is probably the best-known project management tool on the market. It offers a tremendous number of options and is flexible enough for any style of project management.

There’s a free forever plan that is ideal for getting started and offers you most — you may be sensing a theme here — of the features you’ll need. But Asana’s best feature is its excellent timeline implementation of the gantt chart, for which you’ll need to upgrade to a premium plan costing $10.99 per user per month, with a minimum number of 2 seats that translates to a rather expensive $21.98 per month.

2. Trello

Trello is famous for its kanban boards, and many people prefer them to gantt charts, which has helped the app grow rapidly in the last few years.

If you’re prepared to pay $10 per user per month, Trello actually offers gantt charts as well, in the form of its timeline feature.

Trello is mainly designed for teams, not freelancers. However, if you do have the budget for a premium plan, Trello gives you an enviable ability to switch project management styles on a whim.

1. Toggl

Toggl is perhaps the perfect balance of time-tracking and gantt chart that is ideal for freelance projects.

As with most tools, Toggl is designed for teams, with billing starting at $8 per user per month. However, it offers a solo plan, designed for freelancers, that is free forever.

The main thing you miss out on with Toggl’s Solo plan is team timelines, which you won’t need unless you’re outsourcing work. One other obvious omission is unlimited planning boards, which you may find yourself paying for sooner or later.

But for a mixture of simplicity and powerful features available for $0, Toggl is hard to beat.


Featured image via Pexels

Source

The post 8 Freelance Project Management Apps for 2021+ first appeared on Webdesigner Depot.


Source de l’article sur Webdesignerdepot

We all want a little more fun and games in our lives. So, why not add some gamification to your next interactive content campaign?

By 2025, the gamification market is expected to witness a massive 30.1% growth rate, with global sales revenue reaching around $32 billion

That’s because gamification adds more entertainment to the website experience and gets audiences engaged. The idea behind gamification is to bring game mechanics into the design of a website or piece of content. There are many different ways to do this. 

Some companies add hidden achievements and bonuses to their blogs that customers can collect by visiting every page and reading their content. Others allow readers to collect points for leaving comments or play games to win potential prizes. 

Used correctly, gamification is a fantastic way to connect with your audience and increase engagement levels. So, how can you use gamification in interactive content?

The Evolution of Gamification 

Elements of gamification have appeared in everything from marketing campaigns to web design and even eCommerce strategies. 

In 2014, an Apple App Store review of more than 100 health apps even found that gamification elements in applications led to greater participation and higher user ratings. In other words, customers are more likely to get involved with an activity that includes gamification components. 

While gamification can take on many different forms, the aim for most companies is to create an environment where customers can feel more invested in their interactions with the website. For example, if you win a point every time you comment on a blog post, and you can trade those points in for prizes, you have more of a desire to keep commenting. 

The promise of being able to “accomplish” things with pieces of interactive content and websites also appeals to the competitive part of our psychology that pushes us to keep doing things in exchange for the promise of a kind of reward. 

Many companies have generated a lot of enthusiasm for their brands through leaderboards, time events, and similar experiences. For example, just look at how popular McDonalds becomes each year when the monopoly game rolls out as part of the purchasing experience. 

People buy more items than they usually would during McDonald’s Monopoly just for the opportunity to win. This same boost in engagement benefits your content strategy too. 

6 Ways to Add Gamification to Your Content

There’s no one right way to gamify your website or your marketing content. The method you choose will depend heavily on your audience and the kind of experience they respond best to. 

The key to success is finding a way to grab your customer’s attention and hold onto it. Here are some of the tried and tested strategies to explore:

1. Create an Actual Game Experience 

When it comes to incorporating gamification into your website design and content, you don’t necessarily need to be clever. You can be extremely straightforward and just design an actual game. For instance, to help attract more people to the American Army, the US created a war simulator that potential applicants could play on Steam. 

The game aimed to introduce young people who might consider a career in the military to what that job might be like. If the kids liked what they saw on Steam, they could visit the military website and learn more. 

For companies who can’t afford to build an entire fully-featured game, something a little smaller can be just as engaging. For instance, rather than using a standard pop-up with a discount code to entice customers to buy the rental service, Gwynnie Bee created a scratch card. People could scratch the spaces using their smartphone or computer cursor and win money off. 

The great thing about the interactive content from Gwynnie Bee is that it encouraged potential visitors to connect with the business in a lucrative way. To use the scratch card, you first had to give your email address. This meant the company could build its email list while delighting consumers. 

When designing a game experience for your marketing campaign, remember:

  • Get the right support: Designing a great game is tough, particularly if you want something more complicated than a scratch card. Don’t take the risk of creating something that doesn’t work properly; hire a developer. 
  • Promote the experience: Make sure everyone knows about your new game. Share screenshots on social media and talk about it in your email campaigns. 
  • Focus on fun: Remember, games are supposed to be fun. Measure the reactions of your audience to ensure they’re having a good time. 

2. Design a Loyalty or Reward Program

Loyalty is one of the most valuable things your audience can give you. So why not reward them for it? Loyalty programs are fantastic tools for business growth and engagement. They give you a way to turn one-off clients into repeat customers and advocates for your brand. 

How you choose to reward your customers (and when) is up to you. Some companies might give customers points every time they share a post on social media or comment on a blog. This encourages more engagement with your brand. 

On the other hand, you might just let your customers earn rewards for every purchase they make. This is a strategy that Starbucks uses with its reward program.

As customers increase their spending with Starbucks, they get the reward of extra points that they can put towards future purchases. This keeps customers coming back for more and may even entice some clients to buy Starbucks when they otherwise wouldn’t. 

The oVertone company is another excellent example of a brand using gamified rewards with its marketing strategy. The loyalty program breaks down into tiers, where users can see how much they need to spend to ascend to the next level. New rewards and perks appear with each level. 

Remember, when building a loyalty program:

  • Make your customers feel special: Ensure that your audience feels good about being one of the lucky few in your loyalty program. Give discounts and offers they can’t get elsewhere.
  • Keep them informed: Make it easy for your customers to see what they need to do to get their next reward, so they keep coming back for more. 
  • Mix things up sometimes: To stop the experience from getting boring, roll out things like “double points” days and bonuses for your most active customers. 

3. Encourage Customer Interaction

The biggest benefit of gamification is that it encourages and increases customer interaction. You can give rewards to participants that comment on your blog posts, for instance, or share your posts on social. The customer benefits from the reward, while you get the advantage of a better business presence. 

Samsung drives interaction with gamification with a function on its website that allows customers to discuss issues and watch videos. The most active participants get a badge for their efforts. 

If your business structure requires a lot of engagement from your audience, then using gamification elements can encourage them to stick with you for longer rather than losing interest. For instance, language learning software Duolingo has a four-point gamification strategy for its users.

Duolingo knows that learning a new language takes a lot of time, so it asks users to set small specific goals instead. The smaller tasks bring users back regularly, and consistent users gain rewards. There’s even a progress bar to help you track your progress compared to other customers. 

Gamification gives your customers another reason to keep coming back and connecting with your brand. That makes a lot of sense for companies that rely on long-term relationships with customers, like Duolingo and other teaching brands, for instance. Remember:

  • Make it simple: People will only want to interact with your brand if it’s easy to do so. Make it clear what you want your customer to do and what they need to do next. 
  • Reward every action: Keep people coming back for more by rewarding them for their actions, even if it’s just with a gold star or digital sticker. 
  • Nudge inactive customers: If a client gets involved in your interactive content, then stops participating, send an email reminding them why they should come back. 

4. Run Contests and Offer Prizes

Probably one of the easiest ways to use gamification in your advertising campaigns is with a competition. Contests and competitions have been around since the dawn of business. They’re a useful way for companies to collect information from customers, particularly if you ask your clients to sign up to your site with an email address to get involved. 

Competitions are also a way to push your audience into doing positive things for your company. For instance, you could run a competition where consumers share a social media post and tag a friend to enter. Or you could have a competition that asks your clients to refer a friend to get involved. 

When KIND, a healthy snack company, wanted to connect with its customers and create a new product, it didn’t just do market research. Instead, the company created the “Raise the Bar” contest to let customers cast a vote for which flavor they wanted to see next.

When 123ContactForm wanted to engage its audience, it gave people the chance to win one of three platinum subscriptions for 6 months. 

Contests are naturally exciting and fun to take part in. They’re an opportunity to get your audience excited, and you don’t need to give anything huge away either. Just make sure that the prize you offer is something that your audience will be interested in. 

A few more pro tips include:

  • Generate hype first: Don’t just launch a contest out of nowhere; get people excited about the idea with announcement blogs, social media posts, and emails. 
  • Give people a lot of ways to get involved: If people can’t take part in the competition on social media, let them do something on your website instead. 
  • Follow up after the win: When someone does win something from your website, follow up with that winner and post pictures in the form of a blog/case study. This will generate more hype for your brand and get people excited about the next event. 

5. Get Your Audience Feeling Competitive

No matter how much they might deny it, most people are at least a little competitive. So when you’re implementing a gamification campaign into your content and marketing efforts, it pays to tap into that sense of competition. All you need to do is find a way to encourage your followers to compete. 

The best example of a company that did this particularly well is Nike. Nike and the Run Club app teamed up to motivate people to get involved with healthy activities. The app allowed users to customize and build their ideal training program based on their athletic level. 

At the same time, you could also win badges and trophies to share with your running community. The more you took part in challenges on the app, the more you could potentially win. 

The Fitbit application has a similar way of keeping customers engaged. When you download Fitbit, you can access information about your exercise strategies and potentially track your progress towards your goals. However, there are also measurable achievements to earn – like a badge when you first walk 500 miles. 

Users on Fitbit can also find their friends using the same app and compete with them in various challenges. 

To successfully add a competition to your gamification strategy, remember:

  • It needs to be social: People will be more inclined to get involved if they show off their achievements. So make sure that people can showcase their accomplishments. 
  • Make people want to win: There needs to be a reason to get to the top of the leaderboard. You might offer people discounts or exclusive prizes if they accomplish certain goals. 
  • Show progress: Prompt people to keep working on reaching their targets by showing them how close they are to success. 

6. Make Boring Content Seem More Interesting

Some content is naturally more engaging than others. If you want to showcase some important information or data, you might create a whitepaper or a report. Unfortunately, the result can be a relatively bland piece of content.

With elements of gamification, you can make the experience a lot more engaging and interesting. Sites like Daytum.com allow users to turn personal stats and information into charts that showcase information in engaging ways. You can allow your users to track their progress through the report and rack up points as they go. 

Adding subtle elements to otherwise clinical and less interesting information is a wonderful way to make the experience more exciting. The more enticed your customers are by your content, the more likely it is that you’ll sell them on your business. 

Gamify Your Marketing Strategy

Gamification isn’t a new concept, but it’s one that many companies and designers can begin to take advantage of these days. Thanks to more advanced browsers and smartphones, customers can more fully enjoy the interactive elements of websites and content campaigns. 

As your audience dives deeper into the digital world, they expect more unique experiences from you. Gamification can make any website or marketing experience more memorable. It’s time to take advantage. 

Source

The post 7 Ways to Use Gamification in Marketing Campaigns  first appeared on Webdesigner Depot.


Source de l’article sur Webdesignerdepot

According to a recent Hubspot survey, more than 85% of marketers believe video content is essential for any marketing strategy. This percentage is more than 20% higher than in 2016.

Understanding why this is the case is not hard. Modern digital marketing is all about engaging with your audience and sharing personal stories. And there’s simply no better way to do that than video content.

Videos are engaging for people of all ages and less boring than other types of content. However, it’s not easy to create or optimize video content. That’s why we have created a list of the top 10 video content tips and tricks you should follow.

Top 10 Tips and Tricks to Succeed in Video Content Marketing 

Whether you are an influencer, blogger, or business owner, video content is important for promoting your services or products. The following tips will help you improve your video content strategies.

Plus, you can apply these tactics across all websites and platforms: from your website or YouTube channel to social media platforms like Instagram or Twitter.

1. Utilize Video SEO

Contrary to what many believe, SEO does not only apply to written content. In fact, video SEO is just as important for drawing organic traffic to your website or social network account.

You can achieve this in several ways. When you upload a new video, you need to consider things like keywords, tags, file names, and descriptions. However, this is only part of what you can do to optimize your videos for SEO purposes.

There are plenty of video SEO guides for beginners that can help you improve your online presence through your video content. 

2. Identify Your Goals and the Scope of Your Videos

As with written and visual content in general, it is critical to identify your business goals for video content. This is one of the first things you should think about when launching a new video content campaign.

Think about what you want to achieve. For example, do you need to generate new customer leads or expand your audience? Considering the reach of your videos can help you stand out from your competitors.

When it comes to video content, planning is key. For this reason, setting the goals of your strategy should be a priority.

3. Schedule Your Video Content

While it’s important to set goals, no video content strategy will work without consistency. Planning your video content is the best way to be consistent when creating, uploading, and promoting.

There are many online apps and tools that can help you organize your video content strategy. For example, scheduling tools like Buffer or MeetEdgar can help you keep everything organized and save time uploading your videos.

In addition to these social media scheduling tools, you can also use apps like Trello to help you organize your content creation in general.

4. Use Premade Material like Instagram Templates

If you are a professional video creator or video editor, you’ll have no problem creating top-notch video content. But what happens if you have no experience with video content at all?

Luckily, there are plenty of tools out there to make your life easier. For example, if you want to create video stories for Instagram, you can use captivating pre-made Instagram templates.

Editing such templates using software like Photoshop can save you both time and money. However, if you do not have Photoshop experience, you can also create videos using simple online editors like Canva

5. Make Your Videos Engaging and Emotional

There are a few tips we would like to share when it comes to the content of videos. An important thing to keep in mind is that your videos should always be engaging. If you don’t try to engage with your audience through your videos, there is a big chance of failure. 

Therefore, whether you own a personal blog or an enormous corporate website, your video content should connect you emotionally with your audience. Adding a personal feel to your videos is a fantastic approach to consider. 

By doing so, your customers/readers will feel the need to engage by sharing their stories with you.  

6. Create Educational and Relevant Video Content

There are a few tips we’d like to share with you when it comes to video content. One important thing to keep in mind is that your videos should always be engaging. If you are not trying to engage your audience through your videos, there is a high chance of failure.

Whether you have a personal blog or a huge corporate website, your video content should connect emotionally with your audience. Adding a personal touch to your videos is an excellent approach to consider.

This way, your customers/readers will feel the need to engage by sharing their stories with you.

7. Implement CTAs

Calls to action are one of the most effective marketing strategies for written content. Although most websites only include CTAs on the homepage, it’s a brilliant thing to also use them in blog posts, videos, and visual content in general.

You should let your customers know how they can interact with your brand. For example, let them know about your website or how they can follow you on social media for more information.

CTAs are the best way to keep your customers and ultimately increase your conversion rates.

8. Focus on Storytelling

Videos that focus on sales often bore viewers. For this reason, you should add some value to your video content. Creating videos that act like stories is a great thing to do.

When you tell a personal story, your customers can better understand your brand and how it can help them. Remember, storytelling makes your content more engaging and interesting.

9. Promote your Content

Say you have developed a great video content strategy and have already created some top-notch videos. What should be your next step? Well, maximizing your target audience is a smart approach.

You can achieve this by promoting your videos on platforms like Facebook, YouTube, Instagram, etc. Another smart move is to incorporate your video content into other content like blog posts, your website, etc.

10. Occasionally Evaluate your Video Content Strategy

Since you have already established your goals and the scope of your videos, you know exactly what you want to achieve with your video content strategy. Therefore, it’s important to evaluate how your plan is working. If you are happy with the analytics of your videos, that’s great.

If not, you can always consider what’s going wrong. For example, maybe you need to promote your videos better or include more CTAs.

Wrap Up

In this article, we analyzed how important video content has become for marketing. For this reason, implementing videos into your marketing strategies is a great thing to do.

If you follow the tips and tricks above, you will increase your video content strategy’s chances of success.


Featured image via Unsplash.

Source

The post 10 Tips to Help Video Content Succeed in 2021 first appeared on Webdesigner Depot.


Source de l’article sur Webdesignerdepot

Creating an incredible brand experience for an end-user is about more than just designing the right home page or lining up a series of great product pages. 

Effective website design conveys crucial information about a company, through everything from font styles, to image choices. Nowhere is this representation of brand identity more important than on the about page. 

People frequently confuse the about page with the contact page or fail to leverage it correctly simply because they don’t know what to say. However, creating an about page that speaks to an audience can be immensely powerful. 

What is an About Page?

The first step in designing a great about page is understanding the purpose of the space. This isn’t just a page on a website explaining what a company does. 

The about page is an introduction to a company’s story, its brand essence, and personality. 

Done correctly, this page will demonstrate a crucial sense of affinity between a business and its customers. It will highlight values that resonate with a customer and make it easier for clients to trust businesses.

The Yellow Leaf hammocks company starts its about page with a video.

As you scroll through the interactive site, you discover new elements of the company’s tale, including what prompted the birth of the business to begin with and the brand’s mission. 

Yellow Leaf lets its visitors know what the company is all about by using authentic images of real people to external content and bold quotes. 

There are even snippets from customer case studies for social proof. 

About pages are relevant because they give customers a way to build a real human connection with a business. Harvard professors say that 95% of purchasing decisions are emotional; we don’t buy things just because we need them. Instead, we look for companies that we feel connections with to solve problems. 

Using an about page to convey an attitude, personality, or just what makes a business special is how designers can ensure that end-users will care more about the business. 

How to Make an About Page Stand Out

So, how do you make an about page stand out?

Since every company is different, there’s no one-size-fits-all strategy for everything.  However, there are a few essential steps to consider as you move through the design process. 

Here are some pro tips for successfully attracting attention with the about page…

Step 1: Decide What to Include

It’s tempting to assume that a complicated about page will lead to a stronger relationship between a brand and its customers. After all, the longer the story, the more the customer knows about the company – right?

While it’s essential to include plenty of valuable information in an about page, it’s also worth remembering that today’s customers are short on time. They don’t want to spend hours scrolling through one part of a website. Instead, they want access to quick, convenient snippets of information. 

The Joseph Payton about page is effective because it cuts the story down into bite-sized chunks. Each piece of information highlights valuable insights for the customer. Plus, hand-drawn images and animations make the experience feel like you’re getting to know Joe on a deeper level. 

Before you begin designing, ask yourself:

  • How much text does the page need? How much space does there need to be for copy? How can you spread the content out in a visually engaging way?
  • What sections should the page include? For example, does there need to be a link to the contact us page or a contact form somewhere?
  • How does the page connect to the rest of the website? For example, can you link to things like case studies and reviews with quotes to tie more of the website together?

Step 2: Make the Mission Statement Clear

In a world where emotion influences buyer behavior, clients and customers want to buy from companies they believe in. It’s not enough to have the right product or price point anymore. People want to know that they have a human connection with a business. 

On some about pages, it’s difficult to pinpoint the real mission of the company. It seems like you have to scroll through endless paragraphs of text to make your own assumptions about what matters to the company. However, a well-designed about page puts this crucial info front and center. 

For instance, on the Apptopia about us page, the subheading tells you everything you need to know about the brand. This heading instantly tells the audience whether it’s worth reading on to find out more. 

The best about us pages often include a lot more than just a single sentence of text. But it’s worth pinpointing some of the essential details from these pages and drawing extra attention to them. A larger font or a different font color could be perfect for this purpose. 

Alternatively, if it’s difficult to refine the company’s mission down into one message, it might be worth creating a whole segment at the top of the page dedicated to this information. That’s what the Toms shoe company does.

Step 3: Invest in the Right Trust Elements

People aren’t always sure who they can trust these days. 

There are millions of websites out there and billions of companies. Not all of them are going to appeal to every customer. Since an about page is all about making a crucial human connection between a business and its client, it’s important to implement as much trust as possible. 

The good news is that there are many trust elements you can embed into an about page to make it more reputable. Star ratings taken straight from companies like Trusted Reviews and Google are a great way to show that a company is already impressing its followers. 

Quotes plucked from your customers or segments of case studies that you can place throughout the About Page copy is another great way to show your authenticity. 

You could even take the same approach as Aja Frost here and embed genuine data and graphs into the about page.

One particularly helpful way to make a website’s about page more trustworthy without eating up too much space is to implement trust stickers. Badges that show all the right groups and regulators approve a company are a great start. 

Even showcasing the logos of companies that the business worked for before on a slideshow could be an excellent opportunity to add depth to their authority. 

Step 4: Convey Brand Personality

Brand personality is reflected in the tone of voice that a company uses for its content. You can see a company’s personality in the choice of colors it has on its website. It’s in the fonts that convey a message, and the videos, images, and other unique strategies that each business uses. 

Although a brand personality needs to shine through in everything the company does, it’s imperative on the about page. This is the environment where a customer is getting to know a business for the first time. As a result, the consumer should instantly recognize what kind of brand archetype they’re working with. 

Take a look at the Eight Hour Day about page, for instance. The first thing you see is a picture of two people laughing. That means you instantly get a sense of friendliness.

As you scroll through the page, you’re greeted by friendly, informal copy combined with bright colors and snippets of useful information. Everything feels comfortable and reassuring. 

When you reach the bottom of the page, you find a bunch of data that makes the company seem more trustworthy. There are links to its social media pages and a partial client list showcasing brands like JCPenny, Wired, and Purina.

Using the right combination of font, copy, and imagery, this About page tells you exactly what to expect before you begin interacting with the company. 

Step 5: Take Visitors on a Journey Through Time

Showing customers where a business is going with things like brand mission statements and values are great. However, it’s also worth giving people an insight into where a brand has already been. 

Many of today’s shoppers aren’t comfortable buying from brands that haven’t spent much time in their chosen industry. They want to see that the people they’re working with have experience, heritage, and plenty of background knowledge. 

What better way to demonstrate all of these things than with a timeline of accomplishments? Here’s an example of how Marshall showcases its history by mentioning various crucial historical milestones.

A timeline of events doesn’t have to be this complex, however. If you don’t want to overwhelm visitors with a wall of text, an actual timeline that offers quick and easy insights into what the business has done over the years could be a better option. 

Another option could be to have a few key statements from the company’s timeline, then link out to a separate “History” page for people who want to find out more. 

Step 6: Show the Human Side

People don’t buy from businesses; they buy from other people. 

An about page isn’t just a chance to show customers what a company does. It’s also an introduction to the people behind that organization. Showcasing the team members that contributed to the growth and continued development makes that organization more attractive. 

Obviously, if there are hundreds or thousands of employees in a team, you might not be able to mention them all on an about page. However, the page should generally include some insights into the c-suite and significant members of staff. 

A selection of company photos is a good way to introduce your team. However, you can consider other options too. For instance, to maintain their unique brand, the Tunnel Bear team designed to draw their own bear icons that represented their personalities.

The design is adorable, and it’s a wonderful way to showcase what makes the company so unique. At the same time, using this kind of illustration means you can avoid the hassle of trying to get all of your business photos to look consistent. 

Step 7: Show Values with Visuals

Finally, as we’ve mentioned frequently throughout this guide, an about page is an essential place to showcase the values of your business. These are the core principles that guide you in everything that you do. They help tell customers what matters most to you and prevent you from moving in the wrong direction. 

However, you’re not restricted to highlighting your values through copy and nothing else. You can also introduce customers to the things that matter most to you through visuals too. Graphics or illustrations that highlight important aspects of your business are a great way to share information without relying too heavily on text. 

Videos are another brilliant option, particularly if you have a lot to say but not a lot of time to say it in. That’s what Ben & Jerrys does.

You can also find a stream of “issues” the company cares about on the website too. This means that people can get more information on things like Democracy, Racial Justice, Fair trading, and what Ben & Jerry’s is doing about all of those things. 

Visual elements like this are a great way to give an about page more pizazz. Plus, they appeal to people who want to learn about your company but don’t want to spend forever reading through the text. 

Create Better About Pages

An about page shouldn’t be an afterthought. 

It’s a crucial part of showcasing a company’s unique style and personality. Used correctly, these pages convey crucial information about everything a business stands for. 

Use the tips above to give more meaning to your about page design, and remember to pay attention to how much your traffic and conversions evolve with every update you make. A better about page could even help you to drive more conversions.

Source

The post 7 Essential Design Tips for a Killer “About Us” Page first appeared on Webdesigner Depot.


Source de l’article sur Webdesignerdepot

Landing pages are crucial for conversions. User-friendly landing pages rank higher in the search engines and generate the maximum leads.

Interestingly, user behavior changes every year, and new website design trends should be kept in mind to continue acquiring sales from your existing landing pages.

If your high-performing landing pages in 2019 have suddenly started underperforming in 2021, then it is a clear indication that your landing pages need a strategic revamp to record higher conversions.

Landing page revisions are necessary for reduced bounce rate, more visitor time on the page, and better user actions.

This article will discuss some of the top web design trends of 2021 that brands have adopted to revamp their landing page designs. You can learn from the trends and apply your own custom design intelligence to redesign your landing pages for 2022 and convert the maximum number of visitors.

Let’s begin…

Why Landing Page Design Is Crucial For Conversions

Landing pages are the first stop on your consumers’ online buying journey and the first chance to put an impression.

People on the internet are becoming less patient. It takes only about 50 milliseconds for a visitor to form an opinion about a brand and decide whether they want to stay or leave the website.

Convincing modern customers to buy products or fill up query forms on a landing page is not easy with traditional website elements.

In 2021, it is now harder to impress visitors landing on your website than in 2019. Keeping in mind the audience of 2021 and beyond, an ideal landing page should be user-friendly, engaging, innovative and should encourage users to take action.

Here are some of the top reasons why landing page design is so crucial for conversions:

  • You get barely 7 seconds to create a strong impression. It is a time span in which visitors roughly scan the page and make their decisions.
  • Publishing 40+ effective landing pages at regular intervals can generate 12X more leads.
  • The average conversion rate from the landing page across all industries is only 2.35%.
  • Using the right types of targeting and testing can boost landing page conversion rates by up to 300%.

Considering the above stats, it can be easily said that a landing page has to be impressive and quick enough to impact the visitors positively.

7 High Converting Landing Pages & Lessons You Can Learn From Each

Below are some of the best high-converting landing pages, which were just updated recently in 2021. For each page, we list a lesson you can learn to inspire your next design revision in 2021 and ahead:

Example #1 – Replace Boring Customer Info Forms With An Interactive Quiz

Landing Page: Nextiva’s Unified Communications Readiness Quiz Landing Page

Industry: Voice Over IP software

Conversion Measured By: Leads fill out a form if they are interested

Redesign focus: Improve the quantity and quality of leads

Solution: Substitute online form with an interactive quiz

In 2019 and even 2020, many businesses were practicing the trend of including a customer form on their landing pages as a call to action to initiate a quick customer action.

The customer information form was useful for businesses because it helped them generate quick leads. However, at the same time, there was no real reason pushing the customer to fill in the lead forms especially if it consisted of more than 2-3 fields.

Nextiva used its creativity to replace boring lead forms with interactive quizzes. In its 2021 page design, the company added a quiz for visitors to participate in.

The aim is to have interactive pages to keep visitors engaged and persuade them to stay on the page.

Here are the comparisons of both the designs:

2019

2021

Key Takeaways:

  • The 2021 landing page now has a free Unified Communications Readiness Quiz that allows business owners to fill the form interactively. Adding a quiz with the number of pages mentioned at the top tells the user how many steps are left to complete the quiz, making their waiting time easier.
  • The background image is replaced with communication icons to simplify the message of the kind of services they offer.
  • The page looks neater and appears to be easier to scan at a glance.

Example #2 – Emphasize Strong Visuals and Copy that Stresses on Product Details

Landing Page: Western Rise Homepage Variation

Industry: Ecommerce

Conversion Measured By: Apparel purchase

Major redesign focus: Improve the number of leads

Solution: Improve the copy and visuals

Western Rise, a clothing eCommerce company, realized the importance of having impressive images and detailed product information on its landing page.

The 2021 page replaced ordinary product images with strong visuals of the models wearing Western Rise clothing. Also, the product image includes extensive product details, which were missing on the older page.

Here is a clear comparison of the 2019 vs. 2021 landing pages of Western Rise:

2019

2021

Key Takeaways:

  • The new landing page has a powerful headline – Performance Clothing for Travel, Work, and Play. In just a couple of words, the brand tells everything about itself. ‘Performance Clothing’ is their unique selling proposition (USP) that tells the customers that their product is durable. Besides, the caption ‘Travel, Work, and Play’ tells what the product is about. Modern customers like products that fulfill a particular need, and Western Rise made it easier for the users to realize the importance of their products which fulfilled their specific needs.
  • The bold visuals in the new page capture contemporary shots of the models that put a strong impression on the audience. Every image is clicked mindfully to explain the style and quality of the Western Rise clothing line.
  • The products displayed on the new page include every minor detail and feature that often other clothing brands ignore, such as the specialty of the product, occasions to wear, and weight other than colors, fabric, fitting, etc.

Example #3 – Use Strong Social Proof To Increase Conversions

Page: Aura Save 50% Landing Page

Industry: Identity Theft Software

Conversion Measured By: Online registration or an inbound call

Major redesign focus: Improve the number of signups

Solution: Add strong social proof

It is a known fact that social proof on sales pages is essential for increased conversions. But in 2021, the importance of social proof has gone too far.

Aura is an identity theft protection service that aims to build trust with its prospective customers when they first browse their landing page. Take a look at how Aura displays customer reviews above the fold to catch user’s attention.

Unlike others, Aura combined the rating stars and the review to prove customer satisfaction and emphasize their expertise in the field.

BONUS:

Another example of using strong social proof is the Exploding Topics newsletter landing page.

Exploding Topics is a newsletter with a pro subscription for content marketers and anyone interested in trending topics about any topic. It’s an excellent example that uses a lot of social proof on landing pages that give something away for free, like a weekly newsletter or an eBook.

If you could notice, the latest landing page below has multiple forms of social proof on a single page. First, they feature a list of brands that trust Exploding Topics. Secondly, they quote Wired Magazine founder Kevin Kelly’s feedback, followed by the logos and tweets praising the newsletter.

Key Takeaways:

  • Exploding Topics uses several different types of social proof that appeal to different demographics.
  • Their “trusted by” logos of world-renowned companies stand out to potential B2B subscribers.
  • Kevin Kelly’s quote is catching the attention of tech-savvy readers.
  • Despite packing the page with social proof, the opt-in form is still well above the fold. It is the best landing page practice that applies to nearly all pages.
  • The landing page uses actually embedded tweets (not screenshots), which help demonstrate that the tweets are legit.

While Exploding Topics have smartly used social proof on its page, the ideas of leveraging social proof are not limited to this only.

Example #4 – Focus On Visually Appealing Above the Fold Content

Landing Page: Perfect Keto Homepage Variation

Industry: Supplements

Conversion Measured By: Online purchase

Major redesign focus: Improve the number of purchases

Solution: Improve Above The Fold Content

Above the fold content greatly impacts customer’s decision-making. Perfect Keto lacked that appeal on its 2019 landing page design.

Hence, the 2021 design was revamped with better visuals and more professional looks.

The 2021 page received major changes in above-the-fold content, such as the top menu bar with the brand name not losing the user’s attention anymore and an additional menu bar giving a quick overview of what the brand offers.

The older page did have many social proofs, but those were limited to customers only. The 2021 design also highlighted the publications where the brand appeared, which proved exceptional in building customer trust.

Take a look at the two landing pages of Perfect Keto in 2019 and 2021:

2019

2021

Key Takeaways:

  • The 2021 landing page heading is more compelling because it clearly conveys what their product is all about. The older page was missing the actual purpose of the product.
  • An additional section on the new page to educate customers about the Keto diet and how to start it helps visitors understand the product even better.
  • The inclusion of a product image above the fold attracts user attention and makes the product trustworthy. People now know what they will be buying right at first sight of the page.
  • The new page proudly displays the products featured in the publications, such as Women’s Health, Healthline, Reader’s Digest, and Popsugar, which again helped customers trust the brand.
  • The page also features a video of the Perfect Keto founder that is brilliantly working in gaining visitor’s attention and faith.

Example #5 – Make The Call to Action More Compelling

Landing Page: Zendesk HelpDesk Softwage Landing Page

Industry: SaaS

Conversion Measured By: Online registration

Major redesign focus: Improve the number of registrations through the website

Solution: Make The CTA More Compelling

Zendesk did a clever job by replacing the sign-up form with a single button. On the older page, it was unclear to the user if the company has a trial option for free unless they move to linked pages. Such confusions often resulted in traffic bounces.

Adding the start free trial button on the 2021 page makes it easier for the users to understand that the product comes with a free trial. At the time, it helps the user take quick action.

Similarly, the ‘Get started’ button at the top was replaced with ‘Free trial’ with the same intention.

Moreover, chat support was added to guide users at any stage of the buyer journey. Live chats are vital to help visitors better understand the product and move a step ahead in the customer journey.

Take a look at below two images:

2019

2021

Key Takeaways

  • The CTA buttons have more actionable text and look more prominent.
  • The color choice for the button is in contrast with the background but matches the page theme.
  • The older page missed sales support, which is included in the new page for a better customer experience.
  • The tabs in the menu bar were reduced to four to make the page simple to use for users.

Example #6 – Use Contrast To Highlight Specific Copy On The Page

Landing Page: GetResponse Website Building Landing Page

Industry: Online Software

Conversion Measured By: Online signup

Major redesign focus: Improve the number of signups

Solution: Use contrast around important copy on the page

GetResponse focuses on attracting visitors’ attention towards the offerings from their business. Starting from above the fold section, the landing page highlights the texts that are important and need the visitors’ attention.

The infographic on the landing page is the next thing that promises to grab user attention while beautifully describing how this website builder works and is useful to the user.

Key Takeaways:

  • The text highlighted on the landing page draws the user’s attention towards what the business has to offer or unique selling points.
  • The infographics briefly explain the working of the tool in an easy-to-understand manner.
  • The Yellow color is used prominently on the landing page to attract user attention and persuades users to try the tool by listing its advantages.

Summary

Landing pages provide the first opportunity to create an impression in the minds of the consumers. A well-structured and mindfully designed page sets the right tone for your brand message and encourages users to choose your business.

However, the strategy for landing pages needs innovations from time to time for better results. The examples and tips shared above prove how landing pages in 2019 have seen significant improvement in 2021.

In the coming year, use these ideas to create landing pages that influence customer decisions and encourage them to take quick actions.

Source

The post 7 Landing Pages Comparisons To Improve Your Conversions in 2022 first appeared on Webdesigner Depot.


Source de l’article sur Webdesignerdepot

In the information age, time is a valuable commodity and something people don’t want to spend too much of. As a result, the average visitor only reads about 20% of the content of a page

For web designers and developers, that means a few things: first, you need to ensure that the web pages you create are as engaging as possible; secondly, you need to find a way of making the critical information on any page stand out; thirdly, every modern designer needs to create assets that are easy for today’s fast-paced customers to use. 

Making websites more scannable is how you do your part as a designer to ensure that the customers who come to a page get the quick and convenient experiences they need. 

So, how do designers embrace scannability?

Designing for Scannability: An Introduction

At first glance, the concept of creating a website for scannability is strange. 

Most designers start their projects with the aim of making customers stay on a page for as long as possible. So it’s odd to think that you would want to make it simple for end-users to skip from one page to another on a website in a matter of seconds. 

However, scannability isn’t just about delivering information and getting users off a page. When sites are scannable, they make it quicker and easier for customers to slide down the purchasing funnel. A quicker and more convenient customer journey leads to a stronger user experience and more conversions. 

Look at Netflix, for instance. It doesn’t give interested users a ton of information on its homepage. Instead, the key USPs of the product are laid out bright and bold in the middle of the screen, along with one simple call to action: Get Started.

Designing for scannability means making it easy for users on a page to glance at a screen and instantly access all the information they need to take the next step in their buyer journey. 

There’s no needless scrolling or wondering what to do next. 

According to analyst Jacob Nielsen, scannability is essential because people look for specific things on every page they visit. 

Customers don’t read through web pages word by word. Instead, they scan through the content, plucking information out that serves their requirements. 

Questions to Ask When Designing for Scannability

So, how do you know if your web pages are scannable?

Start by asking the following questions:

  • What’s the intent of the people who arrive on this page?
  • What kind of information needs to be conveyed instantly?
  • Can the visitor see the next step in their journey immediately?

For instance, when someone arrives on the Evernote homepage, you can assume that they want to:

  • Find out about Evernote
  • Learn how to sign up
  • Jump to other pages to find out about features, and contact details

That’s why the designer behind the Evernote website placed an immediate piece of useful information at the top of the page: “Tame your work, organize your life” tells customers exactly what the entire product is all about. The brief paragraph of information underneath can provide a few more details if customers need it, then there’s an immediate call to action: Sign up for free. 

Not only does the call to action tell users what to do next, but it tells them the most important information they need straight away: it’s free. 

Scannable pages like this are useful because:

  • They help users complete their tasks quicker: Whether you want to sign up or learn more about the product, everything you need is available instantly, with no scrolling required. 
  • The bounce rate is reduced. Customers don’t get confused and hit the back button. That’s good for your client’s SEO and their bottom line. 
  • The website looks and feels more credible: Because customers get all the answers to their questions immediately, they’re more likely to trust the website. 

So, what are some of the best things you can do to make your sites as scannable as possible?

Use Visual Hierarchy

Visual hierarchy is a way of organizing the content on your website in a way that adheres to how people use the website. For instance, if you land on a blog page, you expect to see the headline first, maybe some information about the writer, and any other essential information, followed by the body content. 

Although it’s tempting for designers to try and surprise users with new visual strategies, the best way to make your content more scannable is to give end-users precisely what they expect. 

If you’re not sure what a page should look like, try checking out the competition. 

One of the most obvious visual hierarchy rules is that the main navigation should always go at the top of the page. 

Customers will expect to look at the top of the page to find navigation. They don’t want to have to scroll through your website, searching for a way to get to another page. If you want to make it as easy as possible for end-users to jump from one page to another, you can pin the navigation bar to the page so that it stays with users as they scroll. 

Maintain Negative Space

White space, negative space, or whatever you call it – is the part of your design that’s left empty. 

White space is crucial because it gives all of the objects on your page some much-needed breathing room. Without enough negative space on your pages, it’s impossible to embrace scannability because there’s too much information for a customer to take in at once. 

For instance, notice how there are big gaps of space between every element on a Forbes website post. A proper amount of negative space on your site ensures that users can quickly take in chunks of information and use that information to decide what to do next. 

To ensure there’s enough negative space on your website pages, ask yourself what the key elements visitors will notice when they come to a website. The essential items should be:

  • A title or header to confirm that the user is in the right place
  • A CTA that shows your user what to do next
  • A navigation header or menu
  • Critical information includes an introduction to what a page is about or an excerpt from the blog post they’re about to read. 
  • A visual component: A picture or image that gives context to the page. 

Anything else can usually be removed. So, for instance, if Forbes wanted to make the page above more scannable, they could easily remove the ads and social media sharing buttons.

Make the Next Step Obvious

Every page on a website exists in a hierarchy within the customer journey. 

A homepage leads customers to product pages, which leads to a checkout page, which connects to a thank-you page that sends the visitor back to another product page, and so on. 

When designing for scannability, it’s crucial to make the next step in the journey as obvious as possible. Usually, this means placing the call to action “above the fold,” where the customer can see it immediately.

Ideally, scannable pages should have just one CTA. This will stop your audience members from being confused or overwhelmed by choice. 

However, if you’ve got multiple CTAs, think about the average customer’s journey and what they’ll want access to first.

If those buttons don’t appeal to the customer, they can scroll a little further and see other “next step” options, like shopping for “self-isolation essentials” or browsing other popular product categories:

Test Every Page

Testing for scannability means examining every page and making sure that it’s as easy as possible for customers to move through the buying process as fast as they want to. 

Visit each page you design in a buyer journey and ask how quickly it would take end-users to get from point A to point B and beyond. Here are some of the common issues that might slow the customer’s journey and harm scannability:

  • Readability: Is the font legible? Is it large enough to read on all screens, including mobile devices? Legibility in the design world measures how quickly and intuitively your users can distinguish what’s going on any page. Remember that the color of the background, the amount of negative space around copy blocks, and even font pairing can impact the readability of the content. Show your pages to multiple people and time how long it takes for them to grasp the message that you’re trying to convey. 
  • Fluff: Fluff and extra features can make your pages more intriguing, but they can also slow users down. For instance, one picture at the top of a blog page can add context to the article. A slideshow of pictures stops the customer from progressing and keeps them stuck at the top of the page for longer. 
  • Words instead of numbers: According to Nielsen, eye-tracking studies show that numerals often stop the wandering eye. Numbers are compact and more regularly associated with statistics and facts, so they’re more likely to grab attention. If you want to get important points across to end users fast, use numbers, not words. 

Creating Scannable Pages

Scannability is becoming an increasingly important concept in today’s busy landscape. 

Now that more customers are browsing websites from their smartphones or checking out products on the move, designers need to think more carefully about adjusting to this agile environment. 

Scannable pages that move visitors along the buying cycle and into the next stage of the funnel will deliver better results for your clients, and therefore better outcomes for you. 

Source

The post Quick Ways to Make a Webpage More Scannable first appeared on Webdesigner Depot.


Source de l’article sur Webdesignerdepot

The world of web design is incredibly dynamic. Every year, new trends and opportunities emerge, primarily driven by the arrival of modern technology. 

In recent years, we’ve seen various updates to the web design landscape, such as the arrival of AR and VR solutions for making mixed media. Video content has increased in quality, while the demand for inclusivity and usability has transformed the way that we build everything from websites to apps. 

Yet, for the most part, web design trends have continued to focus on the visual. 

When we hear the word “interface,” we often think of the graphical user interface – the ultimate way to connect users with sites. However, now we have a new, more natural way for customers to interact with their digital tools… The era of voice is here. 

Designing for the Age of Voice

The technology sector has made incredible progress in the development of things like Automated Speech Recognition and Natural Language Understanding. 

Thanks to updates in the way that machines process and understand human language, voice recognition accuracy is now at 90% and above. More than ever before, users can speak to a smart assistant, speaker, or phone-based application, and get the results that they’re looking for without error. 

The simplicity of communicating with technology via voice means that users have adopted this technology at an incredible pace. Half of all searches will be made with voice by the end of this year.

We’re standing on the edge of a fundamental shift in the way that we interact with computers and critical tools. As designers and developers, we need to be ready to embrace this new medium. 

With that in mind, here’s what designers need to think about when designing for voice UI. 

1. Decide How to Experiment with Voice

There are various steps involved in making a website more “conversational.” One of the first steps for any designer or developer is to think about the kind of voice-based interactions they’re going to enable for an app or website. 

For instance, rather than embedding voice technology into a website, you might decide to create a separate Amazon Alexa “Skill” for devices like the Echo. Companies like Capital One have already invested in this technology so that users can ask their smart speaker about their balance, rather than opening a laptop and logging into the site. 

To determine what kind of voice experiences you should be creating for your client, work with them on a customer journey map. Using this map of interactions that the customer has with your client on a regular basis, you can highlight areas where voice interactions might fit into the user flow. 

For instance, if customers are constantly asking questions about a brand or its service, an FAQ page that’s equipped with a bot that can respond to voice queries could be an excellent choice. 

UI design should always solve problems. Examining the frictions and frustrations that your client’s end-users encounter during their journey will help you to decide which direction to take with your voice UI experience. 

2. Examine the Anatomy of Voice Commands

Before designers can create a dialog flow for their voice UI, they need to understand how voice commands work. The key to success in a successful design for voice is understanding the objective of the interaction. A voice consists of three crucial factors for designers to consider:

  • Intent: Intent represents the subject and context of the voice command. A high utility interaction involves a request for a specific task. For instance, your users might request that your app gives them a list of five-star hotels in a specific area. Designing for these requests is often straightforward because what the voice algorithm needs to do is clear. However, low-utility requests can be harder to decipher, such as “hotels near me,” because there’s less specificity for the bot to work with. 
  • Utterance: Utterance refers to how a user phrases a command. For instance, in the case of looking for five-star hotels in Amsterdam, the customer might say “show me hotels,” or they might ask for “places to stay”. Designers must consider every variation of an utterance for their voice command UI. 
  • Optional variables: This refers to the extra filters that your voice UI needs to be aware of. In the case of five-star hotels in Amsterdam, the descriptor “five stars” is optional. The optional input needs to overwrite default values and bring more detail to the search. 

SideChef, for instance, is a voice-activated recipe app that offers narrated guidance to users and allows customers to search for recipes based on their specific needs. The app comes with a wide range of variables built-in, allowing users to customize their searches according to descriptors like “vegetarian” or “quick” meals. 

3. Learn How to Prototype with Dialog Flows

Learning how to leverage a complex UI strategy like VUI takes time and practice. Prototyping designers will often have to think like scriptwriters, designing various dialog flows to suit the different needs of customers, and the numerous interactions they might face. 

Dialog flows will outline:

  • Keywords that lead to the interaction
  • Branches that represent where the conversation might lead
  • Example dialogs for the user and the voice assistant. 

Practicing your dialog flows with scripts that illustrate the back-and-forth between the voice assistant and user will help designers and developers to understand the various nuances that can appear in a customer to robot interaction. 

Remember, while a crucial part of good voice UI design is keeping the communication conversational and straightforward, you will need to ensure that there is a dialog flow in place for every discussion that may occur between end-users and their apps, website, or digital tools. Users don’t want to feel overloaded and overwhelmed, but they need to ensure that they can complete their tasks too.

Consider the voice-based game RuneScape: One Piercing Note, for instance. 

The developers behind this app allowed players to speak with other in-game characters and use commands like “pull the lever” or “open the chest.” In designing the playable components of the game, the designers needed to think about every possible interaction that a player might have with different parts of the story while ensuring that users didn’t stray off track. 

A Few Tips for Voice UI Design 

Voice UI design can be very complex, mainly if you’ve never created something using voice as your only input before. However, once you get used to creating dialog flows, the whole process starts to feel a lot easier. 

As you’re designing, remember to:

  • Always confirm when a task is complete: When designing a checkout flow for an eCommerce page, one of the most crucial screens for a designer is the confirmation page. It shows the customer that the transaction has successfully been completed and stops them from worrying whether they’ve done the right thing. The same concept applies to Voice UI design. If your client’s end-user asks a voice-activated app to book an appointment with their therapist, for instance, they want to know that the appointment has been successfully booked and added to their calendar. Determine how you’re going to deliver the peace of mind your customers need. 
  • Create a strong strategy for errors: Designers and developers are still in the very early stages of experimentation with voice UI. This means that there’s a good chance that something could go wrong with your applications and tools from time to time. Having a strong error strategy in place is crucial. Always design a dialog flow scenario that allows the assistant to respond if they don’t understand a request, or don’t hear anything at all. You can also implement analytics into these situations to identify misinterpretations and improve usability in the future.  
  • Add extra layers of security: Various Voice UI solutions like Google Assistant and Alexa can now recognize individual voices. This is a kind of biometric security that’s similar to face or touch ID. As voice recognition continues to improve, it’s essential to ensure that you’re adhering to the latest guidelines in security. Additional authentication may be required for some companies. For instance, passwords, face recognition, or fingerprints might be needed for things that require payments and transactions. For instance, the Duer voice assistant uses face recognition to both approve payments, and make meal recommendations based on previous purchases. 

Are You Ready for the Voice UI Revolution?

Voice-based user interfaces are here to stay.

In the years to come, the chances are that developers and designers will need to learn how to use voice more consistently as part of their interface strategies. 

The good news is that although voice takes some getting used to as a design tool, it’s easy enough to make sure that your projects are moving in the right direction. Just like any other kind of design, implementing voice means thinking about whether the interactions and experiences that you’re delivering to end-users are seamless, effective, and valuable. 

Succeeding in voice UI isn’t just about adding the capacity for voice into your designs. It’s a matter of learning how to make user’s lives easier with the power of voice.


Featured image via Unsplash.

Source

The post Designing UI for the Voice Era first appeared on Webdesigner Depot.


Source de l’article sur Webdesignerdepot