Articles

If you and your team are dealing with tools like Git or Subversion, you may need an administrative layer where you are able to manage user access and repositories in a comfortable way, because source control management systems (SCM) don’t bring this functionality out of the box.

Perhaps you are already familiar with popular management solutions like GitHub, GitBlit or GitLab. The main reason for their success is their huge functionality. And of course, if you plan to create your own build and deploy pipeline with an automation server like Jenkins you will need to host your own repository manager too.

Source de l’article sur DZONE

On June 29th, GitHub announced Copilot, an AI-powered auto-complete for programmers, prompting a debate about the ethics of borrowed code.

GitHub is one of the biggest code repositories on the Internet. It hosts billions of lines of code, creating an unparalleled dataset with which to train a coding AI. And that is exactly what OpenAI, via GitHub, thanks to its owners Microsoft has done — training Copilot using public repositories.

The chances are you haven’t tried Copilot yet, because it’s still invite-only via a VSCode plugin. People who have, are reporting that it’s a stunning tool, with a few limitations; it transforms coders from writers to editors because when code is inserted for you, you still have to read it to make sure it’s what you intended.

Some developers have cried “foul” at what they see as over-reach by a corporation unafraid of copyright infringement when long-term profits are on offer. There have also been reports of Copilot spilling private data, such as API keys. If, however, as GitHub states, the tool has been trained on publicly available code, the real question is: which genius saved an API key to a public repository.

GitHub’s defense has been that it has only trained Copilot on public code and that training AI on public datasets is considered “fair use” in the industry because any other approach is prohibitively expensive. However, as reported by The Verge, there is a growing question of what constitutes “fair use”; the TLDR being that if an application is commercial, then any work product is potentially derivative.

If a judge rules that Copilot’s code is derivative, then any code created with the tool is, by definition, derivative. Thus, we could conceivably reach the point at which a humans.txt file is required to credit everyone who deserves kudos for a site or app. It seems far-fetched, but we’re talking about a world in which restaurants serve tepid coffee for fear of litigation.

There are plenty of idealists (a group to which I could easily be accused of belonging) that nurture a soft-spot for the open-source, community-driven web. And of course, it’s true to say that many who walk the halls (or at least log into the Slack) of Microsoft, OpenAI, and GitHub are of the same inclination, contributing generously to open-source projects, mentoring, blogging, and offering a leg-up to other coders.

When I first learnt to code HTML, step one, before <p>hello World!</p> was view > developer > view source. Most human developers have been actively encouraged to look at other people’s code to understand the best way to achieve something — after all, that’s how web standards emerged.

Some individuals are perhaps owed credit for their work. One example is Robert Penner, whose work on easing functions inspired a generation of Actionscript/JavaScript coders. Penner published his functions online for free, under the MIT license; he also wrote a book which taught me, among other things, that a while loop beats a for loop, a lesson I use every day — I’d like to think the royalties bought him a small Caribbean island (or at least a vacation on one).

There is an important distinction between posting code online and publishing code examples in a book, namely that the latter is expected to be protected. Where Copilot is on questionable ground is that the AI is not a searchable database of functions, it’s code derived from specific problems. On the surface, it appears that anything Copilot produces must be derivative.

I don’t have a public GitHub repository, so OpenAI learned nothing from me. But let’s say I did. Let’s say I had posted a JavaScript-powered animation from which Copilot garnered some of its understanding. Does Microsoft owe me a fraction of its profits? Do I in turn owe Penner a fraction of mine? Does Penner owe Adobe (who bought Macromedia)? Does Adobe owe Brendan Eich (the creator of JavaScript)? Does Eich owe James Gosling (creator of Java), if not for the syntax, then for the name? And while we’re at it, which OS was Gosling using back in the mid-90s to compile his code — I doubt it was named after a fruit.

If this seems farcical, it’s because it is. But it’s a real problem created by the fact that technology is moving faster than the law. Intellectual property rights defined before the advent of the home computer cannot possibly define an AI-driven future.


Featured image uses images via Max Chen and Michael Dziedzic.

Source

The post Poll: The Ethical Dilemma at the Heart of GitHub’s Copilot first appeared on Webdesigner Depot.


Source de l’article sur Webdesignerdepot

In most companies the single largest cost is human resources. However, by leveraging Open Source intelligently, you can significantly reduce this cost, by literally having the entirety of GitHub’s user base, working for « free » for your company. This of course is a bit like what investors refers to as « China math », but GitHub has 65 million registered user accounts, most of whom we must assume are developers one way or another. If you intelligently structure your organisation around GitHub, there is literally nothing preventing you from using every single one of these developers as your own company’s resource, making you a million times more productive than mega corporations such as Amazon, Facebook, and Microsoft – For a millionth of the cost these mega corporations are paying. But first let’s illustrate the problem, such that the solution becomes clear …

The problem

In one of my previous jobs somebody had cloned an open source git repository, then added its code to our own private corporate cloud’s git repositories, for then to start modifying the thing (the horror!) 2 years later it took one of my developers 6 weeks to update the thing to use the latest version as created by its main developer on GitHub, trying to keep as many of our own customisations as possible in the process. Needless to say, but I was furious about the original decision, due to having responsibilities for code quality at this company.

Source de l’article sur DZONE

Asset management and website performance optimization are two of those unavoidable headaches faced by every website owner.

A digital asset management (DAM) platform can provide centralized asset repositories with intuitive dashboards to help you manage assets. On the other hand, an image CDN can help you get rid of that messy responsive syntax and provide dynamic asset optimization with huge performance boosts.

The problem is that website performance has become such a competitive factor that DAMs with other priorities tend to fall short. On the other hand, specialized image CDNs don’t solve the problems associated with image management, particularly within organizations.

With that in mind, I propose solving these problems for good by putting together image management and optimization stack using ImageEngine and Cloudinary. Instead of being a comparison between these two tools, this article describes the benefits of using them to complement each other.

Features and Asset Management Capabilities

As a DAM, Cloudinary provides you with a visual interface to store, manage, and edit your image and video assets. In that way, it’s not much different from any other professional image managing software such as Adobe Bridge, except that it’s an online, browser-based service.

Using the Media Library, you can upload, delete, and organize images in folders, for example. The visual image editor allows you to make advanced transformations and image touch-ups and see the results instantaneously using tools like sliders, dropdowns, etc. You can even chain transformations together for multi-layered effects.

Cloudinary also allows you to manipulate images and videos this way using their URL-based API.

Cloudinary has additional auxiliary features that make asset management easier (especially in organizations), such as backups, role-based multi-user admin, and feature extensions via third-party integrations and add-ons.

This is something most image CDNs don’t provide. Instead, they allow you to access and transform images using URL manipulation. Transformations are usually made using string-based parameters or directives. A serverless, headless DAM, if you will.

However, the advantage of using a dedicated image CDN like ImageEngine, is that it can usually provide enhanced asset optimization. ImageEngine, for example, is an intelligent image CDN that uses WURFL device detection to finely read the context an image is accessed from (device model, PPI, OS, browser, resolution, etc.) and then chooses the optimal image for that configuration.

This frees up website owners from having to do any additional optimization. This business logic is also built-in to all of their global PoP servers, and ImageEngine specifically delivers cache-hit ratios close to 100%. The following performance section will illustrate the difference this can make in practice.

Check out the key differences between ImageEngine and Cloudinary. And, for a deeper insight, see the comparison with other similar CDNs, like imgix and Cloudflare

Performance

Just to cover our bases and prove that this is an effective asset management and optimization stack, I’m also going to affirm it using a Lighthouse performance audit. Here is a quick summary of the results:
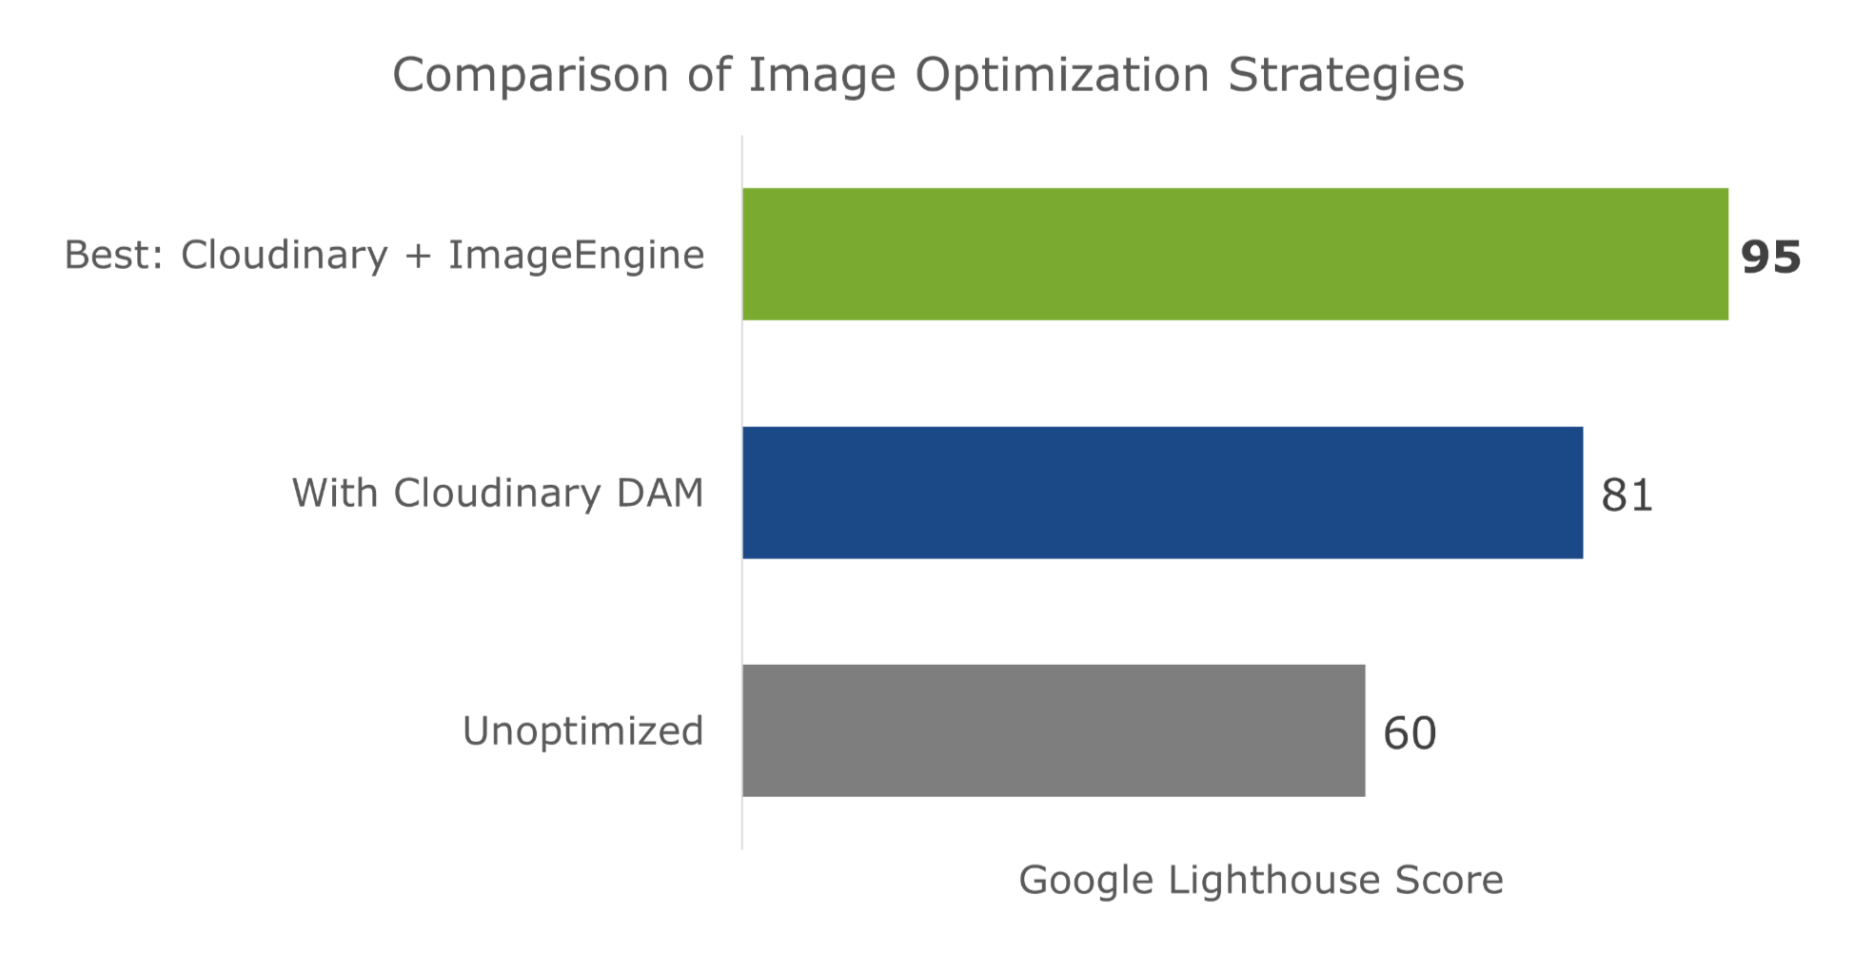
For this test, I built a web page with a tonne of images with overly large file sizes. In this first Lighthouse audit, I didn’t apply any optimization to the images. Here’s the result:
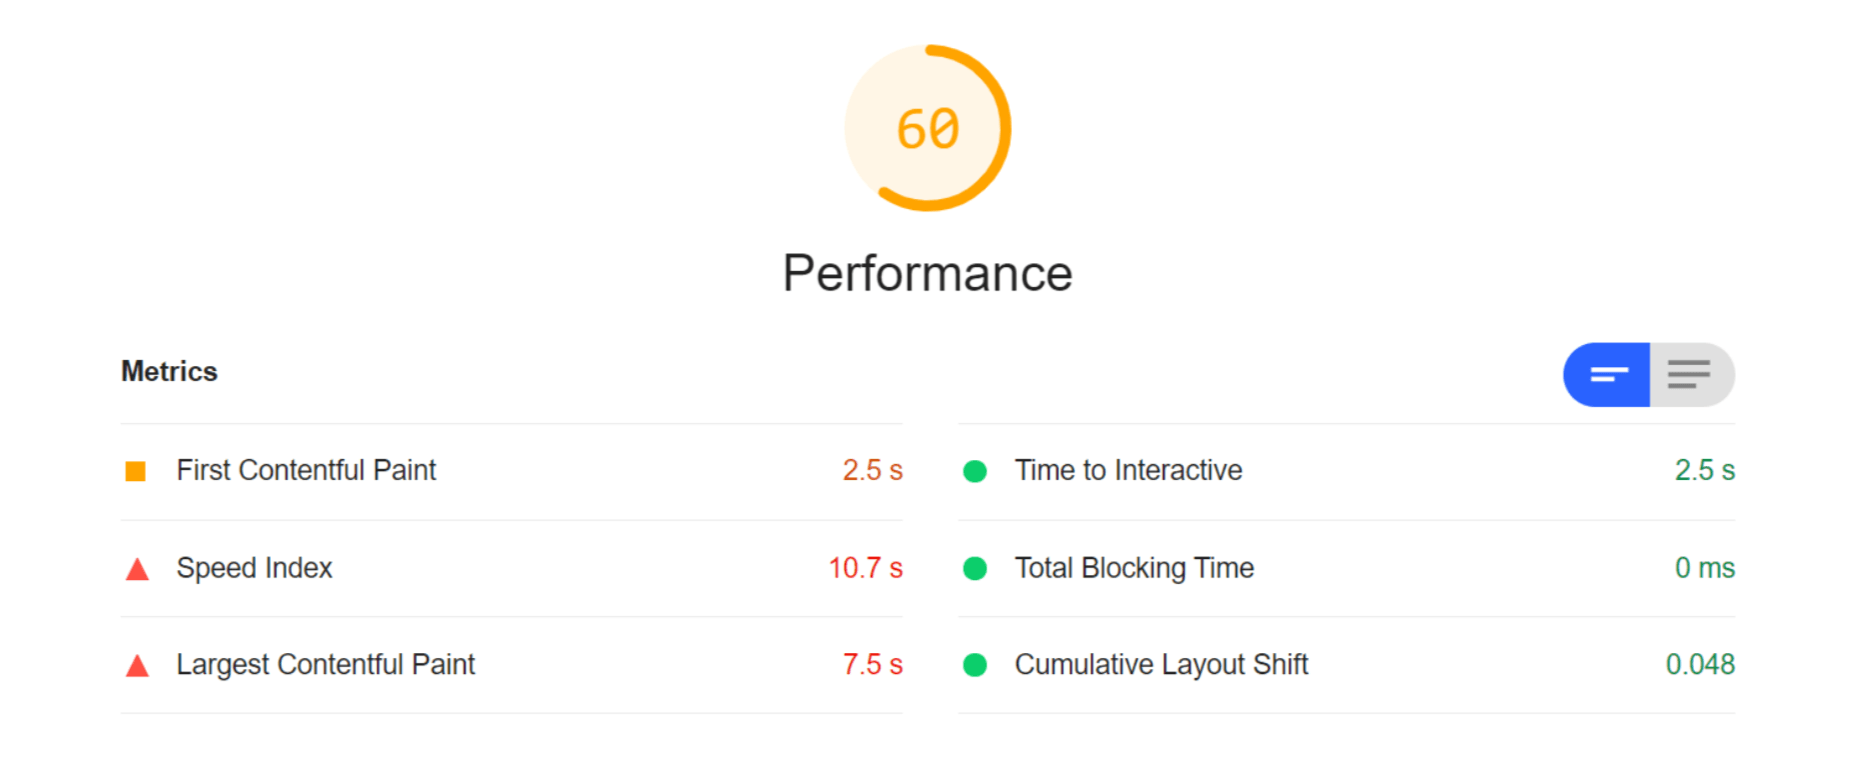
As you can see, we had some major problems when it came to the loading time of our assets. Overall, the page took more than 10 seconds to load. One of Google’s crucial user-centric performance metrics, LCP, scored a miserable 7.5s. Lighthouse suggested that some of the main problems encountered were the asset file size, inefficient cache policies, using non-optimal image formats, and improperly sized images.

Both Cloudinary and ImageEngine are supposed to address all of these factors with their auto image optimization. In the next audit, I used the same page and content but served my images via Cloudinary:
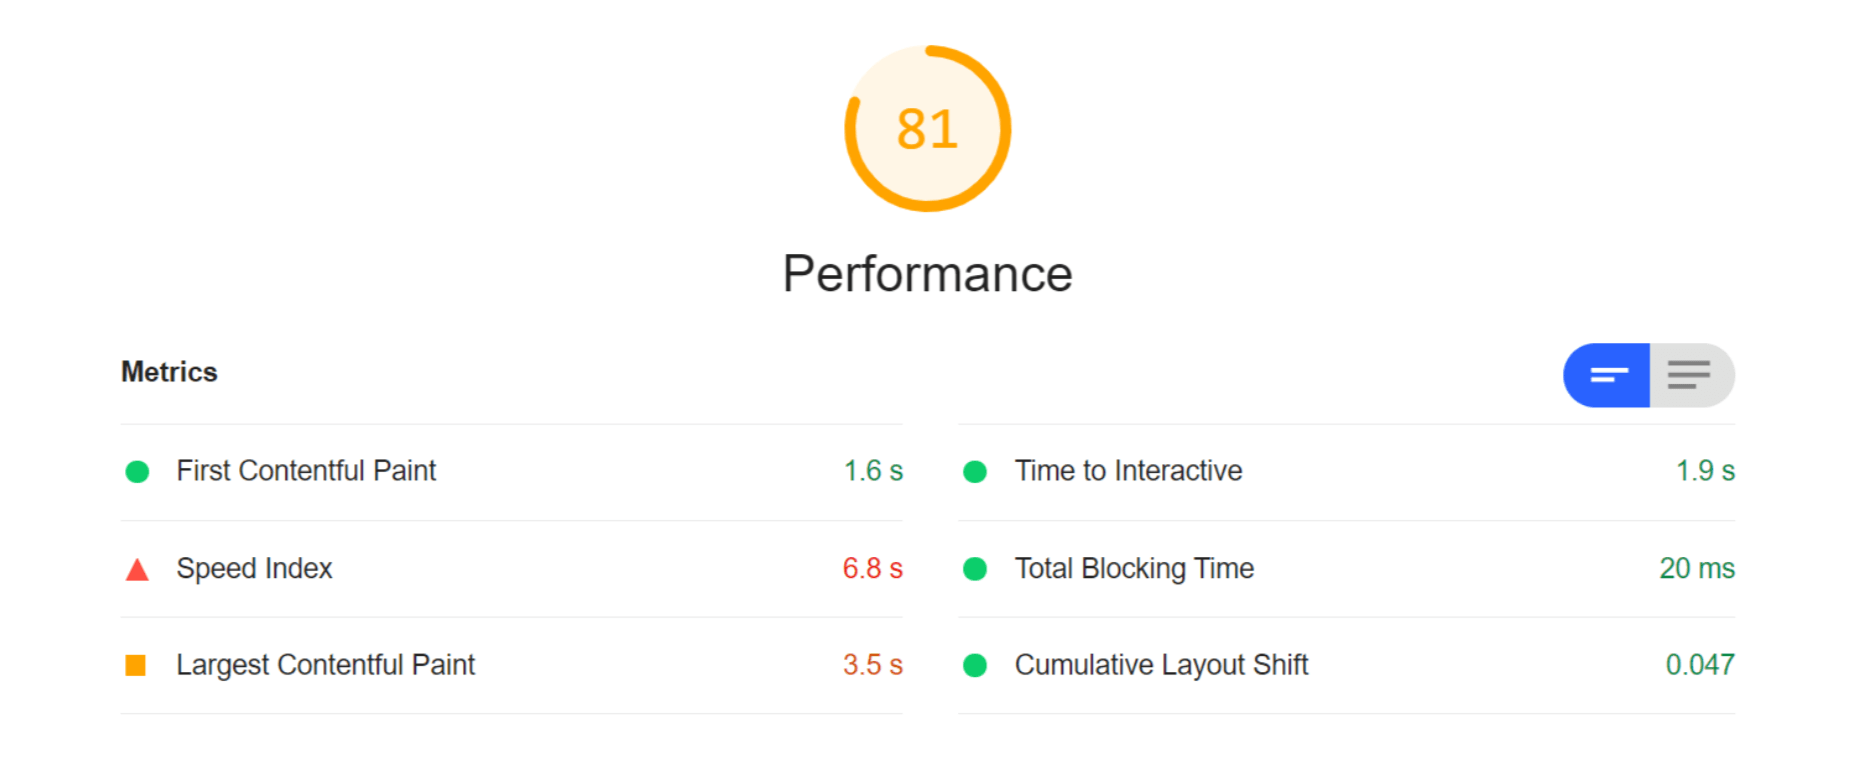
As you can see, there is improvement in most factors. FCP is now in the green, and both the Speed index and LCP times have almost halved. Even TTI and CLS improved slightly. That being said, it’s still nowhere near optimal, and we’re still falling short of the all-important 3-second loading time ceiling.

So, finally, let’s do another Lighthouse audit – this time using ImageEngine on top of Cloudinary. Here are the results:
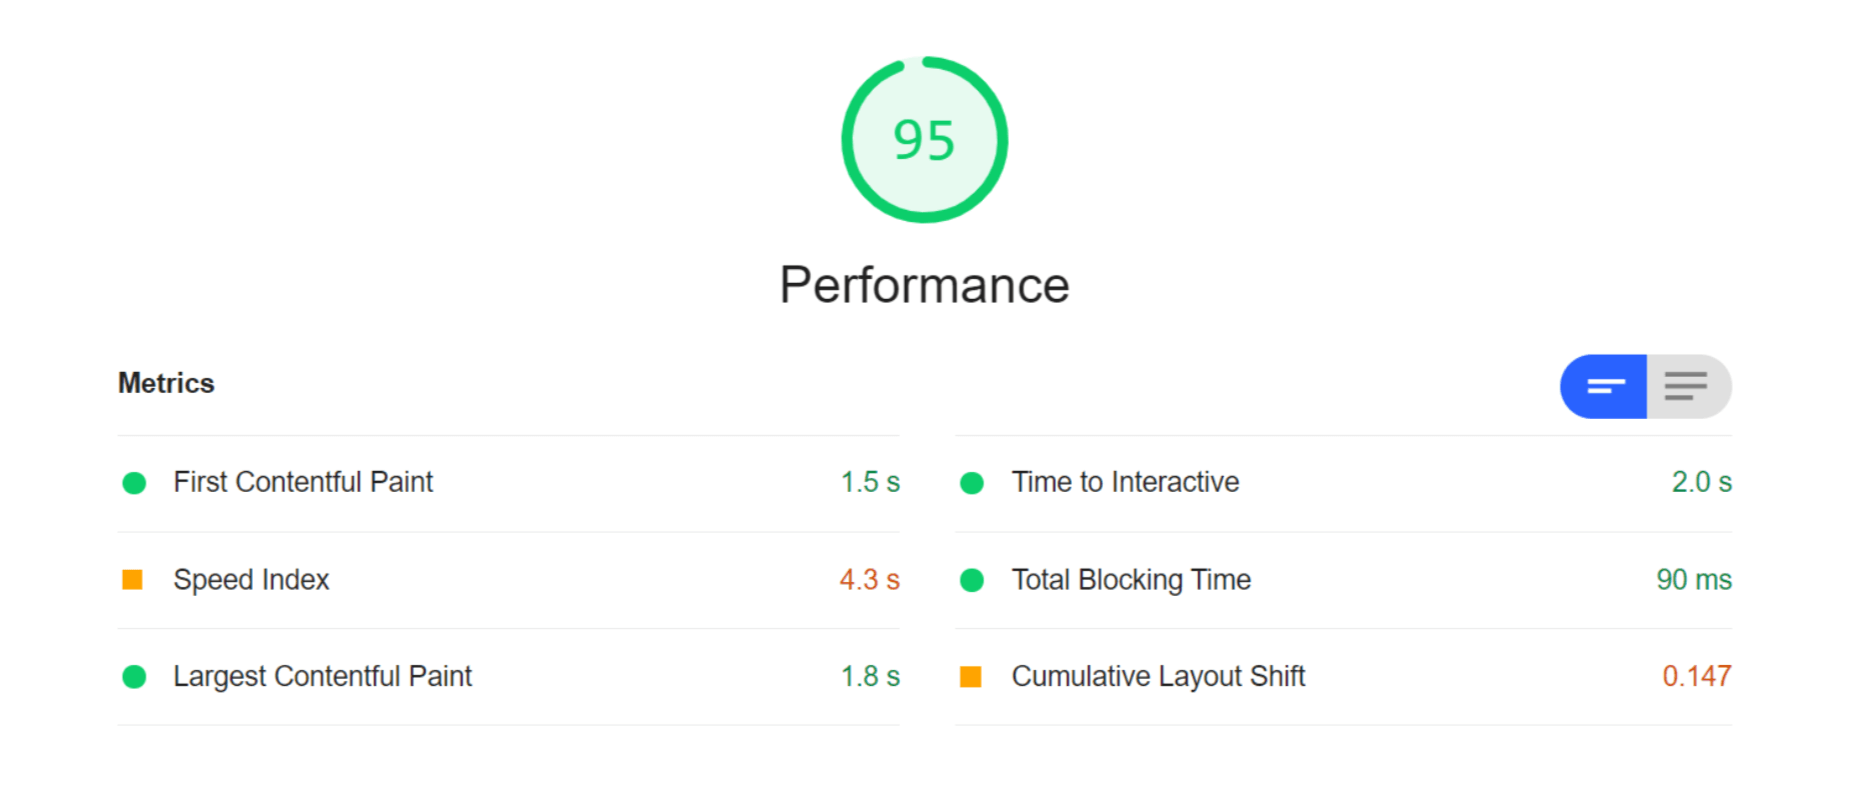
With ImageEngine, I finally scored in the green with 95. All the metrics that have to do with the sheer speed at which image content loads improved. The Speed Index and LCP, which is the most important, improved dramatically. CLS scored worse, but this typically varies from test to test.

You can find another and more extensive breakdown of the performance and pricing comparison here.

Transformations, Bandwidth Utilization, and Cost

Cloudinary’s pricing plans work on a credit-based system. Starting with the free account, you get 25 credits/month. Each credit can be used for 1,000 transformations, 1 GB of storage, or 1 GB of net viewing bandwidth. The other two packages cost $99 for 225 credits and $249 for 600 credits, respectively.

You should plan to generate a minimum of 5 transformations per image. In effect, that limits you to around 200 images with the free plan, excluding whatever manual transformations you make.

ImageEngine’s Basic plan costs $49 and provides you with 100 GB of Smart Bytes. Smart Bytes are based on optimized image content and translate to roughly 400-500 GB of raw images.

So, with Cloudinary, you have to compromise between bandwidth and storage usage as well as the number of transformations you can make. Transformations for Cloudinary are counted as they are dynamically generated on-demand.

However, if you use ImageEngine for optimization, you can switch off Cloudinary’s auto-optimization. When a new image variant is needed, it will be generated and delivered via ImageEngine. Considering variant count isn’t limited by ImageEngine, this will drastically cut down on the number of credits you’ll need to spend on transformations.

Effectively, that means you could use the bulk of your Cloudinary credits purely for storage and specific transformations. For example, advanced cropping, applying effects, or color adjustments. These are, after all, the main functions of a DAM.

With this setup, ImageEngine’s Basic plan and Cloudinary’s free plan should be adequate for most websites, saving around $50 a month.

How to Implement Cloudinary with ImageEngine

Signing up for Both Services

As it will house all of your image assets, the logical place to start would be to sign up with Cloudinary.

Create a (free) account, and make sure to take note of your “cloud name” during the setup wizard. This will be the name of your designated storage location on the Cloudinary platform and is usually a garbled string like di2zgnxh0 by default. However, you can change this to something more meaningful.

Once you’ve signed up, you can start uploading your image assets and creating different versions/transformations of them. Setting up Cloudinary integration on a CMS, like WordPress, is usually straightforward. Just indicate the CMS you’ll be using, copy the API key, install the plugin, and activate it.

Next, sign up for a free trial with ImageEngine. There will also be a short setup wizard during which you will:

  1. Provide ImageEngine with the website where your images will be delivered.
  2. Supply your image origin (in this case, your Cloudinary web folder). For now, you can only add the Cloudinary, e.g., res.cloudinary.com.
  3. Get your ImageEngine image-serving domain, e.g., {randomstring}.cdn.imgeng.in

When in your ImageEngine dashboard, you’ll see this domain listed under “Engines” as well as an entry for Cloudinary under “Origins.” Edit the latter and under “Advanced,” add your Cloudinary folder to the “PATH” field.

That’s it, you should now be able to store and manage images via Cloudinary and serve them via the ImageEngine CDN.

Dynamically Loading Specific Image Variants

Let’s take a look at a use case for loading different transformations of individual images on your site. This example will showcase how you can use Cloudinary’s advanced image editing tools to transform images while still reaping the optimization rewards of using ImageEngine as your image CDN.

A popular practice today is to use rounded images for team, client, or profile portraits. Using Cloudinary, you can load this transformation using the following URL:

https://res.cloudinary.com/myimages/image/upload/w_400,h_400,c_crop,g_face,r_max/w_200/profile.jpg

This will resize the image to 400 by 400px, focus on the face, and apply the maximum amount of radial cropping around it – to a width of 200px.

The same image can then be accessed via your ImageEngine delivery engine simply by swapping out the domain:

https://images.myimageengine.com.imgeng.in/image/upload/w_400,h_400,c_crop,g_face,r_max/w_200/profile.jpg

NOTE: I added my Cloudinary folder designation (“myimages”) as the path to my image origin. With that config, I don’t need to include it every time I use the image URL.

For example, you can set up the origin like this:
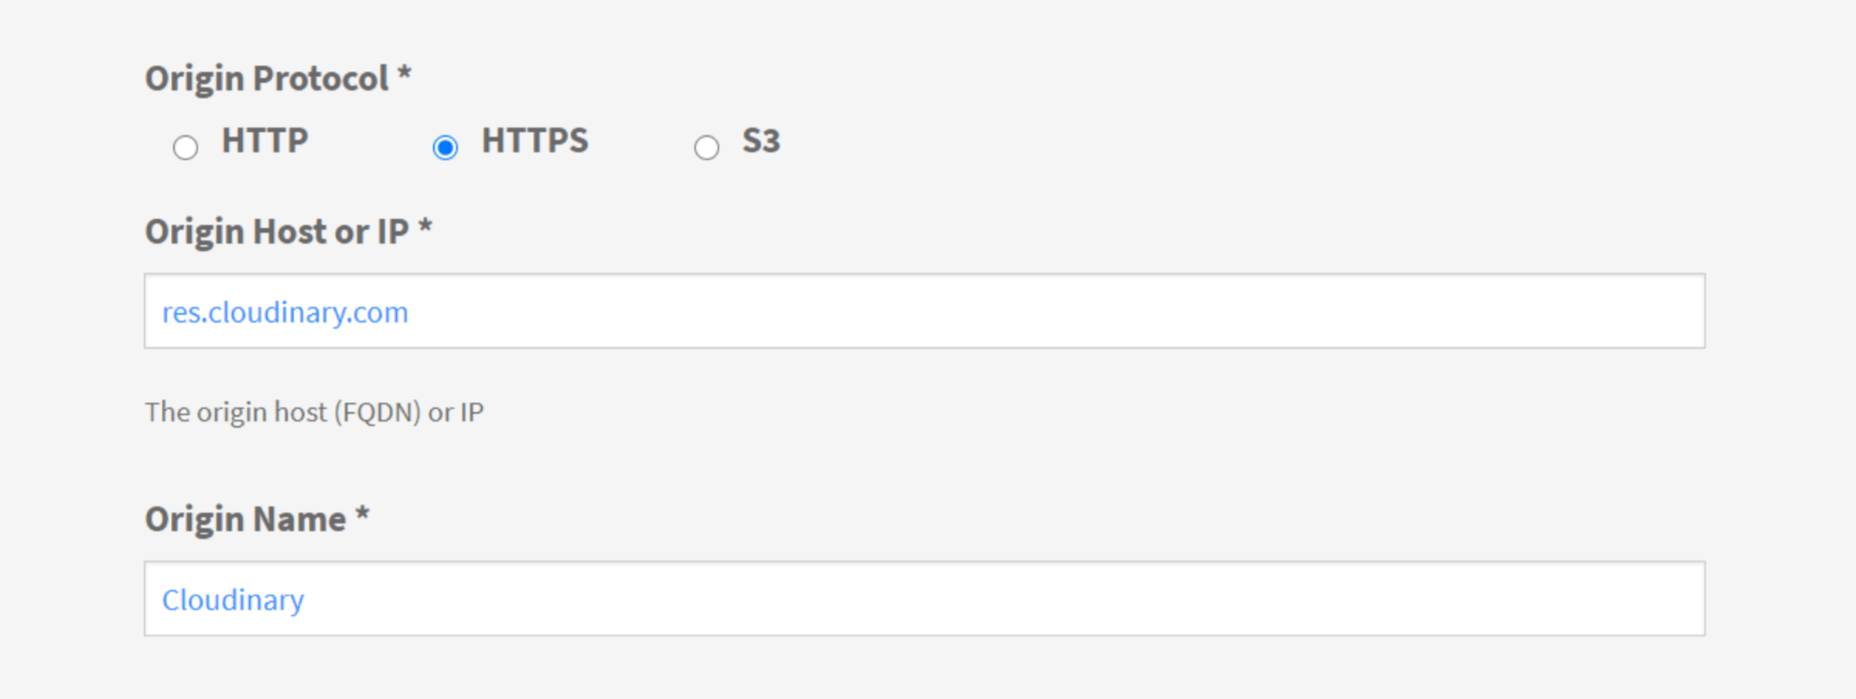
And, then under advanced:

If I specifically wanted to load the profile picture in WebP format (for transparency support, for example), I could add the ImageEngine directive f_webp:

https://images.myimageengine.com.imgeng.in/image/upload/w_400,h_400,c_crop,g_face,r_max/w_200/?imgeng=/f_webp/profile.jpg

ImageEngine and Cloudinary – The Wrap Up

Both ImageEngine and Cloudinary are superb platforms that can make managing image and video assets easier and improve your website maintenance. However, both services have their specialty in which they outperform each other.

For ImageEngine, it’s delivering blisteringly fast image loading times in next-gen formats and with a minimal loss of visual quality.

For Cloudinary, it’s providing a visual interface to organize, store, and edit your image and video assets.

As a further incentive, letting each of these services handle what they’re best at can lead to lowering your long-term operating costs.


[– This is a sponsored post on behalf of ImageEngine –]

Source

The post Start Using a Smart DAM and Image Optimization Stack first appeared on Webdesigner Depot.


Source de l’article sur Webdesignerdepot

Intermine, where I was tasked with creating new user training documentation. For this project, I entirely rewrote the Intermine user documentation — which included images, code snippets, tables, mathematical formulas, and more — using GitBook. This guide will share my experience creating technical documentation using GitBook and act as a de-facto quick-start guide to GitBook.

What is GitBook?

GitBook is a collaborative documentation tool that allows anyone to document anything—such as products and APIs—and share knowledge through a user-friendly online platform. According to GitBook, “GitBook is a flexible platform for all kinds of content and collaboration.” It provides a single unified workspace for different users to create, manage and share content without using multiple tools. For example:

Source de l’article sur DZONE


Introduction

Compared with V1.0, Nebula Graph, a distributed graph database, has been significantly changed in V2.0. One of the most obvious changes is that in Nebula Graph 1.0, the code of the Query, Storage, and Meta modules are placed in one repository, while from Nebula Graph 2.0 onwards, these modules are placed in three repositories:

  • nebula-graph: Mainly contains the code of the Query module.
  • nebula-common: Mainly contains expression definitions, function definitions, and some public interfaces.
  • nebula-storage: Mainly contains the code of the Storage and Meta modules.

This article introduces the overall structure of the Query layer and uses an nGQL statement to describe how it is processed in the four main modules of the Query layer.

Source de l’article sur DZONE

Everyday design fans submit incredible industry stories to our sister-site, Webdesigner News. Our colleagues sift through it, selecting the very best stories from the design, UX, tech, and development worlds and posting them live on the site.

The best way to keep up with the most important stories for web professionals is to subscribe to Webdesigner News or check out the site regularly. However, in case you missed a day this week, here’s a handy compilation of the top curated stories from the last seven days. Enjoy!

The New Trello – Going Beyond the Board

Flameshot – Superb Screenshot Tool

GitHub Surf – Open repositories in a VSCode Environment

The Never-Ending Job of Selling Design Systems

The Secret Ingredients to Design

What Saul Bass Can Teach Us About Web Design

2021 Planner for Notion – A Smart Notion Workspace

Ideas for CSS Button Hover Animations

Ray.so – Create Beautiful Images of Your Code

Variable Font Reveals The Full Horror of The Climate Crisis

Design Systems For Figma: Year In The Life Of A Material Design Advocate

Interface Market – An Extensive Collection of App UI Kits

DogeHouse – Open-Source Audio Chat on the Web

Interaction Design is More Than Just User Flows and Clicks

Design Trends 2021

Straw.Page – Extremely Simple Website Builder

The Impact of Web Design and SEO Conversion Rates

Powerful Microinteractions to Improve Your Prototypes

What’s New in Ecommerce, February 2021

Colortopia – The Easiest Way to Find Colors

5 Simple Design Patterns to Improve Your Website

TextBuddy for macOS – A Swiss Army Knife for Plain Text

Upcoming Interesting JavaScript ES2021 (ES12) Features

WordPress 5.7: Big ol’ jQuery Update

JavaScript reducer – A Simple, Yet Powerful Array Method

Source

The post Popular Design News of the Week: February 15, 2021 – February 21, 2021 first appeared on Webdesigner Depot.


Source de l’article sur Webdesignerdepot

cSvn — is a web interface for Subversion repositories. cSvn is based on CGI script written in С.

This article covers installing and configuring cSvn to work using Nginx + uWsgi. Setting up server components is quite simple and practically does not differ from setting up cGit.

Source de l’article sur DZONE

We all love web badges. You might have spotted many of them in README of repositories, including the repository of my blog, The Cloud Blog. In general, web badges serve two purposes.

  1. They are visually appealing.
  2. They display key information instantly.

If you scroll to my website’s footer section, you will find GitHub and Netlify badges that display the status of the latest build and deployment. I use them to quickly check whether everything is fine with the world without navigating to their dashboards. In essence, a badge is an SVG image with dynamic content embedded in it.

Source de l’article sur DZONE

Millions of repositories are hosted on GitHub, and lots of projects hosted there make their way into your project as dependencies. Developers can just look for modules that cover their use-case and import it into their project, which is actually great! The not-so-great part about importing third-party code is that developers usually just ignore the security aspects of it altogether.

According to GitHub, its security scan for vulnerabilities in Ruby and JavaScript unearthed more than four million bugs, which sparked a significant clean-up effort by project owners. As demonstrated by Equifax’s massive data breach, vulnerable open-source software libraries may contain significant security repercussions. GitHub has made some improvements in terms of notifying the user about the security issues in their code, but the users are required to opt into their security alerts.

Source de l’article sur DZONE