Articles

Le cœur du système d’information d’Atos, comprenant 42 systèmes et 500 interfaces, a été basculé vers le cloud Microsoft Azure, au travers de l’offre RISE with SAP. Un projet mené en seulement 9 mois par les équipes d’Atos.

Atos est un des leaders mondiaux des entreprises de services du numérique, avec une présence dans 71 pays et un effectif de 105.000 collaborateurs, pour un chiffre d’affaires annuel de près de 11 milliards d’euros. Atos est un acteur engagé : partenaire des Jeux olympiques et paralympiques depuis 2001, le groupe met également en œuvre une stratégie net-zéro visant à la fois à atteindre la neutralité carbone en interne, mais aussi à proposer des services et produits décarbonés à ses clients.

Jusqu’alors, Atos hébergeait son système d’information dans ses propres datacenters, dont l’ERP Nessie. Une offre basée sur des solutions SAP, ayant basculé en 2020 vers l’ERP Intelligent SAP S/4HANA. Fin 2020, l’entreprise a décidé de migrer Nessie vers le cloud.

« Plusieurs raisons ont mené à ce choix, explique Frédéric Aubrière, DSI groupe d’Atos. Chaque changement opéré sur un SI on-premise se traduit par des dépenses d’investissement (CAPEX), qu’il faut valider auprès de la direction financière. Avec le cloud, la discussion peut se recentrer sur les seules dépenses d’exploitation (OPEX), ce qui participe à lever certains verrous. En déléguant la gestion des infrastructures à un hyperscaleur, nous libérons également des ressources IT internes, qui peuvent se concentrer sur leur cœur de métier. Enfin, la crise sanitaire a démontré que la flexibilité apportée par le cloud était un atout pour les entreprises. »

Un des arguments mis en avant par Atos est que le cloud est devenu suffisamment mature pour supporter des workloads critiques. « Pendant longtemps, le cloud a été réservé à des systèmes connexes, l’ERP restant hébergé sur site. Aujourd’hui, le cœur du SI n’est plus un terrain interdit au cloud. J’estime qu’il peut et doit basculer vers le cloud. » En migrant le cœur de son système d’information vers le cloud, Atos entend lancer un message fort en direction des entreprises qui hésiteraient encore à adopter ce modèle de déploiement. Le projet est donc particulièrement stratégique pour le groupe. « Ce que nous avons réalisé avec notre SI, nous pouvons le faire pour celui de nos clients », confirme Frédéric Aubrière.

Un projet mené à bien en seulement 9 mois

Atos a mis en œuvre tout son savoir-faire – et la force de frappe de ses nombreux experts – pour réaliser cette migration en un temps record. Le choix s’est porté sur l’offre RISE with SAP, avec un déploiement effectué sur les infrastructures Microsoft Azure de Francfort. Un choix stratégique là encore, les serveurs utilisés dans ce datacenter Microsoft étant des Bull Sequana S. Du matériel conçu par Bull, filiale d’Atos, et certifié SAP, avec des instances pouvant atteindre les 12 To en scale up (et plus d’une centaine de téraoctets en scale out).

Le projet a démarré fin 2020. Dès avril 2021, le système de test basculait en live, suivi par les instances de développement et de qualité. L’instance de production est entrée en fonction le 13 septembre 2021, soit environ 9 mois après le début du projet. Un tour de force de la part d’Atos. Si l’ERP a été migré sans modifications majeures, le périmètre du projet reste en effet particulièrement important. « Nous avons migré notre ERP vers le cloud, mais aussi l’ensemble des systèmes connexes gravitant autour de lui », explique Frédéric Aubrière. Au total, 42 systèmes ont été migrés et 500 interfaces. 5000 tests ont été effectués afin de couvrir un large spectre de cas d’utilisation.

« Hormis quelques ajustements dans les paramètres de connexion, la bascule a été transparente pour les utilisateurs. Le portail MyAtos est toujours accessible de la même façon et permet toujours d’accéder aux mêmes services. Notre SI est par ailleurs toujours aussi stable et performant. » Les performances des infrastructures correspondent jusqu’à maintenant au cahier des charges d’Atos, avec un SLA de 99,7% et un RPO très proche de zéro (30 minutes). « Nous allons exécuter un dry run du DRP dans les prochains mois, afin de mesurer le délai de reprise d’activité de notre SI », confie le DSI d’Atos.

SAP BTP et décarbonisation en ligne de mire

Avec son contrat unique, l’offre RISE with SAP est un facteur de simplification lors du passage au cloud. « Avoir un unique contrat, signé en direct avec SAP, nous permet de nous affranchir de la complexité de la tarification des hyperscaleurs, confirme Frédéric Aubrière. C’est une forme de contrat plus confortable pour les clients et apportant une meilleure prédictibilité sur les coûts. RISE with SAP nous permet également de conserver notre code et nos applications. Il permet de basculer vers le cloud de façon non violente, en respectant les processus et spécificités du groupe. »

Une fois le SI stabilisé et les processus calés entre SAP et Atos, l’entreprise compte travailler sur la prochaine génération de son ERP. Au menu, un nettoyage du code spécifique et son adaptation à la SAP Business Technology Platform (SAP BTP). En parallèle, une connexion avec certains services Microsoft Azure sera mise en place. Autre tâche confiée à la DSI d’Atos, la décarbonation du fonctionnement de sa nouvelle plate-forme cloud. L’élasticité propre aux infrastructures cloud devrait permettre au groupe d’ajuster les ressources au plus près des besoins. L’objectif d’Atos est d’atteindre la neutralité carbone d’ici 2028.

The post Atos bascule son ERP SAP S/4HANA vers le Cloud avec l’offre RISE with SAP appeared first on SAP France News.

Source de l’article sur sap.com

It’s something every design team dreams about – a better design process and handoff procedure. Your design team is not alone if you are looking for a better solution.

Imagine what your workflow would look like if you could forgo the struggles of image-based technology, design and handoff with accurate components that have interactive features. Projects in the design phase will look more like final products and, most importantly, interact like final products. 

Let’s imagine a new design process together.

Challenges of an Image-Based Design Process

Here’s what we all know – image-based design tools provide pictures of components in the visual form but lack the interactivity and conditions that exist in the end-product. There’s not a high level of functional fidelity there, and it can cause confusion among design teams and rework.

These tools require you to redraw the fundamental components and design with boxes and rectangles, which takes too much time and can create a disconnect between the design and development teams. 

Further, you don’t fully maximize the potential of a design system because of inconsistencies between code-powered systems that developers use and these image-based systems for designers. There’s an innate gap between maintaining the environments and creating consistency in components. 

The final and maybe most difficult challenge with an image-based design process is in usability testing. You just can’t test an image the way you can working components. If the prototype is not interactive enough, you lose valuable feedback in the testing process. Functional fidelity is a must-have design and development tool in 2022. 

Iress, market-leading financial software, had many of these same problems in its design system process. You can probably relate to its story, which includes a designer and engineer who aren’t entirely on the same page, hit the deadline and have to deliver, and then get customer feedback. The result was a lot of extra headaches and work. 

But there is a better way: Import all user interface components into a code-powered design system in sync with a design tool so that your team can work in harmony to build, scale, and handoff projects with ease. 

Scale Design With Accurate Components

Here’s what most design and development teams want en route to building products: Accurate components with built-in interactivity, states, and conditions. No redrawing boxes and rectangles; no trying to figure out what states and interaction should be.

And if you can do it with ten times the speed and agility? Now you’re really in business. 

“It used to take us two to three months just to do the design. Now, with UXPin Merge, teams can design, test, and deliver products in the same timeframe,” said Erica Rider, Senior Manager for UX at PayPal. “Faster time to market is one of the most significant changes we’ve experienced using Merge.”

The time and workflow savings come from the ability to maintain only one environment as a product team. Rather than image-based tools, a code-powered design system that will push updates to components as the design evolves is the modern way to work. This workflow can also eliminate duplicate documentation so that your team has a single source of truth for whole product teams. 

Now you can be more agile in the design process and scale. And as Rider hinted at, there is a solution already available in UXPin Merge. 

Scalability with accurate design components has other benefits as well. 

Teams can onboard people faster because the design system is in the design tool. There’s less searching for answers with drag and drop-ready building blocks. New team members will find more success and be more valuable to the team quicker due to fewer inconsistencies and errors. 

Testing also gets a boost as you scale with a single source of truth. You can actually create better usability tests with a high-fidelity, functional version of the prototype, allowing users to leave more valuable and detailed feedback that can improve your product in the early stages. 

Better Handoffs Start Here

As you imagine a better design process, take it one step further. Better handoffs are a goal for most teams. 

An interactive component-based design tool can eliminate the need for multiple iterations of the same meeting to explain how a prototype works. Everyone can see and interact with it for themselves with accurate, true components that ensure the prototype works the same as the product. 

Designers will feel more like their vision is making it into the final product, and developers have a better idea of how to work. Everyone has the exact same components written in code. Thanks to the single source of truth, devs can speed up as they build the product because they start with components that include production-ready code.

A typical design to developer handoff might have multiple steps: Create vector design elements, create a model for interactions, and then send the prototype with documentation. Not to mention the meetings that are required to make sure everyone is on the same page.

In a model with interactive component elements, the developer handoff is fast and easy; they create a prototype with true components and all the built-in properties. The developer copies the JSX code and pastes it into his tool to build the final product. All the component properties and their coded interactions already exist in the source code. This is possible because the source of truth is the code itself, the source code.

Quick Tool Solution and Technical Use

This solution to this common challenge is not somewhere in the future; it’s already here.

UXPin, a code-based design tool, has Merge technology, which allows you to bring all interactive components into UXPin. Then you can use your own, or the open-source library with the ready-made building blocks to get products ready faster.

Here are just a few of the things you can do with Merge by UXPin:

  • Integrate your developer’s storybook to use it as a single source of truth (works for all frameworks)
  • Import design system components from a dev’s Git repository, such as GitHub, Bitbucket, GitLab, or others (works with React)
  • Work with the built-in MUI library
  • Add the npm component package to UXPin on your own (no developer required)
  • Design with the confidence that your work can be ideally reflected by developers
  • Create and share a library of interactive components

Summary 

Say bye-bye to redrawing rectangles – build more accurate prototypes easier and end-products faster with Merge by UXPin.

Now is the time to solve one of your biggest design challenges while upgrading and scaling the design process and improving handoffs. 

Merge by UXPin is user-friendly and made for scalable projects of almost any size. The line between design and development blurs with quicker product release and a fully-interactive solution. Request access today.


[– This is a sponsored post on behalf of UXPin –]

Source

The post How to Scale Your Design Process and Improve Handoff first appeared on Webdesigner Depot.

Source de l’article sur Webdesignerdepot

In recent years, an increasing number of enterprises began to use data to power decision-making, which yields new demands for data exploration and analytics. As database technologies evolve with each passing day, a variety of online analytical processing (OLAP) engines keep popping up. These OLAP engines have distinctive advantages and are designed to suit varied needs with different tradeoffs, such as data volume, performance, or flexibility.

This article compares two popular open-source engines, Apache Druid, and StarRocks, in several aspects that may interest you the most, including data storage, pre-aggregation, computing network, ease of use, and ease of O&M. It also provides star schema benchmark (SSB) test results to help you understand which scenario favors which more.

Source de l’article sur DZONE

The email channel is known for multiple advantages. It is convenient to implement practically, offers many options, and has a fantastic ROI of up to 4200%.

But we also face problems, the most disappointing of which is people ignore emails, not performing the desired action, or worst of all unsubscribing. Why does it happen?

The web is constantly progressing. It offers many tools like modern HTML template builders, ESP services, and other digital assistants that help us at all stages. But even the best tools are not enough; the secret of success still rests with us.

In this post we’ll cover the 7 cardinal sins of email marketing, to help you avoid them.

1. Being Too Late

I can define this mistake as probably the worst. It’s worse than broken links, incorrect dates, or prices. Even more harmful than ugly design.

We lose a lot when postponing email strategy implementation. Beginners often focus all their attention on the content, social media activities, SEO issues… All that is important, right. But ignoring email campaigns is a hard fail.

Thousands of visitors never come again to your website. In other words, they leave the very first levels of the marketing funnel. While regular emailing keeps them engaged and prevents churn.

So delays here are only profitable for competitors. Don’t wait until you collect “enough” contacts. Start as soon as possible. 

Frequency matters too. Don’t bomb people with emails; it annoys and causes unsubscribes. Email frequency is an individual parameter depending on many factors.

2. Disregarding Clients’ Expectations

A fundamental axiom: people unsubscribe when emails are irrelevant. The same goes for neglected expectations. Even the best content with next-gen features won’t save the situation.

I mentioned the email frequency a bit above. Notice that if you announce the weekly emails but send them every day, this is an example of ignoring expectations. Be honest with readers.

Another typical issue is off-topic. If your subscribers are waiting for content related to smartphones, send them newsletters about smartphones, not dresses or domestic turtles :)

But in some cases, getting off-topic can be good. It all depends on the target audience, actual situation, and communication style. 

3. Bad Segmentation 

Once again, relevance is vital. So we must avoid generic emails. Instead, especially if your contact list is extensive enough, apply all the possible parameters: age, gender, location, customers history, etc.

Where to get the respective data? A typical solution is to use update preferences forms in emails or on the website. Let clients choose the topics that are interesting for them.

Use surveys, sign-in forms, AI-based techniques of segmentation… Smart algorithms are great helpers that track clients’ behavior and then process the data for segmentation purposes. 

The better we know our subscribers, the deeper we segment the contact list. It allows sending precisely targeted newsletters to respective segments.

4. Insufficient Personalization 

As Hubspot stats say, personalized emails’ open rate is 26% higher, and their click-through rate is 14% better. But even besides index data, poor personalization is just nonsense today.

Clients are looking for content that matches their preferences, so marketers have to consider these expectations. Segmentation and dynamic range are essential here, but they are not the only techniques.

Everything is much more sophisticated here, in addition to personalized subjects and content. Another solution is to generate recommendations that include the previously browsed products.

AI-powered automation comes to help. Machines will upgrade the classical personalization to the next level called hyper-personalization.

5. Underestimating Mobile-Friendliness 

It’s simply unacceptable to send non-responsive emails today. With so many people opening email on different devices, this is a huge fail.

The modern world is full of gadgets and devices. Email has been opened on smartphones more frequently than on desktop PCs and notebooks in recent years. Up to 70% of readers will read messages on mobiles very soon. No wonder that responsivity turned into a mobile priority.

Regarding layout and design, there are no problems: modern template editors are featured with automated responsivity. But mobile-first means not only layout/design adjustment for mobiles, full-width buttons, or larger fonts. We have to work with content too. Don’t overwrite text remember that recipients read inbox emails on the run. 

Just imagine yourself reading emails in the cafe or cab. And ask yourself: is everything convenient? Would you take the desired action on the run?

6. Non-Professional Approach 

People are quite skeptical of new brands. We need to do our best to attract them. So everything must be done professionally.

The best solution: be a perfectionist. If newsletters look amateurish, they are likely to repel.  

Being amateurish will also ruin your brand identity and reduce customers’ trust. Pay close attention to design, stick to your corporate style, analyze each detail in the context of overall harmony.

7. Overlooking Tests and Improvements 

Testing is vital. Before sending an email campaign, check it via Litmus or Email on Acid to be sure that message looks just as planned. These tools allow testing email rendering by +90 combinations of email clients, devices, and OS.

Knowledge is power. Always try and test your marketing strategies. Are you satisfied with your actual performance? Run A/B tests and focus on the most significant wins and failures. 

Summing Up

Of course, threats are not limited to these seven failures. The last piece of advice: never ignore trends. 

Accessibility? Don’t forget about clients with special requirements. Get whitelisted and incorporate these technologies in your campaigns.

And constantly strive for perfection. With this doctrine, you’ll win!


Featured image via Pexels.

Source

The post 7 Worst Fails in Email Marketing first appeared on Webdesigner Depot.

Source de l’article sur Webdesignerdepot

“Minimum Viable Product,” or “MVP,” is a concept of agile development and business growth. With a minimum viable product, you focus on creating the simplest, most basic version of your product, web application, or code possible.

Minimum viable products include just enough features to attract early adopters and validate your idea in the early stages of the development lifecycle. Choosing an MVP workflow can be particularly valuable in the software environment because it helps teams receive, learn from, and respond to feedback as quickly as possible.

The question is, how exactly do you define the “minimum” in MVP? How do you know if your MVP creation is basic enough while still being “viable”?

Defining the Minimum Viable Product: An Introduction

The concept of “Minimum Viable Product” comes from the Lean Start-up Methodology, introduced by Eric Ries. The purpose of MVP is to help companies quickly create versions of a product while collecting validated insights from customers for each iteration. Companies may choose to develop and release minimum viable products because they want to:

  • Introduce new products into the market as quickly as possible;
  • Test an idea with real users before committing a large budget to product development;
  • Create a competitive product with the use of frequent upgrades;
  • Learn what resonates with the target market of the company;
  • Explore different versions of the same product.

Aside from allowing your company to validate an idea for a product without building the entire concept from scratch, an MVP can also reduce the demand on a company’s time and resources. This is why so many smaller start-ups with limited budgets use the MVP and lean production strategy to keep costs as low as possible.

Defining an MVP: What your Minimum Viable Product Isn’t

When you’re building a Minimum Viable Product, you’re concentrating on developing only the most “essential” features that need to be in that product. For instance, you might be building a shopping app for a website. For the app to be “viable,” it would need to allow customers to search through products and add them to a basket or shopping cart. The app would also need a checkout feature and security components.

However, additional functionality, like the ability to send questions about an item to a customer service team or features that allow clients to add products to a “wish list,” may not be necessary straight away. Part of defining a minimum viable product is understanding what it isn’t. For instance, an MVP is not:

  • A prototype: Prototypes are often mentioned alongside MVPs because they can help with early-stage product validation. However, prototypes are generally not intended for customers to use. The “minimum” version of a viable product still needs to be developed enough for clients and users to put it to the test and provide feedback.
  • A minimum marketable product: An MVP is a learning vehicle that allows companies to create various iterations of an item over time. However, a minimum marketable product is a complete item, ready to sell, with features or “selling points” the company can highlight to differentiate the item from the competition.
  • Proof of concept: This is another similar but distinct idea from MVP. Proof of concept items test an idea you have to determine whether it’s attainable. There usually aren’t any customers involved in this process. Instead, companies create small projects to assess business solutions’ technical capabilities and feasibility. You can sometimes use a proof of concept before moving on to an MVP.

Finding the Minimum in your MVP

When finding the “minimum” in a minimum viable product, the primary challenge is ensuring the right balance. Ideally, you need your MVP to be as essential, cost-effective, and straightforward as possible so that you can create several iterations in a short space of time. The simpler the product, the easier it is to adapt it, roll it out to your customers, and learn from their feedback.

However, developers and business leaders shouldn’t get so caught up focusing on the “Minimum” part of Minimum Viable Product that they forget the central segment: “Viable”; your product still needs to achieve a specific purpose.

So, how do you find the minimum in your MVP?

1. Decide on Your Goal or Purpose

First, you’ll need to determine what your product needs to do to be deemed viable. What goal or target do you hope to achieve with your new product? For instance, in the example we mentioned above, where you’re creating an ecommerce shopping app, the most basic thing the app needs to do is allow customers to shop for and purchase items on a smartphone.

Consider the overall selling point of your product or service and decide what the “nice to haves” are, compared to the essential features. For instance, your AR app needs to allow people to interact with augmented digital content on a smartphone, but it may not need to work with all versions of the latest AR smart glasses.

2. Make a List of Features

Once you know the goal or purpose of your product, the next step is to make a list of features or capabilities you can rank according to importance. You can base your knowledge of what’s “most important” for your customers by looking at things like:

  • Competitor analysis: What do your competitors already offer in this category, and where are the gaps in their service or product?
  • User research: Which features or functionalities are most important to your target audience? How can you make your solution stand out from the crowd?
  • Industry knowledge: As an expert in your industry, you should have some basic understanding of what it will take to make your product “usable.”

3. Create Your Iterations

Once you’ve defined your most important features, the next stage is simply building the simplest version of your product. Build the item according to what you consider to be its most essential features and ask yourself whether it’s serving its purpose.

If your solution seems to be “viable,” you can roll it out to your target audience or a small group of beta testers to get their feedback and validate the offering. Use focus groups and market interviews to collect as much information as possible about what people like or dislike.

Using your feedback, you can begin to implement changes to your “minimum” viable product to add more essential features or functionality.

Understanding the “Minimum Viable Product”

Minimum viable products are evident throughout multiple industries and markets today – particularly in the digitally transforming world. For instance, Amazon might be one of the world’s most popular online marketplaces today, but it didn’t start that way. Instead, Jeff Bezos began purchasing books from distributors and shipping them to customers every time his online store received an order to determine whether the book-selling landscape would work.

When Foursquare first began, it had only one feature. People could check-in at different locations and win badges. The gamification factor was what made people so excited about using the service. Other examples include:

  • Groupon: Groupon is a pretty huge discount and voucher platform today, operating in companies all around the world. However, it started life as a simple minimum viable product promoting the services of local businesses and offering exclusive deals for a short time. Now Groupon is constantly evolving and updating its offerings.
  • Airbnb: Beginning with the use of the founders’ own apartment, Airbnb became a unicorn company giving people the opportunity to list places for short-term rental worldwide. The founders rented out their own apartment to determine whether people would consider staying in someone else’s home before eventually expanding.
  • Facebook: Upon release, Facebook was a simple social media tool used for connecting with friends. Profiles were basic, and all members were students of Harvard University. The idea quickly grew and evolved into a global social network. Facebook continues to learn from the feedback of its users and implement new features today.

Creating Your Minimum Viable Product

Your definition of a “minimum viable product” may not be the same as the definition chosen by another developer or business leader. The key to success is finding the right balance between viability – and the purpose of your product, and simplicity – or minimizing your features.

Start by figuring out what your product simply can’t be without, and gradually add more features as you learn and gain feedback from your audience. While it can be challenging to produce something so “minimalistic” at first, you need to be willing to release those small and consistent iterations if you want to leverage all the benefits of an MVP.

Suppose you can successfully define the meaning of the words “Minimum” and “Viable” simultaneously with your new product creations. In that case, the result should be an agile business, lean workflows, and better development processes for your entire team.


Featured image via Pexels.

Source

The post What is the “Minimum” in Minimum Viable Product? first appeared on Webdesigner Depot.

Source de l’article sur Webdesignerdepot


WordPress is by far the world’s most popular CMS. Not only does it dominate the CMS market with a 64% market share, but it also powers 39.6% of all websites. It has taken the internet by storm by democratizing the web for all. Now, anyone can build, manage, and host a successful website without needing a college degree or coding expertise.

However, while WordPress is great at managing many technical aspects, it still can’t do everything for you. Built mostly on PHP, there are often concerns regarding how performant WordPress is. And, with performance impacting everything from bounce rates to SEO rankings to conversions, it’s something that should be on your radar too.

If you don’t know it yet, images are one of the main causes of slow-loading websites. In recent years, WordPress has stepped up its efforts to try and help users with image optimization out-of-the-box.

Still, as we’ll show, it’s not a total solution, and there is still plenty you can do to deliver better experiences on your WordPress website through image optimization.

What is WordPress Image Optimization? Why is it Important?

Simply put, image optimization is anything you do to make images load faster on your website pages. Almost all websites that use images can benefit from some form of image optimization, even those using WordPress.

Why?

Well, performance is a hugely significant factor when it comes to the competitiveness of your website today.

Google has also made performance an increasingly important factor when it comes to SEO rankings. In fact, performance is a direct ranking signal that carries significant weight.

Google’s Page Experience Update that went live in 2021 has been the biggest move in that direction yet. Soon, Google might even use visual indicators in SERP results to distinguish high-performing websites from the rest.

In Google’s own words, “These signals measure how users perceive the experience of interacting with a web page and contribute to our ongoing work to ensure people get the most helpful and enjoyable experiences from the web.”

So, Why Should We Target Images For Performance Optimization?

According to Google, images are the largest contributor to page weight. Google has also singled out image optimization specifically as the factor with the most untapped potential for performance optimization.

This problem isn’t going away soon. According to data by the HTTP Archive, there are roughly 967.5 KB bytes of image data on desktop web pages and 866.3 KB of image data on mobile pages. This is an increase of 16.1% and 38.8%, respectively, over the last five years.

Thanks to popular e-commerce tools like Woocommerce, it’s estimated that up to 28% of all online sales happen on WordPress websites.

And don’t forget, images are both a key part of conveying information to the user and integral to the design of your website. If they take significantly longer to load than your text, for example, it will negatively impact the user experience in a variety of ways.

In summary, optimized images help your WordPress website by:

  • Improving user satisfaction.
  • Improving various traffic metrics, like bounce rates, time-on-page, etc.
  • Boosting your SEO rankings.
  • Contributing to higher conversions (and sales).

How Does Image Optimization in WordPress Work?

WordPress is so popular because it’s a CMS (content management system) that allows anyone to build, design, and manage a website without any coding or advanced technical experience. Advanced features can be installed with just a few clicks, thanks to plugins, and you rarely have to touch the code behind your website unless you want to make some unique modifications.

In short, using a CMS like WordPress shields you from many of the day-to-day technicalities of running a website.

WordPress Image Optimization: What It Can Do

As we mentioned, one of the main reasons WordPress is so popular is because it takes care of many of the technical aspects of running a website. With that in mind, many think that WordPress should also automatically take care of image optimization without them having to get involved at all.

Unfortunately, that’s not really the case.

True, WordPress does offer some built-in image optimization. Whenever you upload an image to WordPress, it currently compresses the quality to about 82% of the original (since v4.5).

In v4.4, WordPress also introduced responsive image syntax using the srcset attribute. This creates four breakpoints for each image you upload according to the default WordPress image sizes:

  • 150px square for thumbnails
  • 300px width for medium images
  • 768px max-width for medium_large images
  • 1024px max-width for large images.

Here you can see an example of the actual responsive syntax code generated by WordPress:

<img loading="lazy" src="https://bleedingcosmos.com/wp-content/uploads/2021/12/33-1024x683.jpg" alt="" class="wp-image-9" width="610" height="406" srcset="https://bleedingcosmos.com/wp-content/uploads/2021/12/33-1024x683.jpg 1024w, https://bleedingcosmos.com/wp-content/uploads/2021/12/33-300x200.jpg 300w, https://bleedingcosmos.com/wp-content/uploads/2021/12/33-768x512.jpg 768w, https://bleedingcosmos.com/wp-content/uploads/2021/12/33-1536x1024.jpg 1536w" sizes="(max-width: 610px) 100vw, 610px">

Depending on the screen size of the device from which a user visits your webpage, WordPress will let the browser pick the most appropriately sized image. For example, the smallest version for mobile displays or the largest for 4K Retina screens, like those of a Mac.

While this may seem impressive, it’s only a fraction of what can be achieved using a proper image optimization solution, as we’ll show later.

Lastly, WordPress implemented HTML native default lazy loading for all images starting with version 5.5.

So, in short, WordPress offers the following image optimization capabilities baked-in:

  • Quality compression (limited)
  • Responsive syntax (up to 4 breakpoints)
  • Lazy loading

WordPress Image Optimization: What it Cannot Do

There are other issues many have with both the implementation of image compression and responsive syntax as it’s used by WordPress. This leads to some users even purposefully deactivating WordPress’ built-in image optimization so they can fully take control of it themselves.

Here are some of the reasons why:

  • WordPress uses a very basic form of quality compression. It does not use advanced technologies like AI and machine learning algorithms to compress images while maintaining maximum visual quality. It’s also lossy compression, so the quality is lost for good. You can clearly see the difference between an original HD image and the compressed version created by WordPress.
  • WordPress only compresses most images by up to 20%, while advanced image optimization tools can reduce all image sizes intelligently by up to 80%.
  • Responsive syntax can provide significant performance improvements over simply uploading a single HD image to be served on all devices and screens. However, it’s still only limited to a set number of breakpoints (typically 3 or 4). Since it’s not dynamic, a whole spectrum of possible image sizes is not created or used.
  • Responsive syntax code is not scalable and can quickly lead to code that’s bloated, messy, and hard to read.
  • WordPress doesn’t accelerate image delivery by automatically caching and serving them via a global CDN, although this can be done using other tools.

Another important optimization feature that WordPress does not have is auto-conversion to next-gen image file formats. Different image formats offer different performance benefits on different devices. Some formats also enable higher levels of compression while maintaining visual fidelity.

Next-gen formats like WebP, AVIF, and JPEG-2000 are considered to be the most optimal formats on compatible devices. For example, until recently, WebP would be the optimal choice on Chrome browsers, while JPEG-4000 would be optimal on Safari browsers.

However, WordPress will simply serve images in the same formats in which they were originally uploaded to all visitors.

How to Measure the Image Performance of a WordPress Website?

As the undisputed king of search engines, we’ll base most of our performance metrics on guidelines established by Google.

Along with its various performance updates, Google has released a number of guidelines for developers as well as the tools to test and improve their websites according to said guidelines.

Google introduced Core Web Vitals as the primary metrics for measuring a web page’s performance and its effect on the user experience. Thus, Core Web Vitals are referred to as “user-centric performance metrics.” They are an attempt to give developers a testable and quantifiable way to measure an elusive and abstract concept such as “user experience.”

Combined with a number of other factors, Core Web Vitals constitute a major part of the overall page experience signal:

You can find a complete introduction to Core Web Vitals here. However, they currently consist of three main metrics:

  • LCP (Largest Contentful Paint): The time it takes the largest above-the-fold element on your page to load. This is typically a full-sized image or hero section.
  • FID (First Input Delay): The delay from the moment a user first interacts with an element on the page until it becomes responsive.
  • CLS (Cumulative Layout Shift): The visual stability with which the elements on a page load.

Here is an illustration of how these metrics are scored:

While these are the three most important metrics to optimize, they are not the only ones. Google still measures other metrics like the FCP (First Contentful Paint), SI (Speed Index), as well as the TTFB (Time to First Byte), TBT (Total Blocking Time), and TTI (Time to Interactive).

A number of these metrics are directly affected by the images used on your web pages. For example, LCP, FCP, and SI are direct indicators of how fast the content of your web page loads and depends on the overall byte size of the page. However, it can also indirectly affect FID by keeping the main thread busy with rendering large amounts of image content or the perceived CLS by delaying the time it takes large images to load.

These metrics apply to all websites, whether they are custom-made or built using a CMS like WordPress.

When using tools like Lighthouse or PageSpeed Insights, you’ll also get scored based on other flags Google deems important. Some of them are specific to images, such as properly sizing images and serving images in next-gen formats.

If you only use built-in WordPress image optimization, you’ll get flagged for the following opportunities for improvement:

Some of the audits it will pass, however, are deferring offscreen images (lazy loading) and efficiently coding images (due to compression):

A Better Way to Optimize WordPress Images: ImageEngine

Billions of websites are all vying for prime real estate on Google SERPs, as well as the attention of an increasingly fussy internet-using public. Every inch matters when it comes to giving your website a competitive advantage.

So, how can you eliminate those remaining performance flags and deliver highly optimized images that will keep both your visitors and Google happy?

Sure, you could manually optimize images using software like PhotoShop or GIMP. However, that will take you hours for each new batch of images. Plus, you still won’t benefit from any automated adaptive optimization.

A more reasonable solution in today’s fast-paced climate is to use a tool developed specifically for maximum image optimization: an image CDN like ImageEngine.

ImageEngine is an automated, cloud-based image optimization service using device detection as well as intelligent image compression using the power of AI and machine learning. It can reduce image payloads by up to 80% while maintaining visual quality and accelerating delivery around the world thanks to its CDN with geographically dispersed PoPs.

Why is ImageEngine Image Optimization Better Than WordPress?

When making a head-to-head comparison, here are the reasons why ImageEngine can deliver better performance:

  • Device Detection: ImageEngine features built-in device detection. This means it picks up what device a visitor to your website is using and tailors its optimization strategy to what’s best for that specific device.
  • Client hints: By supporting client hints, ImageEngine has access to even more information regarding the device and browser to make better optimization decisions.
  • Next-gen formats: Based on optimal settings, ImageEngine automatically converts and serves images in next-gen formats like WebP, AVIF, JPEG2000, and MP4 (for GIFs).
  • Save data header: When a Chrome user has save-data mode enabled, ImageEngine will automatically compress images more aggressively to save on data transfer.
  • CDN with dedicated edge servers: ImageEngine will automatically cache and serve your optimized image assets using its global CDN. Each edge server has device awareness built-in to bring down latency and accelerate delivery. You can also choose to prioritize specific regions.

So, the key differentiator is that ImageEngine can tailor optimizing images for what’s optimal for each of your visitors. ImageEngine is particularly good at serving mobile visitors thanks to WURFL device detection, which can dynamically resize images according to most devices and screen sizes in use today. As of now, this is a completely unique capability that none of its competitors offer.

It allows for far better and more fine-tuned optimization than WordPress’ across-the-board approach to compression and responsive syntax.

If you want, you could turn off WordPress responsive syntax and compression, and you would still experience a performance increase using ImageEngine. However, ImageEngine also plays nice with responsive syntax, so it’s not completely necessary unless you want to serve the highest-fidelity/low-byte-size images possible.

How Does ImageEngine Work with WordPress?

The process ImageEngine uses to integrate with WordPress can be broken down into a few easy steps:

  • Sign up for an ImageEngine account: ImageEngine offers three pricing plans depending on the scale and features you need as well as a no-commitment 30-day free trial.
  • Specify your image origin: This tells ImageEngine where to find the original versions of your images. For a WordPress website, you can just use your domain, e.g., https://mywordpresswebsite.com. ImageEngine will then automatically pull the images you’ve uploaded to your WordPress website.

  • Copy the Delivery Address: After you create an account and specify your image origin, ImageEngine will provide you with a Delivery Address. A Delivery Address is your own unique address that will be used in your <img> tags to point back to the ImageEngine service. Delivery Addresses may be on a shared domain (imgeng.in) or customized using a domain that you own. A Delivery Address typically looks something like {random_string}.cdn.imgeng.in. If your images are uploaded to the default WordPress folder /wp-content/uploads/, you can access your optimized images from ImageEngine simply by changing your website domain. For example, by typing {imageengine_domain}.cdn.imgeng.in/wp-content/uploads/myimage.jpg into your browser, you’ll see the optimized version of that image. Just press the copy button next to the Delivery Address and use it in the next step configuring the plugin.

  • Install the ImageEngine Optimizer CDN plugin: The plugin is completely free and can be installed just like any other plugin from the WordPress repository.
  • Configure and enable ImageEngine Plugin in WordPress: Just go to the plugin under “ImageEngine” in the main navigation menu. Then, copy and paste in your ImageEngine “Delivery Address,” tick the “Enabled” checkbox, and click “Save Changes” to enable ImageEngine:

Now, all ImageEngine basically does is replace your WordPress website domain in image URLs with your new ImageEngine Delivery Address. This makes it a simple, lightweight, and non-interfering plugin that works great with most other plugins and themes. It also doesn’t add unnecessary complexity or weight to your WordPress website pages.

ImageEngine vs Built-in WordPress Image Optimization

So, now let’s get down to business by testing the performance improvement you can expect from using ImageEngine to optimize your image assets.

To do this test, we set up a basic WordPress page containing a number of high-quality images. I then used PageSpeed Insights and the Lighthouse Performance Calculator to get the performance scores before and after using ImageEngine.

Importantly, we conducted this test from a mobile-first perspective. Not only has mobile internet traffic surpassed desktop traffic globally, but Google themselves have committed to mobile-first indexing as a result.

Here is a PageSpeed score using the Lighthouse calculator for WordPress with no image optimization:

As we can see, both Core Web Vitals and other important metrics were flagged as “needs improvement.” Specifically, the LCP, FCP, and TBT. In this case, both the LCP and FCP were a high-res featured image at the top of the page.

If we go to the opportunities for improvement highlighted by PageSpeed, we see where the issues come from. We could still save as much as 4.2s of loading time by properly resizing images and a further 2.7s by serving them in next-gen formats:

So, now let’s see how much ImageEngine can improve on that.

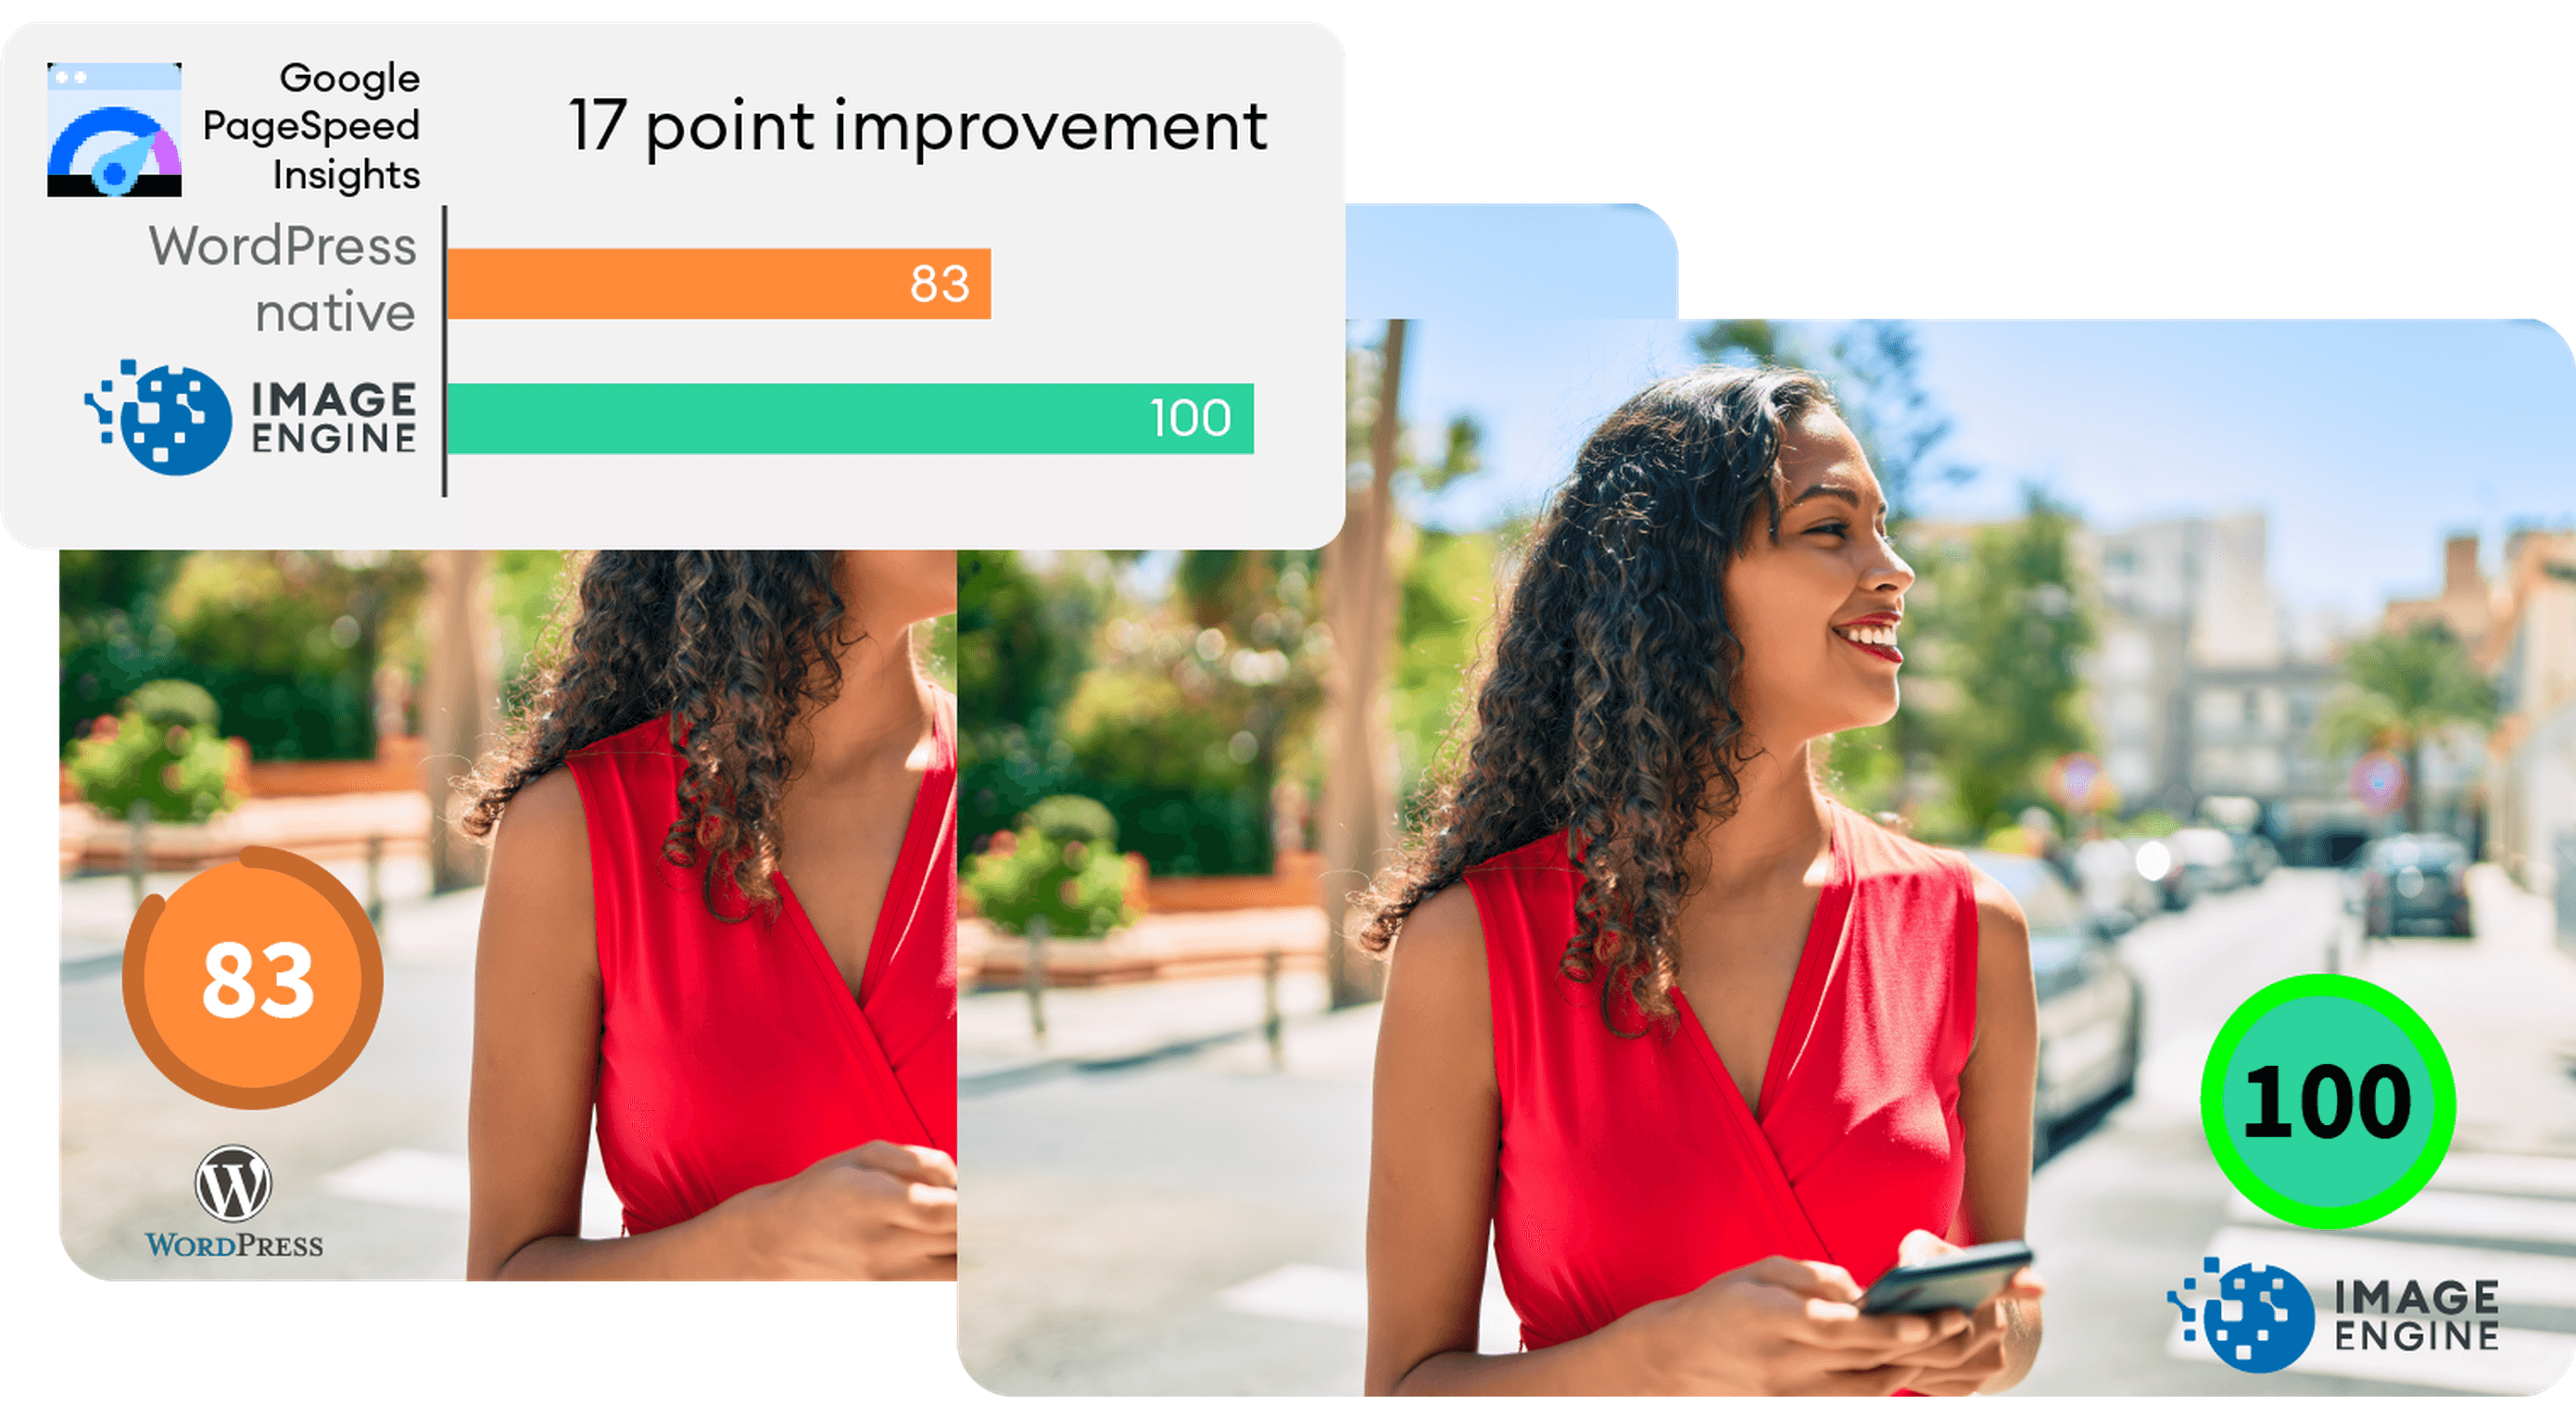
The same test run on my WordPress website using ImageEngine got the following results:

As you can see, we now have a 100 PageSpeed score. I saved roughly 2.5s on the SI (~86%) as well as roughly 1.7s on the LCP (~60%). There was also a slight improvement in the FCP.

Not only will you enjoy a stronger page experience signal from Google, but this represents a tangible difference to visitors regarding the speed with which your website loads. That difference will lead to lower bounce rates, increased user satisfaction, and more conversions.

There was also a 53% overall reduction in the total image payload. This is impressive, considering that it’s on top of WordPress’ built-in compression and responsive syntax.

Conclusion

So, as someone with a WordPress website, what can you take away from this?

Well, first of all, WordPress does feature some basic image optimization. And while not perfect, it should help you offer reasonable levels of performance, even if you use a lot of image content.

However, the caveat is that WordPress applies aggressive, across-the-board compression, which will lead to a noticeable reduction in visual quality. If you use WordPress for any type of website where premium quality images are important, this is a concern — for example, as a photography portfolio, exhibition, or image marketplace like Shutterstock.

By using ImageEngine, you can reduce image payloads and accelerate delivery even further without compromising too harshly on visual quality. What’s more, ImageEngine’s adaptive image optimization technology will provide greater improvements to more of your visitors, regardless of what device(s) they use to browse the web.

Whether or not you still want to use WordPress’ built-in optimizations, ImageEngine will deliver significant improvements to your user experience, traffic metrics, and even conversions.

Plus, true to the spirit of WordPress, it’s extremely simple to set up without any advanced configuration. Just sign up for ImageEngine in 3 easy steps, install the plugin, integrate ImageEngine by copy/pasting your image domain, and you’re good to go.


[ This is a sponsored post on behalf of ImageEngine ]

Source

The post WordPress Website Analysis: Before & After ImageEngine first appeared on Webdesigner Depot.

Source de l’article sur Webdesignerdepot
The importance of scientific research cannot be overstated. User research is crucial to the success of any UX design, and this article will explain all the reasons why.

But first, we will explore what UX research is and how it can give you valuable tools. Then we will analyze why user research is an ongoing, dynamic process.

By the end of this 5-minute read, you will know every efficient research method (qualitative and quantitative) and how to choose the right one(s) for a new or existing UX project.

What is UX Research?

In a few words, we could say that UX research is about observation techniques, feedback methods, and analysis of the whole user experience of a project. As in any scientific research, UX research analyzes how users think and what their motivations and needs are.

The research methods of UX can be divided into two main types: quantitative and qualitative.

Quantitative Research Methods

These methods are all about statistics and focus on numbers, percentages, and mathematical observations. UX designers later transform such numerical data into useful statistics that you can use in UX designs.

To be precise, there are numerous data collection platforms that UX designers use like Google Analytics, Google Data Studio, etc.

Qualitative Research Methods

Qualitative research aims to understand people’s needs and motivations through observation. This includes numerous methods: from interviews and usability testing to ethnographic and field studies.

In general, qualitative research is crucial for us UX designers because it is easier to analyze than quantitative and we can use it quickly in our projects.

Why is UX Research an Ongoing Process?

Suppose you are about to create a UX wireframe. The process is pretty simple. You start with research, proceed with sketching, then prototype and build. But how many times have you gone back to the previous step of the process?

A UX design is completely dynamic and rarely finished. For this reason, UX research should be viewed as an ongoing process. When I stopped worrying about going through this loop over and over again, I immediately became a better UX designer.

Why Should You Invest in UX Research? 

There are many reasons why you should always conduct UX research before you start sketching and prototyping a wireframe:

  1. Stay relevant: Via UX research, you will ensure that you understand what your users need and tailor your product accordingly.
  2. Improve user experience: With comprehensive UX research, you’ll be one step closer to delivering a great user experience.
  3. Clarify your projects: With UX research, you can quickly identify the features you need to prioritize.
  4. Improve revenue, performance, and credibility: When you successfully use UX research, you can boost the ROI (Return on Investment).

9 Effective UX Research Methods  

It becomes clear that UX research is very important to the success of any UX project. All successful approaches derive from three basic foundations: Observation, understanding, and analysis.

So let us take a look at the most popular and effective qualitative and quantitative research methods.

Interviews 

UX designers can conduct one-on-one interviews to communicate with users and analyze the context of the project. This is a very effective UX research method. You just need to set your goals.

  • Difficulty: Medium/Low
  • Cost: Average
  • Phase: Predesign, During Design Phase

Surveys And Questionnaires

This is a very effective approach if you want to gather valuable information quickly. There are many tools like PandaDoc and Wufoo that allow you to create engaging questionnaires and surveys.

  • Difficulty: Low
  • Cost: Low
  • Phase: Predesign, Post Design Phase

Usability Tests

Usability testing is an essential method if you want to test your product in terms of user experience. It can be applied during or after the creation of an app, site, etc.

  • Difficulty: Medium
  • Cost: Average
  • Phase: During Design Phase

A/B Tests

A/B testing is by far the best way to overcome a dilemma. If you do not know which element to choose, all you have to do is organize an A/B test and show each version to a number of users. Based on their feedback, you can then decide which version is the best.

  • Difficulty: Low
  • Cost: Low
  • Phase: During Design Phase

Card Sorts 

With card sorts, you can help your users by providing them with some product content categories (labeled card sets). This is a very cheap and easy way to understand what your users prefer and how they interact with the content you have just designed.

  • Difficulty: Medium
  • Cost: Average
  • Phase: During Design Phase

Competitive Analysis

Analyzing what your competitors are doing differently is critical to the initial stages of a UX design. This will help you identify their strengths and weaknesses and optimize your product.

  • Difficulty: Medium
  • Cost: Average
  • Phase: Predesign

Persona And Scenario Building 

Creating a user persona and a specific scenario for your project is critical. First, you need to build a user persona by integrating the motives, needs, and goals of your target audience.

Then, you can create a scenario that leverages all of this valuable information to deliver a top-notch user experience.

  • Difficulty: Medium
  • Cost: Average
  • Phase: Predesign

Field Studies 

Although a field study is a very effective UX research method, it is also expensive and difficult to conduct. However, there is nothing like field research when it comes to obtaining real-life data.

  • Difficulty: High
  • Cost: High
  • Phase: Predesign, During Design Phase

Tree Tests

Tree testing is a UX research method that you can apply to your designs during or after the construction phase. The process is fairly simple: you provide users with a text-only version of your product and ask them to complete certain tasks. This tactic is a great way to validate your product’s architecture.

  • Difficulty: High
  • Cost: High
  • Phase: During and Post Design Phase

How to Choose the Right UX Research Method?

Good planning is the most important thing for us UX designers. If you know exactly what the UX problem is, you can solve it quickly.

The methods analyzed above are just some of the research tactics used by UX designers. Choosing the right user research method for a project is not easy. To do so, you should first define your goals.

Source

The post How to Get Started With UX Research first appeared on Webdesigner Depot.

Source de l’article sur Webdesignerdepot