Articles

When new technologies arise, we first adopt them for their technical value. If that value proves out, then we reach the magic “crossing the chasm” moment: when a technology jumps to widespread adoption through proven business value and goes mainstream. 

Some technologies, a very select few, make one more jump forward, however — from mainstream to existential imperative. 

Source de l’article sur DZONE

No one likes talking about money. Most of us got into web design because we loved it. But the fact is, we’ve all got bills to pay.

If you’re a half-decent designer or a relatively competent developer, then there’s no reason you can’t make a living as a web designer. Here are six simple steps towards earning a living using the skills you already have.

Step 1. Freelance Work

Many individual bloggers and small company owners require websites to reach a larger audience. You might exploit this opportunity to begin a side business as a freelancer.

One of the most efficient ways to start is to look through employment networks and online classifieds. Eventually though, you’re going to need a portfolio. Building your freelancing company website could be your first opportunity to demonstrate your web development talents. As you embark on new projects, this website can display client testimonials that demonstrate your expertise. Ensure that it’s up to date, relevant, and follows current design trends. Also, make sure your website is linked to your social media profiles. 

Even though you are responsible for finding clients, you have a great deal of flexibility: you can choose your working hours and exercise more freedom and creativity. However, you’d still be accountable for your work and have to execute assignments on time to keep your clients satisfied.

It’s also important to remember that you’ll have to keep track of your taxes and other financial paperwork. Furthermore, you would not have a standard employer who will provide you with health insurance and other perks.

Step 2. Specialize

Today’s market offers a wide choice of web design services most suited to our needs. From designing and building custom websites to creating social media websites to managing SEO and PPCs, web design services offer various services. And while it is beneficial to have a general understanding of what all these services entail, it is always good to identify and refine your expertise. Becoming proficient in one aspect of web design will give you more confidence and direction regarding the kind of work you would like to do.

Allowing yourself to land repeat clients specializing in one type of service will make it easier for you to create processes in your business to complete work accurately and quickly. These processes will also help you build a team should you need one.  

Step 3. Networking Effectively

You should leverage social networking sites such as LinkedIn, practical tools for engaging with colleagues and potential customers. Ensure your profile is updated with all the services offered and all talents you deliver. Make sure you include links to any past projects you’ve worked on. There’s also a career board on LinkedIn that can help you avail yourself of many freelance projects. Registering and engaging with relevant organizations can allow you to acquire more visibility.

Freelancers are generally matched with modest design/development assignments through these websites. Although some developers heavily vouch for them, getting work from these websites when you’re just starting may be exceedingly challenging, considering most of your time will be exhausted in securing billable employment. 

Step 4. Start Your Own Blog or Podcast

Blogs and podcasts are an excellent way to organically acquire fresh customers and other relevant parties. A well-written blog is a terrific source of amusement and knowledge for potential clients. Aside from showcasing your services, a blog may be used to earn money in various ways. Once the blog grows large enough, you can incorporate backlinks, ads, or author-sponsored content. Many popular blogs eventually grow into fully-fledged businesses.

When you start a blog from scratch, it can take a long time to see a return on investment. Consider producing freelance articles for a blog with a constant stream of traffic to help you get started. This will enable you to demonstrate your skills while also getting compensated for them. 

Step 5. Work at a Design Agency

Working at a design agency or in-house could be an ideal option if you desire a more traditional job title. It also helps you build your portfolio with larger and more recognizable clients than those you can secure as a freelancer.

Instead of stressing about the management side of things, you can focus on serving clients and constructing websites with this approach. You wouldn’t have to look for new clients, and you’ll get all of the paid benefits that regular employees get. However, you’d have to work under strict supervision and have less creative control over your projects. There will also be harsh deadlines looming over your shoulder. And this procedure will also set a wage ceiling for you. On the other hand, obtaining employee insurance and securing a source of income can be very reassuring.

Step 6. Start Your Own Agency

Once you feel you have enough relevant experience and are confident in your abilities to perform and manage things well, you can start your own agency. It’s like freelance work, but on a much larger scale. The flexibility to employ others to do your work is the fundamental advantage of having your own agency. You can recruit additional designers and eventually recruiters to help you secure clients.

Having your own agency allows you to do the work you want and how you desire. As a general rule, start as a freelancer and gradually create the foundations for your agency as you gain expertise. You can eventually automate the entire process with hard effort and an innovative business plan.

You must actively network with other people in your business and reach out to new clients in addition to working on your skills. If you can create a solid customer base and take measured chances with your chosen projects, you can procure meatier projects and become prominent in the corporate sector.


Featured image via Unsplash.

Source

The post 6 Simple Steps to a Career in Web Design first appeared on Webdesigner Depot.

Source de l’article sur Webdesignerdepot

Creating and sending business proposals can be a lot of work. However, if you have the right tools and knowledge, you can quickly create and send high-converting proposals that your clients will love. 

This article will explain how to create a fantastic business proposal that looks great and gets signed quickly. Although we’re focussed on design, our tips apply to every industry and type of business.

1. Know When to Talk About Yourself

One of the most common mistakes people make is starting the proposal by talking about themselves. 

You might be surprised to know that clients spend the most time on the introduction chapter, so it’s essential to use it right. You need to set the right tone by explaining to your clients how your solution will help them achieve their goals. 

They want to hear the benefits and feel assured that you’re the best choice for them. If you start the proposal by talking about your company and the values you believe in, you’ll lose the attention of your clients. 

In most cases, the clients have already researched you and know the points you make in your PR releases.

Once you explain your process and the time scales, you can introduce your team and talk about the company. Just make sure it’s short and sweet. 

2. Divide Your Proposal into 6 Sections

Sending a one-page proposal will only confuse your clients and won’t incentivize them to reach out. The best way to format your proposal is to create six sections. 

This should include:

  • Introduction
  • Process
  • Timescales
  • Pricing
  • Next steps
  • Terms and Conditions

You need to showcase what their future could look like if they work with you, listing all the benefits as well as explaining the next steps. You need to write down what happens if they don’t agree with some parts of the proposal, what will happen when you reach an agreement, how much they have to pay, and more. 

Be clear on your follow-up process to speed things up. 

3. Use a Dedicated Proposal App

If you’re someone who fires up MS Word and hopes for the best, your proposals probably don’t get a lot of traction. That’s because you’re spending too much time reinventing the wheel. The best jumping-off point for your proposal strategy is choosing the right app. It will help you automate and speed up the whole process. 

Different solutions suit different people, but some of the features you might want include: 

Digital Signatures

The digital signature option helps you get your proposals signed faster and turns your proposals into legally binding documents. This significantly reduces the agreement time since your clients no longer have to print out your documents, scan them and send them back.

Integrated Payment Methods

Speed up your payment process by choosing the proposal software that has a payment option that allows clients to pay as soon as they agree to your terms and conditions. It can significantly decrease the time it takes to get paid. 

Sales Tool Integration

For an even more straightforward sales process, select a proposal tool that has native integrations with your sales CRM and other sales tools. 

Proposal Analytics

Proposal analytics can help you in the follow-up process. They show when your proposal was opened, on which device, and how much time the client spent on each of the sections. 

Content Library

The content library lets you save any part of the content (text, pictures, videos, terms and conditions, pricing table) for easier access in the future—no more copy and pasting huge chunks of text. 

An Easy-To-Use Editor

In order to be able to create any documents with your proposals software, their editor needs to be very easy to use. If the editor requires design experience, look for a better one.

4. Let’s Talk About Price

When it comes to the price section, there are two significant things you need to look out for: the name of the section and the format of your price.

Naming your pricing section pricing, expenses, or something along those lines cheapens your proposals and makes it seem like a regular invoice. Try naming the section ROI or Investment. It will evoke positive feelings with your clients because if they think of working with you as an investment, they will know that a return on investment is a part of the deal. 

The way you format your prices won’t make or break your deal but can help you speed up the proposal process. Firstly, you need to figure out if you’re going to charge by the hour, based on the value of the project, based on the commission, or something else. 

Once you reach a decision, you have to format the prices in an easy-to-understand and short way. Many companies try to upsell their clients at the very start of their business relationship and create proposals with three different packages. 

We believe that the way you present your prices should be the same as the way doctors prescribe medicine. You need to be the authority on your prices and tell the client what type of package fits their needs. If you leave it up to your client to pick the right package, it will just lead to confusion, and you’ll have to do the extra work to explain the difference to them.

Bonus Tips

Web-based business proposals speed up the signing process. If you make your proposals printable, it will lengthen the time your clients take to agree to your terms and sign them. Make sure your proposals are web-based and have a digital signature option. 

Another tip is to send your proposal as quickly as possible. As soon as you meet with your client and hear them out, start working on your proposal. 

Our last tip is to send your proposal at the beginning of the week. If you send it on a Friday, it will negatively impact the time it takes to get your proposal signed.


Featured image via Pexels.

Source

The post 4 Tips For Getting Design Proposals Signed Faster first appeared on Webdesigner Depot.

Source de l’article sur Webdesignerdepot

Ever since the Python programming language was born, its core philosophy has always been to maximize the readability and simplicity of code. In fact, the reach for readability and simplicity is so deep within Python’s root that, if you type import this in a Python console, it will recite a little poem:

    Beautiful is better than ugly. Explicit is better than implicit. Simple is better than complex. The complex is better than complicated. The flat is better than nested. Sparse is better than dense. Readability counts…

Simple is better than complex. Readability counts. No doubt, Python has indeed been quite successful at achieving these goals: it is by far the most friendly language to learn, and an average Python program is often 5 to 10 times shorter than equivalent C++ code. Unfortunately, there is a catch: Python’s simplicity comes at the cost of reduced performance. In fact, it is almost never surprising for a Python program to be 10 to 100 times slower than its C++ counterpart. It thus appears that there is a perpetual trade-off between speed and simplicity, and no programming language shall ever possess both.
But, don’t you worry, all hope is not lost.

Taichi: Best of Both Worlds

The Taichi Programming Language is an attempt to extend the Python programming language with constructs that enable general-purpose, high-performance computing. It is seamlessly embedded in Python, yet can summon every ounce of computing power in a machine — the multi-core CPU, and more importantly, the GPU.
We’ll show an example program written using taichi. The program uses the GPU to run a real-time physical simulation of a piece of cloth falling onto a sphere and simultaneously renders the result.
Writing a real-time GPU physics simulator is rarely an easy task, but the Taichi source code behind this program is surprisingly simple. The remainder of this article will walk you through the entire implementation, so you can get a taste of the functionalities that taichi provides, and just how powerful and friendly they are.
Before we begin, take a guess of how many lines of code this program consists of. You will find the answer at the end of the article.

Algorithmic Overview

Our program will model the piece of cloth as a mass-spring system. More specifically, we will represent the piece of cloth as an N by N grid of point-masses, where adjacent points are linked by springs. The following image, provided by Matthew Fisher, illustrates this structure:
The motion of this mass-spring system is affected by 4 factors:
  • Gravity
  • Internal forces of the springs
  • Damping
  • Collision with the red ball in the middle
For the simplicity of this blog, we ignore the self-collisions of the cloth. Our program begins at the time t = 0. Then, at each step of the simulation, it advances time by a small constant dt. The program estimates what happens to the system in this small period of time by evaluating the effect of each of the 4 factors above, and updates the position and velocity of each mass point at the end of the timestep. The updated positions of mass points are then used to update the image rendered on the screen.

Getting Started

Although Taichi is a programming language in its own right, it exists in the form of a Python package and can be installed by simply running pip install taichi.
To start using Taichi in a python program, import it under the alias ti:
import taichi as ti
The performance of a Taichi program is maximized if your machine has a CUDA-enabled Nvidia GPU. If this is the case, add the following line of code after the import: ti.init(arch=ti.cuda)

If you don’t have a CUDA GPU, Taichi can still interact with your GPU via other graphics APIs, such as ti.metal, ti.vulkan, and ti.opengl. However, Taichi’s support for these APIs is not as complete as its CUDA support, so, for now, use the CPU backend: ti.init(arch=ti.cpu)And don’t worry, Taichi is blazing fast even if it only runs on the CPU. Having initialized Taichi, we can start declaring the data structures used to describe the mass-spring cloth. We add the following lines of code:

Python


 N = 128 x = ti.Vector.field(3, float, (N, N)) v = ti.Vector.field(3, float, (N, N))

Source de l’article sur DZONE

The global artificial intelligence market is expected to reach over $200 billion by 2027. The big data market segment is anticipated to grow up to US$103 billion by 2027 with a share of 45% from the software segment. Similarly, the projected size of the global deep learning market will reach over $40 billion by 2027 at a CAGR of 39.2%.

Indeed, the implementation of technologies like data science, artificial intelligence, and machine learning in organizations has increased exponentially. In the last two years, during the pandemic outbreak, the technologies played a crucial role in saving lives and fostering economic resilience, showing many surprising trends. 

Source de l’article sur DZONE

Wireframes are a powerful tool, especially for UX designers; whether you are developing a new app, a website, or anything else, the initial steps of any project can be tackled with this robust approach.

There are many occasions when we get stuck or overwhelmed for hours in front of a new project. This is where creating wireframes can be beneficial. A wireframe is nothing more than a diagram of your ideas for the flow of a project.

This post will analyze what wireframes are, and why they are so crucial for user mapping. Then, we will reveal the steps you need to follow to create an efficient wireframe. Let’s dive in…

What Is A Wireframe?

In a few words, a wireframe is a drawing created in the early stages of a UX project. Wireframes are a brilliant and effortless way to create a blueprint for the structure of a page.

In such a drawing, you can include valuable information about the UI and UX of the page you want to design.

You can think of wireframing as a process of visualizing the initial ideas you have about a project. It does not matter if you are comfortable with drawing; you can design wireframes on paper or digitally.

In either case, drawing a wireframe is not about your artistic skills. Instead, wireframes are about structuring your project and identifying the fundamental interactions you want to build out.

Why Is Wireframing Important For UX Designers? 

If you are an experienced UX designer, you have already come across concepts like user mapping and user journeys. Mapping the entire user experience is crucial. And that’s the main reason why wireframing is a must for a UX project.

Since you need to provide a top-notch user experience, wireframing is a great way to ensure this from the earliest stages of your design. But what is the process you need to follow when designing wireframes?

And how can you ensure that your wireframes are efficient? Let’s find out…

Creating An Effective Wireframe In 5 Simple Steps

Creating a good wireframe will allow you to construct your project. You will think it through, prioritize some fundamental interactions and consider alternatives.

1. Research

Although this is not a wireframing step per se, it is critical to the efficiency of your wireframes. How can you start drafting without doing user research? Well, you can not. That’s why the first thing you need to do is analyze your project.

All you have to do is seek similar products/services and check them out. Look at what your competitors are doing right and what they are doing wrong. This way, you will be ready for the next step.

2. Create Personas

You have already selected the best practices and ruled out other guidelines you believe will not be effective on this project. Now it’s time to think about user flow: How many screens will you put on a page? Where are users coming from, and where do you want them to go after reading this page?

By mapping your user flow, you can create a user persona. Then all you have to do is figure out what information to include. 

Mapping the information correctly is crucial because it will help you ensure that users do not get frustrated or overwhelmed when they visit your final page.

Once you do that, you are good to go. 

3. Start Sketching

It’s time to reach for your fine pen, pencil, eraser, and paper. Visualizing your ideas needs to be quick and efficient. Try to avoid fine details because this step is not about creating a high-fidelity wireframe on paper. 

All you need to do here is sketch out basic features and formats.

Since most of us designers are perfectionists, you can use a timer. Set the timer to 4-5 minutes and force yourself to finish the wireframe by that time. Repeat this step until you have created a few wireframes with which you are happy.

Finally, expand and polish your favorite mockups for a few minutes and prepare for the hard part.

4. Ask for Feedback

There is nothing more important than feedback when it comes to wireframing. Discuss your project with your colleagues. Just let them know how each mockup helps you with the project and what idea it visualizes.

Try to sincerely listen to what they have to say about your designs. Once you have gathered all the information and advice, start modifying the wireframe accordingly.

5. Add Details and Create Prototypes

It’s been a long road, but you are now at the point where you feel most comfortable as a UX designer: prototyping. Plenty of software (Adobe XD, Framer, Proto.io, etc.) can help you with this step. 

Start by turning your low-fidelity sketch into a high-quality prototype. Once you are happy with the result, test your prototype’s screens and see if the result serves the user flow. Platforms like UsabilityHub and Prott can help you with this.

Valuable Tips to Keep in Mind While Creating a Wireframe

Keep your Wireframes Simple: Creating a wireframe is not about fine details; try to manage the time you spend on it well. All you need is a clear and simple visualization of your page. You will have all the time you need for prototyping.

Don’t Worry About Your Artistic Skills: Anyone can draw. It’s as simple as that. You do not have to be an artist to create a clear wireframe to help you visualize your ideas. Be confident and make sure you include all the information you need.

Always Think of the User Personas You Created: Creating a wireframe is a smart way to ensure that the page you create meets the user’s needs. Therefore, you should always keep in mind what users will do when they open this page and whether it meets their needs and goals.

The Bottom Line

Creating a wireframe is not as difficult as you might think. All you need to do is research, find out what users need from this page, and create a map. By following these simple steps, you’ll ensure that the wireframes you design deliver a top-notch user experience.


Featured image via Pexels.

Source

The post 5 Simple Steps To Effective Wireframing first appeared on Webdesigner Depot.

Source de l’article sur Webdesignerdepot

Is sketching essential to UX and UI designers? Well, if you think of sketching as a way to explore problems and record potential solutions, then yes, it absolutely is.

One of the most challenging tasks of any design process is capturing the initial idea. We’ve all spent countless hours thinking through an innovative solution to a project, only to lose the idea again. It turns out that sketching is a brilliant solution to this problem.

In this guide, you’ll learn how to improve your UX designs using sketching as a tool. First, we’ll answer the question of how sketching benefits design, then we’ll look at the tools you need, and finally what an efficient sketching process looks like. By the end of this 3-minute read, you’ll have valuable new knowledge that will help you as a designer.

Why Sketching Is Important For Designers

When you start working on a project, it’s tempting to jump straight into high-resolution wireframes. But in doing so, you run the risk of spending hours on each little detail, only to discover that the overall concept doesn’t work.

Sketching — unlike drawing, which is about communicating an idea — is a free-flowing, process that allows you to get your ideas down on paper (yes, paper!) fast.

If there’s one thing you take away from this guide, let it be this: sketches aren’t for clients, or colleagues, or Dribbble, sketches are just for you. They’re a non-written way of rapidly making notes. Sketches will help you recall all the possible routes to consider.

Sketching is all about visualizing your ideas quickly and efficiently. When you’re sketching, you don’t have to worry about details, and you don’t have to worry about communicating with anyone else.

By sketching ideas without detail, you can quickly explore numerous solutions for a project. It’s fascinating how sketching can help you visualize an idea and revise it again and again along the way with minimal effort.

So, what revolutionary new tools do you need?

What Tools Do You Need For Sketching?

Designers love new tools, but when it comes to sketching there are relatively few, and you probably already have them to hand.

First, you’re going to need paper. A notebook is fine, it doesn’t have to be high-quality paper; in fact, you will probably feel freer and less restrained if you make sure that it is cheap.

You’ll need something to make a mark on the paper. A pencil is fine, as is a pen, a biro, and just about anything else. Don’t worry about an eraser, sketching isn’t about correcting mistakes, but you will need a sharpener if you’re using a pencil — never draw with a blunt pencil!

Whatever implement you choose, it’s a good idea to have a heavy marker, like a Sharpie, to pick out an important detail, and perhaps a fine pen to add small detail (if required).

Finally, make sure you have a timer to hand. A chess clock is perfect for an old-school aesthetic, but a timer on your phone is perfectly fine. The timer is to make sure you don’t spend too long on one sketch, so you don’t have time to get wrapped up in perfecting the details.

Sketching 101: A Step-by-Step Process

When you’ve been sketching for a while, you’ll discover your own process, and preferred methods. But for anyone new, here’s how to get started.

1. The Initial Idea

As with designing a wireframe, the most challenging step is getting started. Usually, at the beginning of a project, we are overwhelmed. This is because there are so many ideas, and we do not know where to start. For this reason, a detailed analysis of the project is essential.

You can start by thinking about the most important interactions you need to create. This way, you will find out the most important and exciting aspects of the project.

Since most of us get caught up in the fine details, it is beneficial to think of sketching as a brainstorming session. This session is simply about coming up with an innovative solution for a project and visualizing it.

It’s fine to have an idea that you’ll ultimately disregard. This is not the time to edit yourself.

2. Start Sketching

Take a piece of paper and use your sketching tool to divide it into six sections. Set your timer for 5 minutes and start drafting mockups for the first interaction.

Often, designers struggle with this step, and fall back on what they’re used to, i.e. wireframing and high-res mockups. If you find that you’re struggling to start sketching, start by making a mark on the paper; any mark at all. Then, make a second mark. With the third mark, try to position it in a way that says something to you about the project, by its size, weight, position — anything at all. Keep going, and before you know it you’ll have a complete sketch.

It’s vital that you do not exceed the time you give to yourself because sketching is not about fine details. The time is better spent exploring multiple ideas, even if those ideas only serve to confirm that the first idea was the most promising.

Repeating this step can be very valuable. Once you are happy with the results, you can move on to the next and final step.

3. Self-Editing

Unfortunately, you can not take away every concept you have outlined. This step is about choosing your most effective ideas and expanding on them.

Most designers want to create top-notch, detailed designs, and that’s fine. However, sketches are only really helpful for the early stages of a project, and creating perfect sketches in the first stages of a project may not be productive — in fact, it can be restrictive.

It’s often a good idea to combine some of your designs. Redraw them together, and once you’ve done that expand and refine them.

Improve Your Design With Sketching

It doesn’t matter if you think you’re bad at sketching — no one is going to see your sketches except you. Many of us would struggle to sing in public, but are absolutely fine singing in the shower.

Remember that sketching is not about your artistic skills; it’s about capturing an idea and expanding on it. After all, once you have your final design, you will recreate it digitally.

You don’t have to be an artist to be a designer. And since sketching can improve your UX designs, there are many reasons you should give it a try.

Once you’re comfortable with sketching, you’ll find it an invaluable tool for identifying sticking points in a project, and solving them before you reach the wireframe stage.


Featured image via Pexels.

Source

The post How To Improve UX With Sketching first appeared on Webdesigner Depot.


Source de l’article sur Webdesignerdepot

1, 2, 3 – That’s exactly how long it takes you to start losing visitors if you have a slow-loading website.

Hold on! Surely, the only thing that matters to users is that your website works flawlessly and looks great… right? Wrong!

The fact of the matter is that we’ve all become accustomed to instant access to information and content. The average internet user today places a lot of value on speed, and the bar is continually being raised.

If you are like most people, you probably feel an immediate sense of dread at the thought of optimizing your website. Where do you start? How can you make the most impactful improvements? What makes your website slow in the first place?

Have no fear, as we’ll be answering all of your questions below as well as putting you on your way to a website that loads with blazing speed.

Why Should You Be Worried About A Slow-Loading Website?

Good question!

As many as 53% of visitors abandon a site that takes more than 3 seconds to load. Even worse, 1 in 3 shoppers will leave a website if it takes longer than 5 seconds to load.

So, performance plays a huge role in the user experience of your website and whether your visitors will stay on your website or be converted into customers.

For some time, Google has been keenly aware of this fact. As a search engine, Google knows that it’s counterproductive to recommend content to users if they won’t stick around to consume it.

That’s why they’ve continually been increasing the role performance plays when ranking websites for their SERPs (search engine results pages).

In recent years, Google has introduced core web vitals. These are metrics they hope will help quantify how performance affects the user experience. In general, they measure how fast, stable, and interactive a page is while loading. This will be more important than ever after Google announced its Page Experience update, which started its global rollout in June 2021.

As you may know, ranking highly for Google is vital for your website’s visibility. For one, 68% of online experiences begin with a search engine, of which Google has a 92.7% market share. Even if you manage to land on the coveted first page of Google, the first five results get over 70% of all clicks (28% to the first result alone).

So, to recap why a fast loading website is so desirable:

  • It directly affects your ability to keep, satisfy, and even convert visitors to your website.
  • It impacts your search engine rankings which impacts your “findability” and organic traffic.

8 Reasons Your Site Is Slow + How to Fix Them

O.K., so now that we’re all on the same page regarding the importance of your website performance, let’s look at common issues slowing down your website + how to fix them.

1. You’re Using A Sub-Par Hosting Service

As the party responsible for making your website available to the outside world, your hosting service can be a make-or-break factor. Not only should you pick a host that has a good track record when it comes to uptime a performance, but also one that’s suitable according to your needs.

Even if you take all the steps below to optimize your website’s performance, it may still load slowly if traffic to your website is overwhelming your available bandwidth or your host’s server capacity. If that happens, some users may experience extremely slow loading times, broken features, or even complete unavailability.

For most personal, blog, or local/small business sites, a respectable hosting provider like Bluehost or GoDaddy should be good enough. However, if you plan on running any type of large-scale, high-traffic webstore, business portal, or other type of website, you’ll want premium hosting, such as WPEngine (for WordPress), VPS hosting, or even a dedicated server.

2. You’re Not Optimizing Your Media Assets

As you probably know, media like images and videos take up significantly more space than most other types of content, such as text, code, stylesheets, or other static files. Even a single image has the potential of consisting of more data than dozens of website pages containing nothing but the underlying HTML and text.

In a Speed Essentials presentation, the Google team identified images as the largest contributor to page weight. In fact, they have the potential to consume a website’s entire performance budget if left unoptimized. Images can also directly impact all three of Google’s core web vitals – key metrics Google uses to measure the performance of a website.

However, the use of images and video is likely to continue growing, heightening the importance of finding a sustainable solution. According to HTTPArchive, images have increased by 19.3% on desktop and 42.7% on mobile.

For now and the foreseeable future, optimizing your images carries the greatest potential for improving performance.

The problem is that optimizing image assets requires multiple steps. Most importantly:

  • Using the appropriate next-gen formats which can differ depending on the user’s device, OS, or browser.
  • Appropriately compressing the size and quality of images to reduce payload without affecting visual quality too badly.
  • Using the optimal display size and density based on the accessing device to reduce payloads further.
  • Using lazy loading to only load images as needed.

As you can see, manually going through these steps for every single image on your website can be extremely labor-intensive. This is especially true if you consider that you somehow need to create the optimal variants for different users based on what device, OS, or browser they are using.

In-code strategies, like a JS plugin, responsive images, or CSS media queries tend to bloat your code and lead to other performance issues we’ll discuss below.

Luckily, there are plenty of CDN services available designed specifically for providing some degree of automated image optimization. These platforms analyze the context (i.e., a specific mobile device model, OS version, and browser version) of the user trying to load one of your images and try to serve them a version of the image that’s ideally optimized for them.

However, any media optimization platforms still require installing a small JavaScript plugin to dramatically improve the image and video optimization capabilities. 

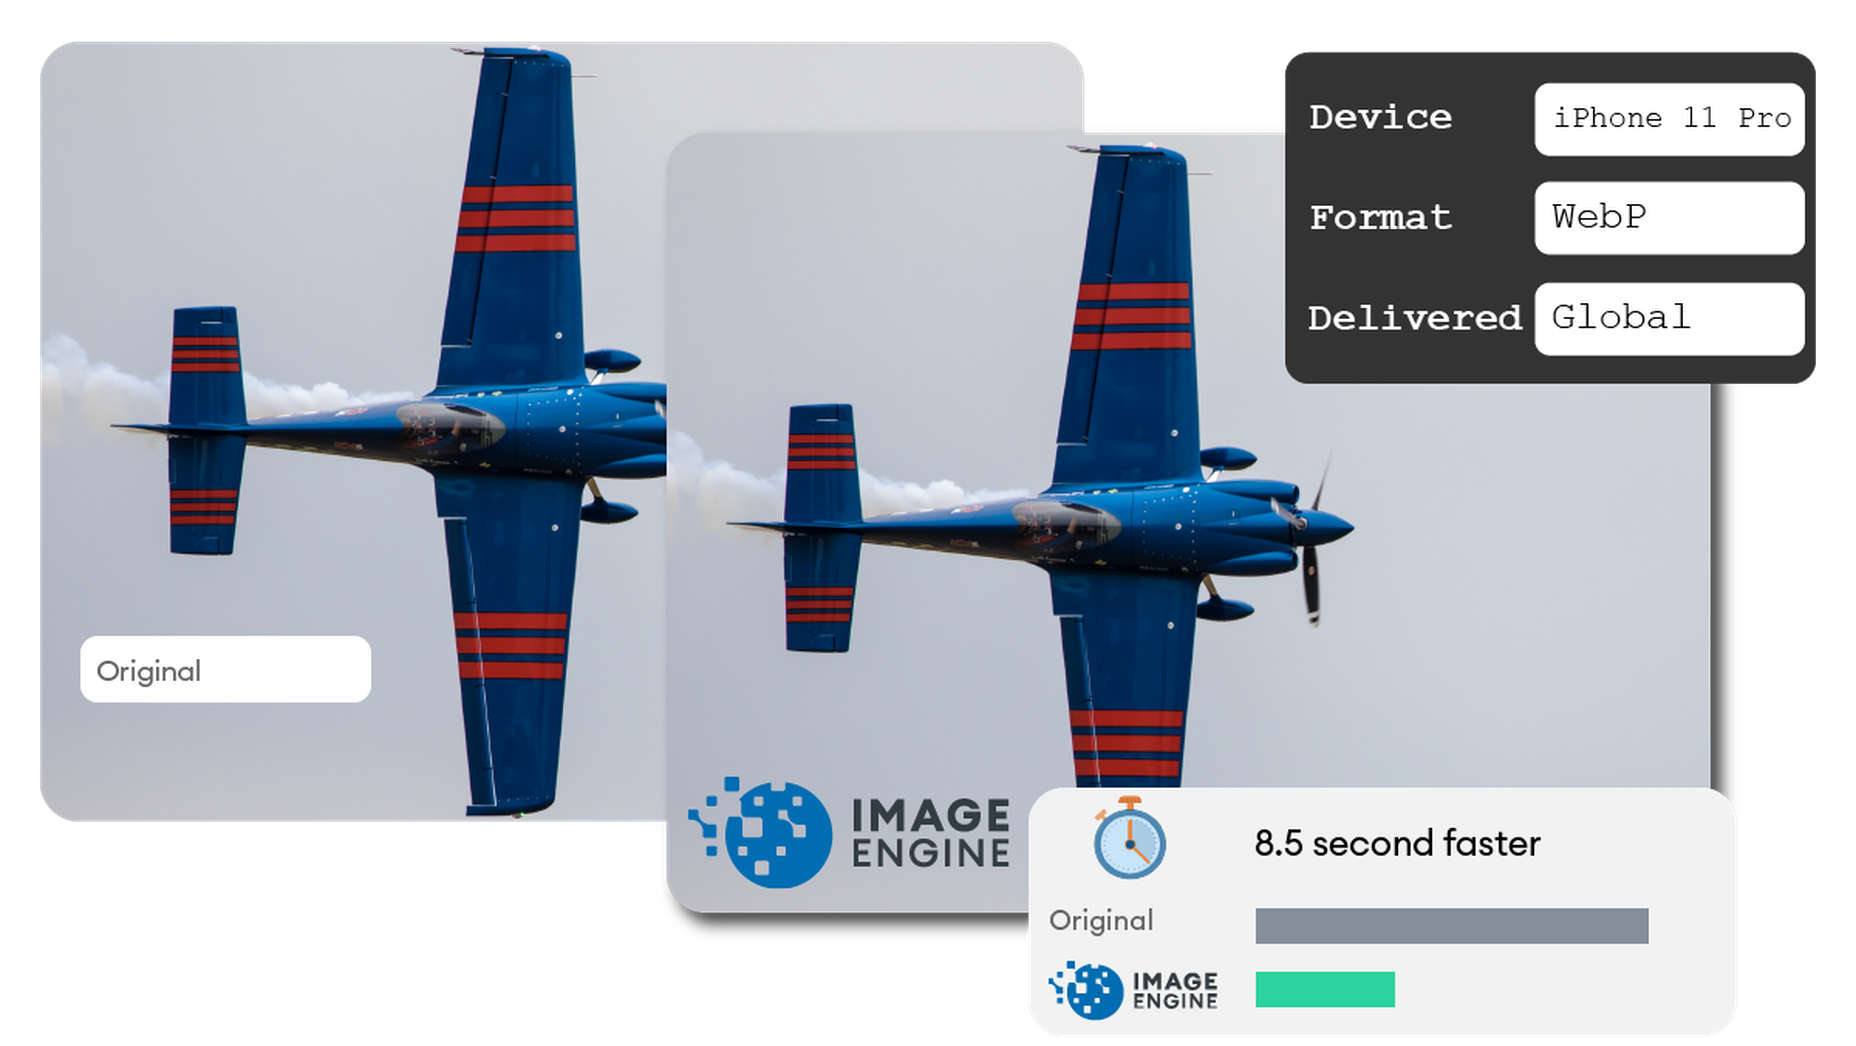
The one exception here is ImageEngine. ImageEngine uses WURFL device-detection to pick up every possible detail of the user’s device. The logic is built into their device-aware edge servers and doesn’t rely on you adding any additional code or markup to your website pages.

So, not only does it reduce your image payloads by up to 80% and serve them via a global CDN, but it doesn’t leave a footprint in your website’s code. As a bonus, it also happens to support the widest range of image/video formats, including animated GIFs, as well as client hints and save-data mode.

3. Render-Blocking JavaScript And CSS Is Delaying Page Loads

JavaScript is the de facto programming language for adding interactivity and advanced features to websites today. Likewise, CSS is the standard for adding styling. Both are critical components for almost any modern website.

However, nothing good comes free, and both may impact the performance of your website, particularly when used carelessly. 

The following are some steps you can take to minimize the impact of these assets on your website performance:

  • Minify your JavaScript and CSS files.
  • Combine a large number of JS/CSS files into fewer files.
  • Replace some of your external JS and CSS files with inline JS/CSS. (Don’t overdo this! Inline JS and CSS is only suitable for small code snippets).
  • Defer loading JavaScript until after all your content is loaded and use media queries for CSS files.

Because media can have a more significant impact on your page weight, this leads some to believe that adding more JavaScript is the lesser of two evils. 

However, depending on whether you already have render-blocking JS, Google might flag this as a completely new issue. Regardless, it will negatively impact your performance score in tools like PageSpeed Insights:

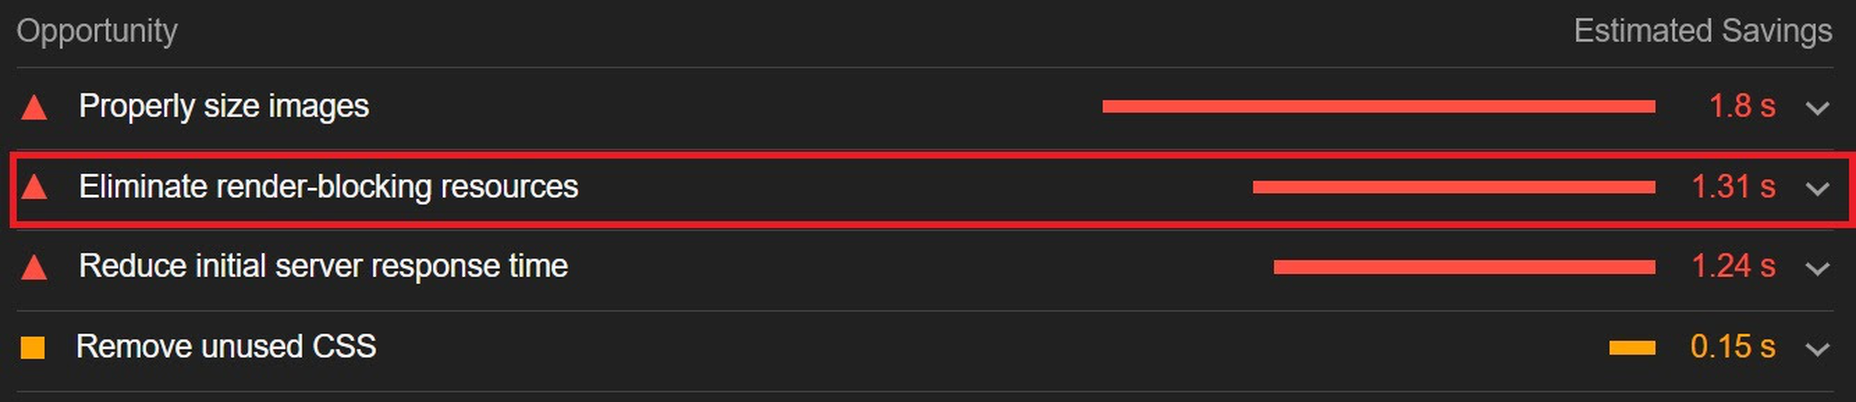
You can avoid it altogether by using an optimization engine like ImageEngine that doesn’t require any JavaScript.

4. You’re Not Using A Content Delivery Network (CDN)

A CDN is a network of servers spread across various regions all over the globe. What it basically does is store a copy of your website on each of these servers. When an internet user visits your site, the CDN automatically serves your website from the nearest server to that user.

What this does is allow your website to load faster, no matter where in the world people are visiting it from. If your website was only hosted on a single server, say somewhere in the U.S., then it could take much longer to load for a visitor located in Asia than one in the U.S.

While they all basically do the same thing, different CDNs are better at handling different types of content. Cloudflare, Fastly, and Akamai are just some of the most popular general-purpose CDNs around. Image CDNs like ImageEngine are purpose-built to not only serve image and video assets but to also optimize them using compression, formatting, etc.

So, the two main factors to consider are the type of content you want to deliver via the CDN and its global coverage. However, it’s usually possible to use multiple CDNs in tandem to cover different types of content and reach a wider area.

5. There’s Excessive Overhead In Your Database

If you have a website with any type of complexity, you probably have a corresponding database. In fact, all WordPress websites require a database to function.

Over the years, a lot of information moves in and out of the database. Sometimes, the data can get lost along the way or become obsolete. If you don’t regularly spring-clean your database, then this can really start to add up. Not only will it bloat the storage size of your database, but it will start to impact the speed of database queries and requests.

CMS users are especially prone to racking up these kinds of artifacts from plugins and themes that have been installed and removed over the years.

Unfortunately, there aren’t many easy fixes for this issue available. With most hosting providers, you’ll probably need to use phpMyAdmin to manually check and scrub your data. If you have a managed hosting solution, the host’s support team might be able to help you out. In the event that you have a locally installed database, there are some tools you can use, although they’re not 100% effective.

The best way to avoid any issues is to make database maintenance part of your routine and to learn the basics of how databases work.

6. You Have Too Many Plugins Or Themes Installed

For CMS users, plugins or themes offer near-limitless potential to spruce up the design and functionality of their website. However, each plugin or theme comes with additional code and content that add to the overall complexity and size of your website.

If you have a hand-coded website, the same goes for any additional applets or libraries you want to add to your site. 

The best way to combat this is to be conscientious when adding any extras to your website. Only install what you really need or want, and make sure to uninstall and properly remove them if you don’t need them anymore.

As mentioned, they might leave various transients or artifacts behind, so you should keep an eye out for them throughout your website files (not just the database) whenever you do some spring cleaning.

7. You Aren’t Utilizing Caching

Caching is often one of the most effective yet ignored techniques for improving website performance. Caching stores your website content in fast-access memory in the user’s browser, allowing it to be loaded near-instantaneously by users. This can include everything from text to stylesheets to images to JavaScript files.

Without caching, a user will need to redownload everything when they navigate to or reload a page — whether or not anything has changed.

However, not properly configuring caching on your website can lead to issues, such as users only loading out-of-date content. Most high-quality caching tools have built-in features that automatically clear the cache when you make changes to a specific website page or content. So, users will only reload content once it has been modified.

Some hosts offer out-of-the-box caching tools with their hosting service. CMS can also usually find plugins for this, such as WPRocket for WordPress.

8. Ads Are Dragging You Down

In the end, ads are just another form of media that increases the overall weight of your website pages. While they are typically small and lightweight, multiple ad placements can really start to add up.

What aggravates the issue is that ads are loaded from external sources. This means they’ll take longer to render, generate more requests, and may mess with how stable your pages load — affecting your core web vitals.

Depending on how important ads are to your revenue stream, you’ll want to carefully consider how many ads you use on your site, where to position them, and when they load. If possible, avoid loading ads at the same time as the rest of your page, especially interstitials.

Conclusion

As you can see, website performance is a multi-faceted subject. Although some may be worse than others, you can’t just address one area and expect your website to suddenly be performant.

However, some general principles apply:

  • Keep HTTP requests low by limiting the number of files required for each of your website pages.
  • Maintain proper code hygiene and spring clean transients and leftover artifacts.
  • Invest in proper hosting infrastructure as well as a CDN for your website.
  • Optimize your media assets to significantly bring down payloads without sacrificing engagement.

The final point deserves another shoutout. As we’ve pointed out, finding an optimization solution for your media, particularly images, is probably the best thing you can do to improve your website performance. From purely a performance perspective, there is no service quite as effective as ImageEngine. It’s also the one that requires the least amount of technical expertise and ongoing maintenance.

Regardless, you’ll want to run some tests using tools like PageSpeed Insights so you can gather data on what issues your website is facing. From there, you can prioritize fixes to make your website more competitive.


[– This is a sponsored post on behalf of ImageEngine –]

Source

The post 8 Reasons Your Site Is Slow + How To Fix Them first appeared on Webdesigner Depot.


Source de l’article sur Webdesignerdepot

Many markets are saturated with competition; it’s no surprise that customers are expecting top-of-the-line experiences. Businesses must keep up with these ever-changing demands to remain competitive and drive forward.

One way to ensure customers have positive experiences is to take a look at your website. Your website is like your digital headquarters, where customers can browse through products or services, have frequently asked questions answered, and be able to reach you if they need direct support.

Making a site user-friendly and customer-centric will assist businesses while they work to build a loyal customer base. Customer happiness is more important now than ever and has the potential to make or break your business. We all know that happier customers spend more, and delighted customers will always come back for more.

Let’s explore some ways you can level up the customer experience on your website to foster customer loyalty and retention, as well as garner brand advocates for your business.

How Important Is CX?

As a site manager, your goal should be to meet customers’ needs. Creating a website is no simple task but can transform CX (customer experience).

Suppose a customer visits your site only to see a buffering symbol or a lag on their desktop or mobile device. This wouldn’t make for a positive experience, would it?

When customers have to spend extra time navigating your website to find what they’re looking for, it can directly lead to site abandonment, where customers leave the site before browsing. It’s vital to consistently monitor your website metrics to see if abandonment rates impact your overall traffic.

Customers who have enjoyable experiences browsing through your site are more likely to appreciate your brand and strongly consider purchasing whatever offerings you have.

Additionally, positive customer reviews can help your business gain new customers — word-of-mouth marketing is still relevant in 2021’s digital marketing landscape. Earning those 5-star reviews can help other potential customers see that they too could have a positive experience with your brand.

As you can see, CX is just as important as the products or services you offer, so keep that in mind as you set out on the journey to improve your website to advocate for your customer base.

Below, we’ll cover some of the most important elements and features of a strong business site so you can implement them.

Valuable Features to Include on Your Website

The features of your website are the foundation of your business. One of the best parts of building a killer website is that you can get as creative as you’d like with all of the features at your disposal.

Whether you use WordPress or another platform to host your website, you can always explore other paid services or offerings online to bring your site to the next level.

For example, the WooCommerce WordPress extension allows e-commerce sites to improve the overall appearance of their site, add customizations and, generally speaking, create a high-quality e-commerce store.

Below are some examples of elements you should consider incorporating into your web design. Offering these features will surely keep your site visible, relevant, and attractive to all types of customers.

1. Add Personalization

Every type of customer can benefit from a personalized experience, and it helps you turn them into loyal customers.

Personalization is becoming more prevalent in web design, whether it’s including past products they’ve viewed on your landing page or making it simple for them to log in to their account.

Maybe you allow your customers to create a wishlist, just as Amazon does. You could also make personalized deals or recommendations for your customers based on their past purchases or search history. When customers see this level of personalization, it may influence their purchasing decisions and make it simpler for them to order products.

2. Include Compelling and Unique Content

Every professional in the digital marketing space knows that content is king. The companies that include the most compelling content garner the most attention and increase the number of customers who make up their customer base. Here are some examples of what your content should look like:

  • Comprehensive
  • Useful
  • Accurate
  • Visually appealing
  • Helpful
  • A direct answer to a search engine query

By following these descriptions, your content will improve. Whether it’s a blog post or a photo or video, quality content is a driving factor in your user engagement. It helps to support your SEO strategy and will undoubtedly keep customers coming back.

3. Prioritize Speed and Usability

Because technology is an integral part of most people’s lives, customers expect to visit a fast, reliable website. No longer will customers wait patiently for a site to load. The dreaded buffering symbol is a clear indicator that your business is not taking customer experience into account.

It’s critical to create a website that loads quickly and is easy to use. Avoid organizing any tabs in a confusing way. Ensure that your website is visually attractive without overwhelming color schemes or photos that take up too much space.

Go for a more modern, contemporary look that’s easy on the eyes. Customers will appreciate this and will likely spend more time browsing your various website pages.

4. Focus on Navigation

Users should be able to access any page on your website with ease. They shouldn’t have to search for the right drop-down menu or type into the search bar unless they’re searching for a specific product or service.

The majority of users on a site, 70% to be exact, spend most of their time navigating freely without using the search bar. This should tell you how vital good navigation is to your business website. Placing menus on the top of your site is common practice — if you would rather place your drop-down menu somewhere else, make sure you’re putting it in a section where it’s easy to find.

Put yourself in your customers’ shoes. See what types of designs you can incorporate into your site to elevate UX and make browsing simple.

5. Make Sharing Simple

One of the best ways to grow your customer advocates is by leveraging your existing customers. Your customers should be able to easily send your product or service descriptions to their friends and family.

Rather than copying a link, include a share feature. If something on your site is worth sharing with other potential customers, make it easy for them to send it.

Social sharing plays a significant role in digital marketing — it helps to garner organic traffic to your website. You can reach a larger number of people than originally intended, which is the most important benefit to reap by making it easy to share links from your site.

6. Incorporate Chatbots

Offering customer support by using chatbots is something major companies are incorporating into their website designs.

Suppose your customer is trying to complete a purchase but runs into a problem with a coupon they’d like to use. Rather than wait on hold on the phone or for an email in their inbox a few days later, an automated chatbot can step in and assist them.

Chatbots are on the rise, and it’ll be critical for your business to include them on your site. Proactive web actions can increase your site’s conversion rates and improve the overall customer experience.

7. Allow Customer Feedback

It shouldn’t come as a surprise that allowing your customers to share their experience with your brand can help you better understand them and the solutions they’re looking for from you.

Did you know that brands with superior customer service can generate 5.7 times more revenue than their competitors? When you’re in touch with your audience, you’re better able to include features they want and need to have a positive experience. By taking advantage of customer feedback, you can make necessary changes to your site to better serve your customers.

Advocate for Your Customer Base

All of the examples listed above can help elevate your site and improve the overall experience for existing and potential customers. Isn’t that the goal of any business, regardless of industry?

To serve your customers effectively means they’ll feel valued and come back for more. Whether that’s ordering more products or requesting more services, you’ll see the benefits of including the elements we’ve covered in this post.

As a recap, here are some steps you can take to advocate for your loyal customers:

  1. Add personalization
  2. Include unique content
  3. Make your site fast and usable
  4. Provide easy navigation
  5. Allow for easy sharing
  6. Leverage chatbots
  7. Be open to feedback

Overall, customer experience will become more important in the future as customer expectations change. Standing out from your competitors is no longer an option but a necessity. So many markets are struggling to do just that — so if you’re able to offer unique features on your site, it could potentially draw more customers in and drive them to purchase.


Featured image via Unsplash.

Source

The post 7 Simple Ways to Boost Your Website’s CX first appeared on Webdesigner Depot.


Source de l’article sur Webdesignerdepot

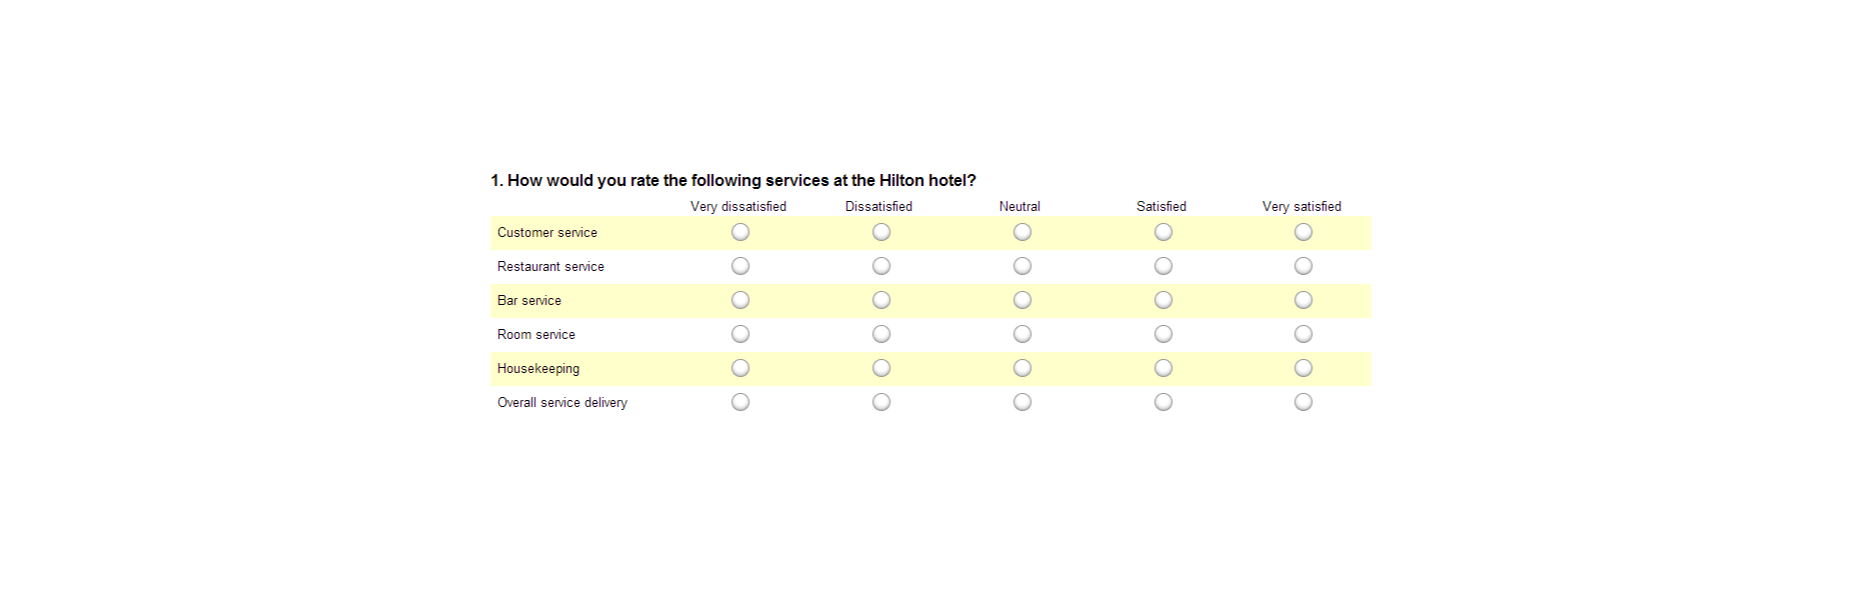
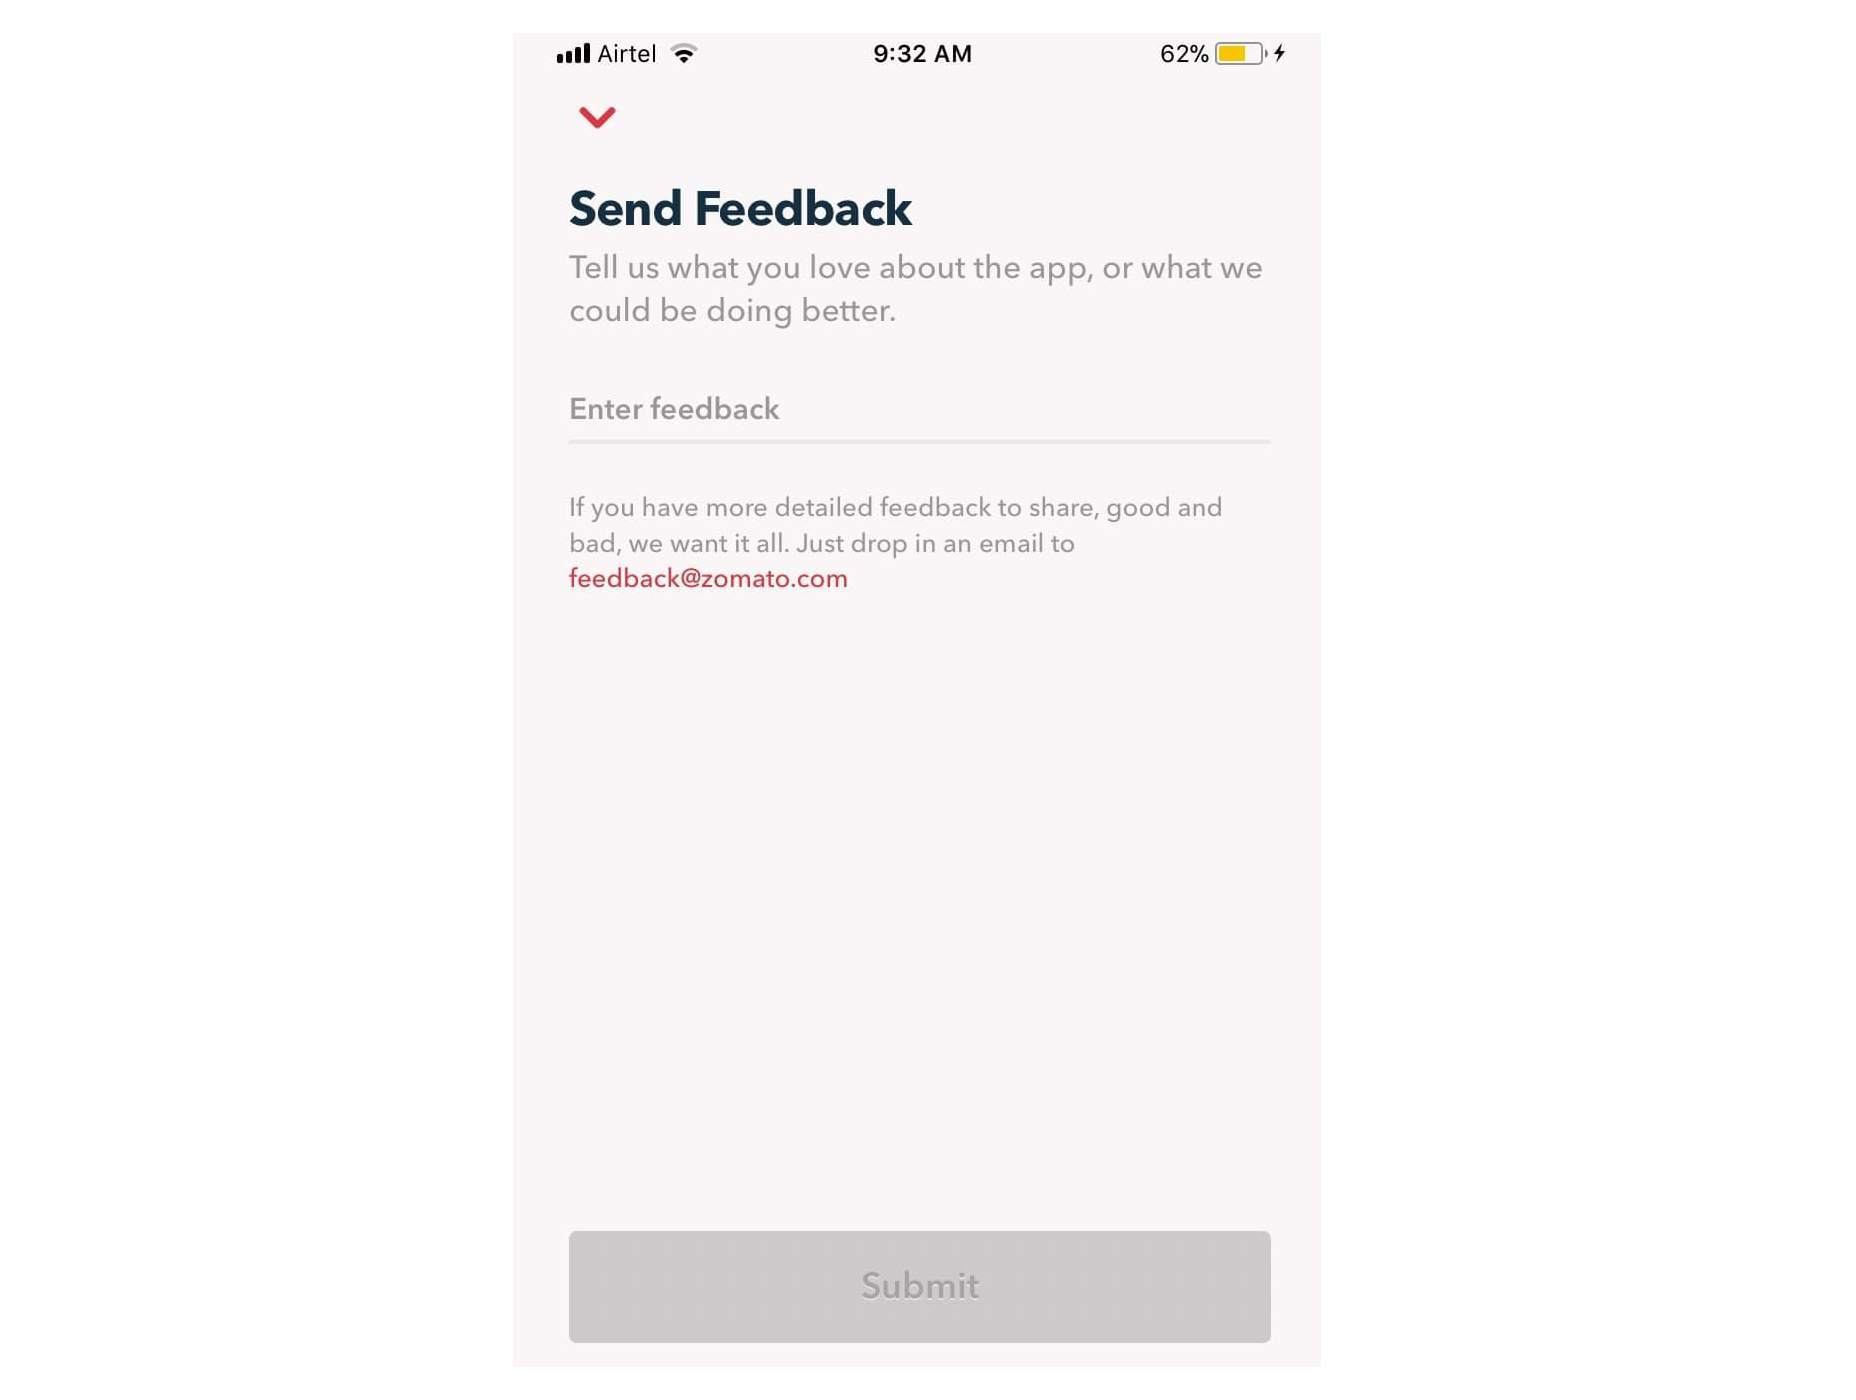
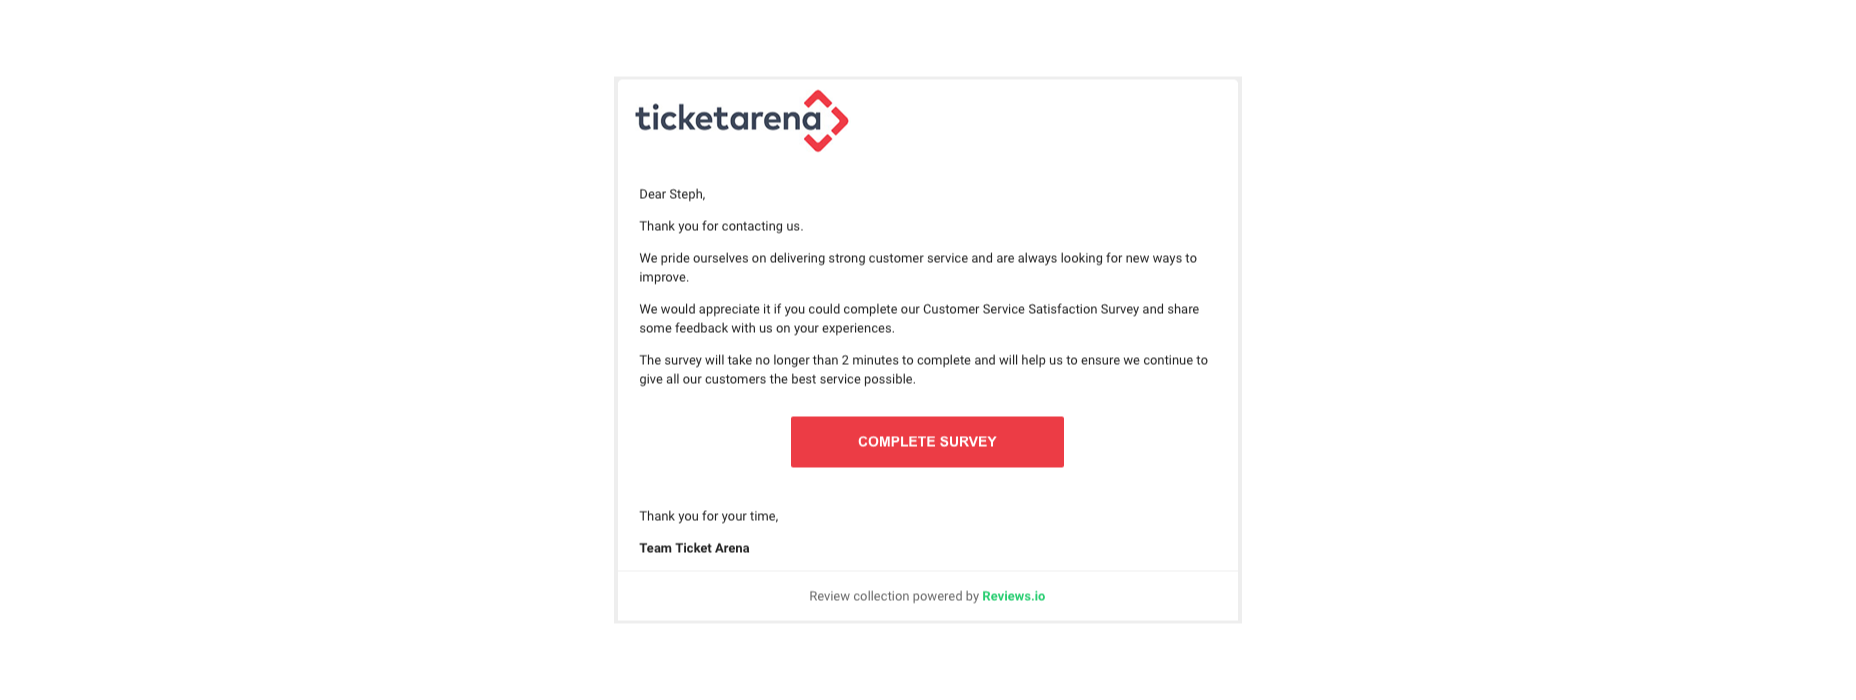
Feedback is one of the most valuable resources for any business. Informative messages from your customers can tell you a lot about your company. They’re a way to check that your service strategies are paying off and a chance to learn which parts of your product need an upgrade.

Reviews and testimonials can also help you better understand your audience and the kind of solutions they’re looking for with your brand. 

Solid feedback is also how you improve your chances of gaining more customers in the long term. Brands with superior customer service generate about 5.7 times more revenue than their competitors. 

Of course, before you can begin tackling challenges like pulling trends from feedback or using your reviews to upgrade your business, you have one essential task to consider: How are you going to collect the valuable information your customers have to share?

There are a lot of options to choose from. You can reach out to clients individually with email messages or set up a feedback form on your website. You could even consider working with a review site to give your audience more options. 

Today, we will look at the steps you can take to collect customer feedback the right way.

Unlocking the Benefits of Customer Feedback

Customer feedback is the information and input shared by your community. It provides a behind-the-scenes view of people’s interactions with your team and shows you where you need to focus on beginning driving new opportunities. 

Customer feedback becomes a guiding compass for your organization when used correctly. It shows you what you’re getting right and wrong from your customer’s perspective. Positive feedback can even become part of your marketing campaigns. User-generated content in the form of reviews and testimonials makes for excellent tools to encourage new people to purchase your products. 

Case studies and in-depth reviews from your clients can also help generate trust among potential customers, so you’re more likely to earn crucial sales. 

Only around 3% of customers say that they find marketers and salespeople “trustworthy.” This means that no matter how good your marketing messages might be, you’re only going to be able to accomplish so much with the claims you make about your brand. Ultimately, your clients will turn to other customers like them to determine who they should buy from.

On average, buyers read around seven reviews before they’ll even consider trusting a business. 

The good news is that around two-thirds of customers will share their personal information with a brand. Clients are happy to provide feedback in the right circumstances. It’s your job to ensure that the process is as easy as possible for your customers.

So, how do you get customer reviews?

1. Design an Effective Feedback Survey

The most obvious way to encourage feedback from your customers is to ask for it. Unfortunately, designing a good customer survey isn’t always as simple as it seems. 

On the one hand, you’re keen to gather as much information as possible from your customer, which could mean that you want to ask many questions. On the other hand, asking too many questions could easily scare your audience away. 

To improve your audience’s chances of actually sharing information, keep the feedback requests as simple as possible.

One or two questions at a time should be enough to give you some helpful information about customer preferences and expectations. When choosing what to include in your survey, remember:

  • Only ask essential questions: If the answer to a question isn’t going to help you achieve your goals, don’t ask it. You don’t need to know someone’s age if you want to know if they had a good experience with your service reps. Keep it relevant. 
  • Make the questions thoughtful: Yes or no questions are great for collecting quick information. However, if you want more valuable feedback, leave your queries open-ended, and give customers room to explain themselves. 
  • Use rating scales: If your customer doesn’t have time to respond to a question in your survey with a complete answer, a rating scale can give you some helpful insights with minimal effort from the client. 

Ensure none of the questions on your survey are leading or loaded. Customers don’t want to feel like you’re answering questions for them. It might also be worth showing your audience how much you value their data with a quick response. Hilton Hotels always responds to any adverse reactions to surveys within days of receiving the information. 

Customers can even see how their reviews contribute to the overall rating of the business. 

2. Master Your Emails and Customer Contact Forms

Email is one of the easiest and most effective ways to gather customer feedback. Because this is a standard support channel for most businesses, there are plenty of opportunities to generate feedback. 

The first step in using emails for feedback is to send a message thanking your customer for their recent interaction with you. If someone purchased a product from your company, immediately follow up to let them know you appreciate their custom. A couple of days after, when your customer has had a chance to use your product or service, that’s when you follow up with your feedback request. 

Ideally, your email request should be as short and straightforward as possible, with a clear call to action that tells your customer what to do next. This example from Papier keeps things as detailed as possible.

If you want to boost your chances of engagement, you can add elements to your email that might encourage a positive response, for instance:

  • Remind them of what they bought: Remind your customer of the item they purchased with a picture and a bit of information. Highlight the key features and benefits of that product, so they have some inspiration on what to write about in their review. 
  • Offer them a reward: If you want to boost your chances of your customers doing something for you, you need to offer something in return. This could be a discount on their next order, a chance of winning something, or even just free shipping on their next purchase. 
  • Personalize the message: Make your customer feel special by personalizing the message. Use their name and reference their previous interactions with your company. If they’ve been with your business for a while, mention that in the email.  

Remember, many of your customers are likely to check their emails on the go. That means that giving feedback should be as simple as possible, regardless of the tech your customer is using. For instance, in this Zomato example, users can choose to drop an email to the company or send feedback straight from the app. 

3. Create App Usability Tests

If you want some in-depth insights into your company, and your business processes, then a usability test could be the best way to generate valuable feedback. If you have your app, ask your customer to submit some information right there and then, after they’ve finished using the service. The great thing about this kind of input is it’s fresh.

Unlike other customer reviews that might come a day or two after your customer has used a product, usability tests allow you to get feedback at the moment. There’s a much better chance that you’re going to get some relevant and detailed responses here. 

For instance, in this Skype lab feedback request, customers can tick boxes for any video or audio issues they had and leave a starred review. 

If there’s extra information to share, the customer can tap on the comment box to elaborate. However, they don’t need to do this part unless they want to. 

With usability tests, it’s a good idea to focus on a few key things that you want to learn about. For instance, Skype’s example above demonstrates that the company wants to check at least five user experience issues for both video and audio. 

Giving your customers options that they can choose from reduces the amount of work they need to put into leaving a review. It also means that you can get actionable information on which parts of your app or site need the most improvement. 

You can get the same kind of instant feedback on your website, too, mainly if you’re using a live chat app for customer service. 

Live chat is quickly becoming an essential part of the customer experience environment because it’s fast, easy to use, and efficient. It’s also highly affordable for most companies, thanks to evolving technology. Set up your Live Chat app to immediately request a review from your customer when the interaction is over.

For instance, SiteGround asks customers to rate their service provider with a picture of the employee they spoke to. The image lets the customer see that they were talking to a real person, which improves the relationship with the company. The statement about feedback improving the customer service and support that SiteGround can offer shows the customer how valuable their reviews are. 

4. Conduct Customer Interviews

Conducting a customer interview is a lot like sending out a survey. The main difference is that you ask the client to engage in a much more in-depth conversation. Usually, these interviews will be the initial research required for a published case study on a B2B website. 

Reaching out to valuable and loyal customers can give you a fantastic source of in-depth information to learn from. You’ll need to make sure that you have a good relationship with the customer in question before you attempt this, however. Most one-time clients won’t want to get involved with a time-consuming interview. 

Look at your CRM technology and find out who your most impressive VIP customers are. Reach out to them with a request for feedback, and make sure you offer something in return. For instance, tell them that you’d like to interview for a case study that you can display on your website. If they’re happy for you to do this, you can reward them with a discount on their next purchase or some gifts. 

You could also follow up with a customer who recently contacted your team for an interview, like Ticket Arena does here. With this message, they promise the customer that their insights will make the customer experience better for future clients:

When requesting long-form qualitative feedback, remember to think through your questions carefully. In-depth stories from customers bring nuance and color to your quantitative data. They could even guide your business to making some crucial future decisions. 

When talking to your customers:

  • Start with an open-ended dialogue: Remember that open-ended questions are crucial to get as much detail as possible from your customers. These queries give your customers more flexibility to cover the details of their experiences.
  • Get more specific as you go: Start with simple questions, then build on them as your conversation evolves. Use the things you learn from your customers to dive into topics that are relevant to them. For instance, if a customer mentions your live chat app, go into a deeper discussion about the channels they prefer to use. 
  • Practice active listening: Make sure that you’re open and receptive to the information you’re given. Actively listen to customers, even if you’re not in the same room, by acknowledging what they say and providing valuable responses. 

5. Use Social Media

Sometimes, people are reluctant to give feedback for your business on your website because they’re not in the frame of mind. When customers come to your site, there’s a good chance they’re looking for information from you or want to check out a new product. 

They’re probably not in the right mood to start sharing their opinions. 

However, if you capture your customers on social media, there’s a good chance they’ll be feeling a lot more talkative. After all, social media platforms are where most customers discuss their issues with companies, talk about purchases with friends, and make their voices heard. 

Simply paying attention to when people talk about your company on social media can give you a lot of helpful feedback. Social listening tools allow you to collect post information every time someone mentions your business name or product. 

Alternatively, you can actively use the tools on social media to gather data from customers. For instance, Instagram has its own “poll” feature on Stories that allows companies to collect opinions. 

If you’re collecting feedback on social media, remember that you shouldn’t be asking any questions that are too complicated. Although people are more willing to share their opinions on social, they’re still looking for a relatively laid-back and casual experience.

Polls, where people can vote for their preferences with a single click, are more likely to garner engagement than a post asking people to tell you about the best purchasing experience they ever had with your brand. 

If you do want to encourage more in-depth feedback, the best option is to promise a reward in return for your follower’s effort. 

Make the experience fun by transforming it into a competition. 

For instance, ask your customers to share their favorite story involving your brand for a chance to win an impressive prize. You can ask each customer to tag their response with a branded hashtag so that relevant answers are easier to find. You could even add users to tag their friends in their posts too, to increase brand reach while you collect feedback:

With gifts and rewards to incentivize them, people will be much more likely to interact with your brand and put effort into the reviews they leave. You could even gather some user-generated content to put into your subsequent ad campaigns. 

6. Create a Dedicated Website Page

Finally, if you want to make it as simple as possible for people to leave feedback on your website and for you to collect all of that information into one space, then create a review page on your website. This can double up as social proof for people who need additional evidence to buy from your brand. 

A review page could be as simple as a page on your website listing the latest comments that your customers have left. You can include a form at the bottom of the page where people can add their thoughts. Just make sure that you carefully review these posts before they’re submitted to your website if you want to prevent spam from getting through. 

You could also create a case study or portfolio page that showcases the work you’ve done with other companies like Fabrik Brands does here:

At the bottom of each case study, give your customers a unique email address they can reach out to if they want to be featured as your following case study. Or include a contact form where people can get in touch to discuss their own experiences. 

Having a dedicated review, case study, or testimonial page on your website could be enough to inspire more feedback from your customers. It’s also a fantastic way to demonstrate how credible your company is to potential buyers. 

Still, Struggling? Take the Customer Out of the Equation

If, even with all the suggestions above, you still can’t seem to convince your audience to give you some decent feedback, then take them out of the equation. You can learn things about your audience without asking them for information. Google Analytics and other tools will give you valuable insights into which of your blog pages get the most engagement and how many people click on individual buttons throughout your site. 

These fundamental insights might not be as good as valuable, contextual feedback from your audience, but they’re an excellent way to start figuring out how to invest in your future growth. 

Remember, feedback of any kind – even if it’s just statistics and numbers – gives your business the ability to grow and make informed decisions.

Gather as much feedback as you can, and make sure you use it!


Featured image via Pexels.

Source

The post 6 Tips for Collecting Customer Feedback (The Right Way) first appeared on Webdesigner Depot.


Source de l’article sur Webdesignerdepot