Articles

You have been looking for a theme for your website. You haven’t yet settled on all the design details or come across a specialty theme that appears to have what you might need. Then, a multipurpose theme would be a wise choice.

Multipurpose WordPress themes have become extremely popular because of the flexibility they offer. Also, because of their relative ease of use and the powerful tools, you will usually find built into them.

With a good multipurpose theme at your fingertips, you are usually in a position to build anything. You can build a simple personal blogging site or a complex multifunctional site for a client. To make life a little easier, most multipurpose WordPress themes have features to help you get started quickly and in the right direction.

Here is a superb collection of 7 of the top multipurpose WordPress themes on the market today. These themes can help you build virtually any kind of website.

1. Betheme – Website Builder for WordPress with 600+ Pre-Built Websites

BeTheme has long been one of the most popular multipurpose WordPress themes. Not content to rest on their laurels, BeTheme’s authors took suggestions from their customers and created a better builder.

The Live Builder is 60% faster. Its UI is so intuitive that you won’t waste time learning how to use it. It features exciting new and powerful capabilities and performs familiar page-building features better than ever.

With the Live Builder, you can –

  • Edit live content visually without switching between backend and frontend; you can view an element and customize it simultaneously.
  • Use the Revisions feature to create, save, and restore what you want; no more lost changes thanks to the Autosave, Update, Revision, and Backup options.
  • Access the Pre-built Sections Library: find the section or block you need and add it to your page.
  • Select from the large and diverse selection of Items; categories include typography, boxes, blocks, design elements, loops, etc., to help you create exactly what you have in mind.

Click on the banner to learn more.

2. Total WordPress Theme

The introduction emphasized the ease of use and flexibility most multipurpose themes provide. Total has both in abundance thanks to its drag and drop frontend page builder and hundreds of built-in styling options.

Highlights include –

  • An advanced version of the WPBakery page builder.
  • 40+ single click importable demos, 100+ page-building modules, and 500+ styling settings to help you create exactly what you want.
  • Dynamic Template and Pre-styled Theme Cards to tailor dynamic templates for your posts.
  • Templatera and Slider Revolution plugins plus full WooCommerce compatibility.
  • A selection of developer-friendly hooks, filters, and snippets for future theme customization.

Even though Total was designed with perfection in mind, or perhaps because of it, it is the right choice if you need to get a high-quality website up and running in a short period of time. Total’s 47,000+ customers seem to agree.

Click on the banner to learn more.

3. Avada Theme

The fact that Avada is the all-time best-selling WordPress theme with more than 450,000 sales to date might be all the reason you need to choose it, but there are plenty of other good reasons for doing so as well.

For example –

  • Avada’s drag and drop page builder, together with the Fusion Page and Fusion Theme options, makes building a website quick and easy.
  • Single-click import demos, stylish design elements, and pre-built websites are there to help speed up your project’s workflow and impart a high level of quality to the finished product.
  • Avada’s Dashboard organizes your work, and its Dynamic Content System gives you maximum flexibility and full control over your project.

Click on the banner to find out more about this fast, responsive, and WooCommerce-compatible theme.

4. Uncode – Creative Multiuse & WooCommerce WordPress Theme

Uncode will be an ideal choice for building creative, magazine, and blogging websites and for building agency sites as well. This fast, sleek, pixel-perfect multipurpose theme has sold more than 80,000 copies to date.

Uncode’s impressive features include –

  • More than 450 Wireframe section templates that can easily be modified and combined.
  • A Frontend Editor on steroids coupled with the WooCommerce custom builder.
  • A “must-see” gallery of user-created websites.

5. TheGem – Creative Multi-Purpose High-Performance WordPress Theme

TheGem is literally a Swiss Army knife of website building tools that make it ideal for creating business, portfolio, shop, and magazine websites.

Among the many gems included in the package are these –

  • The popular and industry-leading WPBakery and Elementor front-end page builders.
  • 400+ beautiful pre-built websites and templates together with 300+ pre-designed section templates.
  • A splendid collection of WooCommerce templates for shop-building projects.

6. Impeka – Creative Multipurpose WordPress Theme

With Impeka, flexibility is almost an understatement. This intuitive, easy-to-work-with multipurpose theme gives beginners and advanced users alike complete freedom to dream up their ideal website and then make it happen – and fast.

You can –

  • Choose among the Enhanced WPBakery, Elementor, and Gutenberg page builders.
  • Select from 50 handcrafted design elements and Impeka’s 10 custom blocks.

Impeka is perfect for building every website type, from blogging and online stores to commercial businesses and corporations.

7. Blocksy – Gutenberg WordPress Theme

Blocksy is a blazing fast and lightweight WordPress theme that was built with the Gutenberg editor in mind and is seamlessly integrated with WooCommerce.

  • Blocksy is responsive, adaptive, translation ready, and SEO optimized.
  • Blocksy plays well with all the popular WordPress page builders, including Elementor, Beaver Builder, and Brizy.

This popular multipurpose WordPress theme can be used to create any type of website in no time.

Of all the design choices a WordPress user needs to make, choosing a WordPress theme for the task at hand is perhaps the most important.

That choice, more often than not, involves a multipurpose theme. Most multipurpose WordPress themes are extremely flexible. So, you can avoid the tedious and time-consuming task of trying to find exactly the right one for your niche and for the job.

Multipurpose themes work for any website niche and offer whatever an admin might need.

Choose one from these 7 Best Multipurpose WordPress Themes, and you should be able to create your website with relative ease.

Source

The post  7 Top Multipurpose WordPress Themes You Should Check Out first appeared on Webdesigner Depot.


Source de l’article sur Webdesignerdepot

There’s no shortcut to success when it comes to Google search results. That is unless you count pay-per-click advertising.

While pay-to-play will shoot your site to the top of the SERP immediately, it’s not a sustainable strategy for maintaining your position there. So, you’re going to have to get serious about SEO.

This guide will show you what to do to improve your SEO ranking and start seeing results this year:

  1. Use Google Analytics to track metrics
  2. Get an SSL certificate
  3. Improve mobile page speed
  4. Design a mobile-first UI
  5. Make your site accessible
  6. Optimize your images
  7. Create great content
  8. Structure your content for scannability and readability
  9. Create click-worthy title tags and meta descriptions
  10. Choose one focus keyword per page
  11. Improve your internal link strategy
  12. Use only trustworthy external links
  13. Get your site listed as a featured snippet
  14. Get high-quality backlinks
  15. Create a Google My Business page
  16. Refresh Your Content
  17. Regularly monitor Google Search Console

How to Increase Your Website’s SEO Ranking

If you can improve your SEO ranking — and get your pages closer to, if not on the highly coveted top SERP — you will:

  • Boost your site’s overall visibility as its authority in search grows;
  • Bring high-quality traffic to your pages;
  • Drive-up your conversion rate.

That said, search engine optimization is most effective when it’s an ongoing strategy as opposed to something you set up and forget about. So, some of the suggestions below will only need to be implemented once, while others you’ll have to return to every six months or so to make sure your site is on track.

Let’s get started.

1. Use Google Analytics to Track Metrics

If you haven’t yet begun tracking your website’s activity with Google Analytics, it’s the very first thing you need to do.

While Google Analytics alone can’t tell you how well or poorly your website ranks, there’s valuable data in there about what happens to the traffic that arrives from Google. Or any search engine your visitors use.

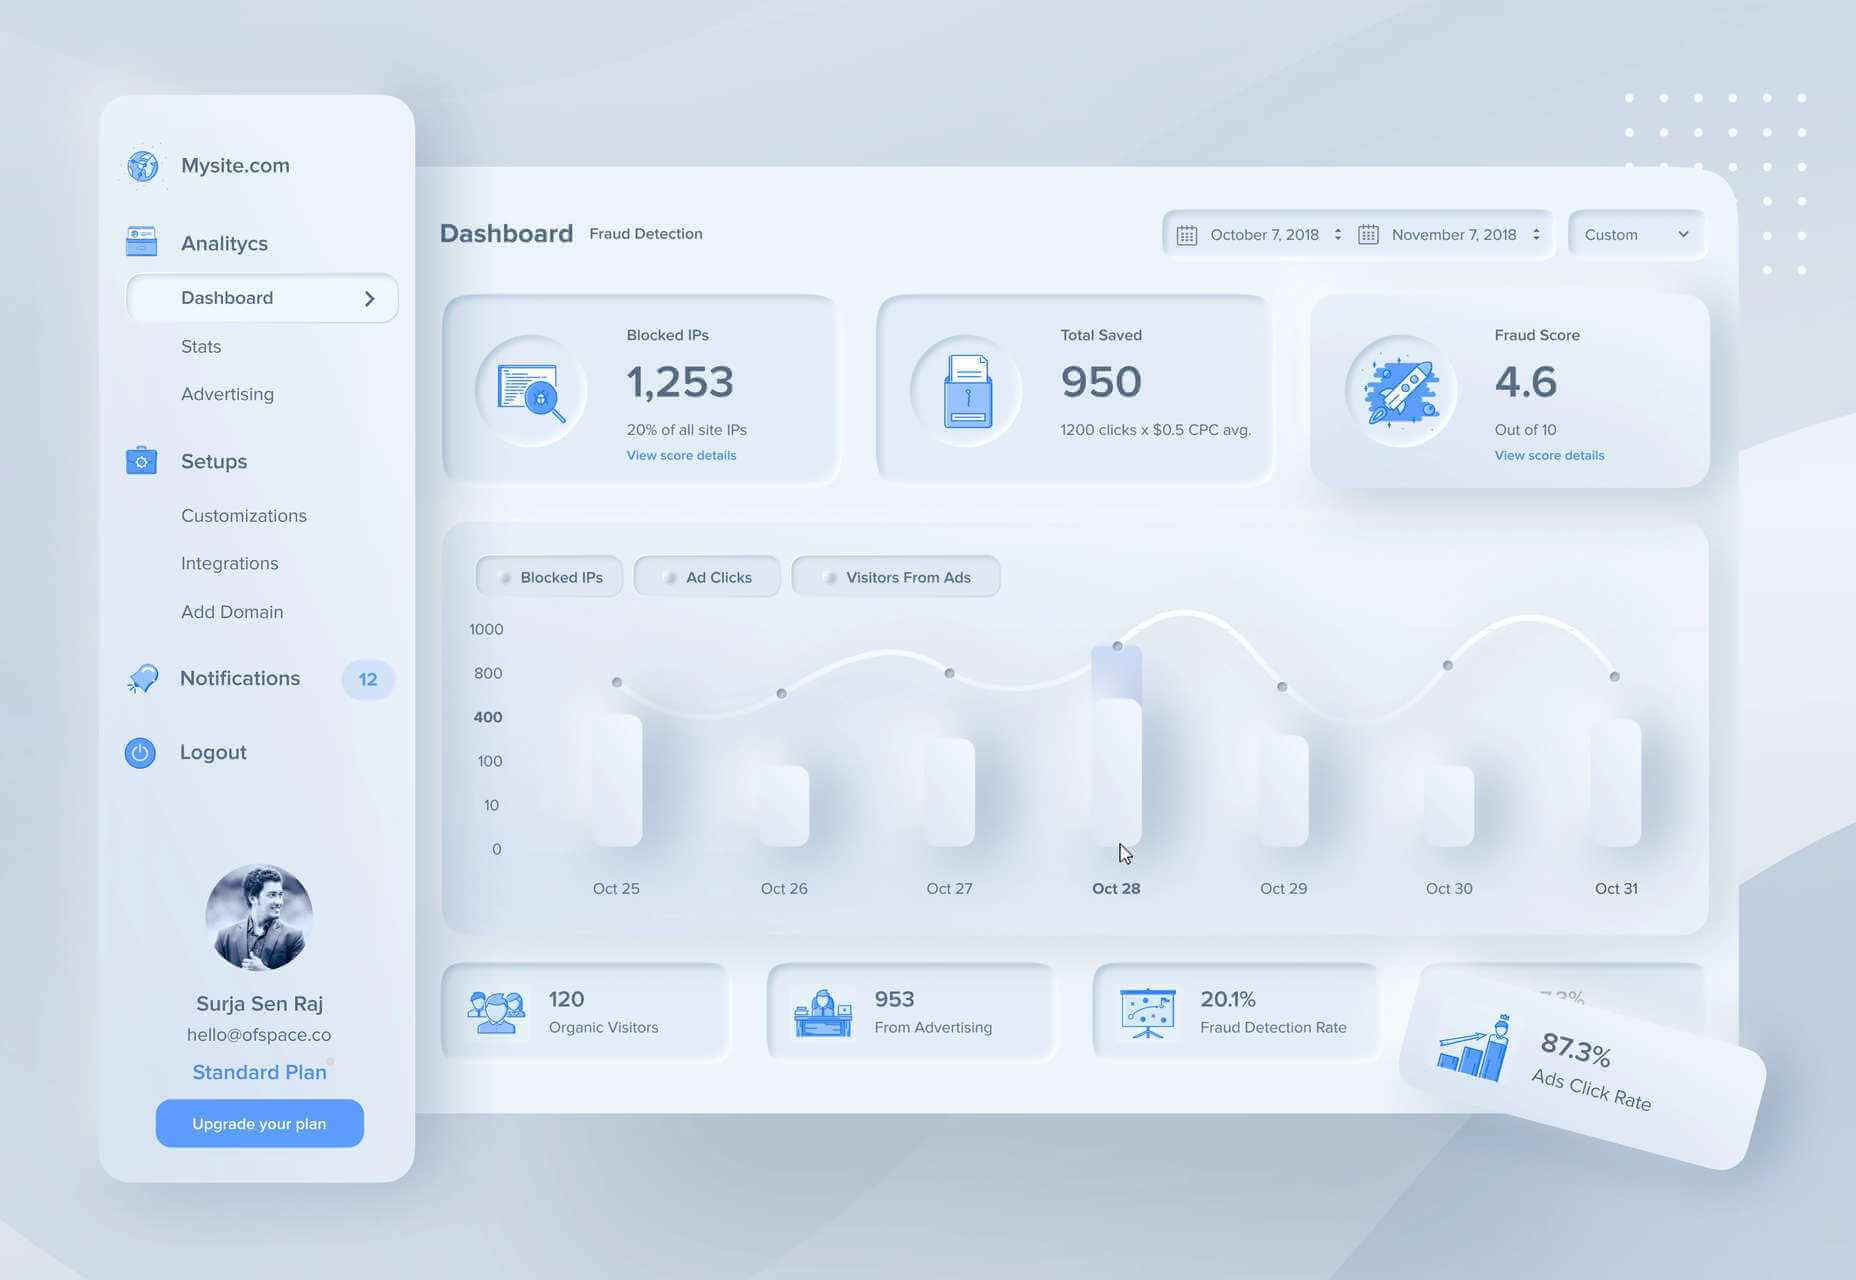
You can find this information under Acquisition > Source/Medium:

What you want to see here is that (1) you’re getting lots of visitors from organic search results (as opposed to paid) and (2) that they’re highly engaged. So, that means:

  • Longer times on site;
  • Multiple pages visited;
  • Lower bounce rates.

And if you configure Google Analytics to track different conversions on your site, you can see how well those organic visits convert.

Obviously, there’s a lot more you can track here. But you must understand if your SEO efforts are working in the first place, and that’s where you’ll get your confirmation.

2. Get an SSL Certificate

HTTPS has long been one of Google’s SEO ranking factors. Yet, of the two billion-plus websites that are online today, BuiltWith data shows that only 155 million have an SSL certificate installed:

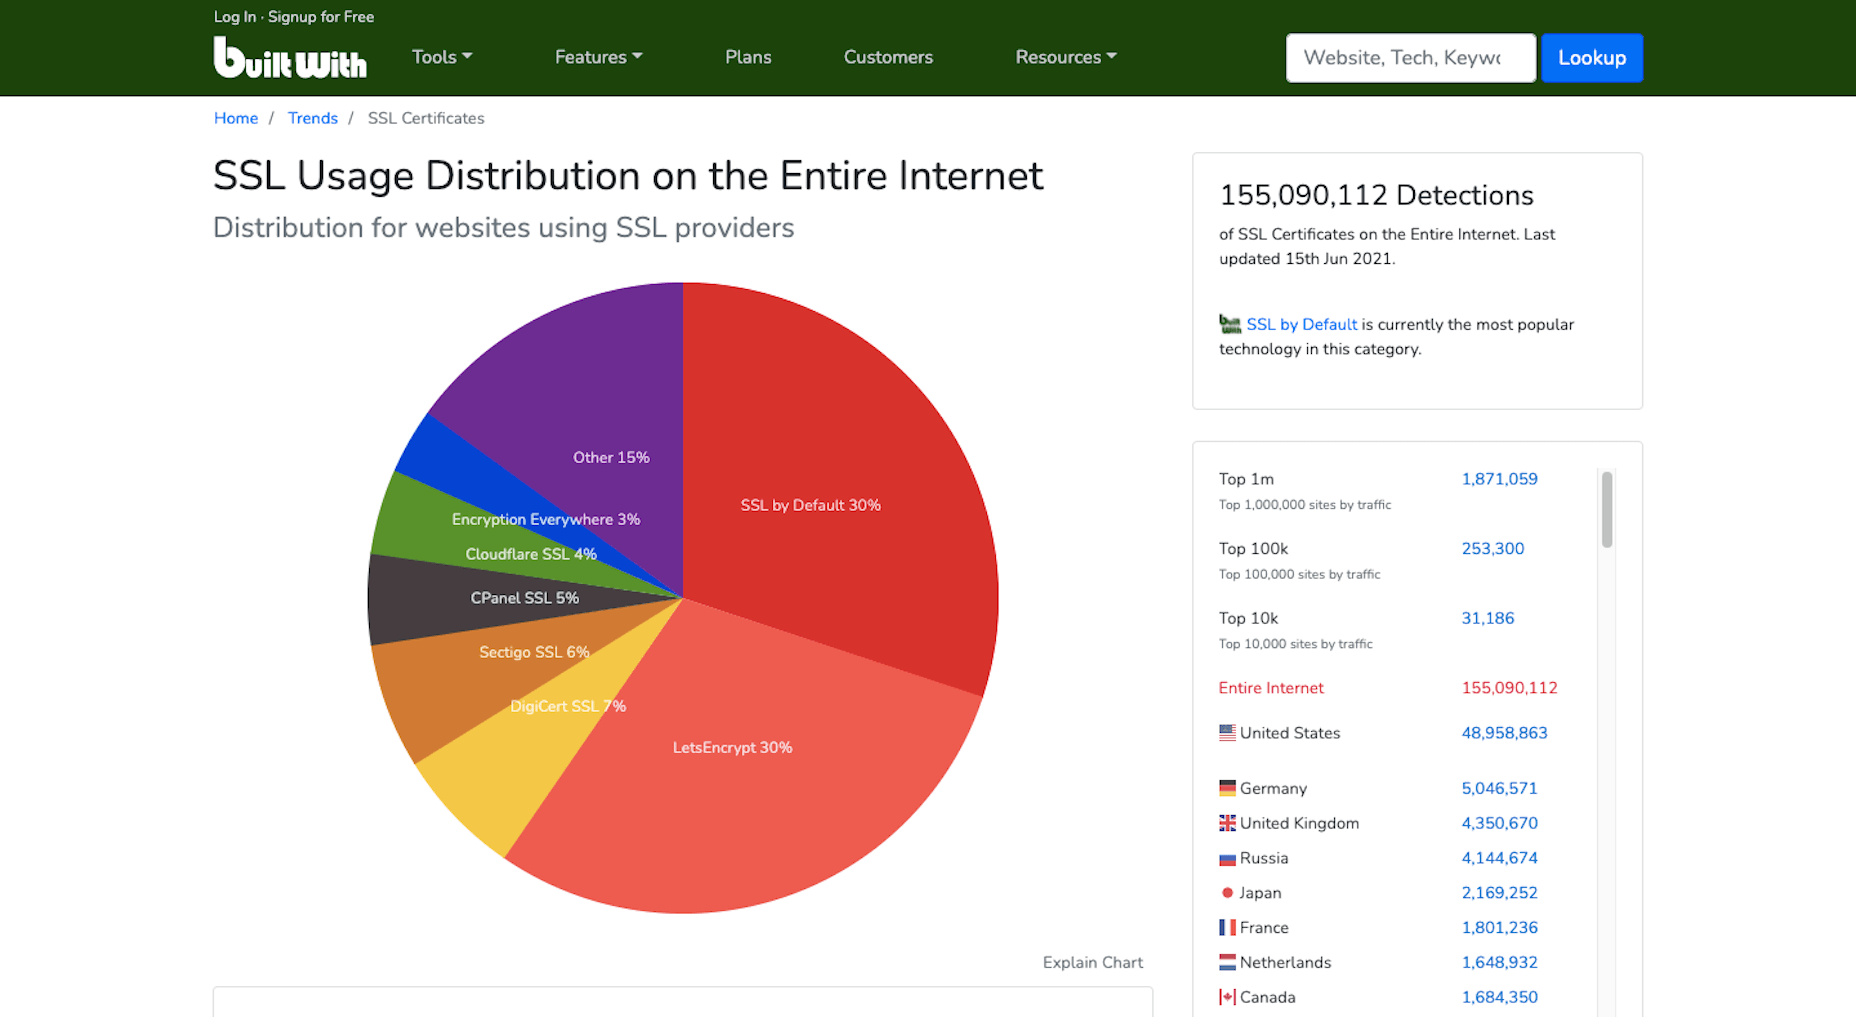
Security and privacy are major concerns for consumers. So if you want to increase their confidence in your website, installing an SSL certificate is an easy thing to do. And it’ll put you in Google’s good graces, too.

If you don’t have one already, get one for free from Zero SSL.

3. Improve Mobile Page Speeds

Mobile loading speeds became a Google ranking signal in July 2018.

It was something we saw coming ever since smartphones overtook the desktop as the primary device people used to access the Internet. Once it became a ranking factor, though, mobile page speed was something we could no longer treat as a “nice to have.” It became a must.

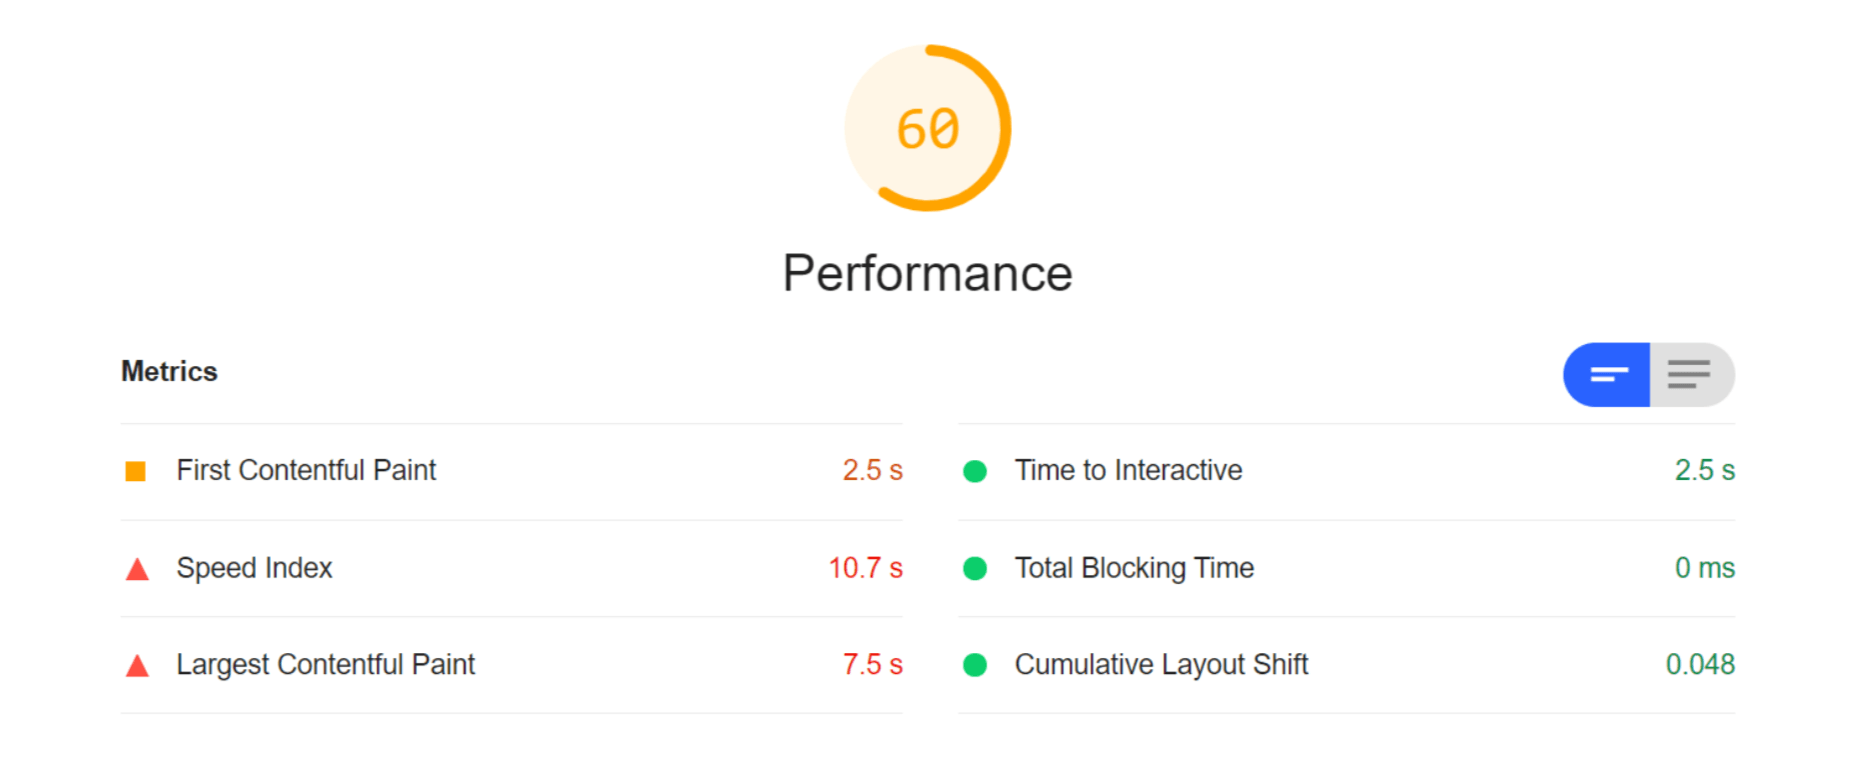
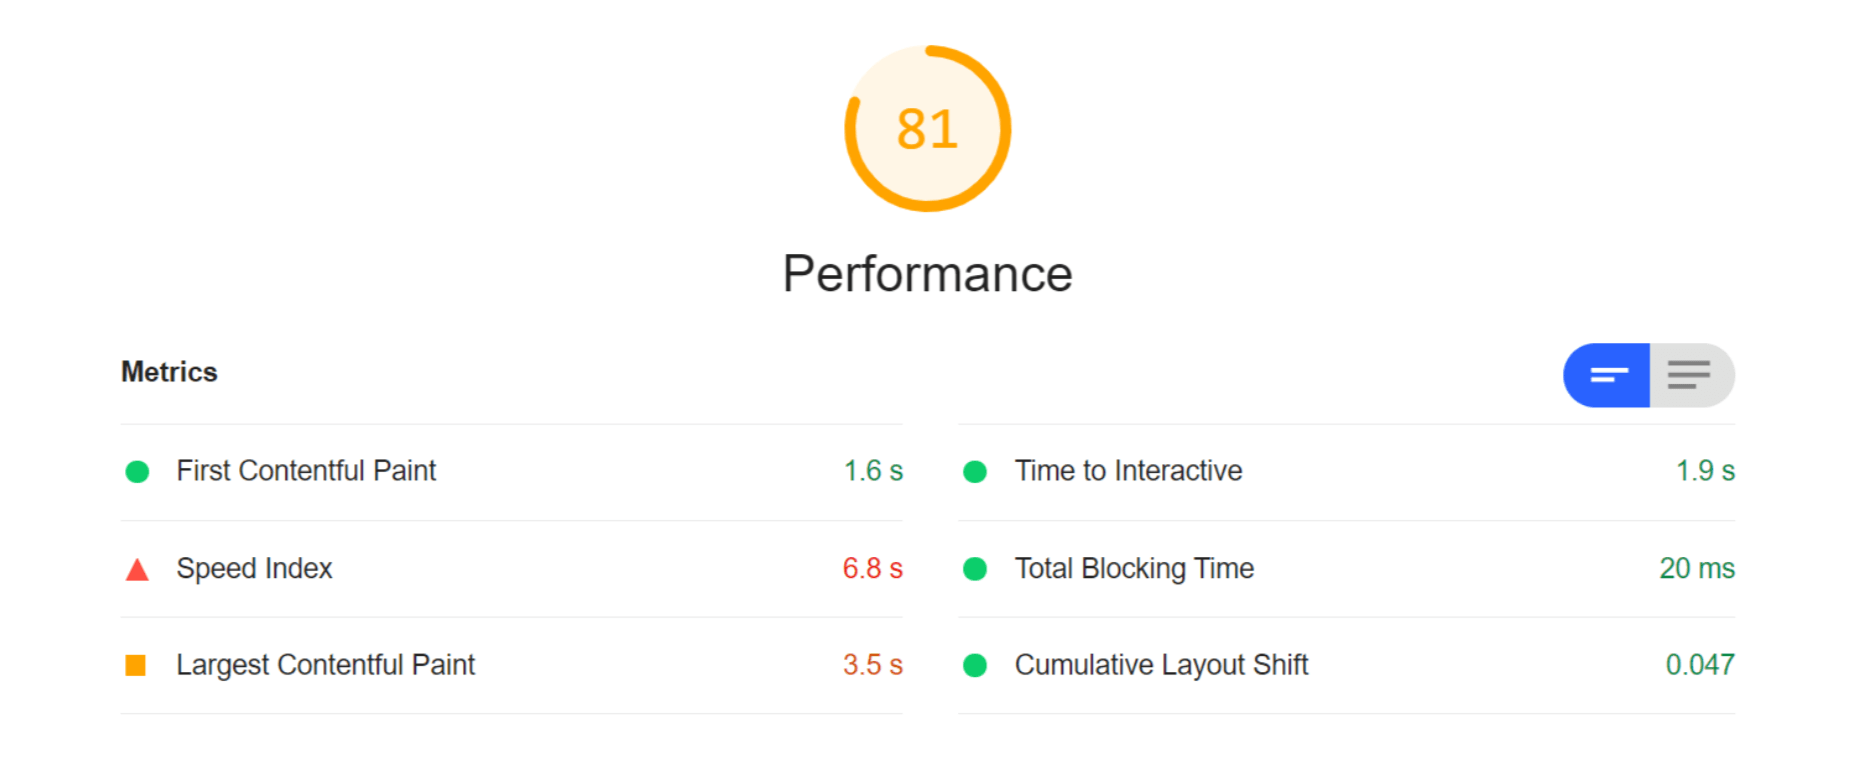
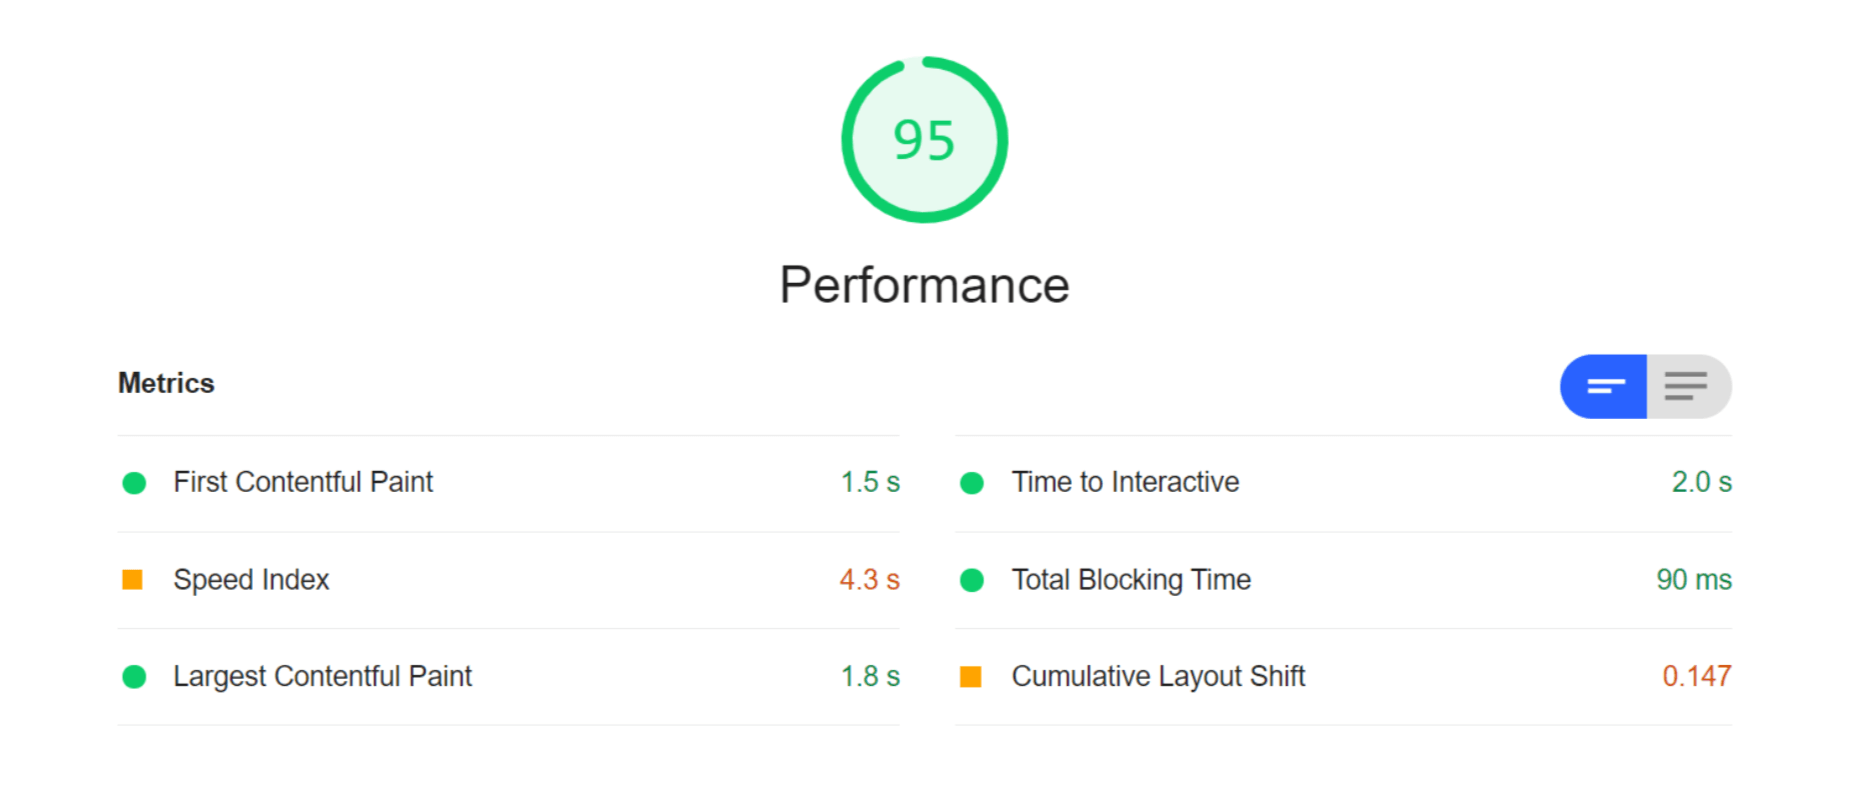
And with Google’s most recent Core Web Vitals algorithm update, there’s no ignoring how big of a role your site’s mobile loading speeds (i.e., performance) play in ranking it.

To ensure that your site meets Google’s expectations for speed, bookmark the Core Web Vitals tool. It’ll tell you how your site performs across all four of the major ranking categories.

You’ll find your speed-related issues at the bottom of the page, along with resources to help you resolve them.

Most of those tips will have to do with optimizing your code. However, there are other things you can do to make your site load quickly:

  • Use well-coded themes and plugins;
  • Remove unused themes, plugins, media, pages, comments, backups, and so on from your database and server;
  • Install a caching plugin that’ll minify, compress, and otherwise make your site lightweight and fast.

It’s also not a bad idea to review your web hosting plan. You might not have the right amount of server power or resources to keep up with your existing activity.

4. Design a Mobile-First UI

On a related note, a mobile-first design can also improve your site’s loading speeds. Rebekah Carter wrote a really helpful guide on how to do this last year.

In addition to speeding things up — since you won’t be trying to jam a bunch of desktop-first design and content into a smartphone screen — it’s going to help your site rank better.

Just be careful when you do this. A mobile-first design doesn’t mean creating a scaled-back version of the larger site for smartphone users.

In fact, Google explicitly tells us not to do that and why:

“If it’s your intention that the mobile page should have less content than the desktop page, you can expect some traffic loss when your site is enabled mobile-first indexing, since Google can’t get as much information from your page as before.”

And if your response is that the content on desktop-only doesn’t matter, then it really shouldn’t be there. Don’t waste your visitors’ time with useless or repetitive content, as it’ll only give them more reason to abandon your site.

5. Make Your Site Accessible

Accessibility has come to the forefront of the SEO discussion thanks to Core Web Vitals.

Now, running your site through the tool will tell you if there are any inaccessibility issues that Google will ping you for. But that doesn’t make your site completely accessible.

Considering the rise in website accessibility-related lawsuits, you’ll want to take this seriously.

Because a bad experience due to inaccessibility won’t just cost you visitors and a lower search ranking, it’ll cost you a lot of money, too.

Here are some things you can do to ensure that your site and all its content is accessible.

6. Optimize Your Images

Technically, image optimization falls under the page speed tip. However, that’s not the only way you should be optimizing your images, which is why I wanted to address this separately.

According to HTTP Archive, the average weight of a mobile web page these days is 1917.5 KB. Images take up a sizable chunk of that weight:

Because of this, bloated image sizes are often to blame for slow pages.

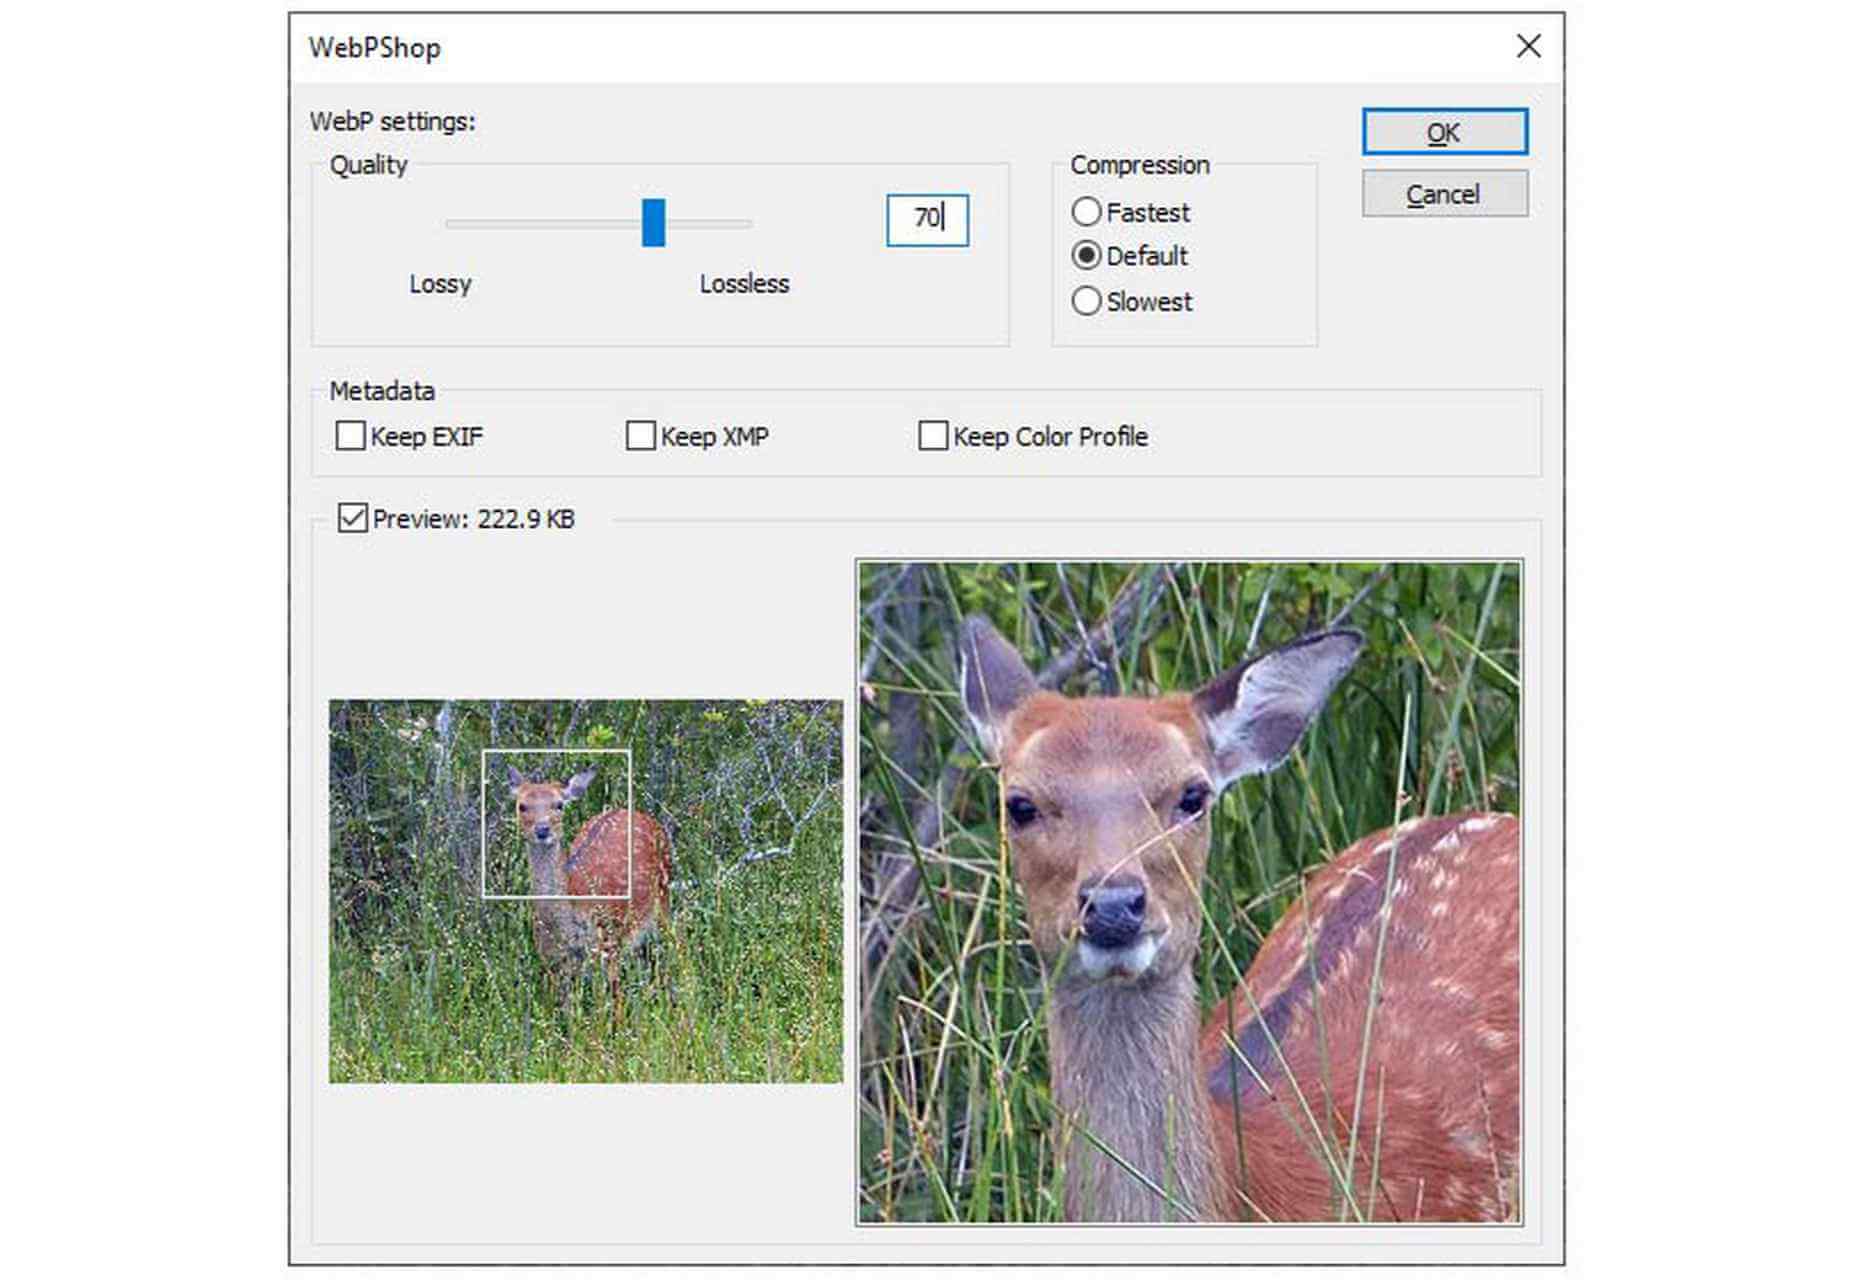
You can do several things to optimize your images for speed, like using lightweight formats, resizing them, and compressing them. You’ll find 6 other image optimization tips here.

While those tips will help you speed up your site and, consequently, improve your SEO ranking, there’s something else you need to do:

Add alt text to your most important images.

One reason to do this is to improve accessibility. Another is so your web page can rank in both the regular Google search results and image results as this search for “WordPress by the numbers” does:

If you can write alt text that perfectly describes your graphic and matches the image searchers’ intent, you can create another ranking opportunity for your page.

7. Create Great Content

There are many technical ranking factors you have to pay attention to if you want to create a good experience for your visitors and rank well as a result. However, none of that will matter if your content sucks.

So, how do you make great content? It really depends.

Think about the difference between a page describing your web design services and a product page for a blender.

Your web design services page would need to:

  • Explain why hiring a web designer is a must;
  • What your design services entail;
  • What they can expect in terms of results;
  • Include some proof in the form of testimonials or portfolio samples;
  • Have information on next steps or how to get in touch.

That would be a comprehensive and useful page. If business owners searched for “hire a web designer near me” or “should I hire a web designer?”, that page would sufficiently answer their query.

A product page, however, would need to:

  • Provide a brief summary of the blender;
  • Show photos of the blender, different angles of it, as well as different variations of the product;
  • Display the price;
  • Allow customers to Add to Cart or Save for later;
  • Include technical specs of the blender;
  • Recommend related products;
  • Display sortable customer testimonials and ratings.

The last thing a shopper would want is to be directed to a product page that reads like one of your services pages.

So, great content not only needs to be well-written and error-free, but it needs to match the searcher’s intent and expectations. If you can do that, your visitors will stay as long as they need to read through everything, which will help strengthen the page’s ranking.

8. Structure Your Content for Scannability and Readability

Including necessary details and in the right format is an important part of making a page’s content valuable to the visitor. The structure is going to help, too.

For starters, you want to make sure every page is human-readable. So, that involves:

  • Shorter sentences and paragraphs;
  • Linkable table of contents for longer pages;
  • Header tags every few hundred words;
  • Descriptive and supportive imagery throughout;
  • Text callouts like blockquotes and bolded phrases.

By making a page less intimidating to read and easier to scan for a quick summary of what it is, you’ll find that more visitors are willing to read it and follow your calls to action.

You can use a tool like Hemingway to improve your page’s readability. Quickly pop the text of each page into the editor and follow the recommended suggestions:

You’re also going to have to think about how well Google’s indexing bots can read your page. They’re smart enough to pick up on cues but not smart enough to sit down and read your article on the benefits of Vitamin D or how to install a new showerhead.

So, you’ll need to use HTML meta tags as well as hierarchical header tags to tell the bots what the page is about.

If you’re building a WordPress site, you can use the Yoast SEO plugin to analyze how scannable and readable each page of your site is (among other things):

9. Create Click-Worthy Title Tags and Meta Descriptions

To get eyeballs on your really great content, the brief preview users see of it in search results needs to be able to lure them in. Get more clicks to your site from search, and Google will take notice.

But they can’t just be superficial clicks. If Google notices that your page is getting a ton of traffic that almost immediately drops off once they see the content on the page, your page will not fare well in search results.

So, your goal is to stay away from clickbait-y title tags and meta descriptions and make them click-worthy.

The first thing to focus on is the length. Google only gives you a certain amount of space to make your pitch.

There are many tools you can use for this, but I prefer Mangools’s SERP Simulator:

It allows you to play around with your URL, title tag, and meta description and to watch in real-time as it fits the allotted space. You can also compare it to the pages that currently rank for the keyword you’re going after, which can be a really useful reference point. After all, if those sites have made it to the first SERP, then they’re doing something right.

Another thing to think about when writing click-worthy titles is how engaging they are.

The tool I recommend for this is CoSchedule’s Headline Studio:

I don’t find this useful so much for basic web pages. You don’t need to get creative with something like your About or Contact pages. But for content marketing? If you want to beat out competing articles for attention in Google, this tool will be very useful.

10. Choose One Focus Keyword Per Page

It’s not as though you can add a keyword tag to your page, and Google will automatically rank your site for it. That’s not what keyword optimization is.

Instead, what you do is select one unique keyword per page and write the content around it. So, it’s really more about creating a clear focus for yourself and then comprehensively unpacking the subject matter on the page.

Keep in mind, though, that if you want to improve your chances of ranking for the keyword, it needs to be relevant to your brand, useful for your audience, and your site needs to actually be able to compete for it.

You can use the Google Keyword Planner to find keywords that fit those criteria:

Ultimately, you should choose a keyword that:

  • Has a decent amount of monthly searches — over 1,000 is what I aim for;
  • Have “Low” to “Medium” amount of competition, but the lower, the better;
  • Matches the user intent. So take that keyword, put it into Google and see what you find. Then, look at the sites on that first page of search results. Do they match what your own page will address? If so, then you’ve found a keyword that aligns with your users’ search intent.

Now, if you’re writing great content that addresses your visitors’ questions and concerns, then optimizing for your focus keywords will happen naturally. The same goes for related keywords you might want to target. As you write the content for each page, the keywords will organically appear.

But remember how I said Google’s indexing bots need certain HTML and header tags to “read” the content on the page? This means you’ll need to include the focus keyword in some of those areas, so there is no question about what the page is about.

Here’s where your focus keyword should show up:

  • Title tag (H1);
  • Meta description;
  • Slug (hyperlink);
  • Within the intro;
  • The first H2 header tag;
  • Alt text for the most important image on the page;
  • Within the conclusion.

It should also appear throughout the page, along with variations of the keyword that people might search for.

You can use the Yoast SEO plugin to analyze this as well.

11. Improve Your Internal Link Strategy

Okay, so here’s where we start to get into SEO strategies that Google might not directly care about, but that can still drastically improve how well your site ranks.

Internal links, in particular, are valuable because they create an interconnected structure for your site. Here’s a basic example of why that’s important:

Let’s say these are the pages on your website. Each of them can be accessed from the home page and main navigation. This structure tells us that each page is related to the overall message and mission of the company, but they are not related to one another. And that doesn’t make sense, right?

When you’re educating visitors on your Web Design services, it’s naturally going to come up that you also happen to specialize in WordPress and eCommerce design. So, those internal links should appear on your Web Design page. And vice versa.

In addition, your Portfolio and Contact Us pages are likely going to be the most common CTAs on the site. Your prospective clients shouldn’t be forced to backtrack to the homepage or scroll up to the navigation to take action. By including these internal links or buttons within the content of the services pages, you’re giving them a quick and direct line to the next steps.

The more intuitive you make the user journey, the easier it will be for them to convert.

This is one reason why websites with a strong internal linking structure perform well in search results. Another reason is that internal links help Google’s bots find all of the content on your site and better understand how they relate to one another.

12. Use Only Trustworthy External Links

Link juice is one of the reasons why business owners are obsessed with getting backlinks. We’ll get to that shortly.

But it’s also something that comes into play when choosing external links to include on your site.

Link juice is the idea that one site can pass its authority to another through a dofollow link. So, by linking out to authoritative and trustworthy sources, your site may raise its own clout with the search engines because of that connection.

However, it works both ways. If you create external links to websites with misinformation that pose a security threat to visitors or are otherwise untrustworthy, that bad reputation can do your website harm.

So, make sure that every external link you use is necessary and reliable. If not, get rid of it.

13. Get Your Site Listed As a Featured Snippet

I said earlier in this post that pay-per-click advertising is the only way to shortcut the SEO process and get on the first page of Google. That’s not entirely true.

We’ve already seen how optimizing your images for Google Images search can shoot your site to the top of results. Another way to get ahead is by optimizing your page using structured data to land a spot as a featured snippet.

Like this page from Bankrate that answers the question “how do you get a loan”:

Remember that structured data alone won’t instantly move your web page into the featured snippet space. The content needs to be the best it can be, and the structured data needs to be well written.

Schema.org was created to help you pick the right category and write the structured data for it:

Use this to write up the relevant microdata for the pages to make the most sense to do so. For instance, an About page probably wouldn’t benefit from having structured data attached to it. However, a lengthy blog post that explains a step-by-step process would.

There are WordPress plugins (Yoast is one of them) that will help you insert this code into your pages if you prefer.

14. Get High-Quality Backlinks

Backlinks pointing to your website are a huge indicator to Google that your site is share-worthy and authoritative.

However, like everything else in SEO, you can’t cheat your way into a bunch of backlinks. They need to come from authoritative sources, and they need to be relevant. That’s why paying or bartering for backlinks isn’t usually effective. If your web page’s backlink doesn’t organically fit within the content on their site, visitors aren’t going to click on it.

There are lots of ways to go about building up a repository of backlinks that do generate authority for you and improve your SEO ranking in the process:

Get active on social media and become an authority there: The rule is generally that 80% of your posts need to be non-promotional. By sharing content from all kinds of sources that are relevant to your audience, you’re going to get more meaningful engagement. And this’ll eventually put the spotlight on your own content and get people to share it on social media, too.

This is something that Google will look at when ranking your site: What sort of social signals are coming from your brand?

Get featured as an expert: You don’t need to become an influencer for people to view you as an expert in your field. It’s all about your reputation.

By leveraging your reputation to get speaking gigs, you’ll grow your authority even more. Just make sure they’re relevant to what you do. So, look for podcasts, webinars, and conferences in your field that are looking for experts.

Become a guest blogger: If public speaking isn’t your forte, that’s okay. Turn your attention instead to lining up guest blogging gigs.

By writing high-quality content for authoritative websites (whether you get paid or not), you’ll bring more attention to your own brand. And Google will pass that authority onto your site.

15. Create a Google My Business Page

Any business can create a Google My Business page. There are a number of SEO-related benefits to doing this.

The first is that local businesses can literally put themselves on the map with Google My Business. Here’s what a Google search for “restaurants near me” looks like:

Even if your site doesn’t appear on the first SERP, the map that sits at the top of search results can give you a front seat anyway.

Another reason to create a My Business page is that you get to control your knowledge graph sidebar, like Ford’s Garage does here:

By including high-quality graphics, pertinent details about the business, and collecting positive customer reviews, this knowledge graph could do your brand’s reputation a lot of good in the eyes of Google and your prospects.

16. Refresh Your Content

This is useful for all of the content on your site, even your most high-performing pages.

If your site is starting to gain traction, take a close look at your Google Analytics data. You may find a few pages that no one seems to be paying attention to or, worse, that they always seem to bounce from.

In Google Analytics, go to Behavior > Site Content to figure out which pages are underperforming.

Then, ask yourself:

  1. Is this page even a necessary part of the user journey? If not, you can probably scrap it and have one less distraction on your site.
  2. If this page is necessary, what do you need to do to make it more valuable and relevant to your audience?

With the most popular pages on your site, it’s not unreasonable to expect that at least part of what you originally wrote will go stale or become irrelevant within a year or two. So, it’s a good idea to refresh these as well.

To do that, it’s simple. Do a search in Google for your focus keyword. Read through the top five results and see what sort of information your post is missing. Then update it accordingly.

Anything outdated or irrelevant should also be stripped out.

17. Regularly Monitor Google Search Console

Last but not least, you should keep your eyes on Google Search Console.

There’s a lot of valuable information in here that will tell you why your site might not be ranking as well as it could. You’ll find issues related to:

  • Indexing
  • Mobile usability
  • Security
  • Core Web Vitals

You’ll also find data on how well your site is ranking in general. You’ll find this under the Performance tab:

Use this to identify:

  • Which keywords you’re ranking for and are driving traffic to your site;
  • Which keywords you’re getting the most impressions from but not getting clicks from;
  • Which keywords you’re getting the most clicks from but not a lot of impressions;
  • Which keywords you rank low for and could stand to improve upon.

You can learn a lot about how strong your SEO strategy is. Just use the Clicks, Impressions, and Position tabs to sort your data so you can better understand what’s going on.

Then, prioritize fixing the pages that can and should be bringing your site highly qualified traffic but aren’t.

Wrap-Up

If you’re wondering how long it’ll take before you see an improvement in your SEO ranking, it depends. If your domain’s current authority is low, it can realistically take about six months to see major changes. That said, if you implement all of the suggestions above, you can certainly expedite that.

Just remember that there are no real shortcuts in SEO. You need to have an authoritative and trustworthy website and brand before anything else. So, take the time to build your credibility online so that these SEO tactics can really work.

Source

The post 17 Things You Can Do To Improve Your SEO Ranking In 2021 first appeared on Webdesigner Depot.


Source de l’article sur Webdesignerdepot

Every day design fans submit incredible industry stories to our sister-site, Webdesigner News. Our colleagues sift through it, selecting the very best stories from the design, UX, tech, and development worlds and posting them live on the site.

The best way to keep up with the most important stories for web professionals is to subscribe to Webdesigner News or check out the site regularly. However, in case you missed a day this week, here’s a handy compilation of the top curated stories from the last seven days. Enjoy!

How to Treat Clients Who Treat You Poorly

PC Users Are Furious About The New Windows 11 Design

20 Best New Fonts, June 2021

22 Free Web Design Tools from Spring 2021

10 Best Google Fonts for Headings 2021 Collection

Why Python is Not The Programming Language of the Future

The 6 Levels of UX Maturity

Top 20 JavaScript Tips and Tricks to Increase Your Speed and Efficiency

Drawing Graphics With The CSS Paint API

Creating Rhythm With Typography

Soft UI: Making Sense of the Latest Design Trend

Optical Size, The Hidden Superpower of Variable Fonts

WebP Images: A Primer

Perfect Tooltips With CSS Clipping and Masking

Source

The post Popular Design News of the Week: June 21 2021 – June 27, 2021 first appeared on Webdesigner Depot.


Source de l’article sur Webdesignerdepot

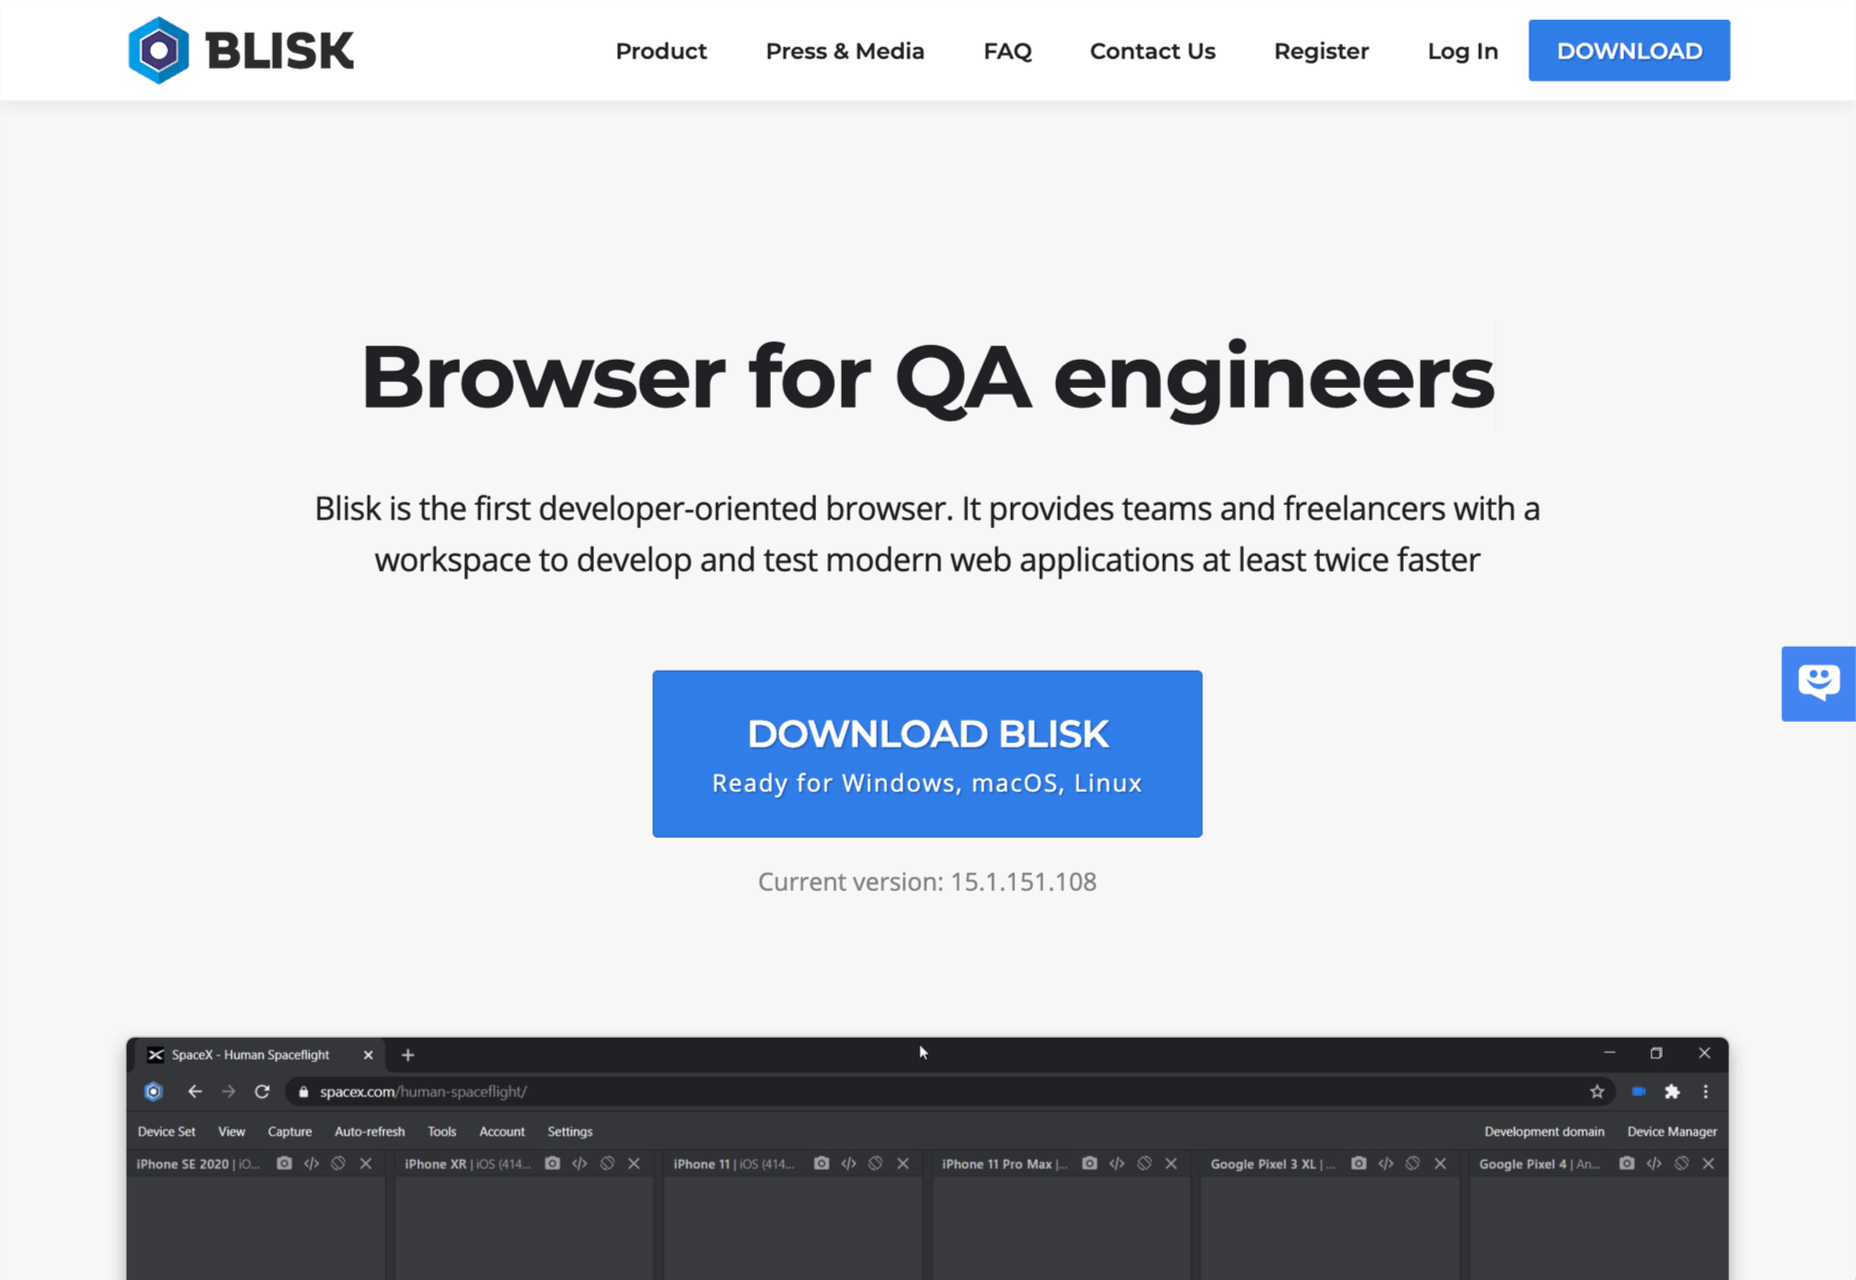
With the widespread acceptance of web standards, and the resulting deprecation of browser prefixes, there has been a noticeable change in the browser market. Where once browser manufacturers would try to lure users in with promises of feature support, now the focus is on privacy, speed, and developer tools.

When it comes to web development, you should really be testing on every browser and device you can lay your hands on; you’re probably already doing so using an app like LambdaTest, or BrowserStack.

When quality assurance testing, you probably work by market share: starting with Safari on mobile, Chrome on desktop, and working your way down to Opera and (if you’re a glutton for punishment) Yandax; naturally, when testing, it’s the largest number of users that concerns us the most.

But before you reach the QA stage, there are a number of browsers designed to assist development. Browsers that offer tools, especially for front-end developers, that assist with code and speed up development. Here are the best browsers for web development in 2021:

1. LT Browser

LT Browser is an app for web developers from LambdaTest. Like many of the apps in this class, it offers side-by-side comparisons of a site in different viewports. Additionally, LT Browser has a number of features that make it stand out.

As well as previewing web pages, LT Browser offers developer tools to rival Chrome, which is handy if you want to see how changes across different devices affect your Lighthouse scores. LT Browser also supports hot-reloading, which means when you make a change to your code, you don’t have to hit ‘refresh,’ the viewports simply reload — it’s surprising how much of a time-saver that simple addition is.

LT Browser requires a LambdaTest account, there is a free plan, and paid plans start at $15/month.

2. Firefox Developer

The best conventional browser for web development in 2021 is the developer edition of Mozilla’s Firefox.

The standard edition of Firefox is an excellent browser, packed with features, and privacy-focused. The developer edition adds to this with a suite of tools aimed at developers. The CSS and JavaScript debugging tools are superb, and the Grid tools are unparalleled for coding layouts with CSS Grid.

Firefox Developer is free to download.

3. Polypane

Polypane is one of the new generation of web browsers that are firmly intended as development aids rather than browsers. Polypane allows you to compare different viewports and platforms by placing them side by side. Interactions like scrolling are synced.

Polypane takes a step further than many browser apps in this class by showing social media previews. It even has a suite of accessibility tools, including some handy color blindness simulators.

Polypane has a 14-day free trial, and plans start at $8/month.

4. Blisk

Blisk is another browser for developers that allows you to line up a collection of viewports in a single app. URL and scrolling are synced, making testing interactions and animations effortless.

Blisk is awesome fun to play with and delivers a great preview of a responsive design. But be warned, synced viewports can be addictive, and it’s easy to line up browsers and become hypnotized by the synchronized movement; you’ll need a very large screen to get the most out of Blisk.

Blisk plans start at $9.99/month.

5. Sizzy

Sizzy is another app that allows you to view multiple viewports at once. It also has synchronized interactions, and like many competing apps, Sizzy allows you to screenshot different views.

Sizzy also includes a very clever synchronized inspect tool, so you can focus on individual elements across different viewports. It’s an excellent option for debugging, particularly if you’re digging into someone else’s code.

Sizzy has a 14-day free trial, and paid plans start at $7.15/month.

6. Brave

Brave is a privacy-focused browser that runs up to three times faster than Chrome. If you’re someone who balks at rendering speeds on most sites, Brave could be for you.

Brave’s main benefit for developers is that it supports Chrome extensions while maintaining privacy — it can even access the Web using Tor if simple privacy mode isn’t enough for you. There are hundreds of useful Chrome extensions, and if you avoid Chrome due to privacy concerns, then Brave solves your problem.

Brave is also pioneering a new system for monetizing site revenue, allowing viewers to tip sites, and soon, to control how advertising revenue is distributed.

Brave is free to download.

7. Chrome

Boring it may be, but Chrome is still the world’s most popular browser from the US to mainland China. Where once sites were “best viewed in IE,” Chrome is now the Web’s default.

No matter the site you’re designing, it has to work well in Chrome, and no simulator is as good as the real thing.

In addition to being the benchmark for page rendering, Chrome developer tools are the simplest way to access your Lighthouse scores, which helps you track down issues that may be holding you back in Google’s search results.

Chrome is free to download.

Source

The post 7 Best Browsers for Developers in 2021 first appeared on Webdesigner Depot.


Source de l’article sur Webdesignerdepot

It’s fair to say that AMP (Accelerated Mobile Pages) is a controversial topic among web developers.

AMP is a Google-guided technology that strips down web pages to a limited sub-set of tags to serve pages faster. It was developed as a web-based rival to native news apps from vendors like Apple.

The controversy first arose when it was clear how much influence Google had over the conventions, essentially creating a tiered Web overseen by a single entity. The clamor didn’t calm when it became clear that Google prioritized AMP pages for mobile search results. Developers were left in a difficult position: stand by best practices supporting a platform-agnostic Web, or do what’s right for their clients by building the most competitive mobile site possible.

But that was 2015, six years is a lifetime for a web technology, and things are about to change.

Hidden among the announcements about the much-delayed Core Web Vitals update — it’s finally rolling out, a year after originally planned, but don’t expect to see much impact until the end of August — is the news that Google mobile search will no longer prioritize AMP pages.

Beginning immediately (from the 17th June onwards) and completing sometime before the end of August, AMP will cease to be a factor in mobile site ranking. The AMP badge on mobile search results will disappear, and AMP is not required to have your site included on Google’s news app.

This significant move is due to the fact that the Core Web Vitals update from Google will expect the same speed and usability as AMP from non-AMP pages. Google still expects the same optimized user experience; it simply isn’t offering a cheat sheet on how to achieve it.

You can continue to use AMP, but there’s no automatic benefit to doing so, and the housekeeping involved in maintaining multiple front-ends means it’s far simpler to optimize your base site. Without a solid purpose, AMP ceases to fill a need. And just like that, one of the most controversial technologies of recent years slips away.

Featured image via Unsplash.

Source

The post Poll: Is AMP Dead, and Do We Care? first appeared on Webdesigner Depot.


Source de l’article sur Webdesignerdepot

Every digital aspect comes with a security risk if not handled properly. With billions of people using online and digital technologies worldwide, there are ample opportunities for hackers to break the security wall and create unrest all around. Cybersecurity news has become too frequent these days. We see bitcoin mining, credit card credential stealing, injecting malicious code into the systems, stealing confidential data, etc. In today’s digital world, it is not just about having speed, reaching your customers quickly, easy setup, mind-blowing features, etc., but rather, it is about how safe or secure your systems, data, or features are.

What is Cybersecurity?

The approach and practice of securing electronic data, networks, computer systems, and any form of digital infrastructure from malicious attacks is known as Cybersecurity. Banks, educational institutions, tech companies, government agencies, publishing media houses, hospitals, and every sector invest in cybersecurity infrastructure to protect their customer data, secrets, and business intelligence from attackers.

Source de l’article sur DZONE

This month’s new tools and resources collection is a mixed bag of elements for designers and developers. From fun little divots to tools that can speed up development, you are sure to find something usable here.

Here’s what new for designers this month:

June’s Top Picks

Codewell

Codewell is a service to help you learn, practice, and improve HTML and CSS skills with real templates. The benefit here is pretty obvious. When working with real templates, you can see the result of actions and changes. The tool includes free and premium options with new templates to work on weekly. Everything works in a responsive environment, and free plans have access to free challenges and a Slack community; a paid plan also includes source files and premium challenges. You need a Github login to get started.

LoomSKD

LoomSDK is an easy and reliable way to add video messaging to your product – and it’s free. The SDK enables your users to record, embed, and view with Loom videos directly within web apps – adding clarity and context to any workflow.

Pintr New Image

Pinter New Image turns photos into funky and fun line images. Upload an image with plenty of contrast, use the controls to set the look you want to achieve, and download. The new images are available as PNG or SVG. Maybe use it to create your next profile photos for social media or a nifty avatar.

Terms & Conditions Apply

Terms & Conditions Apply is a game that explains all those little pop-ups that you accept to enter and interact with websites. You are tasked with a mission to start the game: Do not accept terms and conditions, say no to notifications, and opt-out of cookies. Can you do it?

Khroma

Khroma uses artificial intelligence (via personalized algorithm) to learn what colors you love and create palettes for you to discover, search, and save for use in projects. The beta tool is easy to get started with, although you do have a little color-picking homework to get started.

6 WebTools

Mmm

Mmm is a different type of website builder. The tool, which is still in alpha, allows users to create drag and drop websites in a simple manner. It works almost like making a digital collage. Users can get a custom URL, and every page is responsive. The interface is designed so that you can even build yours on a phone. And here’s the other feature – they encourage messy designs.

LightGallery

LightGallery is a lightweight, modular, JavaScript image and video lightbox gallery plugin. It works with React.js, Vue.js, Angular, and TypeScript. It includes plenty of demos and documentation to help you make the most of this gallery tool.

Vandal

Vandal is a nifty browser extension for Firefox or Chrome that allows you to navigate back in time without changing tabs. The utility of Vandal is to allow quick and easy access to all the archived snapshots for a URL, and it supports navigation to a snapshot as well.

CSS Layout Generator

The CSS Layout Generator is a tool for creating the CSS for layout components. It is also a learning tool for teaching what is possible in CSS for positioning elements in the browser. Tweak specifications to see how it impacts the layout, CSS, and HTML.

Alpaca Data API

Alpaca Data API is an easy-to-use feed that allows you to bring in stock market data for modeling and backtesting. (it includes free and premium options based on your needs.)

Mobile Palette Generator

Mobile Palette Generator is a color-picking tool that will help you select the best hues for mobile design projects. It then shows you all the specs for primary, secondary, and accent colors.

6 Icons and UI Kits

Iconoir

Iconoir is an open-source icon repository with more than 900 SVG icons. Search icons, browse by category or poke around for what you are looking for. Everything is ready to use without signups or forms to fill out.

Pmndrs Market

Pmndrs Market has a collection of more than 300 three-dimensional elements and drawings of things for use in projects. Model renders are in a rough style with a realistic feel.

Boring Avatars

Boring Avatars is a fun collection of semi-customizable avatars without faces, hence the name. It’s a fun playground that puts a new twist on something that you might not expect to do differently.

Spark

Spark is a free download with three different website design starters. The hero images are ready to build from and are made for Figma.

Venus Design System

Venus Design System is a premium UI kit packed with more than 2,000 components and states that allow you to design fast. There’s also a demo version for you to test before you buy.

ReadyUI

ReadyUI contains more than 200 blocks and designs for agencies, developers, startups, and more. Everything is production-ready using Bootstrap and Figma files. Choose from light or dark themes and search for a design that works for your project.

5 Tutorials

Creating Generative SVG Characters

Creative Generative SVG Characters is a marriage of JavaScript and SVG that creates fun characters derived from drawings. Using shapes and a little code, you can see how to draw smooth lines, create polygons, and add other shapes for a fun feel. There’s a full demo on Codepen.

5 Steps to Faster Web Fonts

5 Steps to Faster Web Fonts helps you remove some of the bulk from popular typography options. Iain Bean explains a set of methods you can deploy to ensure that load times are quick with some applicable code snippets. Here’s a preview: Tip 1 is to use the most modern file formats (WOFF2).

The Perfect Link

The Perfect Link walks you through some accessibility checks from the A11Y Collective for linking best practices. Some of the things you think are the “right way” may be challenged here. The information goes through everything from design to semantics and is wonderfully thorough. It’s a must-read.

Readsom

Readsom is a curated collection of newsletters and emails that you can read online or sign up for. Its catchphrase is to “discover content you’ll want to read.” It is a good way to find newsletters that interest you, including plenty of design and development options that you might not otherwise know about.

Famous First Websites

Famous First Websites isn’t a tutorial per se, but it does provide a good place to do some visual learning. See what your favorite websites looked like when they launched and the evolution of the designs.

Source

The post 22 Exciting New Tools For Designers, June 2021 first appeared on Webdesigner Depot.


Source de l’article sur Webdesignerdepot

In most cases, you aren’t the only person working on the same project or codebase. That means that other people get to read your code and have to understand it. That’s also true for the code comments you leave behind. Developers often write ‘quick and dirty’ comments without much context, leaving other developers clueless about what you’re trying to say. It’s a bad practice that creates only more confusion than clarifies things.

So, yes – you should be bothered with writing meaningful code comments to help other developers. A code comment that describes the function, the reasoning behind the function, and its input and output will speed up the learning process of other developers. Especially for junior developers, this information comes in handy when learning the code.

Source de l’article sur DZONE

Asset management and website performance optimization are two of those unavoidable headaches faced by every website owner.

A digital asset management (DAM) platform can provide centralized asset repositories with intuitive dashboards to help you manage assets. On the other hand, an image CDN can help you get rid of that messy responsive syntax and provide dynamic asset optimization with huge performance boosts.

The problem is that website performance has become such a competitive factor that DAMs with other priorities tend to fall short. On the other hand, specialized image CDNs don’t solve the problems associated with image management, particularly within organizations.

With that in mind, I propose solving these problems for good by putting together image management and optimization stack using ImageEngine and Cloudinary. Instead of being a comparison between these two tools, this article describes the benefits of using them to complement each other.

Features and Asset Management Capabilities

As a DAM, Cloudinary provides you with a visual interface to store, manage, and edit your image and video assets. In that way, it’s not much different from any other professional image managing software such as Adobe Bridge, except that it’s an online, browser-based service.

Using the Media Library, you can upload, delete, and organize images in folders, for example. The visual image editor allows you to make advanced transformations and image touch-ups and see the results instantaneously using tools like sliders, dropdowns, etc. You can even chain transformations together for multi-layered effects.

Cloudinary also allows you to manipulate images and videos this way using their URL-based API.

Cloudinary has additional auxiliary features that make asset management easier (especially in organizations), such as backups, role-based multi-user admin, and feature extensions via third-party integrations and add-ons.

This is something most image CDNs don’t provide. Instead, they allow you to access and transform images using URL manipulation. Transformations are usually made using string-based parameters or directives. A serverless, headless DAM, if you will.

However, the advantage of using a dedicated image CDN like ImageEngine, is that it can usually provide enhanced asset optimization. ImageEngine, for example, is an intelligent image CDN that uses WURFL device detection to finely read the context an image is accessed from (device model, PPI, OS, browser, resolution, etc.) and then chooses the optimal image for that configuration.

This frees up website owners from having to do any additional optimization. This business logic is also built-in to all of their global PoP servers, and ImageEngine specifically delivers cache-hit ratios close to 100%. The following performance section will illustrate the difference this can make in practice.

Check out the key differences between ImageEngine and Cloudinary. And, for a deeper insight, see the comparison with other similar CDNs, like imgix and Cloudflare

Performance

Just to cover our bases and prove that this is an effective asset management and optimization stack, I’m also going to affirm it using a Lighthouse performance audit. Here is a quick summary of the results:

For this test, I built a web page with a tonne of images with overly large file sizes. In this first Lighthouse audit, I didn’t apply any optimization to the images. Here’s the result:

As you can see, we had some major problems when it came to the loading time of our assets. Overall, the page took more than 10 seconds to load. One of Google’s crucial user-centric performance metrics, LCP, scored a miserable 7.5s. Lighthouse suggested that some of the main problems encountered were the asset file size, inefficient cache policies, using non-optimal image formats, and improperly sized images.

Both Cloudinary and ImageEngine are supposed to address all of these factors with their auto image optimization. In the next audit, I used the same page and content but served my images via Cloudinary:

As you can see, there is improvement in most factors. FCP is now in the green, and both the Speed index and LCP times have almost halved. Even TTI and CLS improved slightly. That being said, it’s still nowhere near optimal, and we’re still falling short of the all-important 3-second loading time ceiling.

So, finally, let’s do another Lighthouse audit – this time using ImageEngine on top of Cloudinary. Here are the results:

With ImageEngine, I finally scored in the green with 95. All the metrics that have to do with the sheer speed at which image content loads improved. The Speed Index and LCP, which is the most important, improved dramatically. CLS scored worse, but this typically varies from test to test.

You can find another and more extensive breakdown of the performance and pricing comparison here.

Transformations, Bandwidth Utilization, and Cost

Cloudinary’s pricing plans work on a credit-based system. Starting with the free account, you get 25 credits/month. Each credit can be used for 1,000 transformations, 1 GB of storage, or 1 GB of net viewing bandwidth. The other two packages cost $99 for 225 credits and $249 for 600 credits, respectively.

You should plan to generate a minimum of 5 transformations per image. In effect, that limits you to around 200 images with the free plan, excluding whatever manual transformations you make.

ImageEngine’s Basic plan costs $49 and provides you with 100 GB of Smart Bytes. Smart Bytes are based on optimized image content and translate to roughly 400-500 GB of raw images.

So, with Cloudinary, you have to compromise between bandwidth and storage usage as well as the number of transformations you can make. Transformations for Cloudinary are counted as they are dynamically generated on-demand.

However, if you use ImageEngine for optimization, you can switch off Cloudinary’s auto-optimization. When a new image variant is needed, it will be generated and delivered via ImageEngine. Considering variant count isn’t limited by ImageEngine, this will drastically cut down on the number of credits you’ll need to spend on transformations.

Effectively, that means you could use the bulk of your Cloudinary credits purely for storage and specific transformations. For example, advanced cropping, applying effects, or color adjustments. These are, after all, the main functions of a DAM.

With this setup, ImageEngine’s Basic plan and Cloudinary’s free plan should be adequate for most websites, saving around $50 a month.

How to Implement Cloudinary with ImageEngine

Signing up for Both Services

As it will house all of your image assets, the logical place to start would be to sign up with Cloudinary.

Create a (free) account, and make sure to take note of your “cloud name” during the setup wizard. This will be the name of your designated storage location on the Cloudinary platform and is usually a garbled string like di2zgnxh0 by default. However, you can change this to something more meaningful.

Once you’ve signed up, you can start uploading your image assets and creating different versions/transformations of them. Setting up Cloudinary integration on a CMS, like WordPress, is usually straightforward. Just indicate the CMS you’ll be using, copy the API key, install the plugin, and activate it.

Next, sign up for a free trial with ImageEngine. There will also be a short setup wizard during which you will:

  1. Provide ImageEngine with the website where your images will be delivered.
  2. Supply your image origin (in this case, your Cloudinary web folder). For now, you can only add the Cloudinary, e.g., res.cloudinary.com.
  3. Get your ImageEngine image-serving domain, e.g., {randomstring}.cdn.imgeng.in

When in your ImageEngine dashboard, you’ll see this domain listed under “Engines” as well as an entry for Cloudinary under “Origins.” Edit the latter and under “Advanced,” add your Cloudinary folder to the “PATH” field.

That’s it, you should now be able to store and manage images via Cloudinary and serve them via the ImageEngine CDN.

Dynamically Loading Specific Image Variants

Let’s take a look at a use case for loading different transformations of individual images on your site. This example will showcase how you can use Cloudinary’s advanced image editing tools to transform images while still reaping the optimization rewards of using ImageEngine as your image CDN.

A popular practice today is to use rounded images for team, client, or profile portraits. Using Cloudinary, you can load this transformation using the following URL:

https://res.cloudinary.com/myimages/image/upload/w_400,h_400,c_crop,g_face,r_max/w_200/profile.jpg

This will resize the image to 400 by 400px, focus on the face, and apply the maximum amount of radial cropping around it – to a width of 200px.

The same image can then be accessed via your ImageEngine delivery engine simply by swapping out the domain:

https://images.myimageengine.com.imgeng.in/image/upload/w_400,h_400,c_crop,g_face,r_max/w_200/profile.jpg

NOTE: I added my Cloudinary folder designation (“myimages”) as the path to my image origin. With that config, I don’t need to include it every time I use the image URL.

For example, you can set up the origin like this:

And, then under advanced:

If I specifically wanted to load the profile picture in WebP format (for transparency support, for example), I could add the ImageEngine directive f_webp:

https://images.myimageengine.com.imgeng.in/image/upload/w_400,h_400,c_crop,g_face,r_max/w_200/?imgeng=/f_webp/profile.jpg

ImageEngine and Cloudinary – The Wrap Up

Both ImageEngine and Cloudinary are superb platforms that can make managing image and video assets easier and improve your website maintenance. However, both services have their specialty in which they outperform each other.

For ImageEngine, it’s delivering blisteringly fast image loading times in next-gen formats and with a minimal loss of visual quality.

For Cloudinary, it’s providing a visual interface to organize, store, and edit your image and video assets.

As a further incentive, letting each of these services handle what they’re best at can lead to lowering your long-term operating costs.


[– This is a sponsored post on behalf of ImageEngine –]

Source

The post Start Using a Smart DAM and Image Optimization Stack first appeared on Webdesigner Depot.


Source de l’article sur Webdesignerdepot

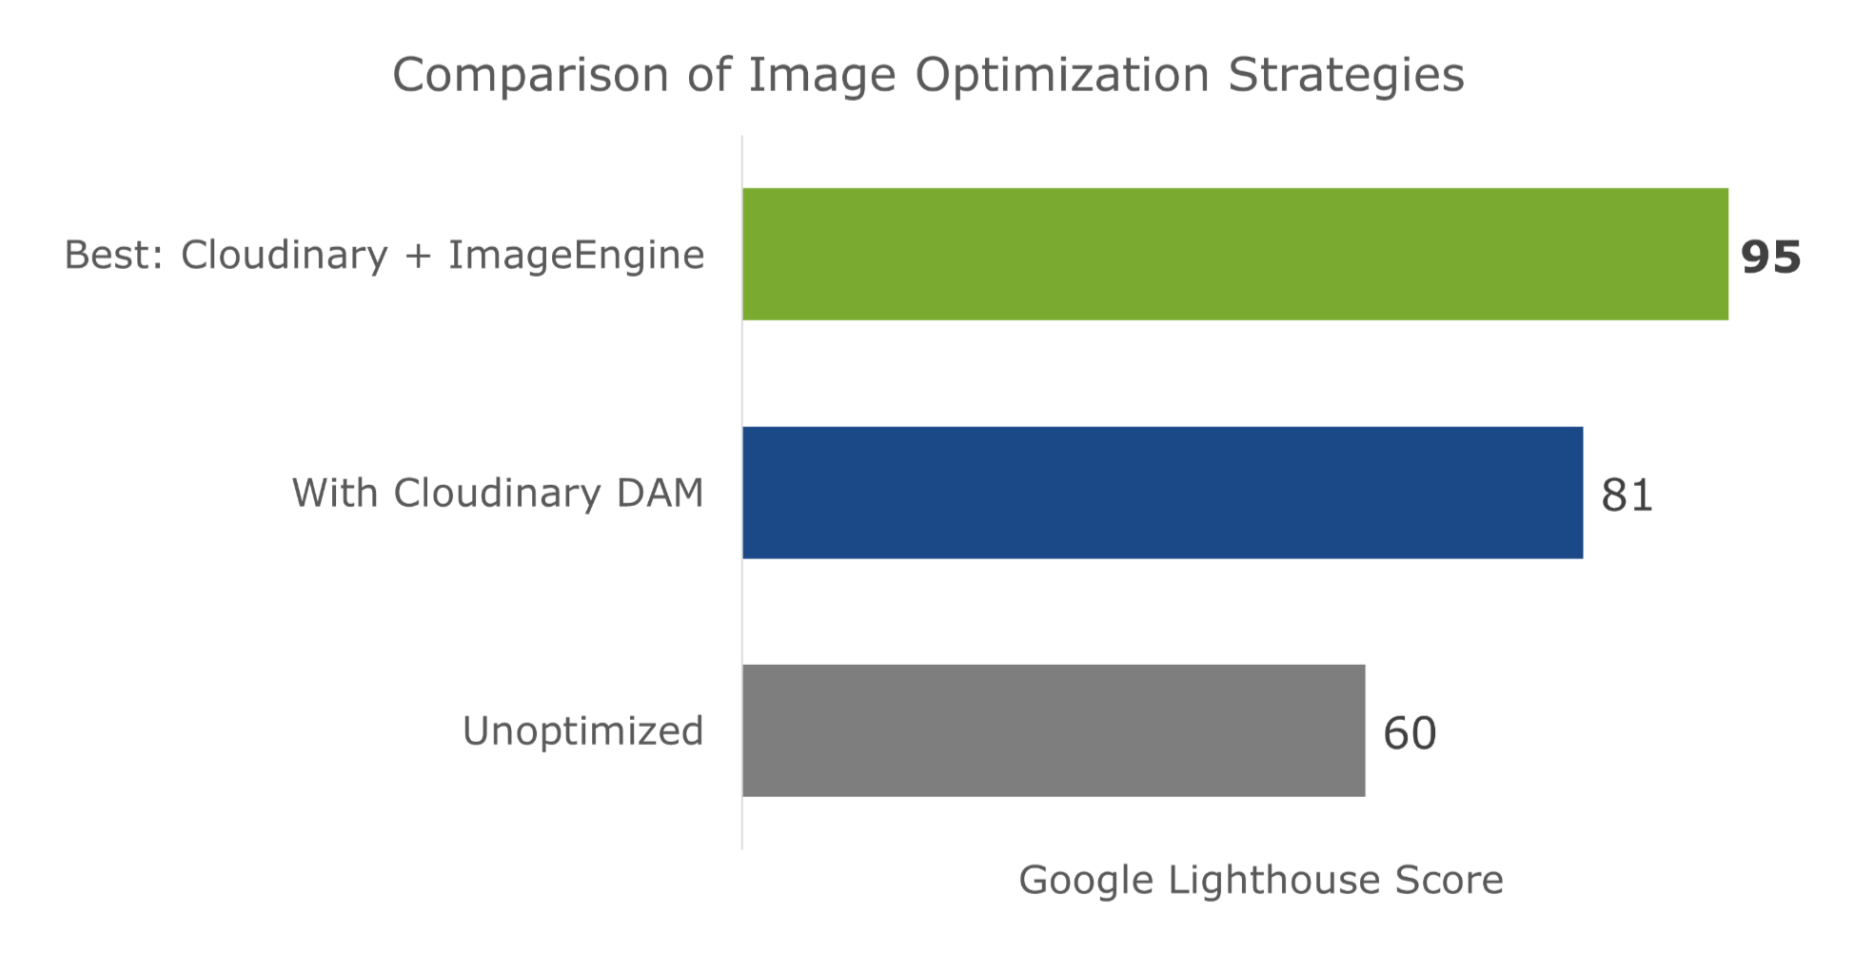
Parallax is a term that is applied loosely and frequently in the world of web design. As a trend, it has been popular and unpopular in equal measures for some time. However, it’s still one of the most valuable tools for animation in the digital world.

Parallax creates an illusion of depth when scrolling, a timeless effect that still has lots of value in the web design world.

Sure, parallax has its issues, from problems with usability, to concerns with mobile responsivity — but it’s also an interesting way to make a website stand out when done correctly.

Let’s take a closer look at some of the ways that parallax scrolling still works in 2021…

1. Parallax Tells A Story

Let’s start simple. 

One of the most effective ways to use parallax scrolling in the modern age is to tell a story. Today’s consumers want to have an emotional connection with the brands they buy from – now more than ever. Five years ago, studies showed that around 80% of customers want brands to tell stories, and that trend remains consistent to this day.

In the age of digital consumerism, where people can’t get to know a company in person through face-to-face interactions with its salespeople, companies need new ways to connect with their clients. Telling brand-driven stories is a way to highlight that your company is more than just a faceless entity – it’s something with real soul. 

Let’s look at the “Recap After Use” website, a portfolio belonging to the innovative Louie Sellers. This website showcases Louie’s skills with attention-grabbing visuals, including a parallax animation that makes it looks like Louie is drawing the page as you scroll through it.

This is the kind of exceptional animation that makes parallax scrolling more compelling. The animation isn’t there to make a visual difference to the page – it tells you something more about the person behind the website and what they can do.

2. Parallax Increases Website Visit Times

If a website effectively tells a story with parallax animation, you can also bet that’s going to keep customers or readers on a page for longer. Reducing bounce rate by increasing engagement is one of the main goals of any web designer. (Bounce rates, of course, refer to the percentage of site visitors that hit the back button after just seeing the first page of your website.)

While some people argue that parallax websites can hurt your SEO rankings if they slow down your site, there’s also the argument that the lack of a visually engaging page can harm SEO. Bounce rates drag down your ranking and make it harder to get audience attention. 

A parallax animation that tells a story and engages your audience through carefully delivered information is a great way to keep people around – even just for a little longer than usual. For instance, if you check out Alex Dram’s portfolio page here, you’ll see several shapes coming together during the parallax scrolling animation.

The shapes merge to tell a story about the visual experiences that Alex can create for customers. It’s a way to draw the eye and connect with the viewer without just writing about what you do through text. 

3. Parallax Develops Credibility

There’s a reason why both examples of parallax scrolling we’ve looked at so far are from creative portfolios. Parallax scrolling, with its excellent storytelling capabilities, is great for demonstrating your credibility as a digital expert. Basically, it’s a version of “showing” and not “telling” customers about your skills. 

You can tell someone that you know how to use tricky techniques like parallax animation correctly, but they’re less likely to believe you that way. If you can show that you have the skills to create something amazing, that’s more engaging. 

The OK Alpha team is a great company to reference when it comes to sensational design. This company seems to always be on the cutting edge of the latest trends, whether it’s bold typography or bright colors. To add to the impact of their website, the company has combined parallax effects into the mix to make everything more immersive as you scroll. 

This is a beautiful example of how companies in the design landscape can use techniques like parallax scrolling to show what they’re capable of. 

4. Parallax Makes Information More Fun

Most of us are naturally visual learners. We like to consume information in a way that’s refreshingly eye-catching and attractive. That’s why visual content generally earns more social shares and attention than written content. With parallax scrolling, companies that want to deliver valuable information and educational content to their audience can do so effectively.

Rather than just scrolling through a page and seeing lots of text, your customers can see images and graphs come to life alongside the blocks of text they’re reading. It’s like adding video demonstrations next to a textbook to help people better understand what they’re reading about. 

Look at the Web Design and Art History microsite from Webflow as an example. The company wants you to understand how web design and art have evolved over the years, but it doesn’t want to deliver that information in a boring format. The bright graphics and parallax animation work together to give you a more contextual, meaningful experience.

5. Parallax Replicates Another Medium

What if you could remind someone of their experience when reading a book or watching a video while telling them about a video or a novel? Parallax scrolling and animation can help with that. It’s a way of making your website feel like a video presentation or slideshow without the added components of implementing video players into your back end. 

Parallax scrolling also has another slight benefit over a standard video-based website. On a website that uses a video for a background, the video often plays automatically. This means that your visitors can’t control how quickly the video plays. 

On the other hand, parallax animations driven by scrolling action allow your customer to collect information at a pace that suits them. Take a look at the Story of the Goonies website, for instance. This stunning parallax site introduces you to the details you need to know about the movie in a way that makes it feel like the intro to a film.

The great thing about the parallax on this site is that the slow video-style design also gives you a dose of nostalgia – which ties in perfectly with the movie. 

6. Parallax Is More Memorable

What’s the main reason any designer does anything special to a website? To make it stand out, of course. Web design is all about conveying the unique essence of a brand, business, or entity in a way that’s going to make that client unforgettable. Although parallax isn’t as novel as it once was, it can still be a way to make your site stand out – if it’s used correctly. 

The key to success with parallax scrolling for memorability is making it smart. The layout needs to feel simple and intuitive. Everything needs to work well together, from the lightly shifting font to the various parallax effects that work together to draw the viewer’s eye (and attention). 

A great example comes from Jomor Design – another designer with a portfolio that really grabs your focus from the first second. The layout is beautifully done, with plenty of mini moments for engagement and interactions throughout. As you scroll through the site, you get a better idea of what the designer is all about. The little moments of animation make the whole experience so much more memorable. 

When your site is more memorable and engaging than that of your competition, you can drive many major benefits for your brand, including an improved bounce rate.

What To Remember When Using Parallax

Parallax is just like any other design technique. There are ways you can do it wonderfully, which engage and delight your audience. However, there are also a lot of areas where you can easily go wrong. When using any design element, the main thing to remember is that the primary focus should always be your users’ experiences. Parallax shouldn’t just be a way to show off your design knowledge. It’s just another feature that you can use to create an amazing website. 

Remember that user experience and visual appeal need to work perfectly together for parallax to work. If scrolling through the page is practically impossible for people on a mobile device, then you’re not going to get the results you want. If it’s difficult to take in the message you’re trying to send because the content is moving too quickly, again, your users will suffer. 

Remember the following tips:

  • Simple is better: Reduce the amount of content and visual elements on your page whenever you can. The less information there is to capture your customer’s attention, the less likely it is that you’re going to end up with a problem. 
  • Compress file sizes: Make sure that you’re not reducing the speed of your website by creating a huge single page with tons of high-quality images. You’re going to need to use the smallest possible file sizes. 
  • Check responsiveness: Make sure that the parallax effect works just as well on your smartphone or tablet as it would on a desktop. As more people move their browsing experiences into their palms, you can’t afford to ignore responsivity. 
  • Find the “wow”: Look at these examples of parallax websites. Every one stands out because it does something special with the scrolling effect. If you’re going to be using this strategy with your website, you need to make sure it’s worth the effort. Don’t just follow the same guidelines as everything else. Find the idea that’s going to make people take notice.

Source

The post 6 Ways Parallax Still Works in 2021  first appeared on Webdesigner Depot.


Source de l’article sur Webdesignerdepot